
Whether your data was overwritten, deleted, or never saved, this tutorial shows you how to open an old Excel file and recover an old version of an Excel file using the right method for your situation.
How to Open an Old Version of an Excel File
Old Excel files commonly use the .xls format. Modern Excel can still open many of these files, but security settings may restrict some older formats. You can also use Windows File Explorer, Google Sheets, or Google Drive to access them.
Method 1: Open the File in a Current Version of Microsoft Excel
The simplest option is to open the old workbook directly in Excel:
- Open Microsoft Excel.
- Click Open > select Browse.
- Find the old Excel file on your computer.
- Select the file and click Open.
- If your old file contains custom macros or dates that shift formats during conversion, you can learn how to format dates in Excel using VBA to write quick scripts that clean up date structures across your workbook.
- To create a modern copy, select File > Save As and choose Excel Workbook (*.xlsx).
If Excel opens the file in Protected View, click Enable Editing in the warning bar at the top. If Excel blocks the old file type completely, go to File > Options > Trust Center > Trust Center Settings > File Block Settings, find the relevant Excel file type, and adjust its Open setting. Only change these security settings if you trust the file and its source.
Method 2: Open an Old Excel File from File Explorer
If the file does not open in Excel or another program launches instead, change the file association:
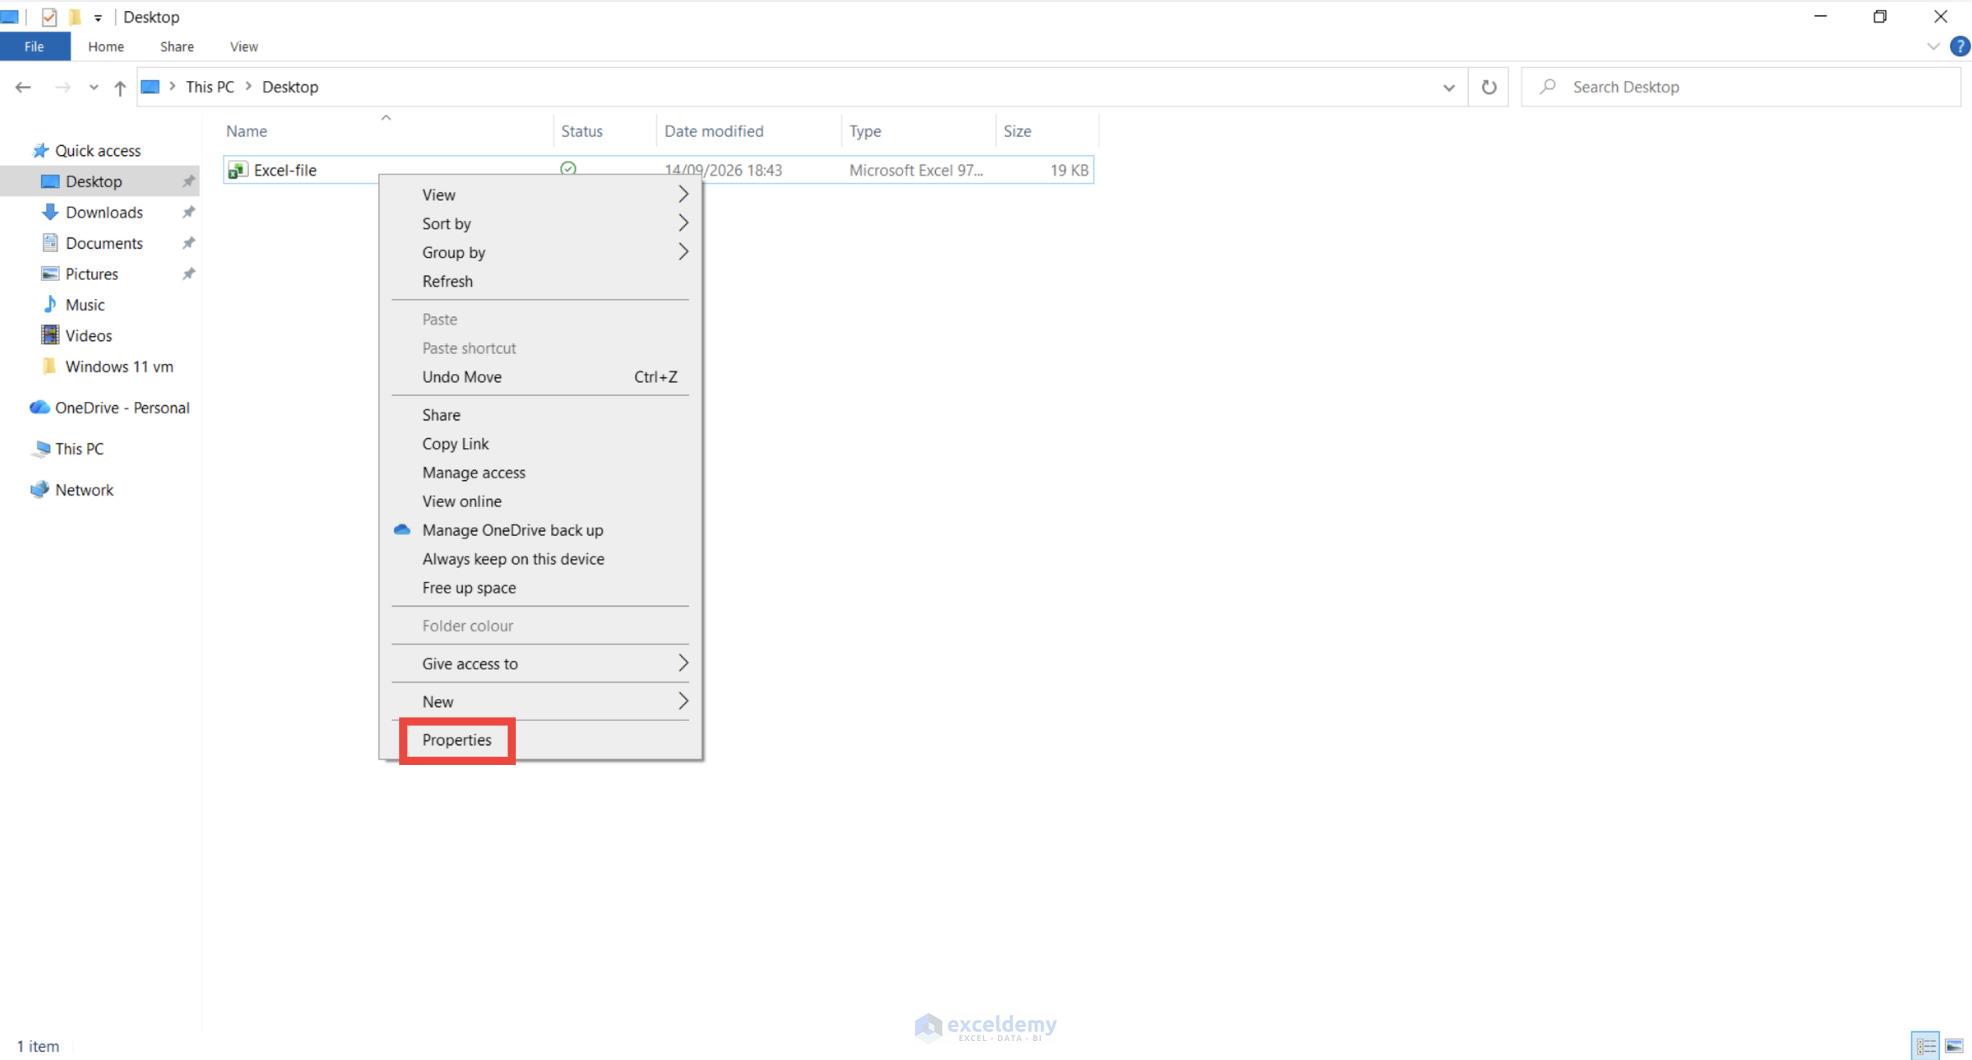
- Right-click the .xls file > select Properties.
- Find Opens with > click Change.
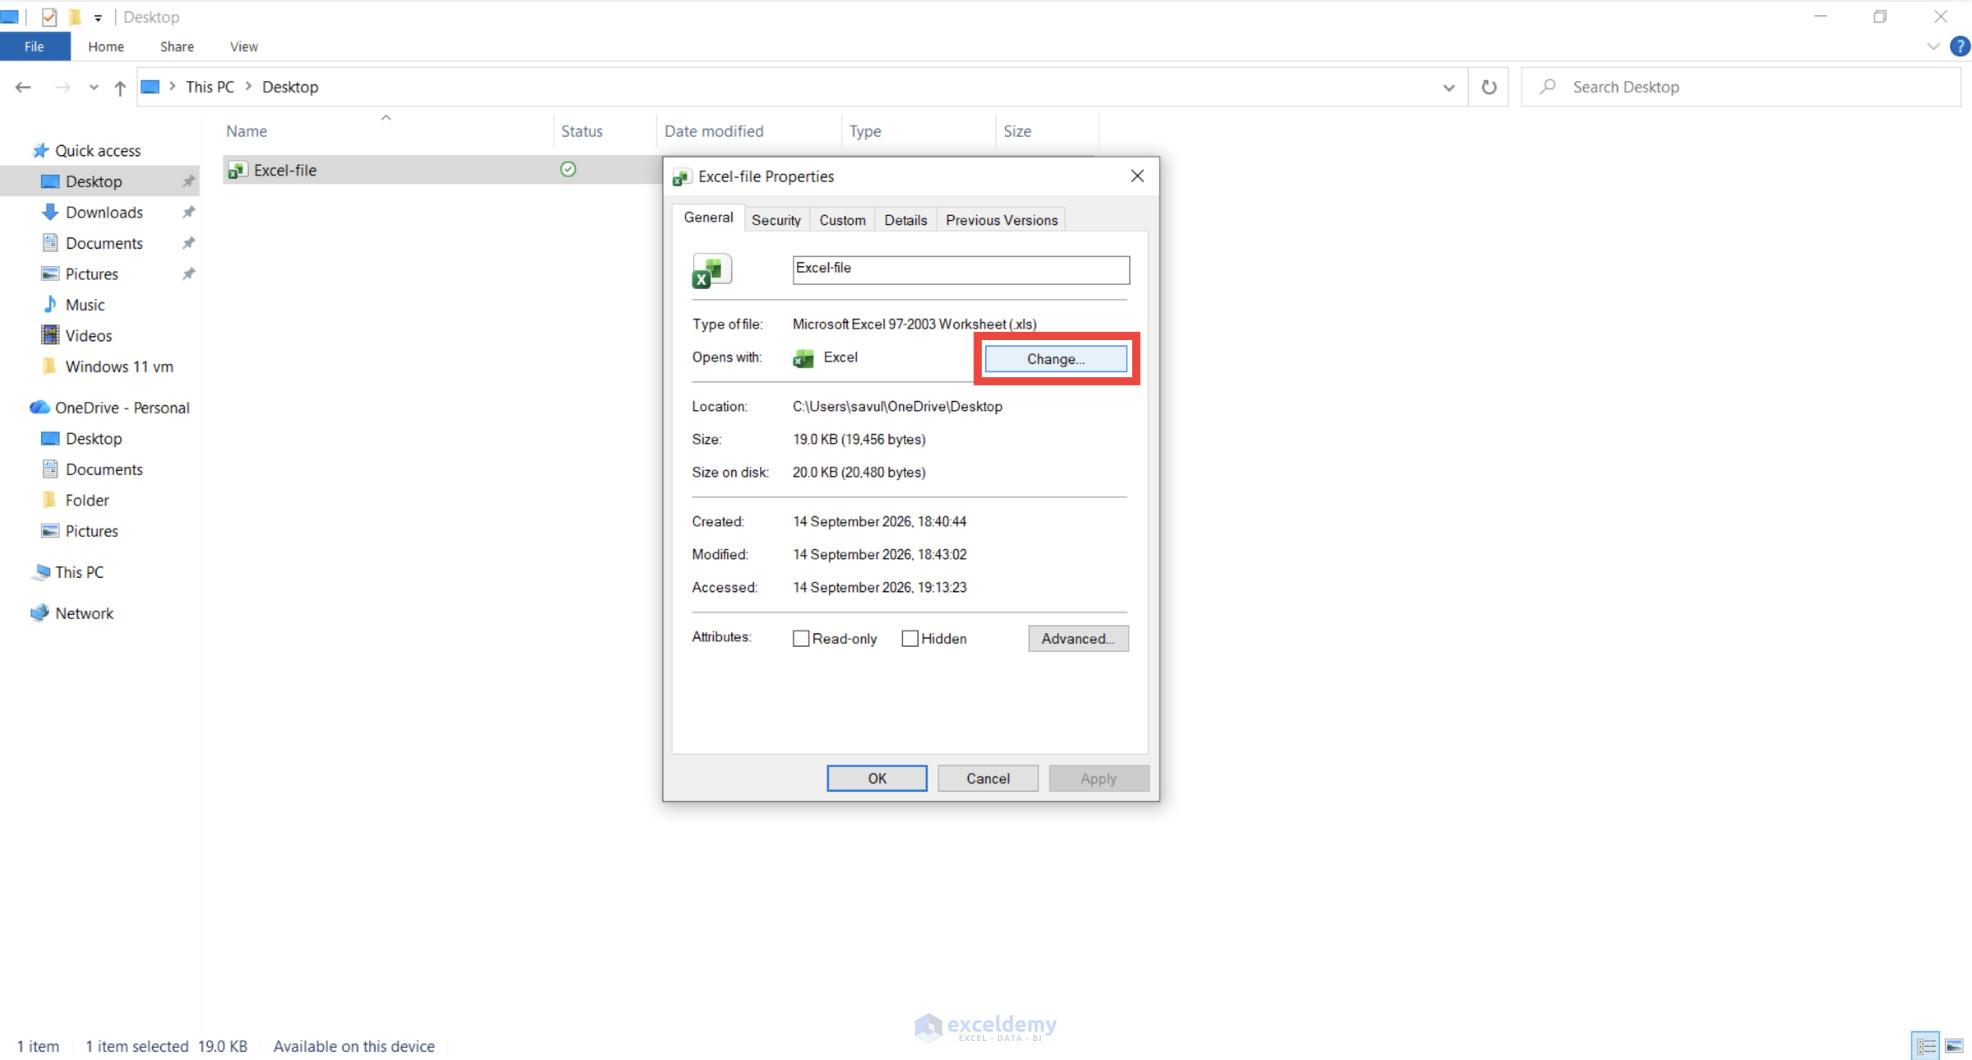
- Select Microsoft Excel from the available applications.
- Click OK to confirm your choice.
- Click OK again to close Properties.
- Double-click the XLS file to open it in Excel.
Windows will now use Microsoft Excel to open this file type by default. If Excel does not appear in the list, select Look for another app on this PC or a similar browse option and locate Microsoft Excel manually.
Method 3: Open an Old Excel File in Google Sheets
Google Sheets can also open XLS files, which makes it useful if you do not have Microsoft Excel or Excel cannot open the workbook normally.
- Open Google Sheets.
- Open a new or existing spreadsheet.
- Select File > Open.
- Open the Upload tab.
- Click Browse.
- Select the old .xls file.
- Click Open and wait for Google Sheets to load the workbook.
This is especially critical if you are dealing with financial sheets, such as trying to build an amortization schedule in Excel, where formula recalculations can behave differently after format conversions.
Method 4: Open an Old Excel File from Google Drive
You can also upload the XLS file to Google Drive first and open it from there.
- Open Google Drive.
- Click New > File upload.

- Select the old .xls file.
- Wait for the upload to finish.
- Find the uploaded workbook in Google Drive.
- Double-click the file.
- Select Open with > Google Sheets if necessary.
If you want to create a newer Excel copy, open the workbook in Google Sheets and select File > Download > Microsoft Excel (.xlsx). Keep the original XLS file until you confirm that the converted copy contains all important data, formulas, and formatting.
How to Recover an Old Version of an Excel File
How to recover an old Excel file version depends on what exactly you need to restore. This applies to both simple spreadsheets and more complex workbooks created with Excel add-ons for charts, dashboards, and other advanced tasks. If you need an earlier version of an existing workbook, follow the methods in Scenario 1. If the entire Excel file was deleted or lost, go to Scenario 2. If you created a workbook but never saved it, follow Scenario 3 to recover an unsaved Excel file.
Scenario 1: You Need an Older Version of an Existing Excel File
If the workbook still exists but you changed, overwrote, or removed important data, there are several ways to recover an old version of an Excel file. You can check Excel Version History, Windows Previous Versions, or an AutoRecover copy if you closed the workbook without saving your latest changes.
This applies to both simple spreadsheets and visual project trackers, such as how to build a Gantt chart in Excel from scratch, where layout changes can disrupt your timeline dependencies.
Option 1: Restore the File with Version History
If you save your Excel workbook to OneDrive, you can use Version History to restore an earlier version of the file.
- Navigate to the folder where your Excel file is stored.
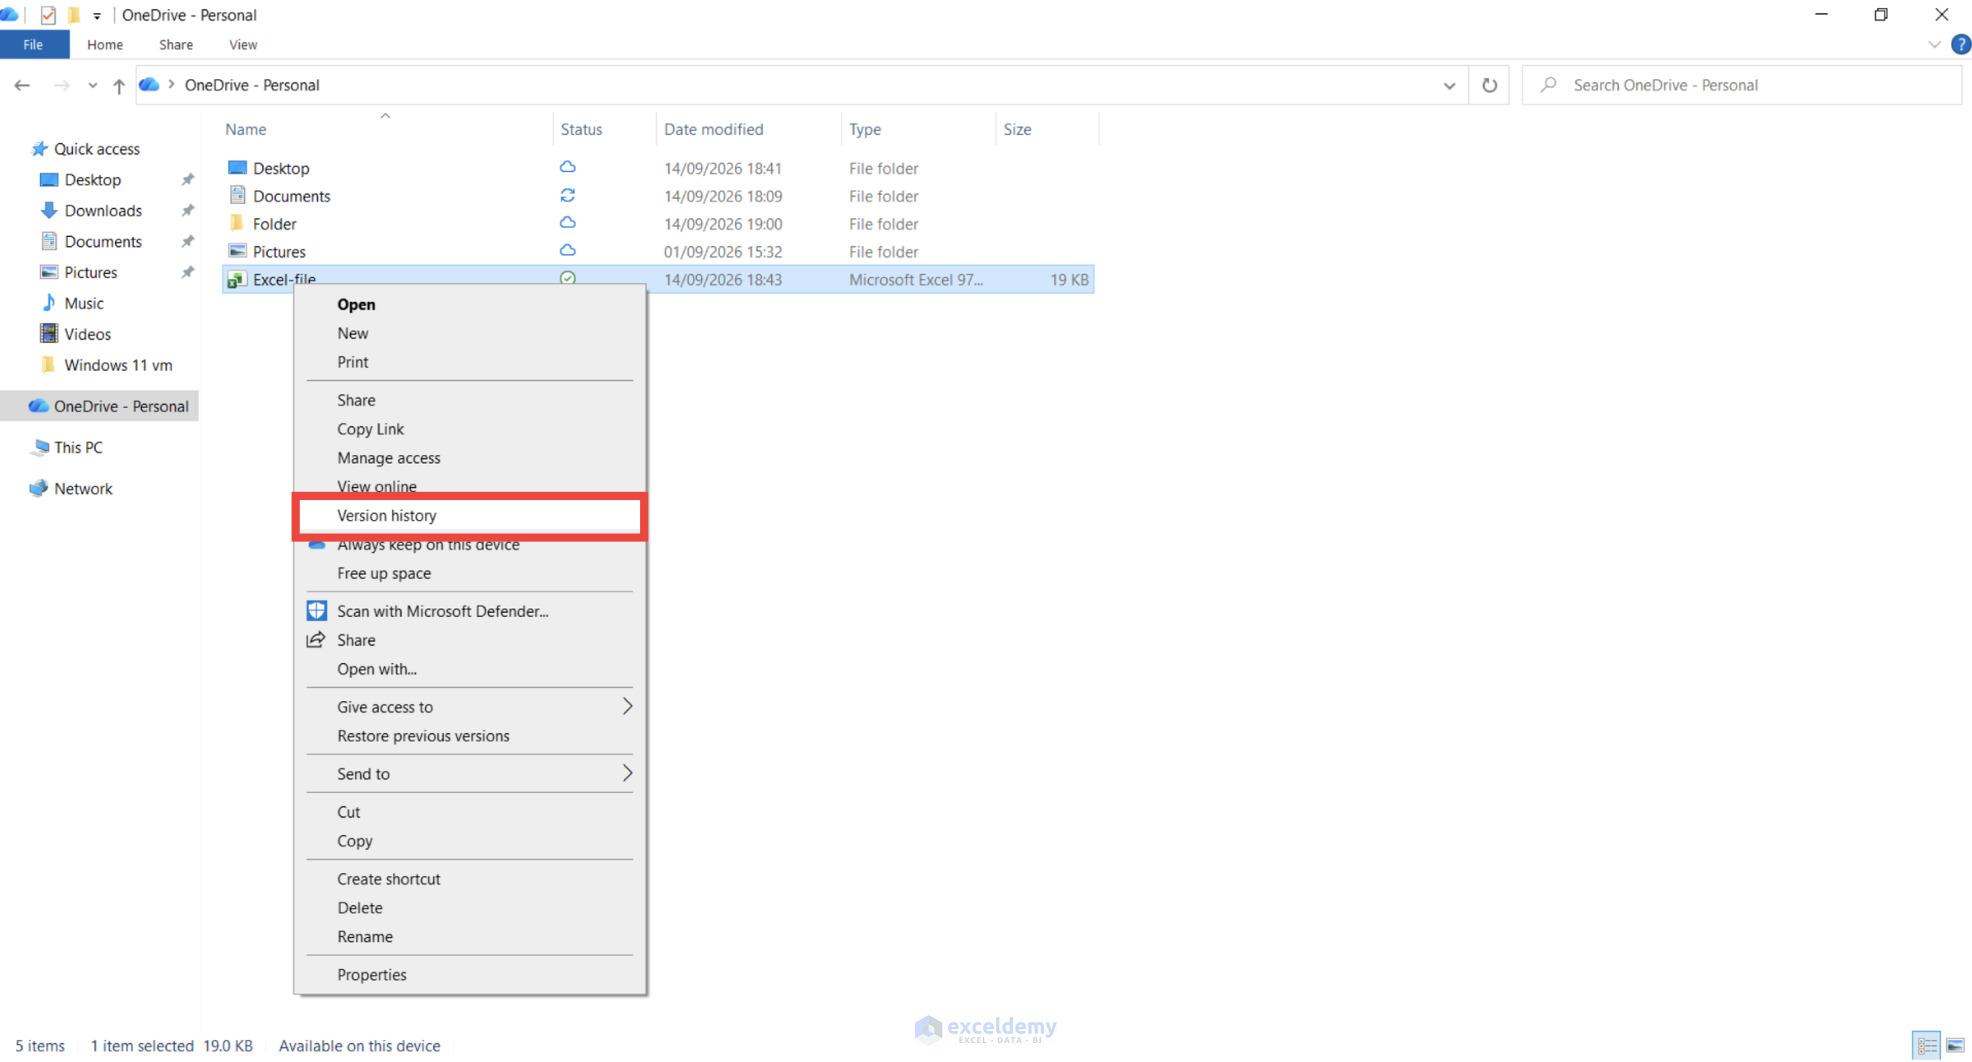
- Right-click the file.
- Select Version history.
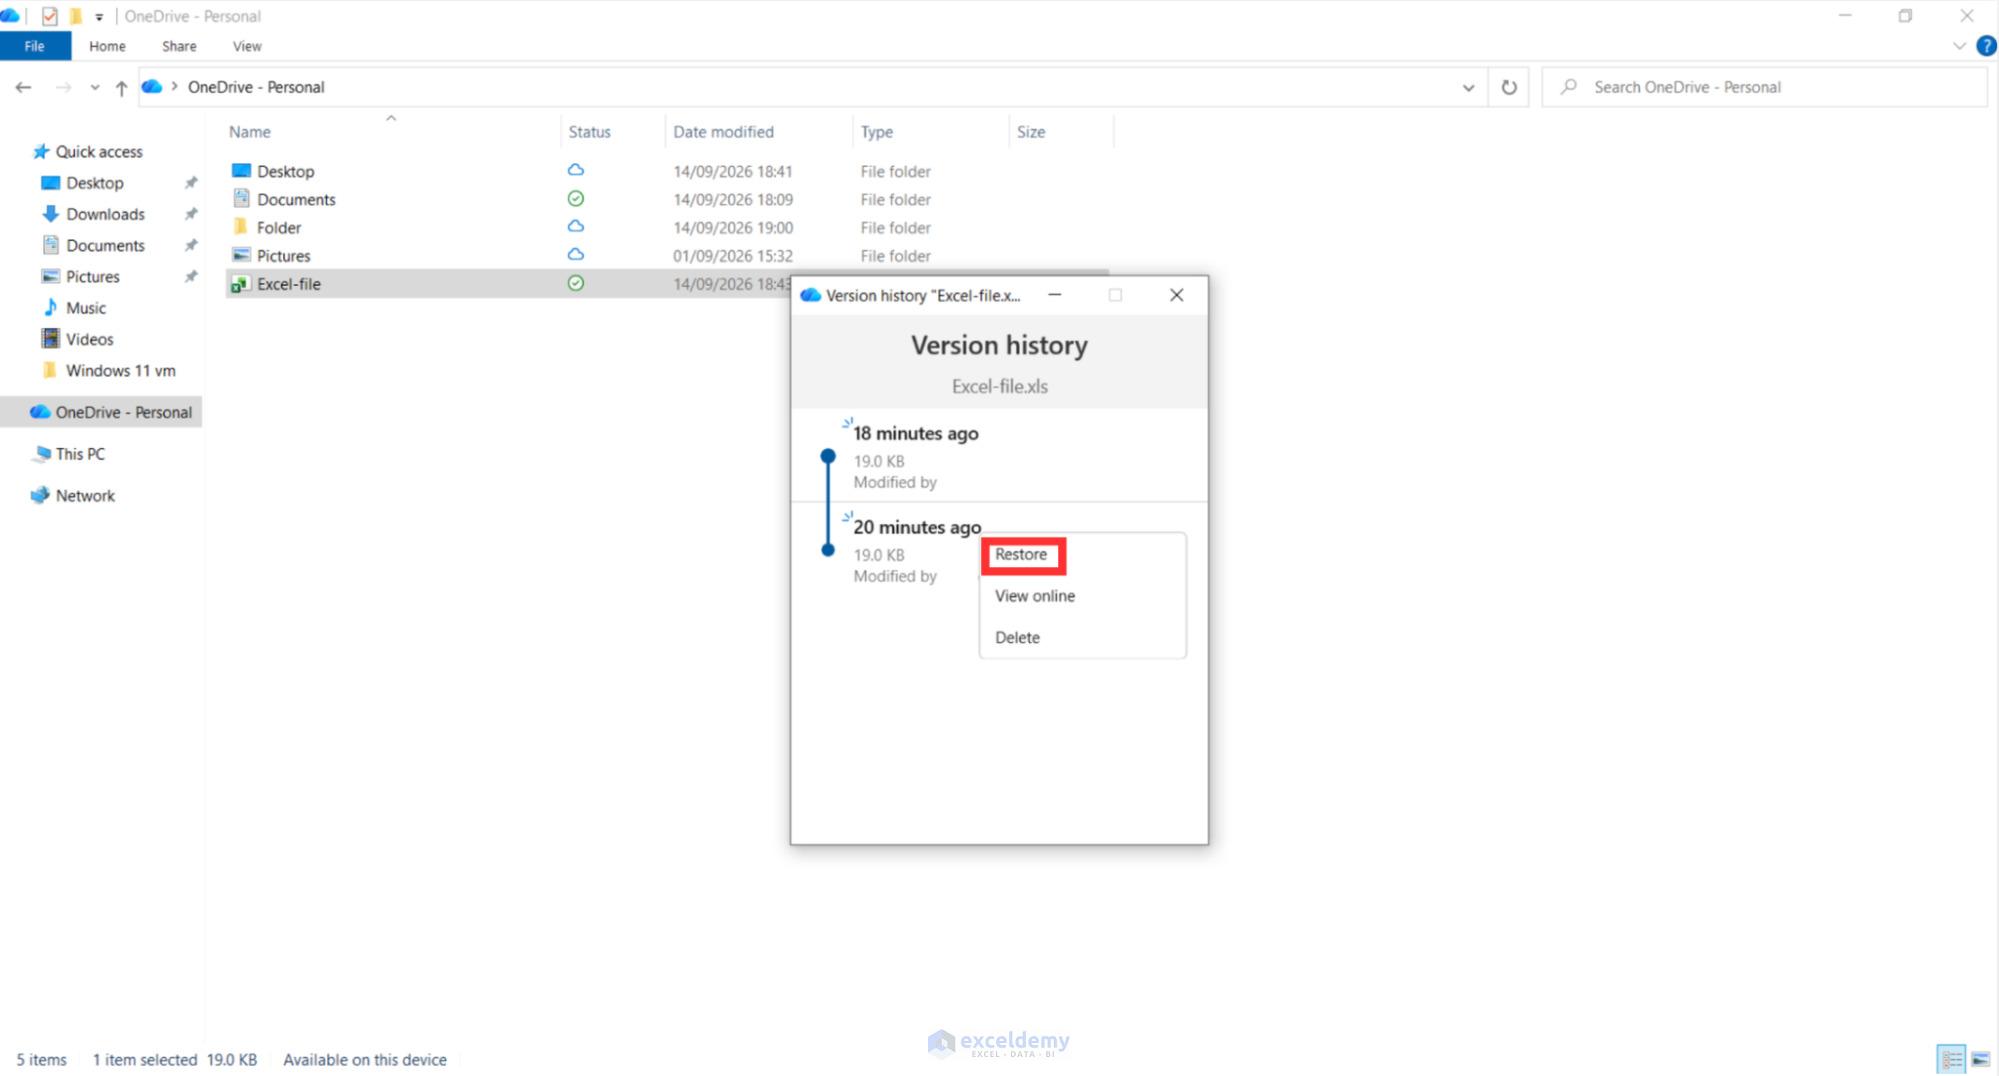
- Review the available versions and their dates and times.
- Find a version from before you made the unwanted changes.
- Click the three dots (…).
- Select Restore to replace the current file with the selected version.
Keep in mind that restoring an older version replaces the current version, so any changes made after the selected version will be lost.
Option 2: Recover an Old Excel File Version with Windows Previous Versions
If the workbook is stored locally on Windows, check Previous Versions. Windows may have an older copy if File History or another backup source created one.
- Open File Explorer and go to the folder that contains the workbook.
- Right-click the Excel file.
- Select Properties.
- Open the Previous Versions tab.
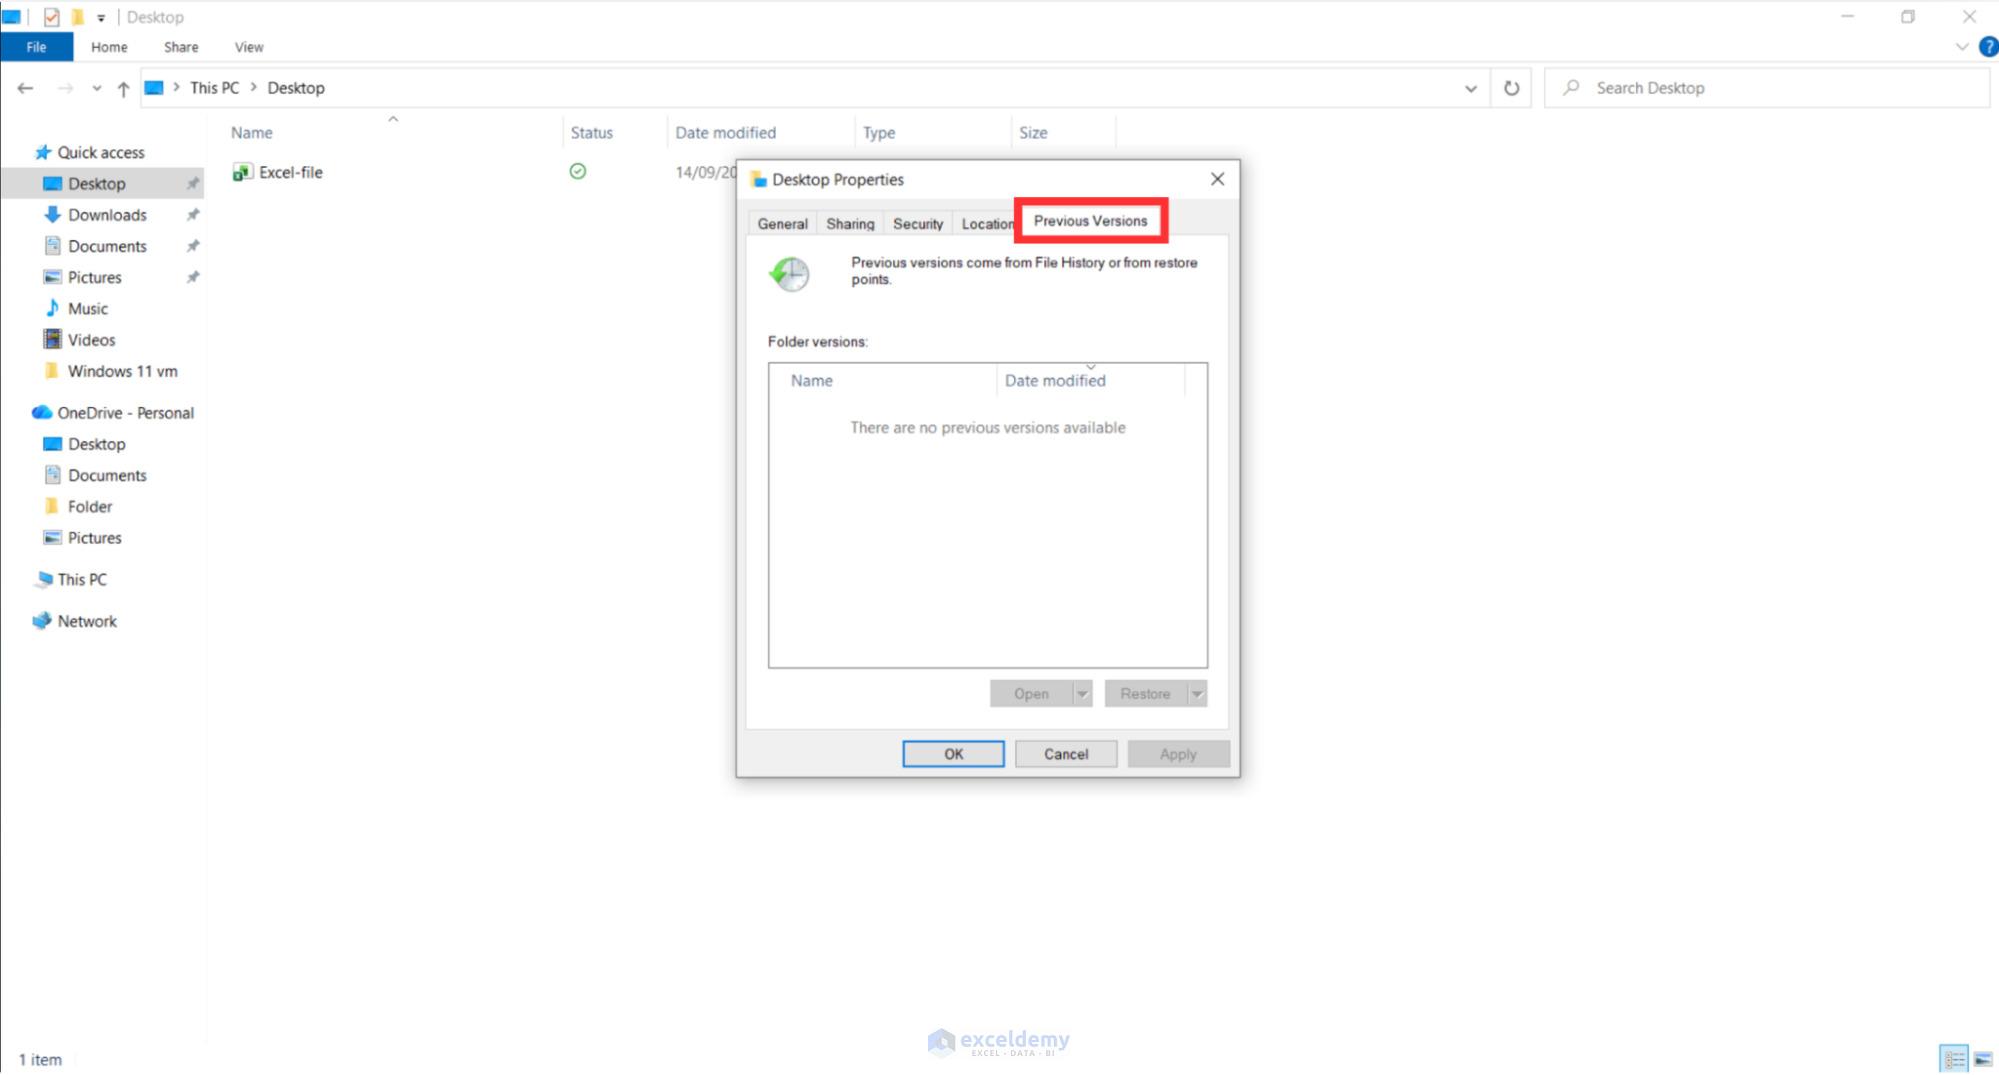
- Review the available copies and their dates.
- Select a version from before you changed the workbook.
- Click Open to check its contents.
- If it contains the data you need, copy the required data or click Restore.
Check the older copy before you restore it because Restore can replace the current version. If the list is empty, Windows does not have an older copy available through this feature.
Option 3: Recover Changes You Closed Without Saving with AutoRecover
If the Excel file was already saved but you later made changes and closed it without saving them, AutoRecover may have kept a copy of those changes.
- Open the Excel file you were working on.
- Go to File > Info.
- Under Manage Workbook, look for a version labeled (when I closed without saving).
- Select that version.
- Check that it contains the changes you need.
- Click Restore in the bar at the top.
- Confirm that you want to overwrite the previously saved version.
This method only works if AutoRecover was enabled and Excel created a recovery version while you were working on the file.
Scenario 2: You Deleted or Lost the Excel File
The right method to get the file back depends on how it was deleted. If you deleted it normally, start with the Recycle Bin or Trash. If it was permanently deleted, check your backups. If you do not have a backup, use data recovery software.
Note: The methods below cover the most common ways to restore deleted Excel files. For more recovery options, we recommend reading this guide on how to recover deleted Excel files.
Option 1: Restore a Normally Deleted Excel File from Recycle Bin or Trash
If you deleted the Excel file normally, it should first go to the Recycle Bin on Windows or Trash on macOS.
- Open the Recycle Bin (Windows) or Trash (macOS).
- Find the deleted .xls or .xlsx file.
- Right-click the workbook.
- Select Restore on Windows or Put Back on macOS.
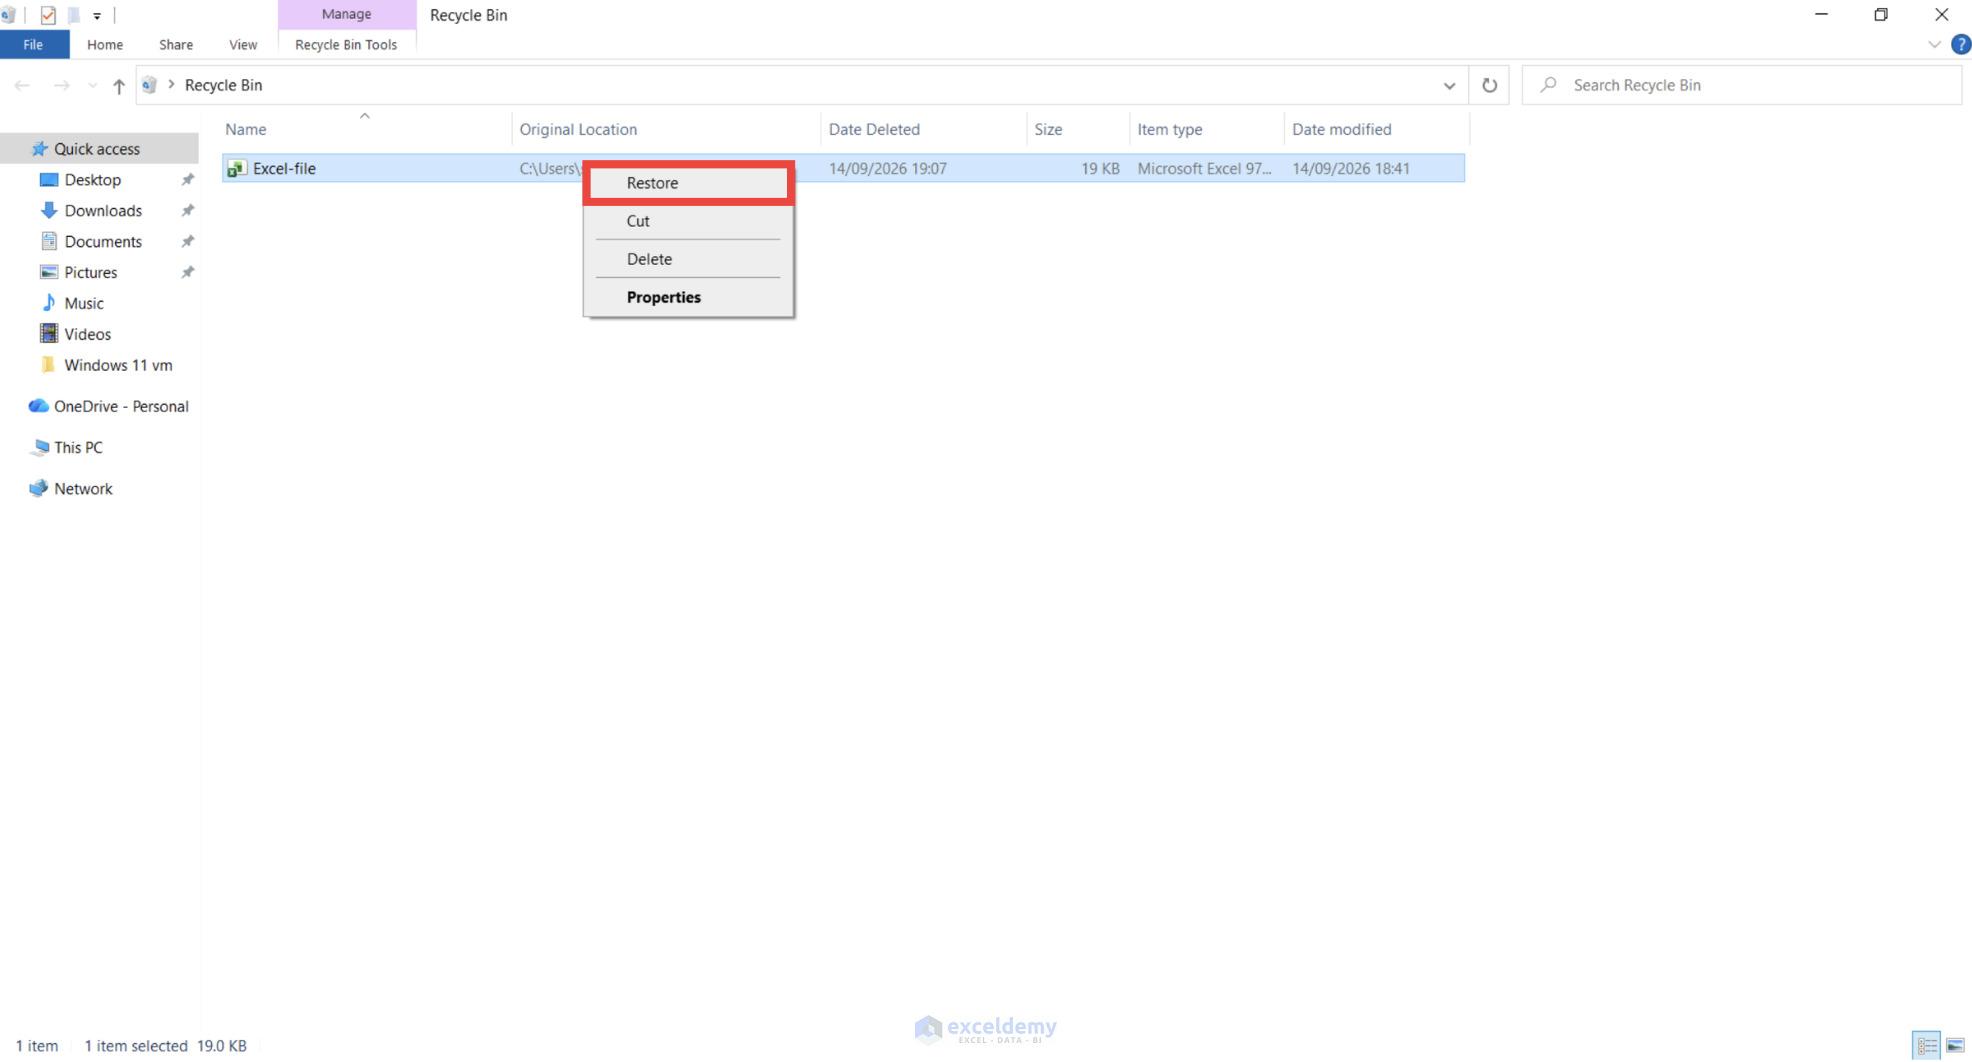
The Excel file will return to its original location.
Option 2: Recover a Permanently Deleted Excel File from a Backup
If the Excel file was permanently deleted, check your backups. On Windows, use File History if it was enabled before the deletion. On macOS, restore the workbook from a Time Machine backup.
On Windows:
- Connect your File History backup drive.
- Open Control Panel.
- Go to System and Security > File History.
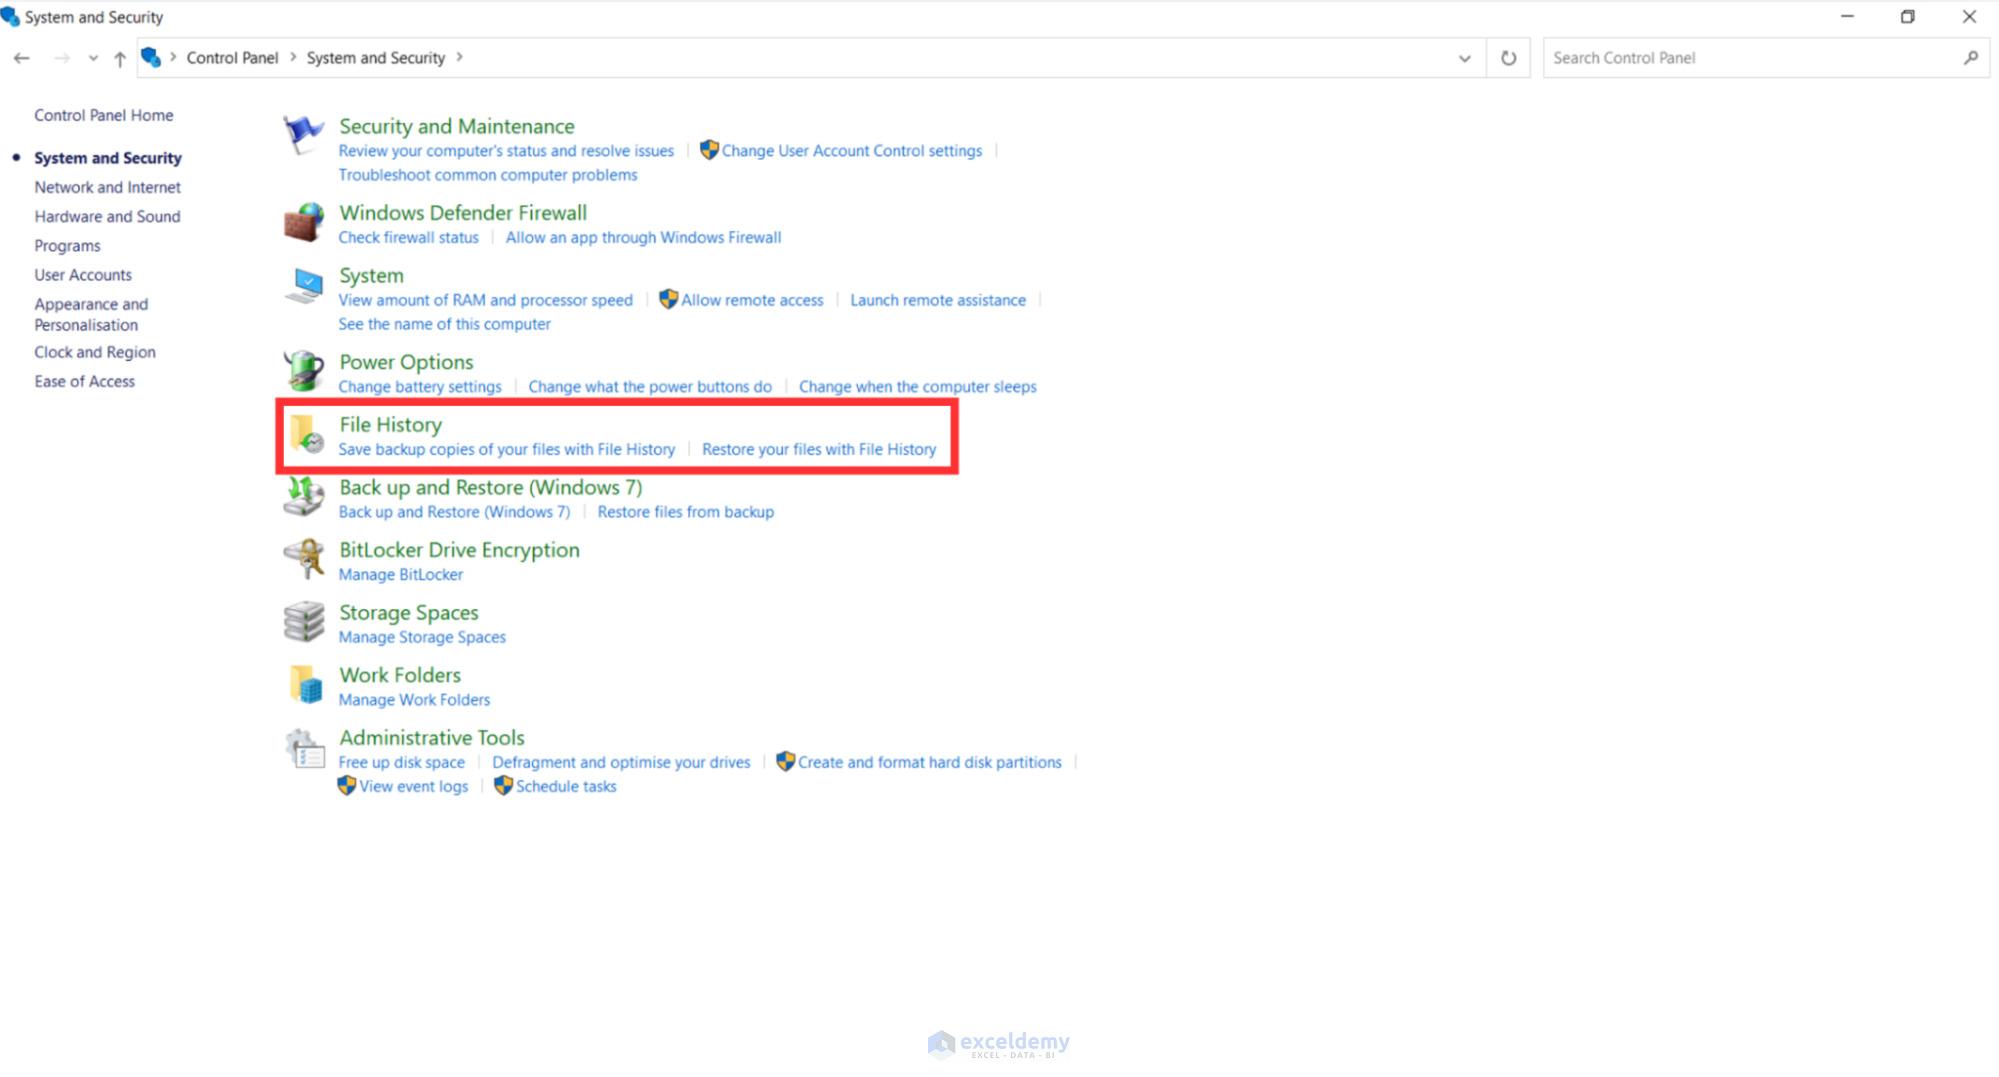
- Click Restore personal files in the left sidebar.
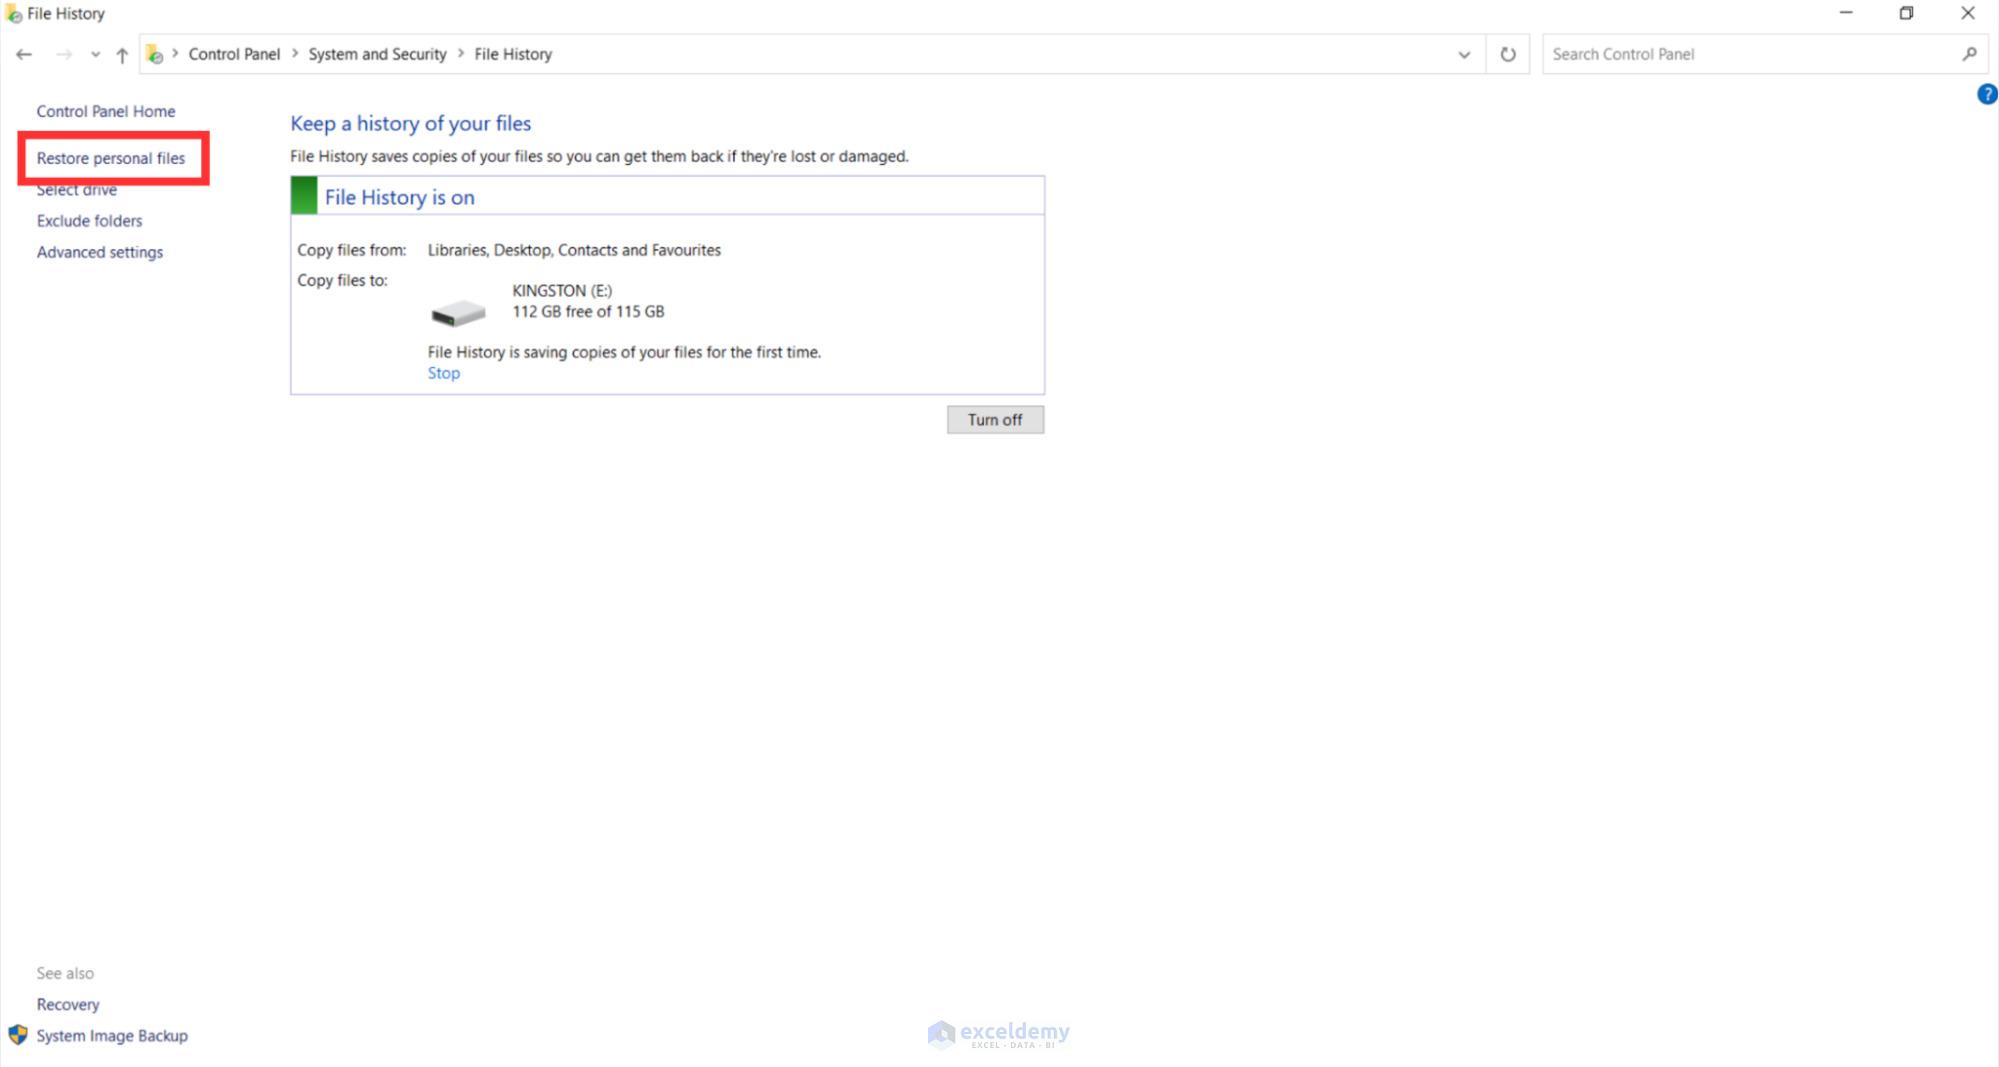
- Open the folder where the Excel file was originally stored.
- Browse the available backup versions until you find one from before the file was deleted.
- Select the Excel workbook you want to recover.
- Click the green Restore button to restore it to its original location.
On macOS:
- Connect your Time Machine backup drive.
- Open the folder where the deleted file was stored.
- Click the Time Machine icon in the menu bar and select Browse Time Machine Backups. If the icon isn’t visible, open System Settings > Menu Bar. Scroll down to Time Machine, then click the checkbox next to the Time Machine icon.
- Use the timeline on the right side of the screen or the arrows to view older backups until you find a date when the file is still available.
- Choose the file you want to recover.
- Click Restore.
Option 3: Recover a Permanently Deleted Excel File with Data Recovery Software
If the Excel file was permanently deleted or you have already emptied the Recycle Bin or Trash, and you don’t have a backup, file recovery software will help restore it. For this, we recommend Disk Drill. It is easy to use, works well with deleted files, and the Windows version lets you recover up to 100 MB of data for free. It also includes a preview feature to check files before recovery and recovery chances indicators that estimate how likely each file is to be recovered successfully.
How to recover an Excel file with Disk Drill:
- Download and install Disk Drill from the official website.
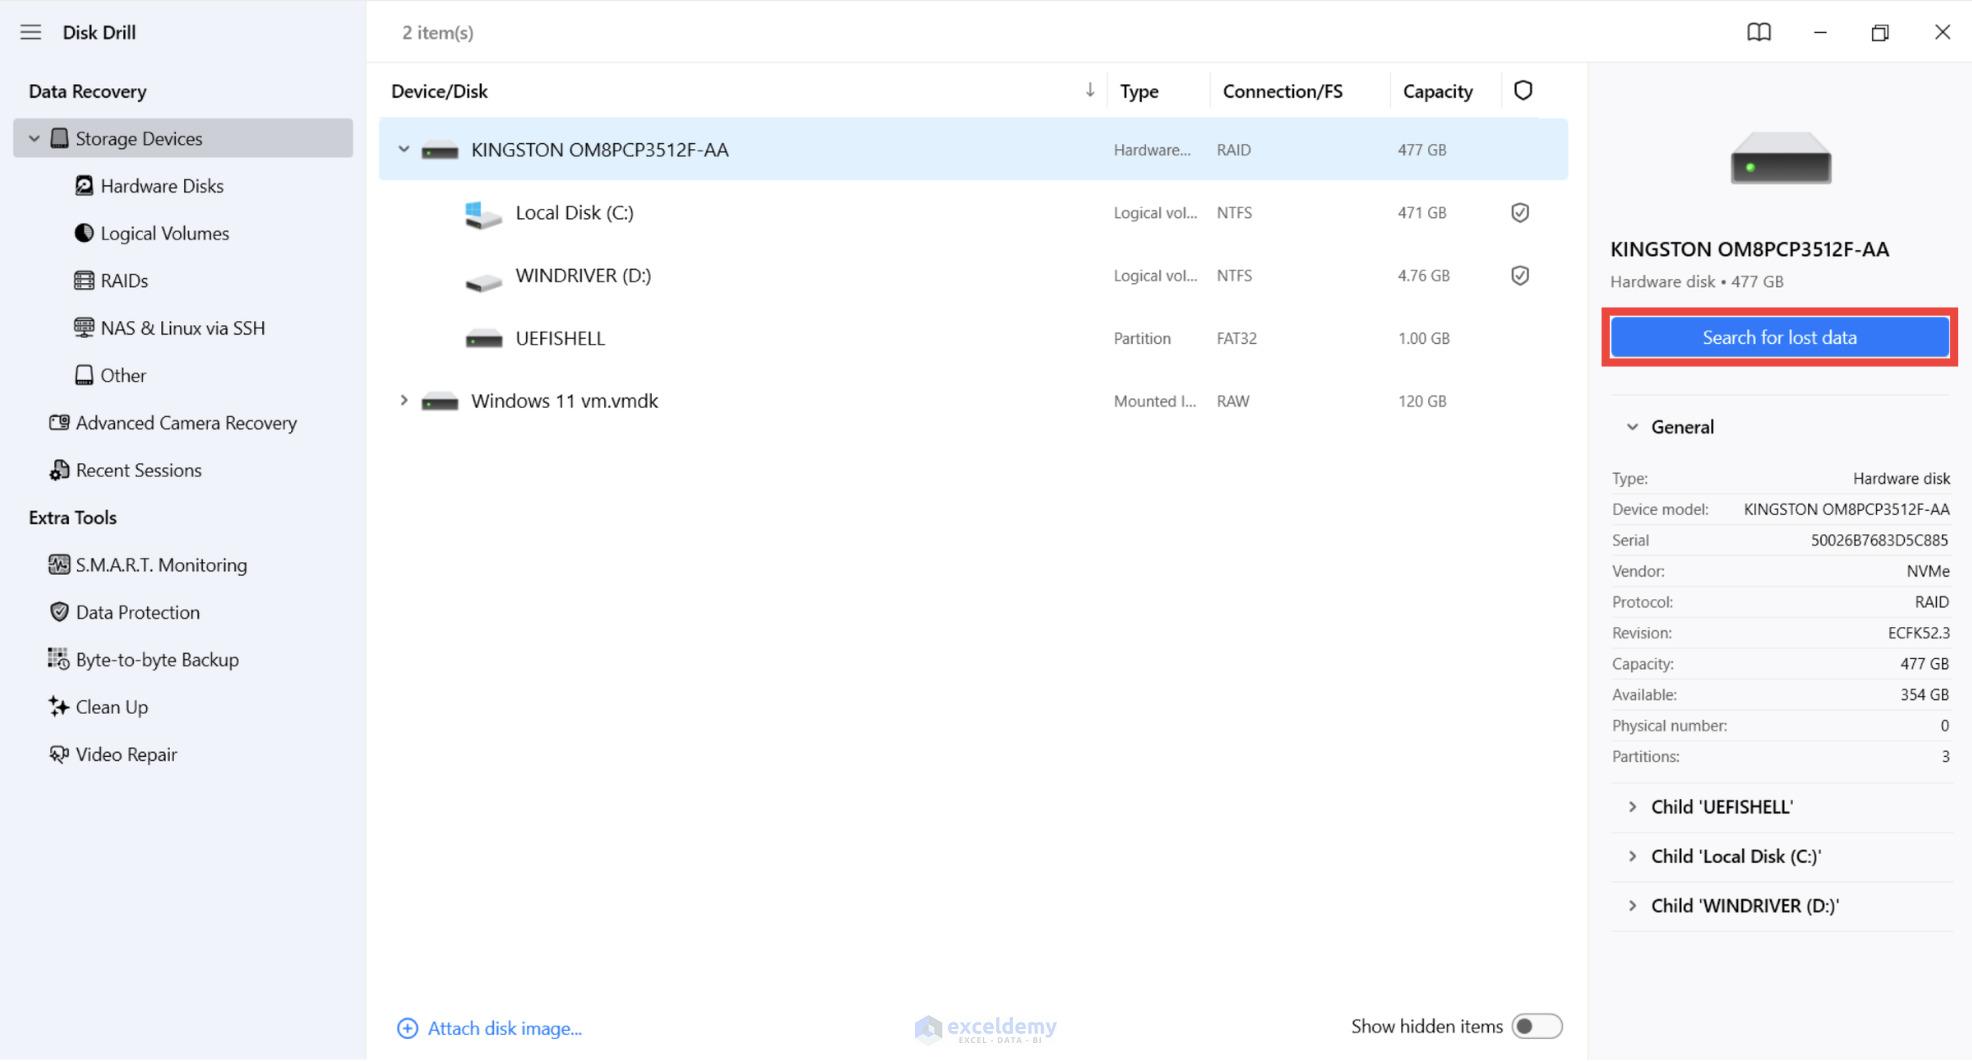
- Open Disk Drill and select the storage device where the deleted Excel file was stored.
- Click Search for lost data to start the scan.
- After the scan finishes, click Review found items to view the results.
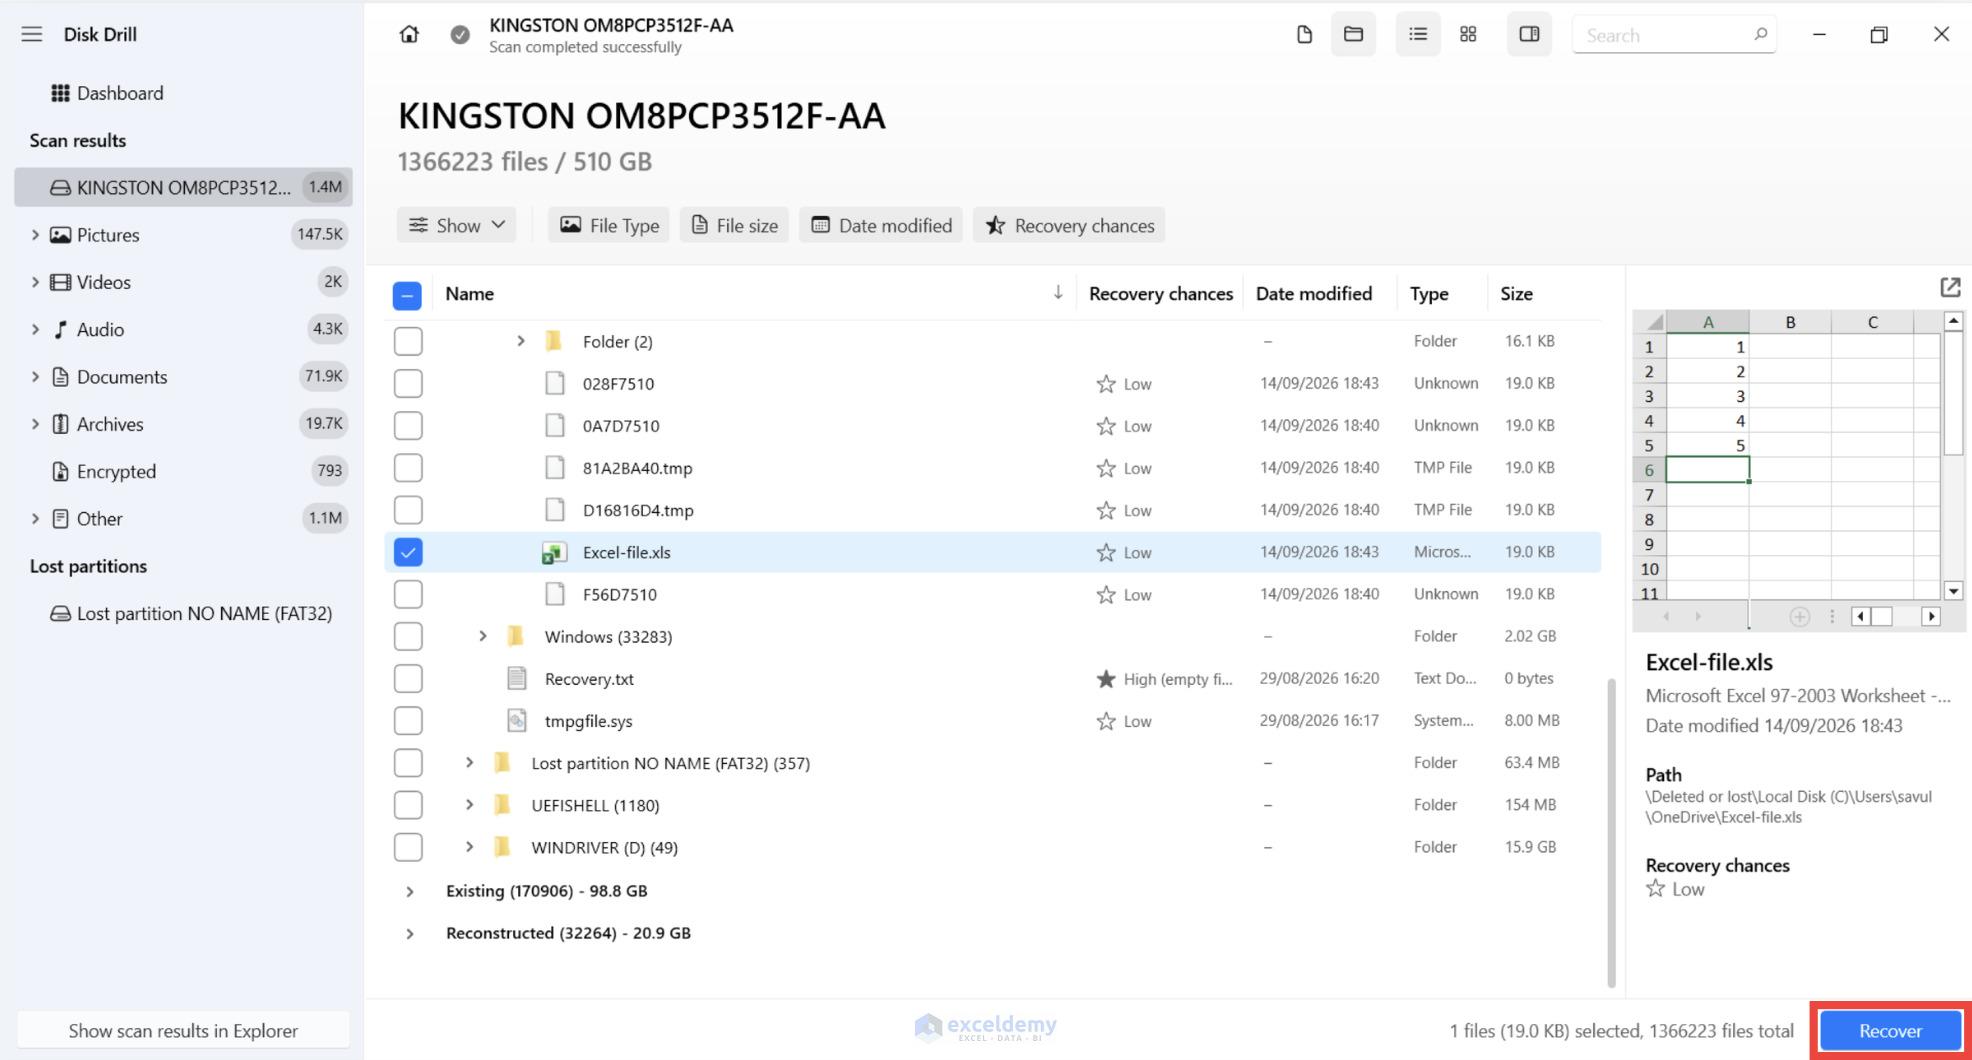
- Use the search bar to look for the workbook by name or filter the results to find .xls and .xlsx files.
- Use Preview to check the Excel file before recovery.
- Select the workbook you want to restore and click Recover.
- Choose a recovery destination on a different storage device to avoid overwriting recoverable data.
- After recovery finishes, open the Excel file and check that its contents are intact.
Recovery is only possible while recoverable file data still remains on the storage device. On HDDs, deleted data can remain until it is overwritten. On internal SSDs, TRIM can allow the drive to clear deleted blocks, after which software recovery is no longer possible.
Scenario 3: You Created an Excel File but Never Saved It
If you created a new workbook but closed Excel before saving it for the first time, Excel may still have an automatically created recovery copy. There are several Excel recover unsaved file methods you can use. Start with Recover Unsaved Workbooks. If the workbook is not there, check the Windows temporary files.
Option 1: Use Recover Unsaved Workbooks
If AutoRecover was enabled while you worked on the workbook, Excel may have saved a temporary version even though you never manually saved the file.
- Open Microsoft Excel.
- Go to File > Info.
- Click Manage Workbook.
- Select Recover Unsaved Workbooks.
- Review the available files.
- Select the workbook you need and click Open.
- Check that it contains your missing work.
- Click Save As in the bar at the top.
- Choose a location and save the workbook immediately.
Option 2: Check Excel Temporary Files
If Recover Unsaved Workbooks does not contain the file, check the Windows temporary folder. Excel and Windows create temporary files during normal operation, and one of them may contain data from the workbook.
- Press Windows + R.
- Type %temp% and press Enter.
- Sort the files by Date modified.
- Look for files created or modified around the time you worked on the workbook.
- Copy any likely file to another folder before you make changes to it.
- Try to open the copied file in Excel.
- If you find the workbook you need, save it immediately as a regular Excel file.
Temporary files may use a different filename or extension from the original workbook, and not every temporary file contains a complete recoverable copy. This method is therefore less reliable than Excel’s built-in Recover Unsaved Workbooks feature.
Conclusion
This tutorial showed you how to open old Excel files and recover previous, deleted, or unsaved workbooks. Depending on your situation, you can use Excel Version History, AutoRecover, Windows Previous Versions, backups, or data recovery software. Start with the method that matches how the file was lost or changed, and always check the recovered workbook to make sure your data, formulas, and formatting are intact.
Get FREE Advanced Excel Exercises with Solutions!