


Combining data from several Excel files manually can be time-consuming, especially when a new file is added every week or month. Power Query is the most efficient way to combine data from multiple Excel workbooks into a single consolidated table, no copy-pasting, no VBA required, and the whole process refreshes automatically whenever your source files change.
In this tutorial, we will show how to merge data from multiple Excel files using Power Query. Power Query allows you to connect to an entire folder, combine files with the same structure, clean the data, and refresh the final table whenever the source files change.
Suppose you receive one sales workbook every month:
- Sales_January.xlsx
- Sales_February.xlsx
- Sales_March.xlsx
The goal is to combine every monthly file into one master sales table without copying and pasting the data.
Step 1: Prepare the Source Files
- Create a folder named something like: Monthly Sales Files
- Move all the source workbooks into this folder.
- For best results, ensure that every file has:
- The same column headings and the same worksheet or Excel table name
- Similar data types
- No merged cells
- No blank rows above the headings
- No subtotal or total rows inside the data
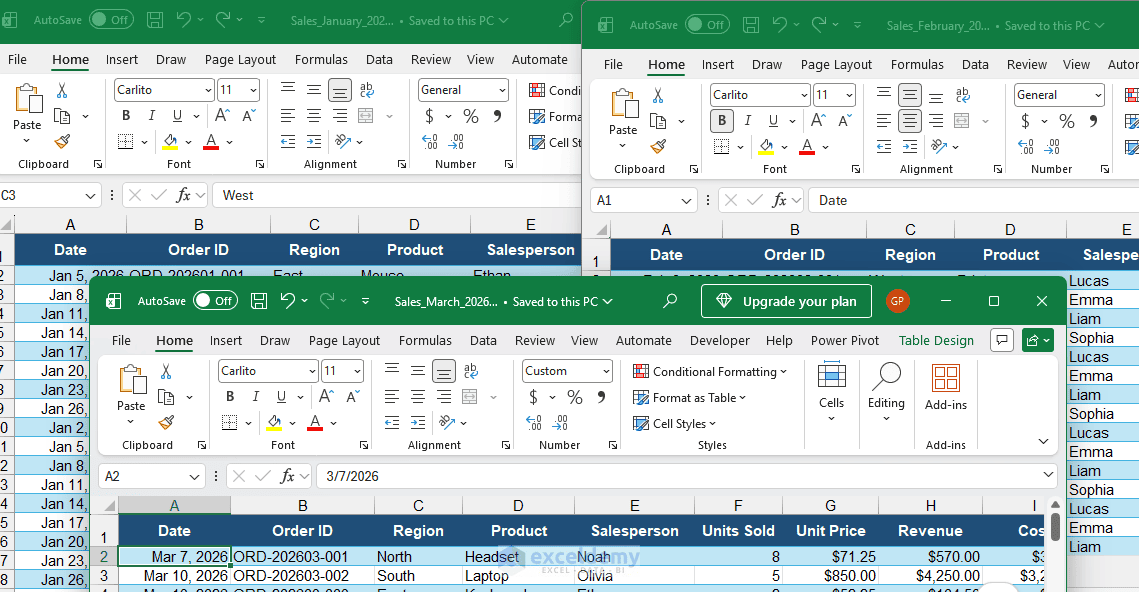
For example, if the data in the January file is stored in an Excel table named SalesTable, the other files should also contain a table named SalesTable. Power Query uses an example file to determine how every file in the folder should be processed, so differences in worksheet names, table names, or column headings can cause refresh errors.
Keep the master output workbook outside the source folder. Otherwise, Power Query may attempt to import its own output file during the next refresh.
Step 2: Connect Excel to the Folder
Open a new Excel workbook that will contain the consolidated data.
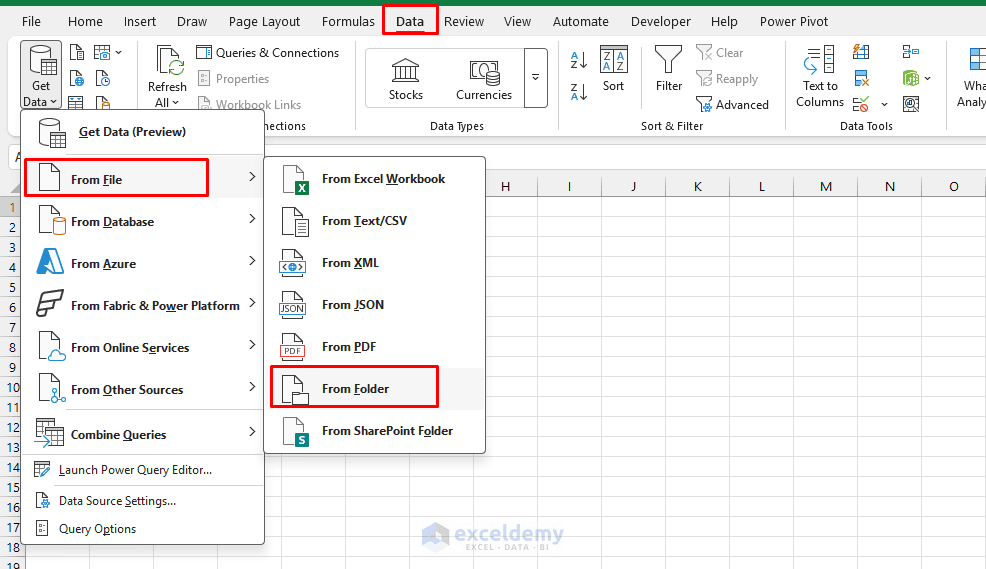
- Go to the Data tab >> select Get Data >> select From File >> select From Folder
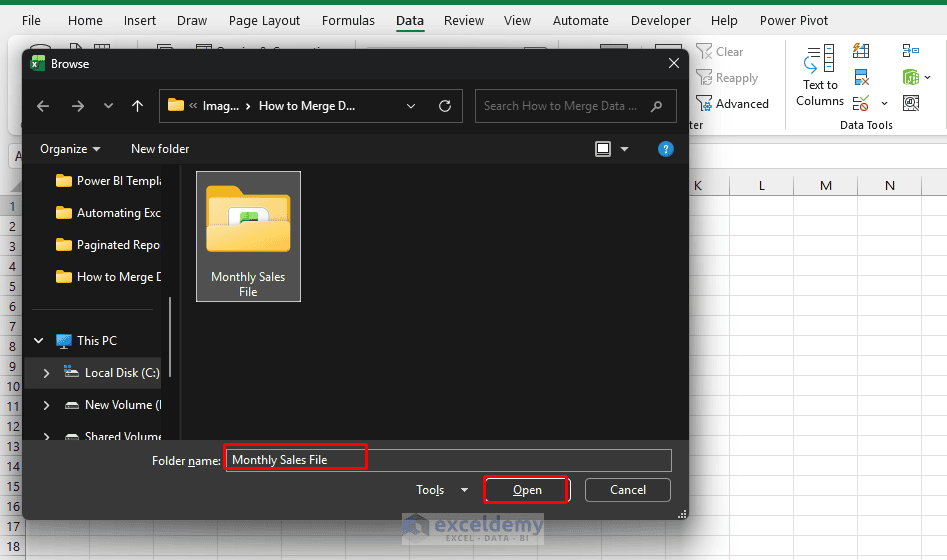
- Browse to the folder containing the monthly files >> click Open
- Power Query will show a preview listing all files found in the folder, along with metadata (name, extension, date modified, etc.)
- Click Combine & Transform Data (or just Combine in older versions)
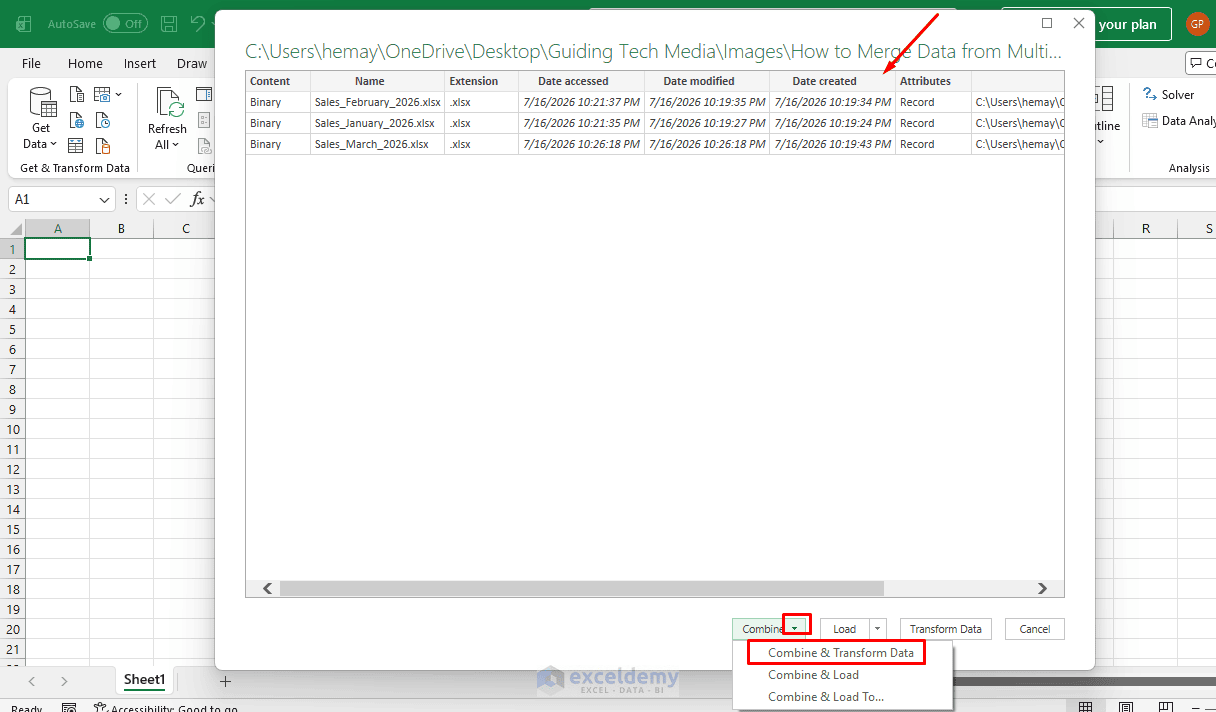
The folder connector can detect files stored in the selected folder and its subfolders, so remove unrelated files or filter them before combining.
Step 3: Configure the Combine Step
- A dialog box will appear asking which sheet or object to extract data from
- Power Query automatically selects one workbook as the sample file
- You can select a different workbook from the Sample File list when necessary, such as Sales_January.xlsx
- In the preview area, choose the worksheet or Excel table containing the required data, such as SalesTable
- Make sure the preview displays the correct headings and records
- Click OK
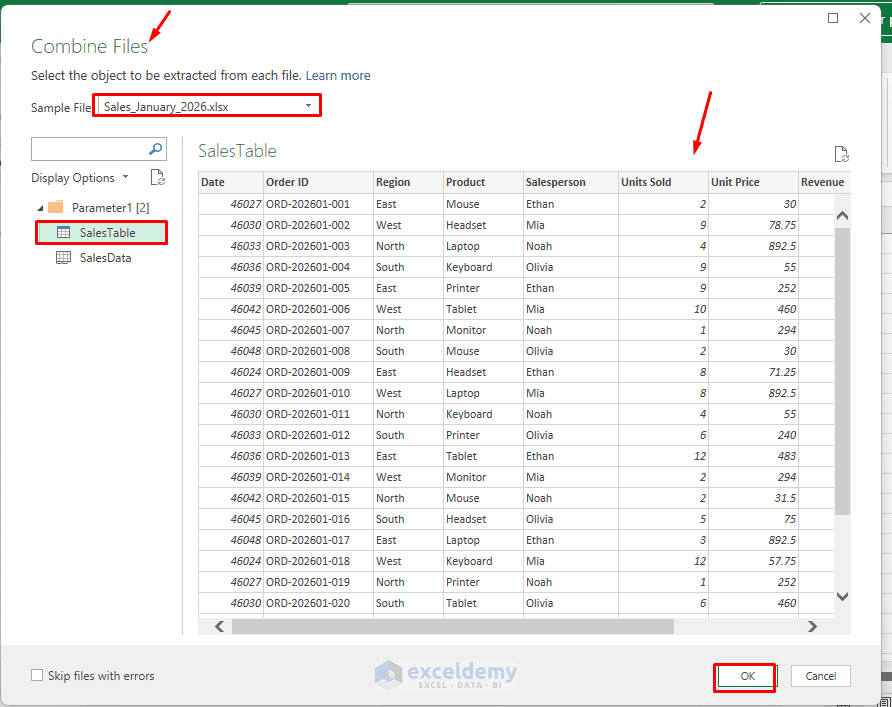
Power Query uses the selected sample file and object to create a transformation process that is then applied to every file in the folder.
Power Query will now:
- Create a sample query showing how it will extract data from one file
- Apply that same logic to every file in the folder
- Automatically append all the extracted tables into a single combined table
- Add a Source.Name column showing which file each row came from, which is useful for traceability
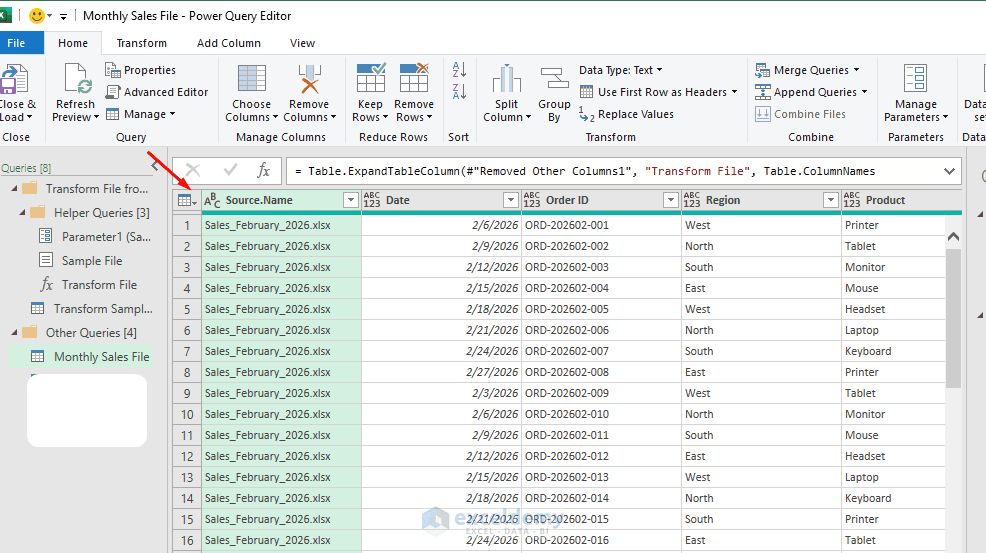
Step 4: Clean Up the Combined Data
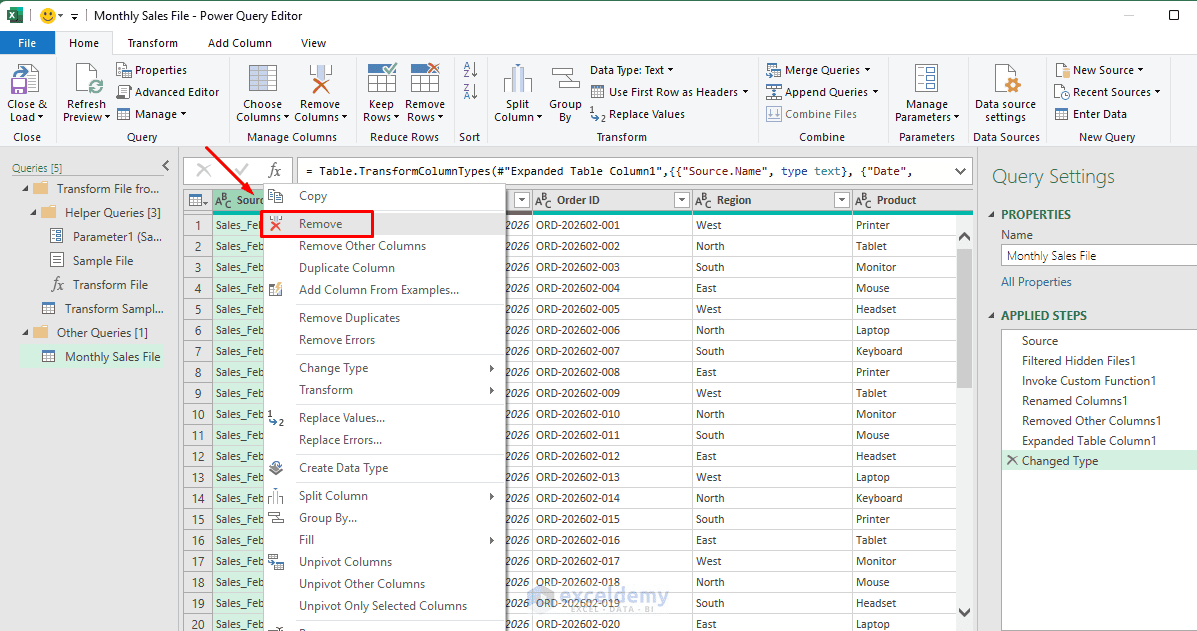
In the Power Query Editor that opens, you will typically want to:
- Promote Headers: If headers appear as a row instead of column titles, go to the Home tab >> select Use First Row as Headers
- Remove Unwanted Columns: Right-click any helper columns >> select Remove (e.g. Source.Name, if not needed)
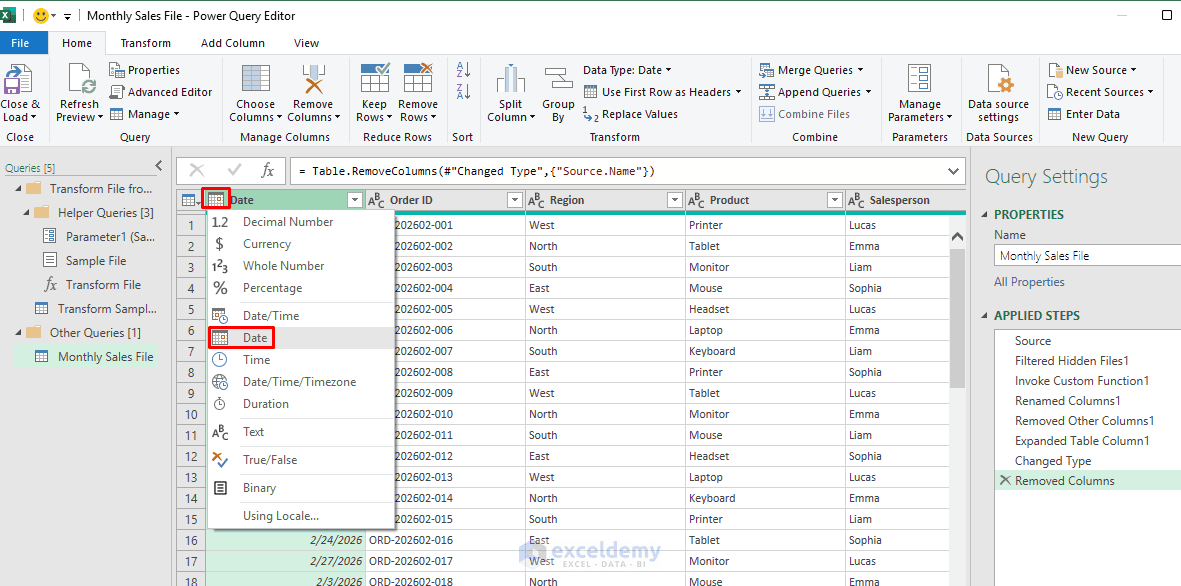
- Change Data Types: Click each column header’s data type icon and set the correct type (Text, Whole Number, Date, Decimal Number)
- Filter Out Blank Rows: Use the filter dropdown on any key column >> uncheck (blank)
- Remove Errors: Go to the Home tab >> select Remove Rows >> select Remove Errors
Step 5: Load the Combined Data into Excel
After reviewing the results:
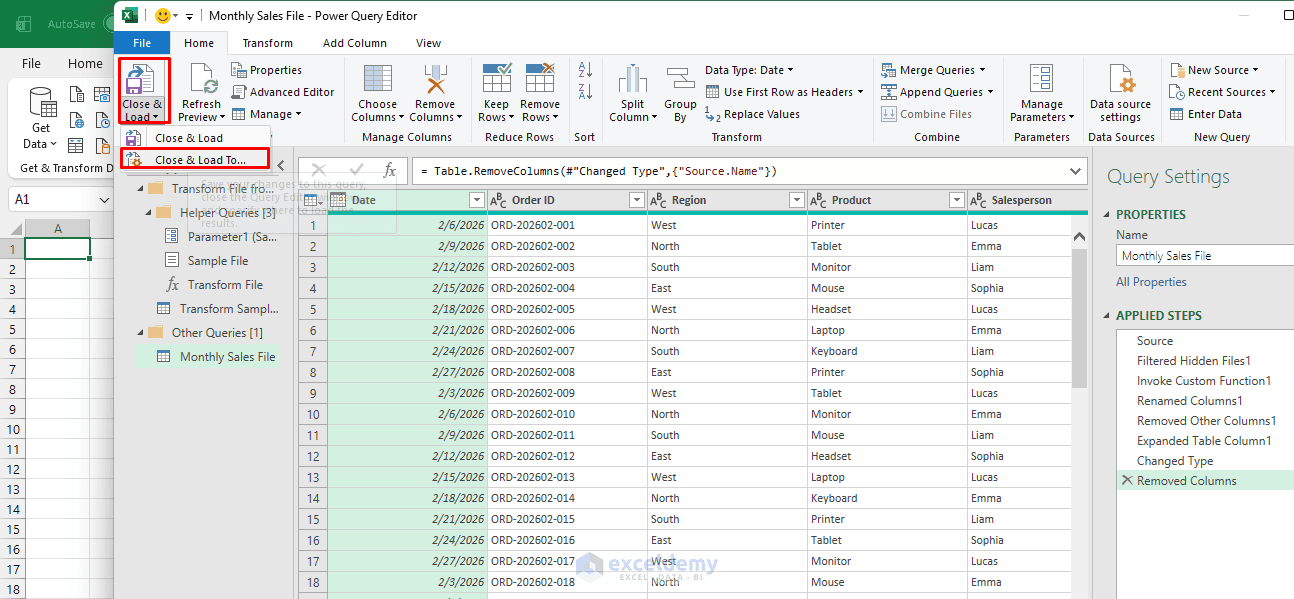
- Go to the Home tab >> select Close & Load >> choose Close & Load To
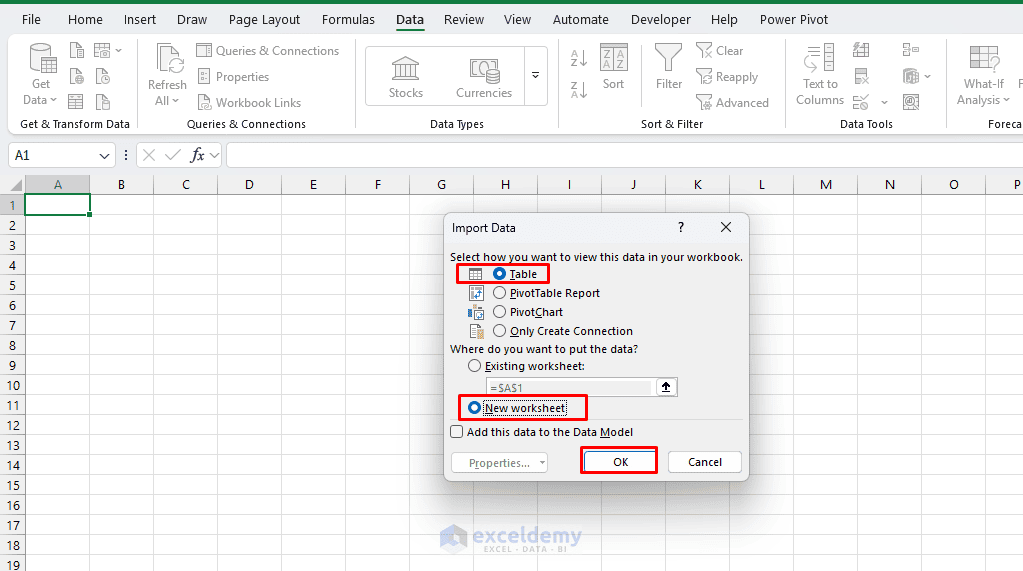
- Select Table >> choose New Worksheet or Existing Worksheet
- Click OK
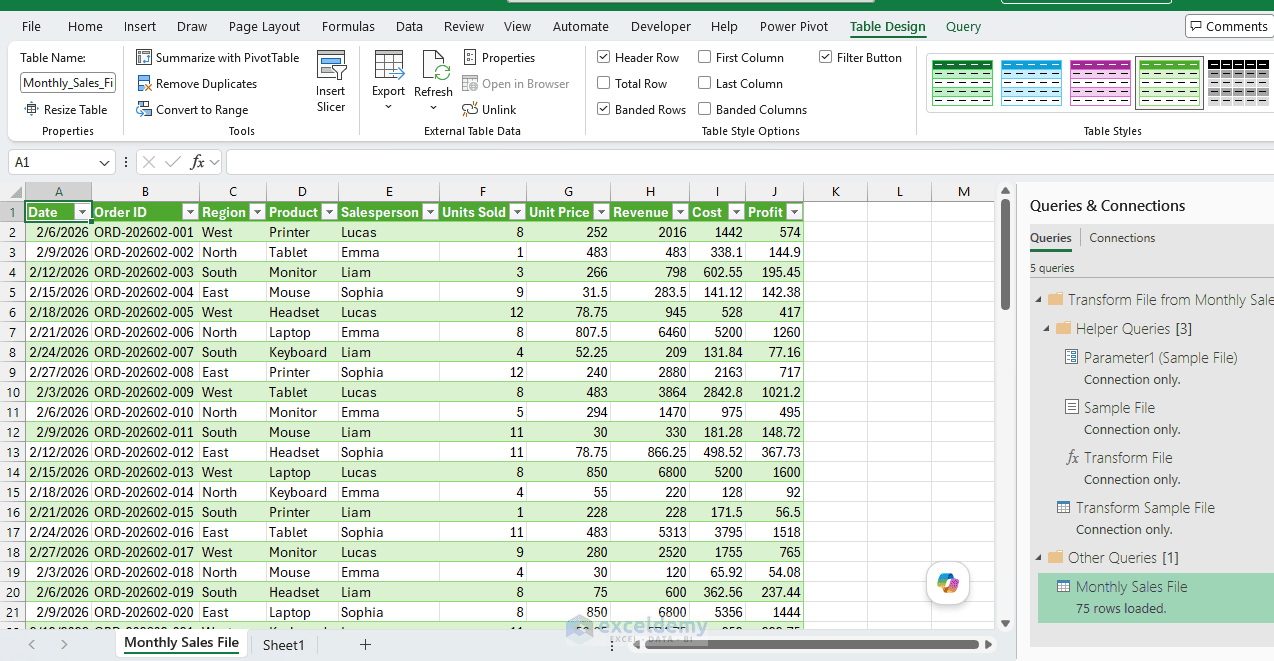
The combined data appears as an Excel table. You can also load the query only as a connection or add it to the Data Model when the dataset will be used in PivotTables, Power Pivot, or other reports.
Step 6: Add New Files and Refresh the Results
After the query has been created, you do not need to repeat the combining process.
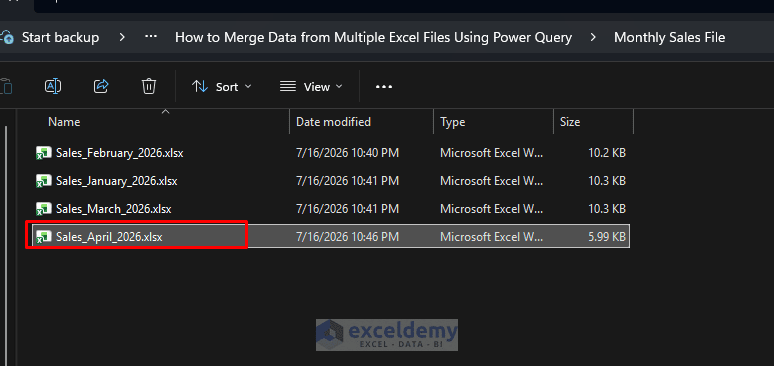
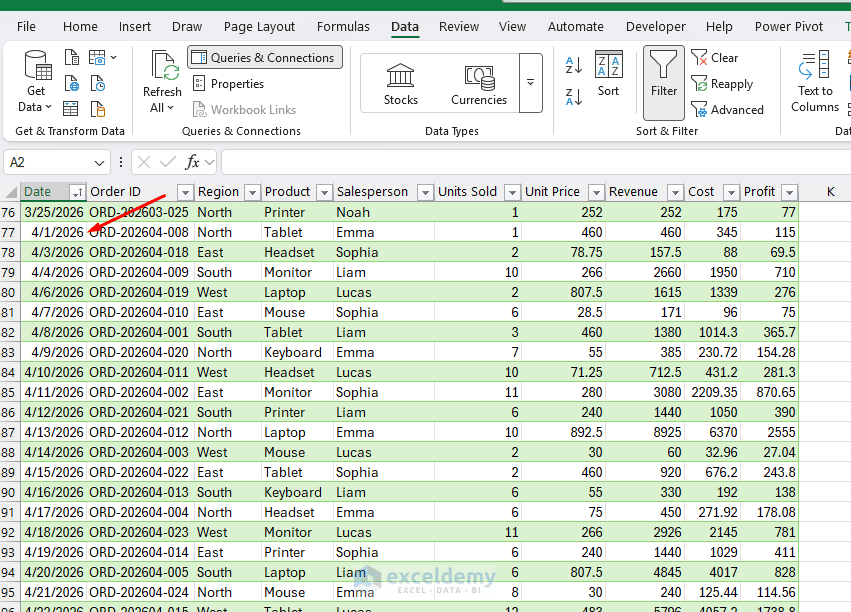
- Add the Sales_April_2026.xlsx file to the source folder
- Open the master workbook
- Go to the Data tab >> select Refresh All
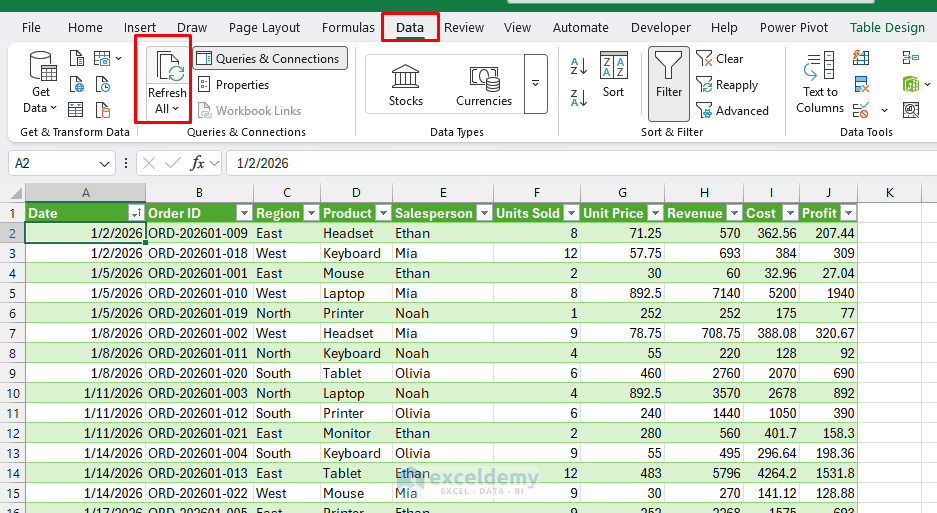
Power Query imports the new file, repeats the saved transformation steps, and updates the combined table.
Optional: Refresh Automatically When the Workbook Opens
To update the data whenever the master workbook is opened:
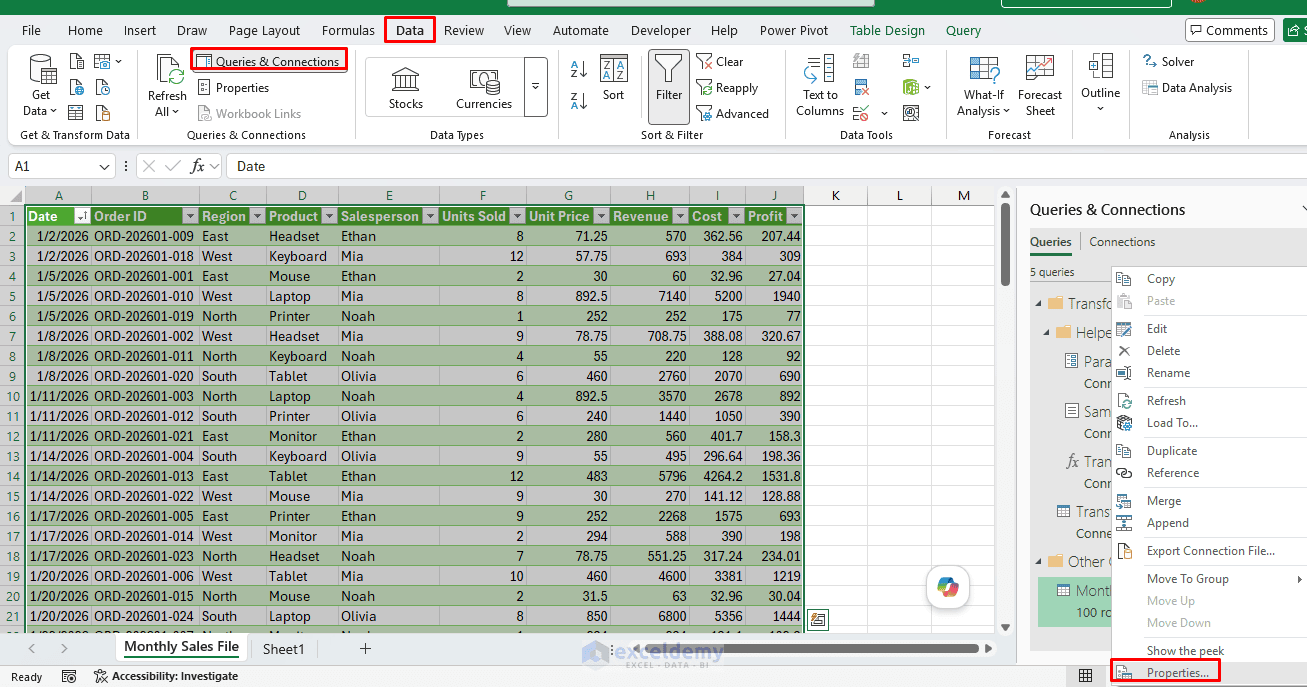
- Go to the Data tab >> Queries & Connections
- Right-click the query connection >> select Properties
- Enable Refresh data when opening the file
- Click OK
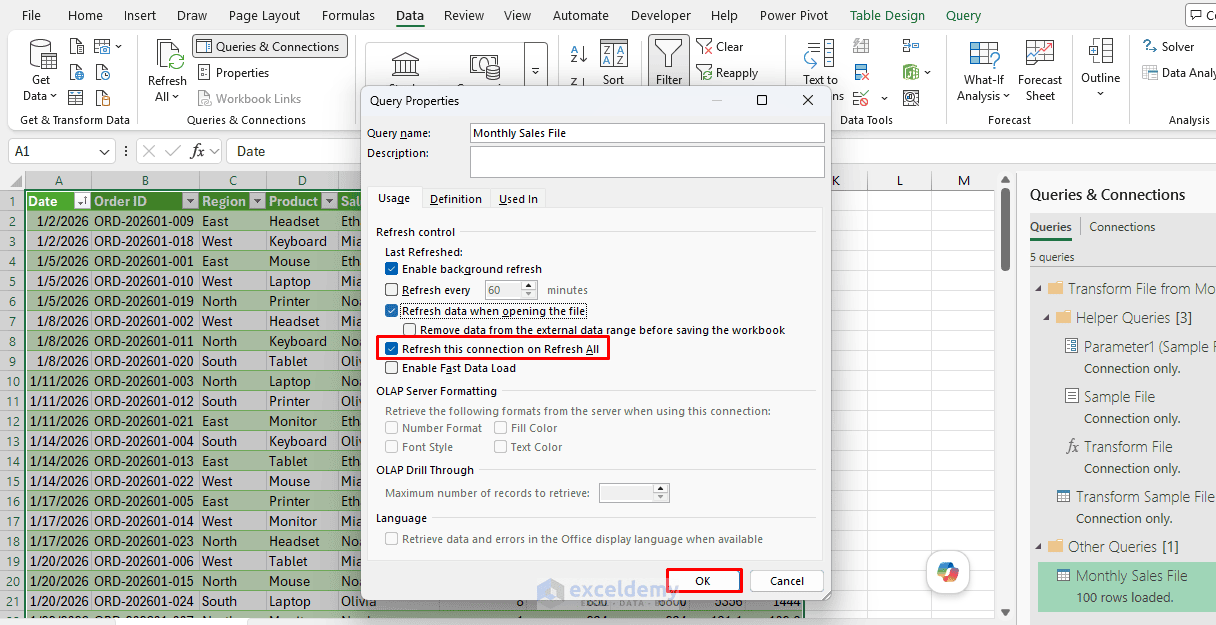
You can also enable Refresh every and specify a number of minutes if periodic refreshes are required.
Merge Specific Sheets from a Known Set of Files
If you don’t want to combine an entire folder — say you have 3–4 specific files to merge, or files with different sheet names you need to select individually — use this approach instead.
Step 1: Import Each File as a Separate Query
For each file:
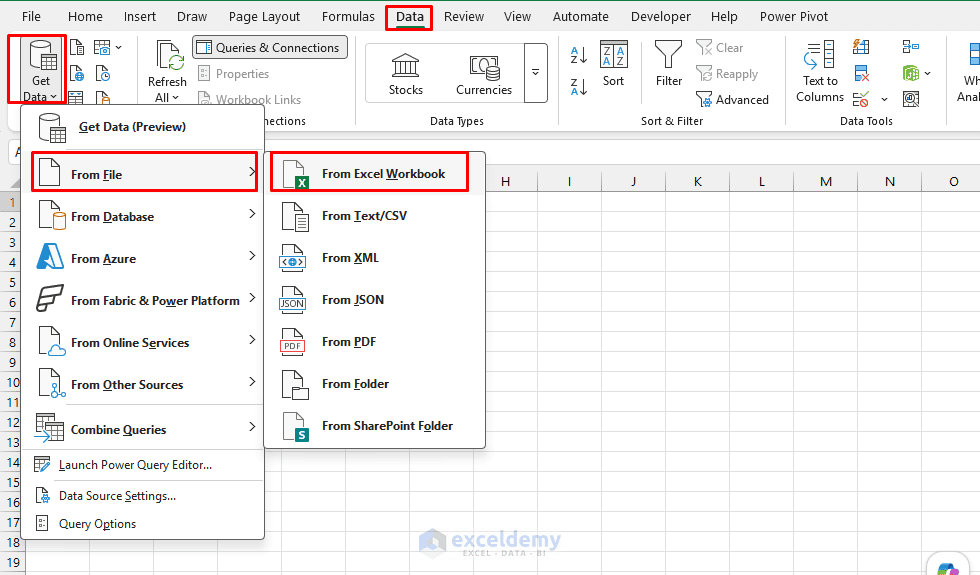
- Go to the Data tab >> select Get Data >> select From File >> select From Workbook
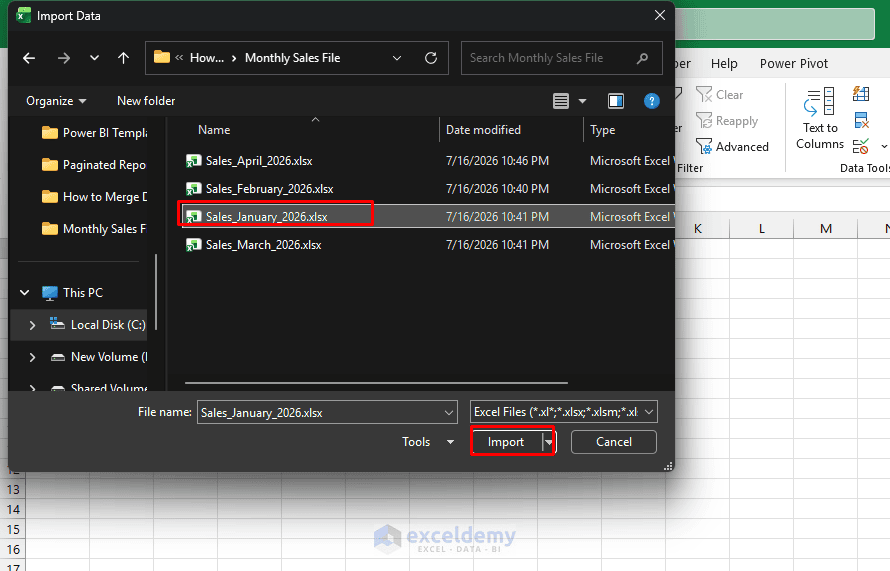
- Select the file and click Import
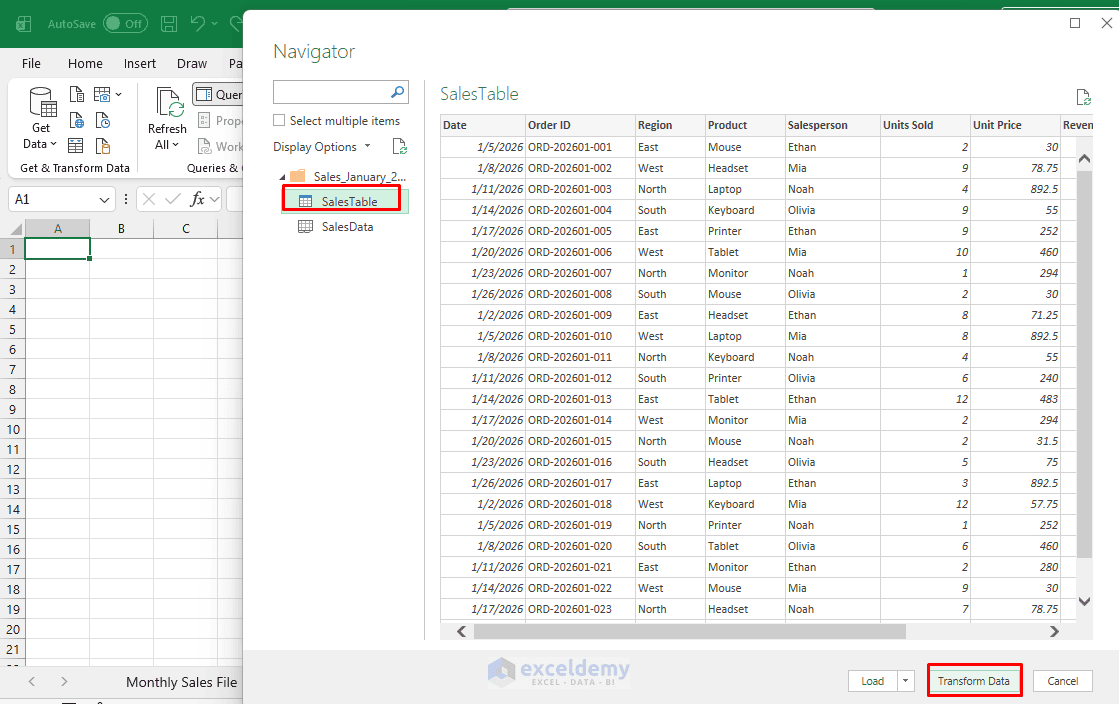
- In the Navigator window, select the sheet or table you want, then click Transform Data
- Repeat this for each file, giving each query a clear name (e.g. Sales_Jan, Sales_Feb, Sales_Mar) via the Query Settings pane on the right
Step 2: Standardize Each Query (If Needed)
Before merging, make sure each query has:
- The same column names (rename by double-clicking the header if they differ)
- The same data types
- The same column order (not strictly required for appending, but good practice)
Step 3: Append the Queries Together
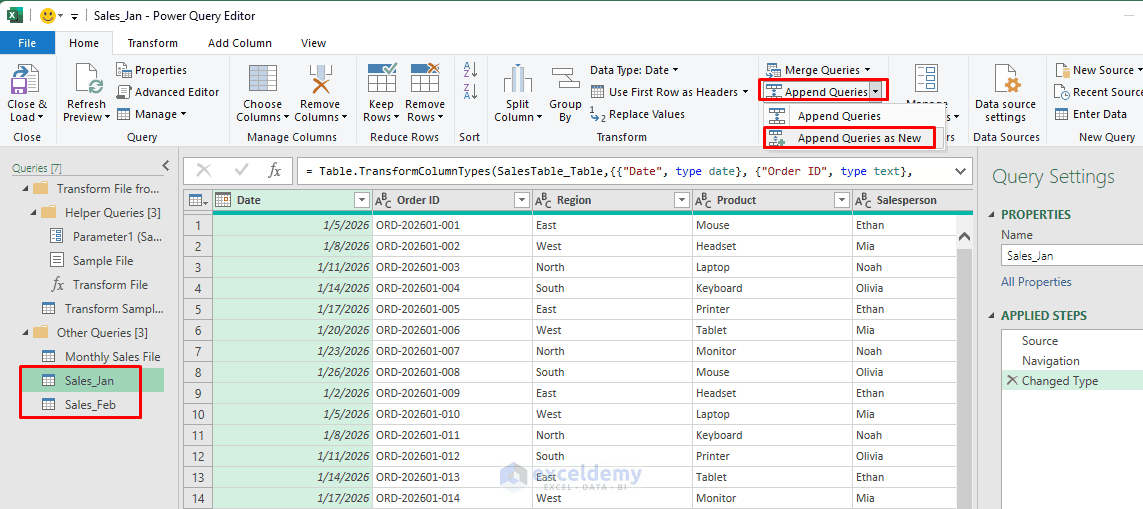
- Go to the Home tab >> select Append Queries >> select Append Queries as New
- In the dialog box:
- Choose Two tables if merging just two, or Three or more tables to select multiple at once
- Add all the queries you want to combine (Sales_Jan, Sales_Feb, Sales_Mar) to the right-hand list
- Click OK
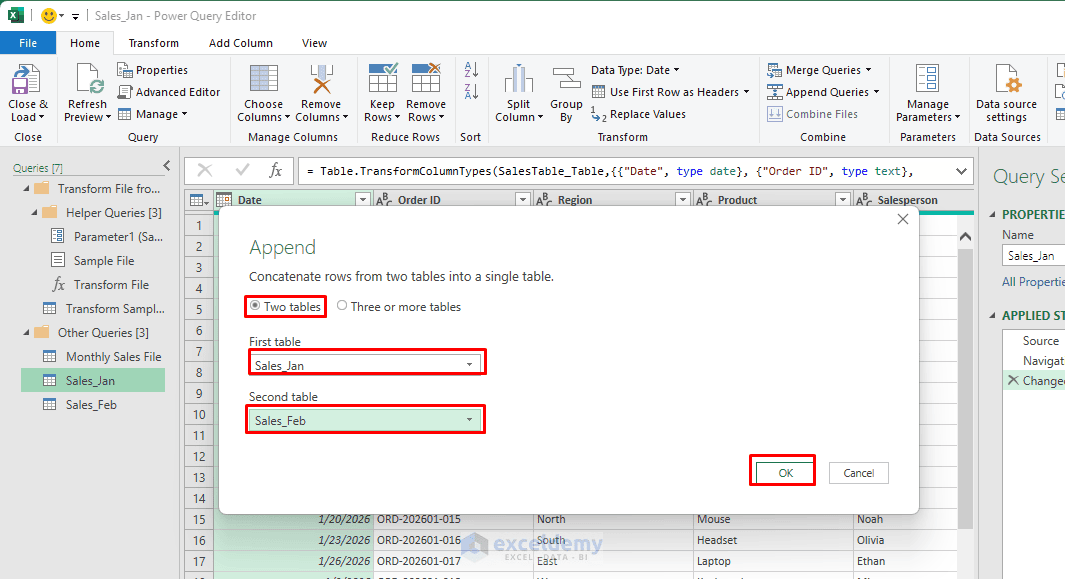
Power Query creates a new query (e.g. “Append1”) that stacks all rows from the selected queries into one table.
Step 4: Rename and Clean the Combined Query
- Rename the new query to something meaningful, like Combined_Sales, via Query Settings
- Apply any final cleanup (remove duplicates, fix data types, filter blanks) as described in Step 4
Step 5: Load the Result
- Click Close & Load to bring the combined table into your worksheet
- Your individual source queries can stay as connection only — select Only Create Connection and click OK
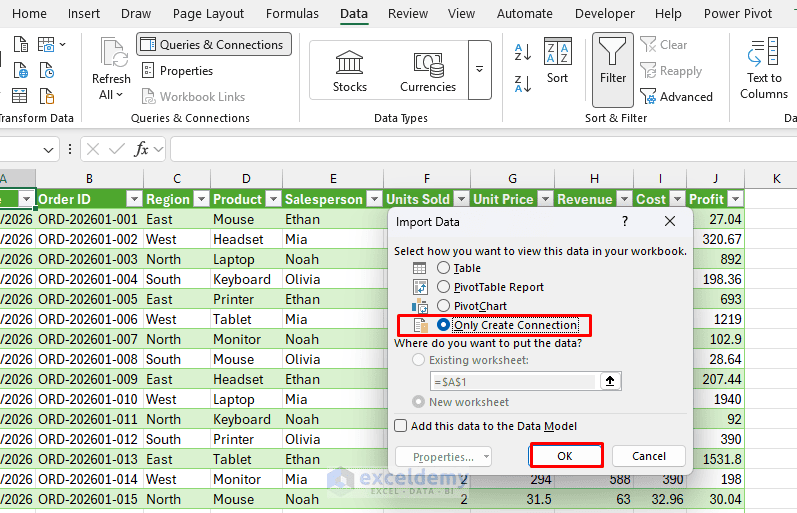
This keeps them from cluttering your workbook with extra sheets — they will simply feed into the Append query.
Handling Files with Different Column Names or Structures
If your files aren’t perfectly uniform (e.g. one file has “Client Name” and another has “Customer”), you have two options:
Option A: Rename Before Appending
In each query, rename the mismatched column to a common name before appending. Power Query appends by column name, so mismatched names will appear as separate columns populated with nulls.
Option B: Use “Combine Files” Advanced Editing
After using the From Folder option, click the auto-generated Transform Sample File query and edit the M code directly to handle renaming logic dynamically. This is useful if new files may have inconsistent headers going forward.
Common Problems and Solutions
- Files Are Not Combining: Check whether every workbook contains the selected worksheet or table name. If the sample file uses SalesTable, all source workbooks must also contain SalesTable.
- Some Columns Contain Errors: The source files may contain inconsistent data types — for example, one Revenue column may contain numbers while another contains text such as “N/A”. Clean the inconsistent values or change the data type after combining the files.
- An Unwanted Workbook Was Imported: Return to the folder query and filter the Name, Extension, or Folder Path column before the Combine Files step.
- A Refresh Fails After Renaming a Column: Power Query transformation steps reference column and table names. Renaming or removing a source column can break later steps. Review the Applied Steps pane to identify the first step that displays an error.
Conclusion
By following the steps above, you can merge data from multiple Excel files using Power Query. Power Query turns a repetitive copy-and-paste process into a refreshable workflow. After the initial folder connection is created, adding new workbooks to the source folder and including them in the consolidated table is as simple as selecting Refresh All. This approach is especially useful for combining monthly reports, branch files, departmental submissions, survey exports, transaction records, inventory lists, and other regularly updated datasets.
Get FREE Advanced Excel Exercises with Solutions!


Ms. Shahmima Sultana,
I thanfully acknowledge the receipt of your tutorial of 26-Aug-26 on different excel topics. These are helpful tutorials.
I will remain thankful to you.
With Regards,
Mohammad Afzal
Karachi – Pakistan
Hello Mohammad Afzal,
Thank you for your kind words and appreciation. I’m glad to know that you found the tutorial helpful. Your feedback means a lot to us.
Stay connected with ExcelDemy for more Excel tutorials and resources.
Regards,
ExcelDemy