
Sheet protection is one of the most misunderstood features in Excel. Most people learn it the hard way. Users hit Protect Sheet, and suddenly every cell is locked, including the ones they wanted users to edit. Then they can’t figure out why their own formulas won’t update. Protecting an Excel worksheet can prevent users from accidentally deleting formulas, changing headings, or damaging a report. However, because every cell is marked as Locked by default, applying sheet protection without preparing the worksheet first can make the entire sheet uneditable.
In this tutorial, we will show how to lock cells and protect sheets without locking yourself out. Follow this workflow to avoid getting locked out of your own spreadsheet.
Understanding Cell Locking in Excel
Here’s the part almost everyone misses: every cell in Excel is locked by default, but that locked attribute only takes effect once you turn on sheet protection. So, the actual workflow is always two steps, done in this order:
- Locked Property: Determines whether a cell can be edited after protection is enabled
- Protect Sheet: Activates the locked-cell restrictions
Marking a cell as locked does not immediately prevent editing. The restriction only takes effect after you protect the worksheet. By default:
- Every cell is marked as locked
- The worksheet itself is not protected
- Therefore, all cells can still be edited
Step 1: Identify Your Input Cells vs. Formula/Reference Cells
Before touching any settings, mentally (or visually) separate your sheet into two categories:
- Editable Cells: Where users enter data (e.g. SalesID, OrderDate, Region, SalesPerson, ProductName, Units, UnitPrice, UnitCost, Status)
- Protected Cells: Formulas (Revenue, TotalCost, Profit), headers, labels, calculated outputs — anything that should stay untouched
A good practice: Color-code input cells (e.g. light yellow fill) so both you and future users instantly know where typing is allowed.
Step 2: Select and Unlock the Input Cells
- Select the range(s) you want users to be able to edit
- Hold Ctrl to select multiple non-adjacent ranges
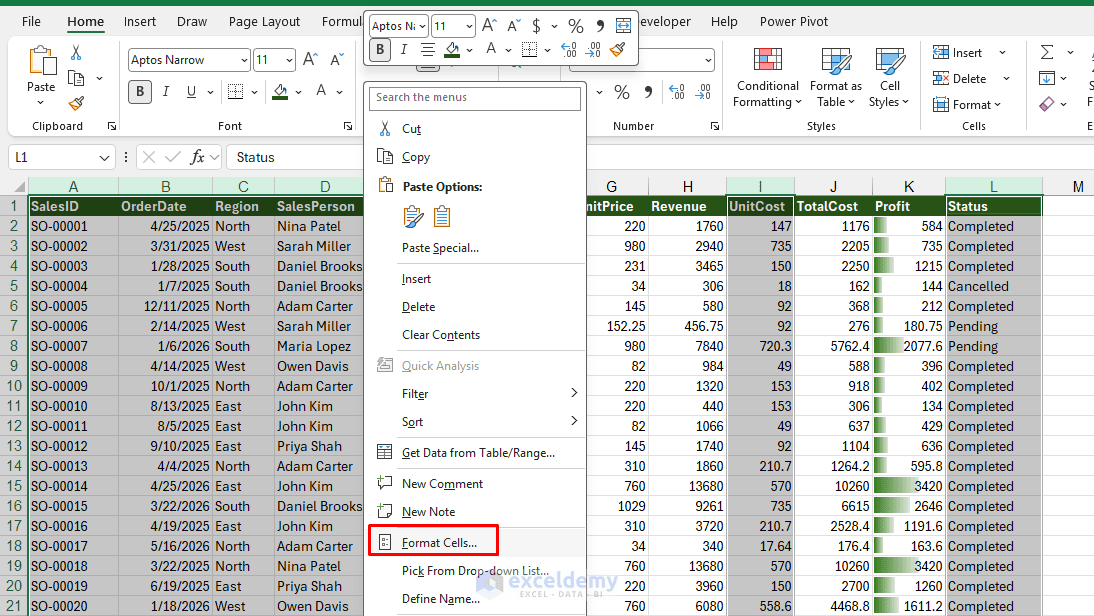
- Select A:F, I, and L
- Right-click >> select Format Cells or press Ctrl + 1
- Go to the Protection tab >> uncheck Locked
- Click OK
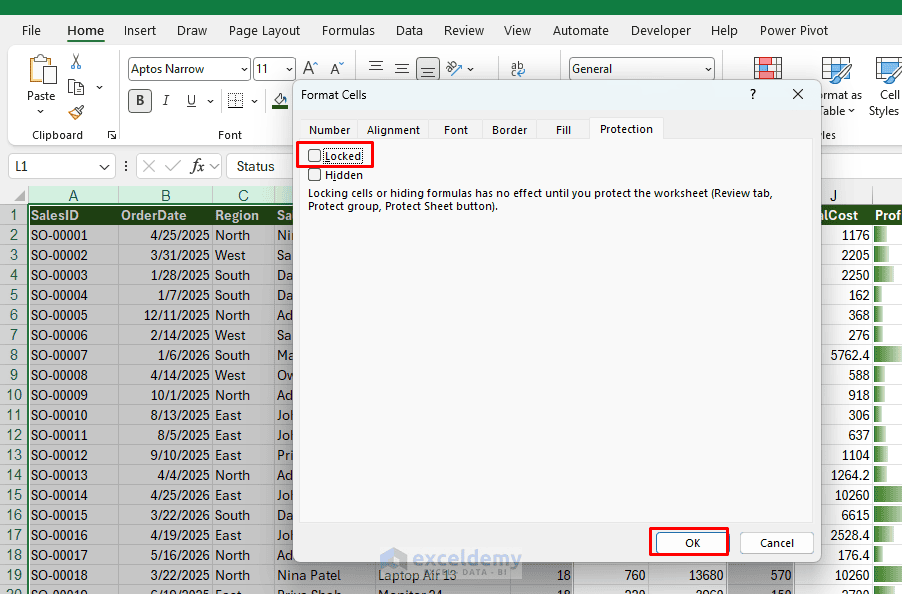
Nothing visibly changes yet; you’re just marking which cells stay editable once protection is switched on. Leave the Revenue, TotalCost, and Profit columns locked (their default state) since those are your formula columns.
Optional: Hide the Formula Logic
You can also select Hidden if you do not want the formulas to appear in the Formula Bar after protection is enabled. Use the Hidden option only when users do not need to inspect the formulas.
Find and Lock All Formula Cells Automatically
In a larger worksheet, selecting formula cells manually can be difficult. Excel can find them automatically.
- Select the worksheet range you want to protect
- Go to Home >> select Find & Select >> select Go To Special
- Select Formulas
- Click OK
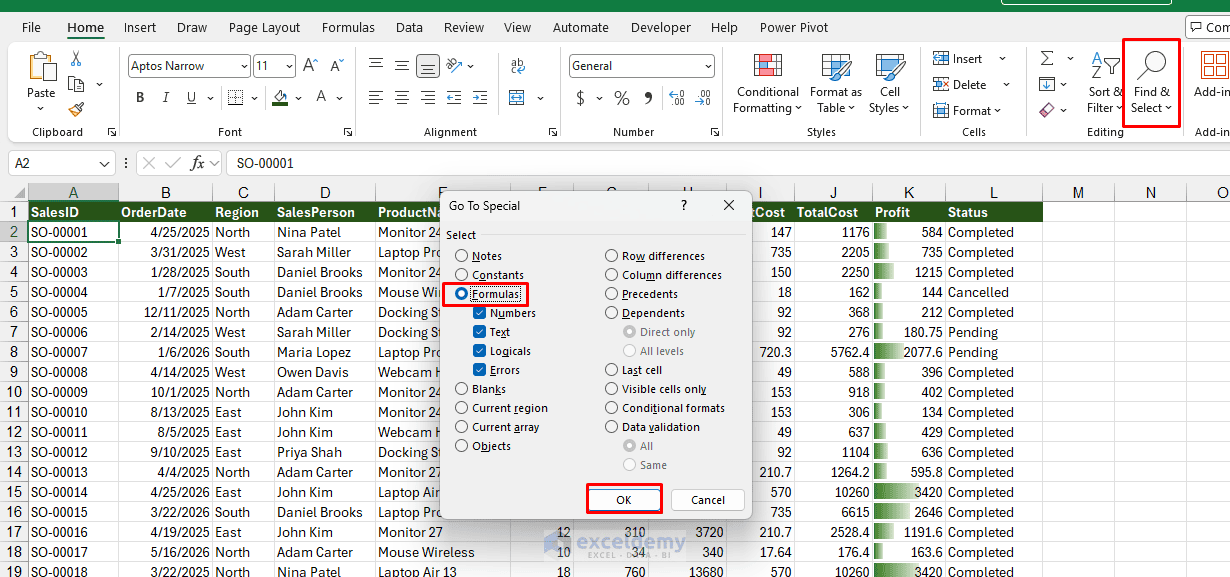
- Excel selects every formula cell in the range
- Press Ctrl + 1
- Open the Protection tab >> select Locked
- Optionally select Hidden
- Click OK
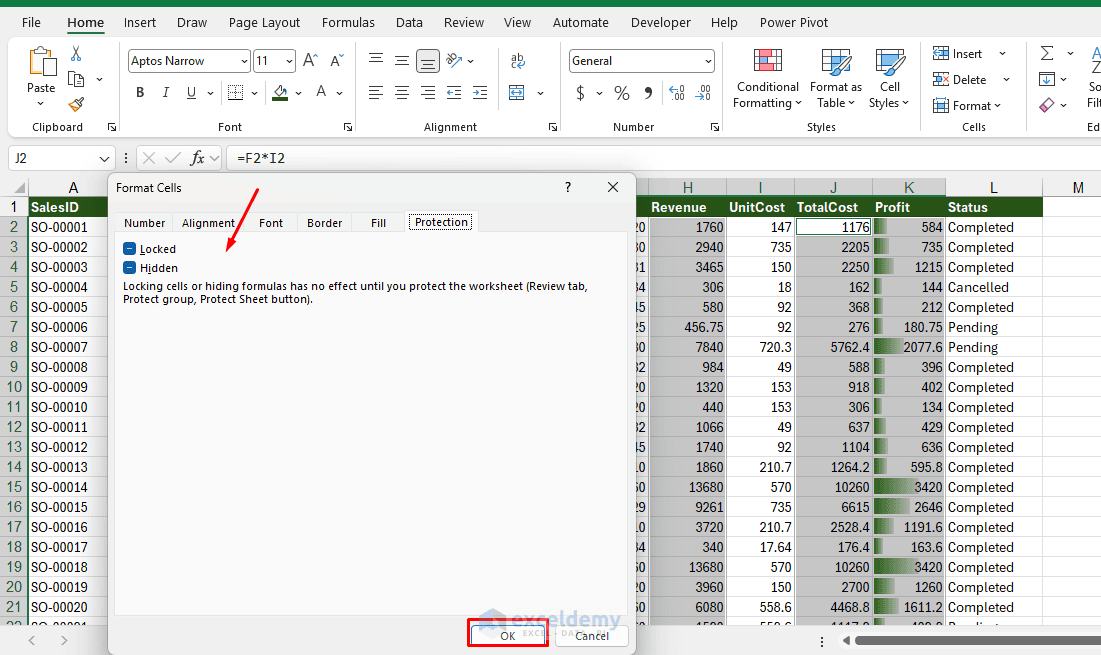
A reliable approach is to unlock the entire working range first and then use Go To Special to lock only the formula cells.
Step 3: Allow Specific Users to Edit Specific Ranges Without a Password
If different people need access to different sections without sharing one universal password:
- Go to the Review tab >> select Allow Edit Ranges (Excel for Windows)
- Or go to Protect Sheet >> select Allow users to edit ranges
- Click New
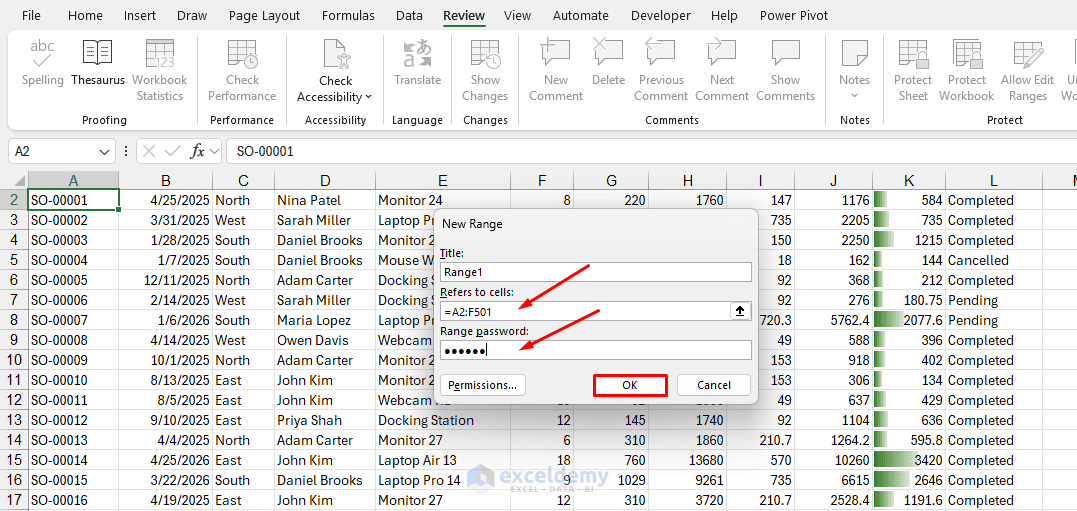
- Define the range and assign a range-specific password if needed
- Click OK
This lets you grant granular access — so the finance team can edit Column C but not Column D, even after the sheet is protected. This step is optional and mostly relevant for shared workbooks with multiple contributors.
Step 4: Protect the Sheet
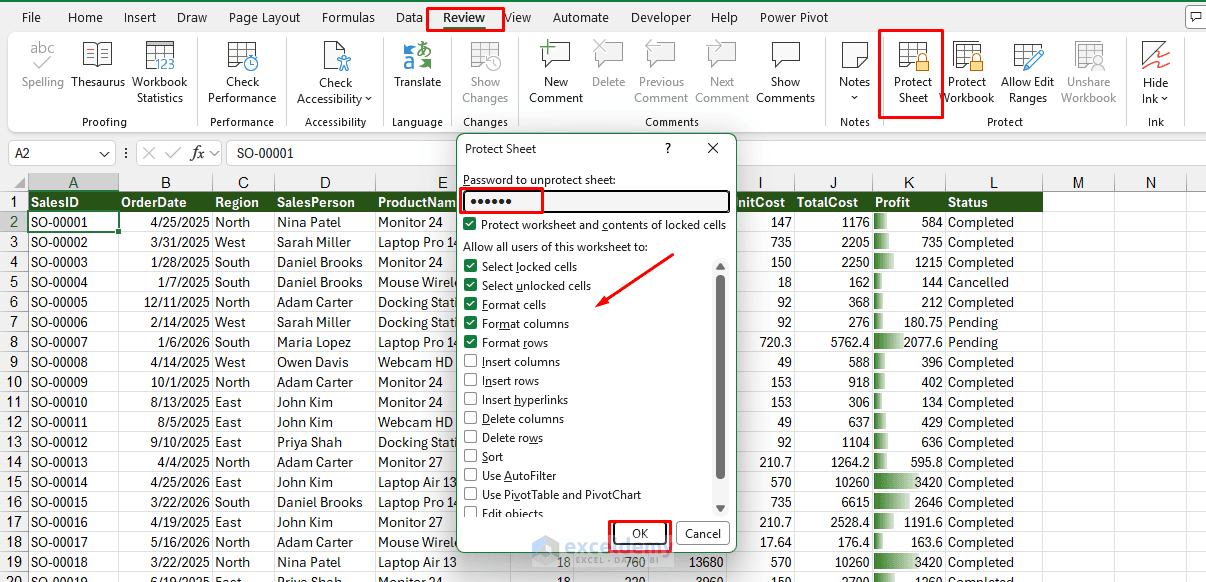
- Go to the Review tab >> select Protect Sheet
- You’ll see a checklist of what to allow users to do even while the sheet is protected
- Check the ones you want to permit:
- Select locked cells: Usually leave checked so users can at least click and view them
- Select unlocked cells: Must be checked, or users can’t reach your input cells
- Format cells/rows/columns: Check only if users need to adjust appearance
- Sort/Use AutoFilter: Check if the sheet includes filterable tables
- Insert/Delete rows or columns: Generally leave unchecked to preserve structure
- Set a password (optional, but recommended if this needs to be enforced rather than just a soft guardrail)
- Click OK
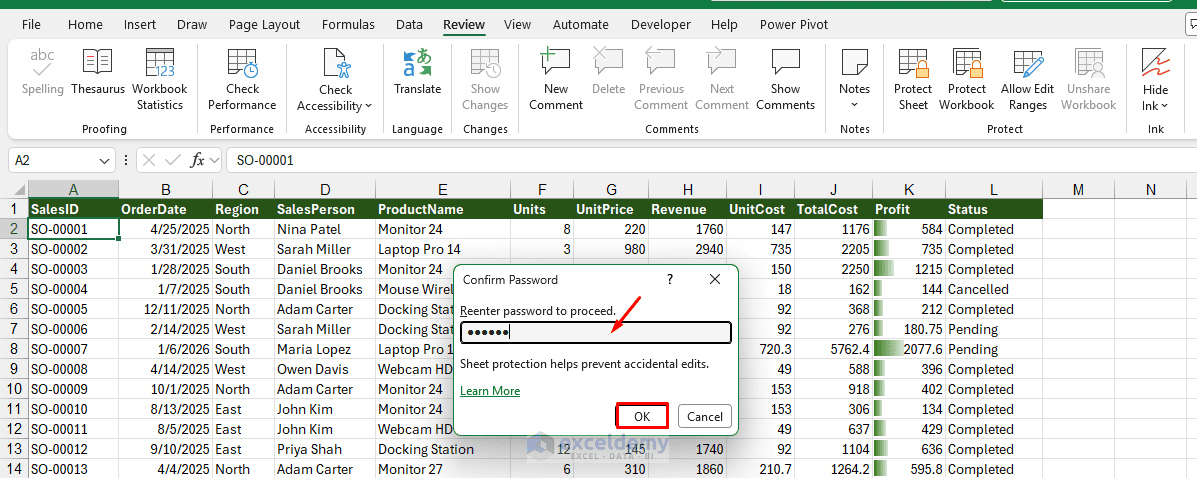
- Re-enter the password >> click OK
Important: If you set a password and forget it, Excel does not offer an official recovery method through Microsoft. Store it somewhere safe (password manager, secure note) — don’t rely on memory alone.
Step 5: Test Before You Distribute the File
This is the step people skip, and it’s the one that actually prevents “locking yourself out”:
- Try typing into a cell you meant to keep editable and confirm it works
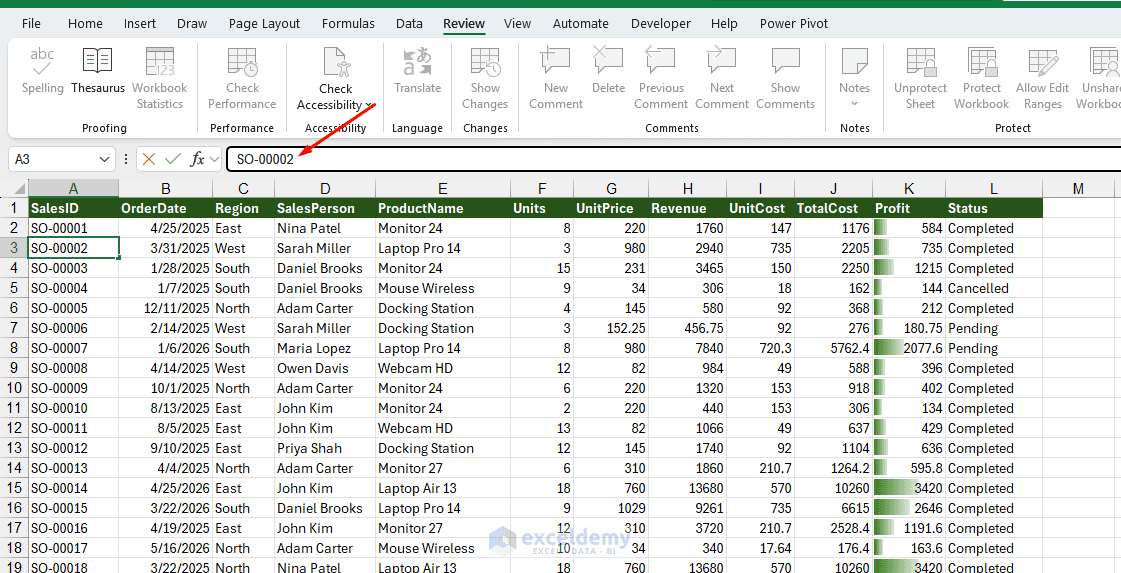
- Try typing into a formula cell and confirm Excel blocks it with the expected warning message
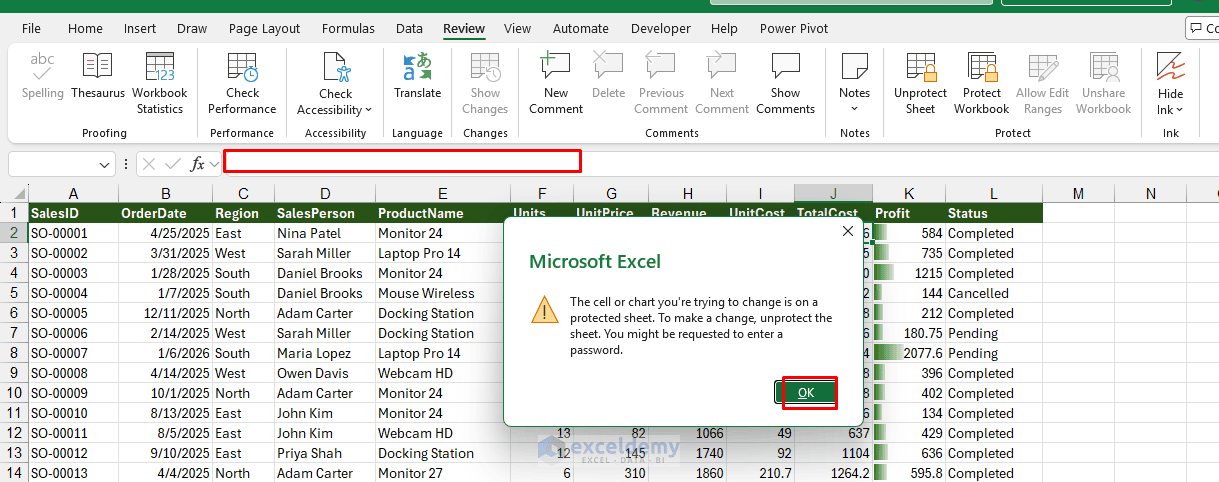
- Try any actions you unchecked and confirm they’re blocked
- If something is locked that shouldn’t be, unprotect the sheet, revisit Step 2, and re-protect
If an important cell cannot be edited:
- Go to the Review tab >> select Unprotect Sheet
- Enter the password
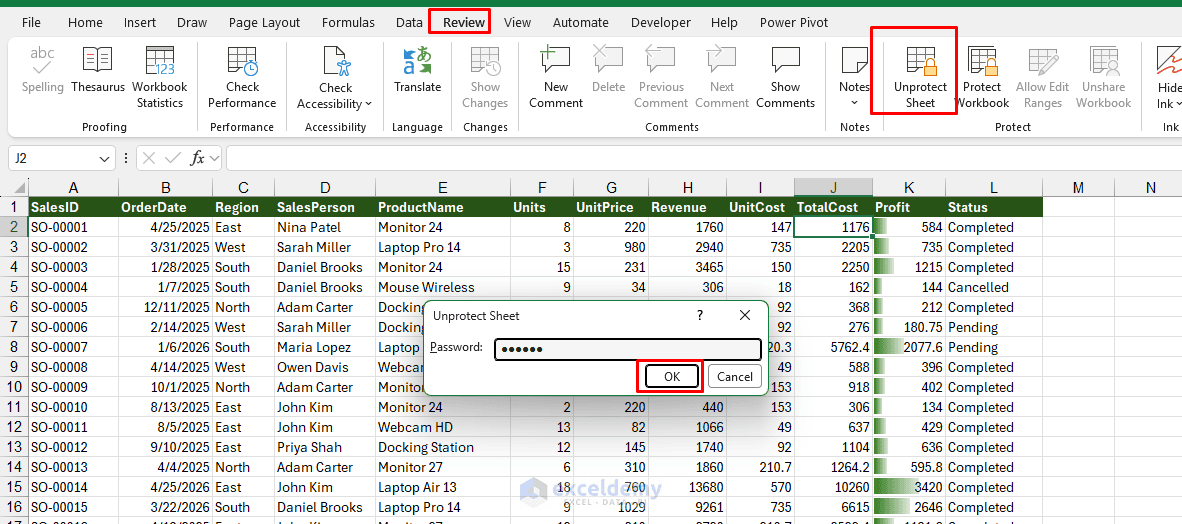
- Select the cell
- Clear its Locked property
- Protect the sheet again
How to Avoid Locking Yourself Out (The Real Failure Modes)
- Keep an Unprotected Backup: Save a separate backup before applying protection. For example: Sales_Report_Master_Unprotected.xlsx. Use the protected version for distribution: Sales_Report_Protected.xlsx
- Use Descriptive Cell Formatting: Clearly identify editable cells so that users do not repeatedly attempt to change protected areas.
- Forgetting to Unlock Cells Before Protecting: You protect the sheet and immediately can’t edit anything, including cells you built for input.
- Fix: Unprotect (Review >> Unprotect Sheet), select input cells, uncheck Locked in Format Cells, re-protect.
- Forgetting the Password: You protected the sheet with a password months ago and no longer remember it.
- Fix: There’s no built-in recovery. Prevention is the only real fix. Store passwords in a password manager, or avoid passwords entirely for internal sheets where soft protection (no password) is enough to prevent accidental edits.
- Protecting the Workbook Structure and Losing Track of It: This is different from sheet protection. Protect Workbook locks the structure (prevents adding, deleting, renaming, or moving sheets) but does not lock cell contents. Don’t confuse the two — you may need both, but they solve different problems and use separate passwords.
- Locking Cells That Contain Dropdowns or Data Validation Triggers: If a locked cell has data validation (like a dropdown list) and you protect the sheet without unlocking it, users can’t open the dropdown at all. Always unlock validation cells intended for user interaction.
Bonus: Protecting Multiple Sheets at Once (VBA)
If you’re protecting many sheets with the same settings, doing it manually sheet by sheet is tedious. This macro applies identical protection across every sheet in the workbook:
Sub ProtectAllSheets()
	Dim ws As Worksheet
	Dim pwd As String
	pwd = "YourPassword"  ' Replace with your password, or use "" for no password

	For Each ws In ThisWorkbook.Worksheets
    	ws.Protect Password:=pwd, _
                   AllowFiltering:=True, _
                   AllowSorting:=True, _
                   AllowFormattingCells:=False
	Next ws

	MsgBox "All sheets protected."
End Sub
To reverse it:
Sub UnprotectAllSheets()
	Dim ws As Worksheet
	Dim pwd As String
	pwd = "YourPassword"

	For Each ws In ThisWorkbook.Worksheets
    	ws.Unprotect Password:=pwd
	Next ws

	MsgBox "All sheets unprotected."
End Sub
- Run these from the VBA editor, or assign them to a button for one-click protection toggling across large workbooks.
Conclusion
By following the steps above, you can lock cells and protect sheets without locking yourself out. The key is to prepare cell permissions before selecting Protect Sheet. Unlock the cells intended for data entry, leave formulas and important content locked, enable only the permissions users need, and thoroughly test the workbook before sharing it. This approach protects your formulas and worksheet structure while keeping the workbook practical and easy to use.
Get FREE Advanced Excel Exercises with Solutions!