Here’s an overview of how data will be presented from Excel into PowerPoint.
How to Embed an Excel File in PowerPoint: 5 Suitable Examples
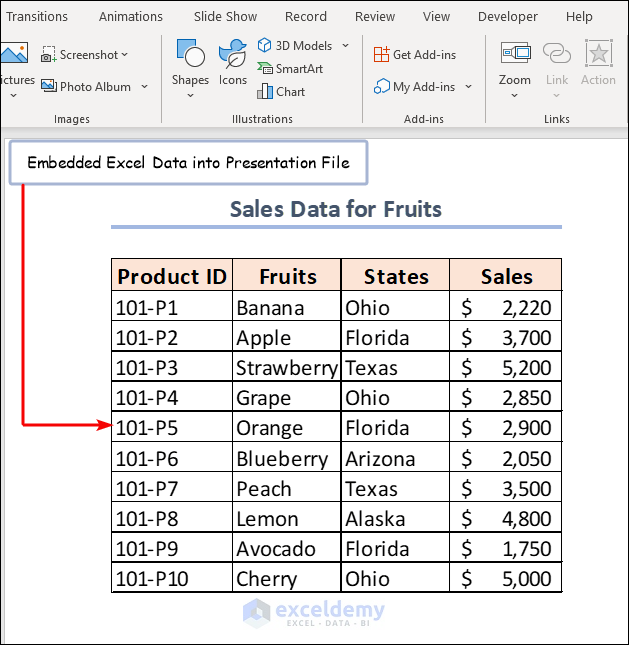
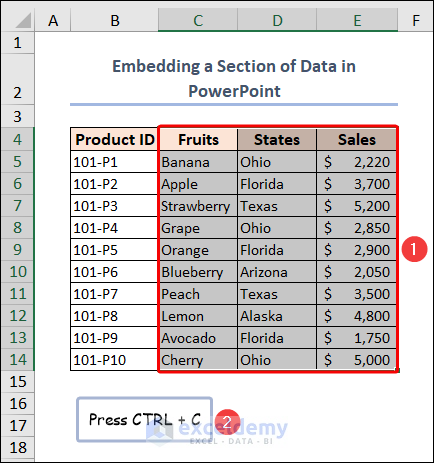
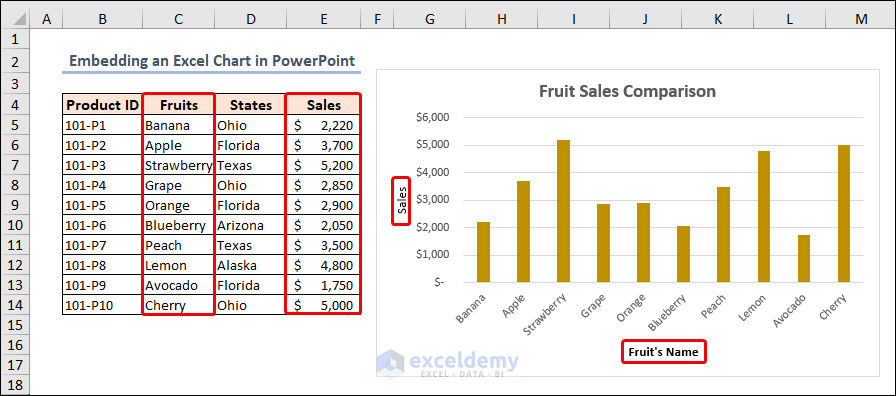
Let’s assume we have a “Sales Data for Fruits” dataset, which includes the Product ID, Fruits, States, and Sales amount under columns B, C, D, and E respectively.

Method 1 – Embedding an Entire Excel File in PowerPoint
- Select the Insert tab on the Ribbon in PowerPoint.
- Click on the Object command on the Text group of commands.

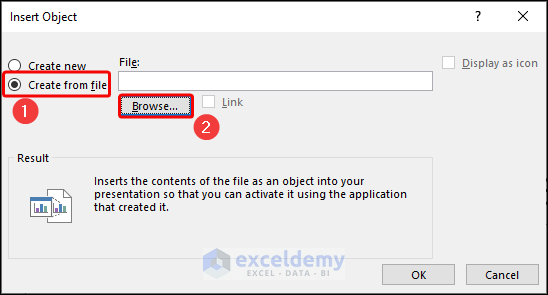
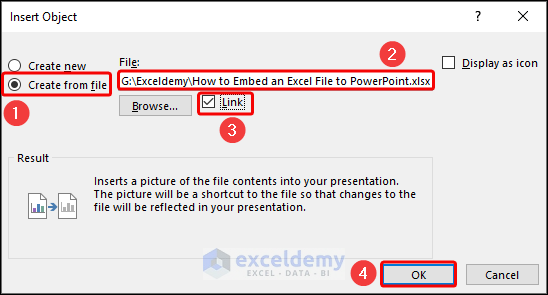
- In the Insert Object dialog box, click on the radio button of Create from file option.
- Choose the Browse… button.
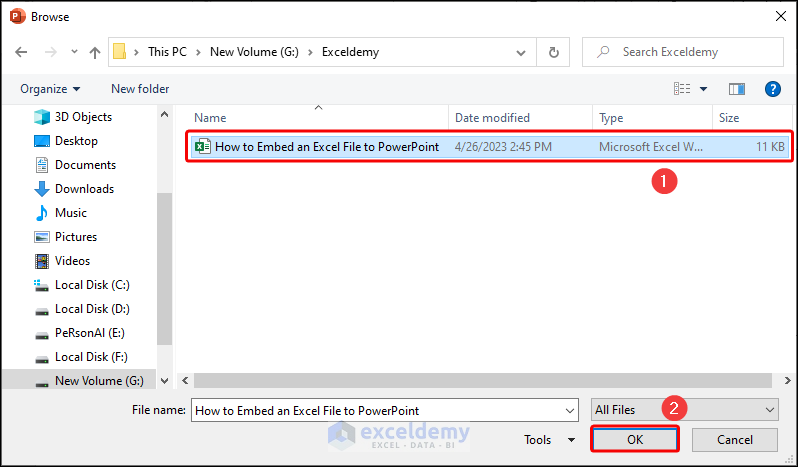
- In the Browse window, select your desired file and click OK.
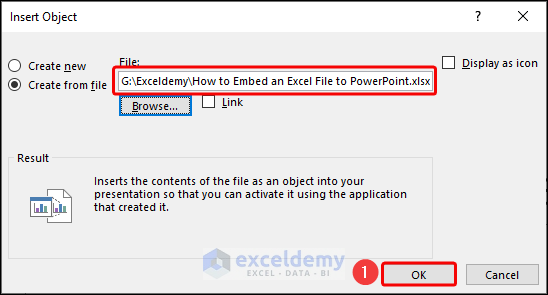
- You can see your file path and name in the highlighted box. Click OK.
Note: Don’t check the box before the Link option to embed the Excel file.
Make sure to attach your intended data on the first page of the Excel file.

Read More: How to Perform Excel to PowerPoint Automation
Method 2 – Embedding a Section of Excel Data in PowerPoint File
- Open the Excel file and select the range of data (e.g. C4:E14) you want to embed.
- Press CTRL + C on your keyboard to copy this range.
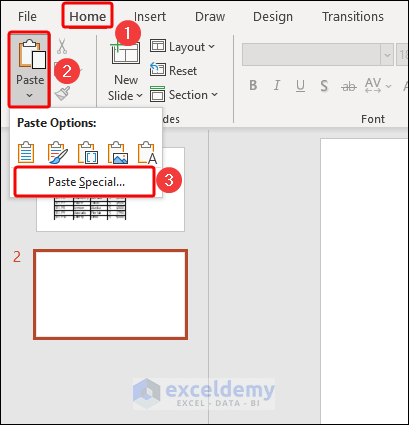
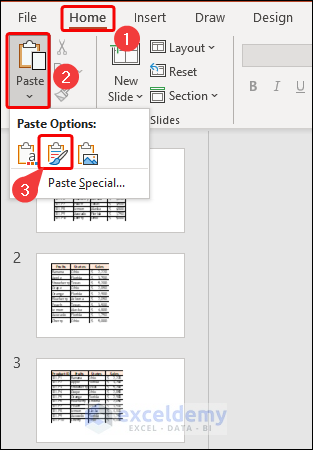
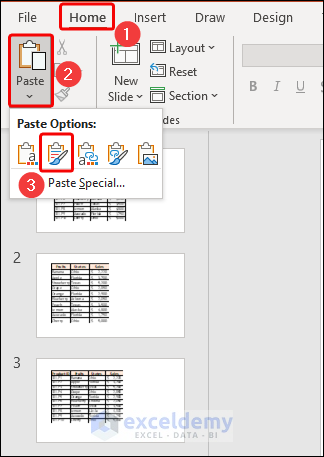
- Open your PowerPoint slide and navigate to the Home tab.
- Click on the Paste drop-down option and then click on Paste Special.
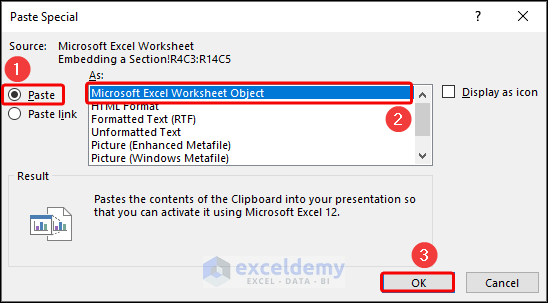
- Select Paste and click on Microsoft Excel Worksheet Object. Press OK.
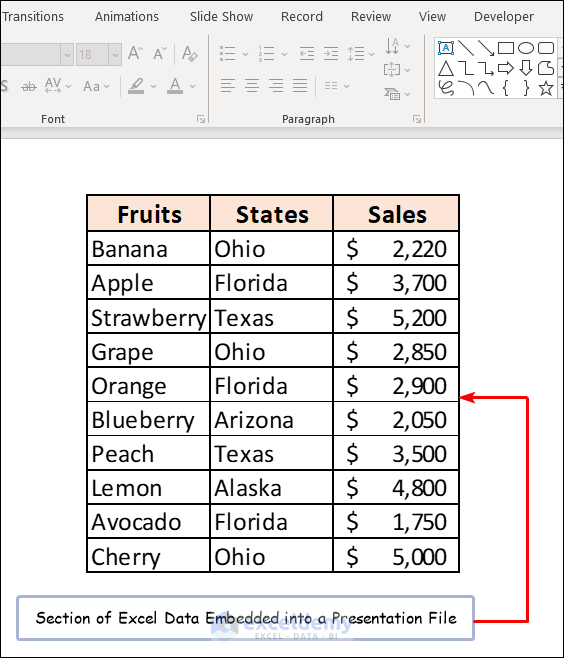
- The selected range is copied to the presentation file.
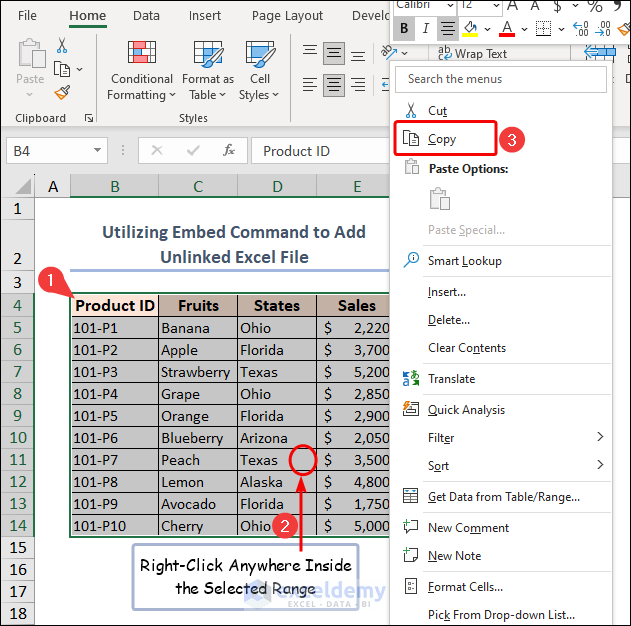
Method 3 – Utilizing Embed Command to Add Unlinked Excel File
- Select the dataset (e.g. B4:E14) and right-click.
- Click on the Copy command from the context menu.
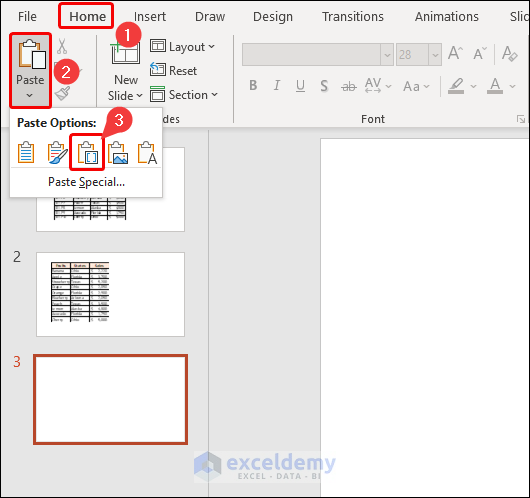
- Use the Paste drop-down option in PowerPoint.
- Choose Embed (E) from Paste Options.
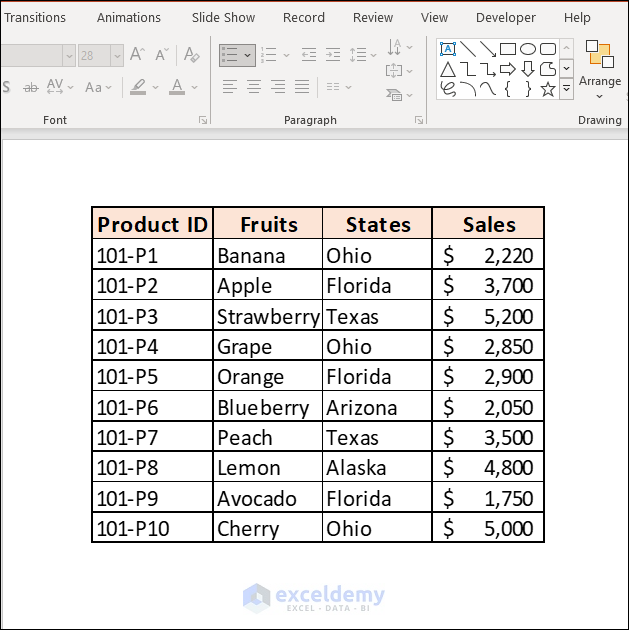
- The output in PowerPoint is as follows.
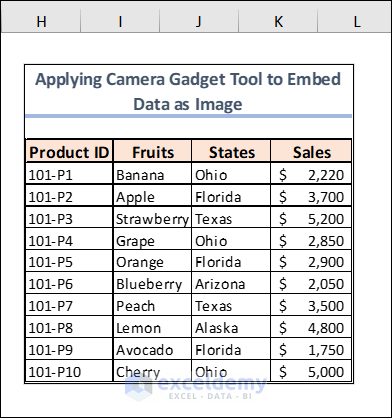
Method 4 – Applying Camera Gadget Tool to Embed Data as Image
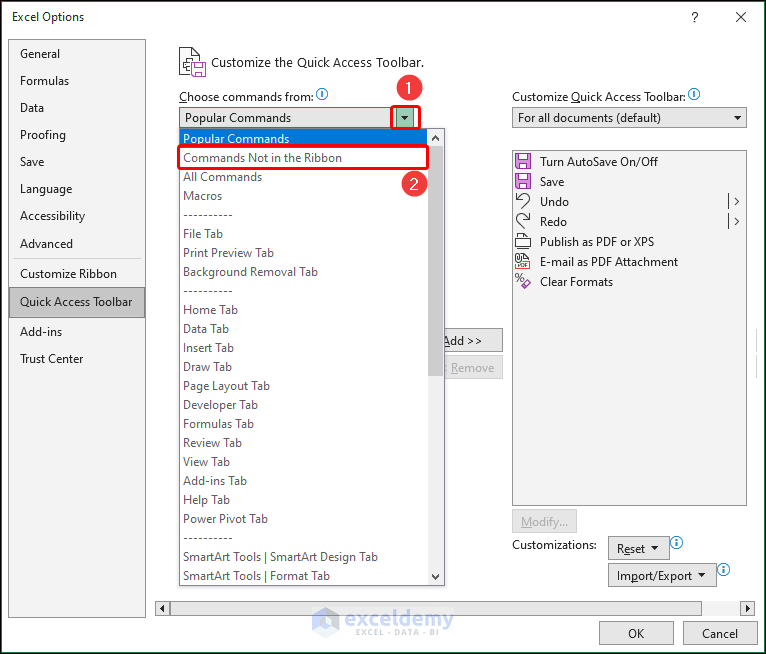
- Click on the triangular-shaped Customize Quick Access Toolbar icon and select More Commands.

- This will bring a dialog box as follows. Click on the drop-down icon beside the Popular Command bar to get more options. Then pick Commands Not in the Ribbon from the available options.
- To bring the Camera tool to the right side, select Camera and click the Add button in the middle.
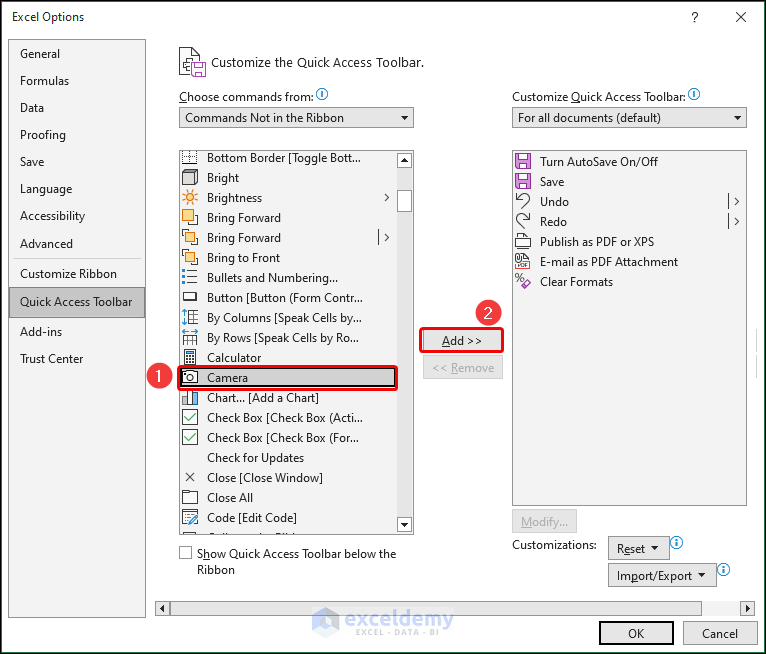
- Press OK.
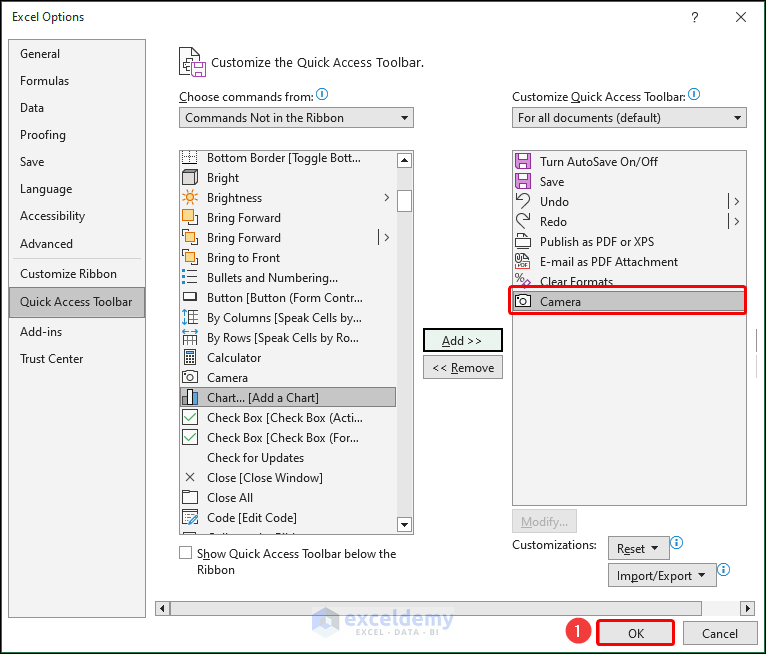
- This will allow you to have a Camera icon in the Toolbar. Now you’re ready to take snaps of the selected area by using the Camera tool.
![]()
- Select the region you want to copy and press the Camera icon.
![]()
- Left click anywhere to get an image.
- Copy the image by selecting it and pressing Ctrl + C command.
- Paste the output in the presentation slide as follows:
- Remember that the embedded portion is an image.

Read More: How to Link Excel Data to PowerPoint Chart
Method 5 – Embedding an Excel Chart in PowerPoint File
Charts are perhaps the most commonly-used Excel format in PowerPoint.
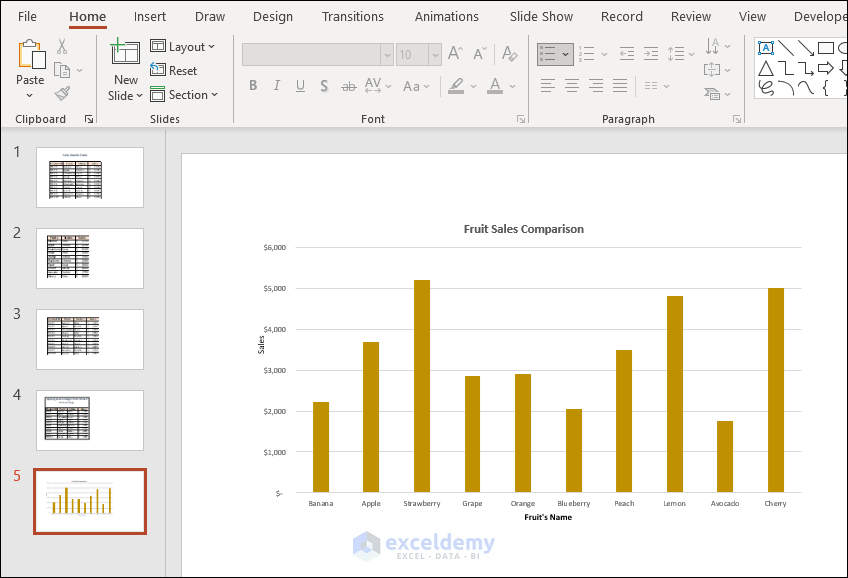
- Copy the Excel chart with Ctrl+ C command.
- Paste the chart into the PowerPoint slide by using Keep Source Formatting & Embed Workbook, one of the Paste Options.
Finally, the output in the presentation slide is as follows:
Embed Vs. Link an Excel File in PowerPoint
When you want to add an Excel file to a PowerPoint presentation, you have two options: embedding or linking the file. Here’s a brief overview of the differences between the two:
- Embedding an Excel file in PowerPoint means that a copy of the file is saved within the PowerPoint presentation itself. This can make your presentation larger in file size, but it also means that you don’t need the original Excel file to view or present the data. Any changes made to the original Excel file won’t be reflected in the embedded copy within PowerPoint.
- Linking an Excel file to PowerPoint means that the presentation will display data from the original Excel file. This keeps the file size of the presentation smaller and ensures that any changes made to the Excel file are reflected in the PowerPoint presentation. However, if the Excel file is moved or deleted, the links will be broken and the data won’t display correctly in the presentation.
Read More: How to Link Excel Sheets to PowerPoint
How to Insert Excel File into PowerPoint as Icon
- Open a presentation file and select the intended slide to place the icon.
- Go to the Insert tab and click on the Object tool in the Text group.

- Select the Create from file option.
- Click on the Browse button to attach the Excel file that you want to place as an icon on the slide.
- Make sure to check the boxes beside Link and Display as icon options.
- Click OK.
![]()
- Use the hooks on the icon’s corners to resize it and drag it into place on the slide.
- Double-click the icon to access the workbook’s contents and edit them.
![]()
Read More: How to Insert an Excel File into PowerPoint as an Icon
How to Link Excel File in PowerPoint That Updates Data Dynamically
- To link an Excel file in PowerPoint, do the same things as you did in Example 1.
- You have to mark the box before the Link option.
- Press the OK button.
Now, if you make any changes in the Excel file, you’ll get the updated data in PowerPoint.
Note: If you delete the file or change the location of the file, PowerPoint will start throwing errors when trying to display data.
Read More: How to Link Powerpoint to Excel for Dynamic Data Updates
Benefits and Drawbacks of Embedding an Excel File in PowerPoint
When creating presentations, it’s useful to embed the Excel file directly into the PowerPoint file. But, it’s important to consider the benefits and drawbacks of this approach.
Benefits
- Easy Access to Data: Embedding an Excel file in PowerPoint allows you to easily access and manipulate data without having to switch between programs.
- Increased Interactivity: Embedding an Excel file in PowerPoint allows you to create more interactive presentations with live data that can be manipulated and updated in real time.
- Saves Time: It can save time by eliminating the need to create separate charts and graphs from scratch.
- Better Organization: Embedding an Excel file in PowerPoint allows you to keep all your data in one place, making it easier to organize and manage your presentation.
- Consistent Formatting: Embedding ensures that your data will be presented with consistent formatting and style.
Drawbacks
- File Size: Embedding an Excel file in PowerPoint can increase the file size of your presentation, making it more difficult to share and collaborate with others.
- Compatibility Issues: Embedding an Excel file in PowerPoint can lead to compatibility issues between different versions of PowerPoint and Excel.
- Security Risks: Embedding an Excel file in PowerPoint can pose security risks if the Excel file contains sensitive information.
- Limited Editing Capabilities: Embedding an Excel file in PowerPoint limits your editing capabilities, as you may not be able to make changes to the data directly within the PowerPoint slide.
- Refreshing Data: If the data in the embedded Excel file changes, you will need to manually refresh the data in the PowerPoint slide to ensure accuracy.
Things to Remember
- Keep file size in mind when you embed an Excel file in PowerPoint.
- Ensure compatibility with different versions of PowerPoint and Excel.
- Test your presentation to ensure that the embedded Excel file displays correctly.
- Update the presentation file with an embedded Excel file if the data changes or needs to be refreshed.
- Consider security and privacy concerns when embedding Excel files containing sensitive information.
Frequently Asked Questions
1. Will embedding an Excel file in PowerPoint increase the file size of my presentation?
Yes, it can increase, especially if the Excel file contains a lot of data. This can make it more difficult to share and collaborate on the presentation.
2. How do I ensure compatibility between different versions of PowerPoint and Excel when embedding a file?
To ensure compatibility, it’s important to save the Excel file in a format that is compatible with the version of PowerPoint you are using.
3. What security risks should I be aware of when embedding an Excel file in PowerPoint?
It’s important to ensure that any sensitive information within the embedded Excel file is appropriately protected and access is limited to authorized individuals.
Practice Section
We have provided a practice section on the right side of each sheet so you can practice yourself. Please make sure to do it yourself.
Download Practice Files
Download the following practice workbook and presentation file. It will help you to realize the topic more clearly and will help you practice yourself.
Related Articles
- [Fixed!] Problems with Embedded Excel Files in PowerPoint
- [Solved] Embedded Excel in PowerPoint Not Showing All Data
- How to Open Existing PowerPoint File from Excel VBA
<< Go Back to Excel to PowerPoint | Export Data from Excel | Learn Excel
Get FREE Advanced Excel Exercises with Solutions!
