In Microsoft Excel, we use the VBA FileDateTime function to find out the last modification date of any drive, file, or directory. In this article, we will go through the process of using the VBA FileDateTime function. To illustrate this function to you, we give an overview of this function. After that, we will give examples with different datasets to make you understand everything about this function.
Download the Practice Workbook
You can download the practice workbook from here.
Overview of Excel VBA FileDateTime Function
- Description
The VBA FileDateTime function specifies the last modification date of any drive, file, or directory.
- Generic Syntax
FileDateTime(pathname)
- Argument Description
| ARGUMENT | REQUIREMENT | EXPLANATION |
|---|---|---|
| pathname | Required | It indicates the location of any drive and the directory or folder |
- Returns
Returns the last modified date of any drive, file, or directory.
- Available in
MS Office 365, MS Excel 2016, MS Excel 2013, 2011, Excel 2010, Excel 2007, Excel 2003, Excel 2016 for Mac, Excel 2011 for Mac, Excel for iPhone, Excel Online, Excel for iPad, Excel for Android Mobiles, and Excel for Android tablets.
3 Uses of VBA FileDateTime Function in Excel
In Excel, the use of the VBA FileDateTime function is frequent while working with time-related datasets. Let’s take a glimpse at 3 uses of VBA FileDateTime in Excel:
1. Detect Last Modified Time of Folders of a Particular Drive Using FileDateTime Function
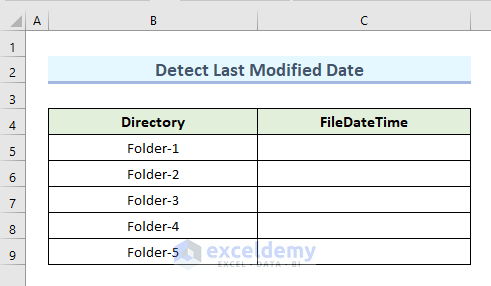
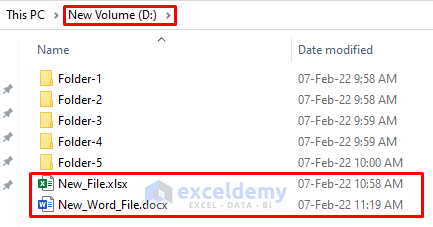
First and foremost, we will use the FileDateTime function to detect the modification date of folders in a particular drive. In the following image, we can see that Drive D contains 5 Folders. Besides we can see the last modification of these folders also. So, we will identify the last modification date of these folders in an excel file with the VBA FileDate Function.
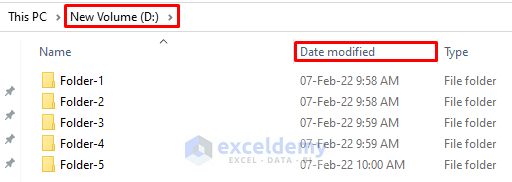
So, we will identify the last modification date of these folders in an excel file with the VBA FileDate Function. In the following dataset, we have a column “Directory” which contains the name of folders in Drive D. We will extract the last modification date of these folders in the FileDateTime column. So, take a look at the steps to see how we can use this function for performing this action.
STEPS:
- Firstly, from the Developer tab select Visual Basic.

- Next, from the Insert tab select the option Module.

- Now, we can see a new blank VBA Module.
- After that, Insert the following code in the blank Module:
Sub Directory()
Dim NameOfFile    As String
Dim FullName    As String
Dim rng         As Range
Dim i           As Integer
Set rng = Range("B4")
NameOfFile = Dir("D:\", vbDirectory)
i = 1
Do
FullName = "D:\" & NameOfFile
rng.Offset(i, 0) = NameOfFile
rng.Offset(i, 1) = FileDateTime(FullName)
NameOfFile = Dir
If NameOfFile = "" Then Exit Do
i = i + 1
Loop
End Sub- Then, press the F5 key or click on Run.

- Finally, we can view the last modification dates for all the folders in Column C.

Read More: How to Use VBA TimeSerial in Excel (3 Examples)
2. Use the VBA FileDateTime Function to Identify the Last Modification Date of a Distinct File
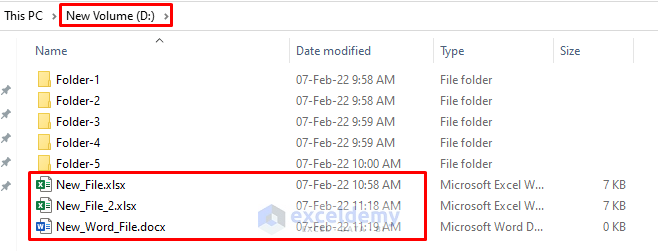
In this method, we will use the VBA FileDateTime function to identify the last modification date of files in a folder or drive. For this example, have added three files with our previous folders in Drive D.
So, we will specify the last modification date of these files in an excel file like the following one. Let’s see the step-by-step action of how we can do this.
STEPS:
- First, open the VBA Module.
- Next, insert the following code:
Sub Detect_File()
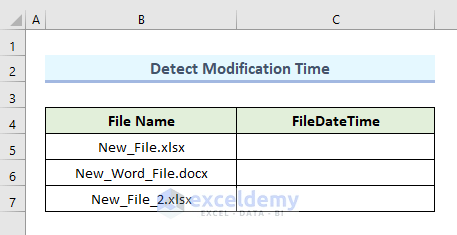
Range("C5").Value = FileDateTime("D:New_File.xlsx")
End Sub- Then, click on Run or press F5 to run the code.

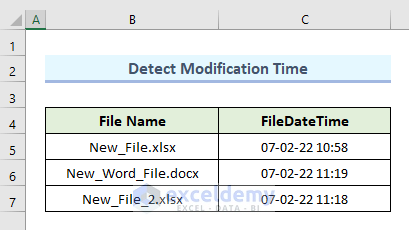
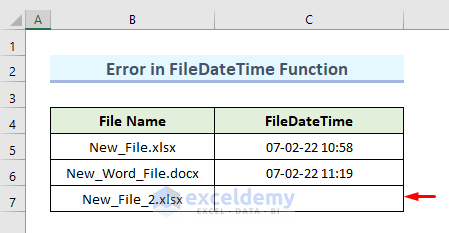
- So, we get the last modification date & time for the file “New_File.xlsx”.
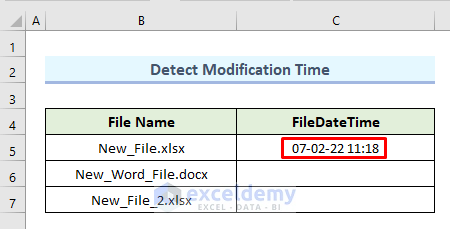
- After that, we will specify the last modification date of the file “New_Word_File.docx”.
- In order to do this in the VBA Code Module, insert the following code:
Sub Detect_File()
Range("C6").Value = FileDateTime("D:New_Word_File.docx")
End Sub- Here, we can see that we have only changed the file name and range value from C5 to The rest of the code is the same as the previous one.
- Click on Run.

- As a result, we get the last modification date & time for the file “New_Word_File.docx”.

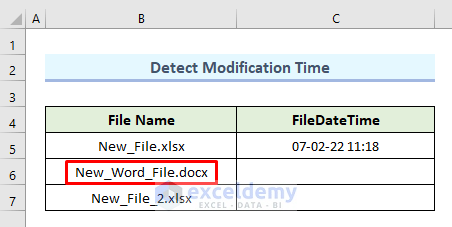
- Finally, we will identify the last modification date & time for the file “New_File_2.xlsx” in cell C7. To do this we will change the file name and the range value to C7.
Read More: How to Use VBA MkDir Function in Excel (6 Examples)
Similar Readings:
- How to Use Log Function in Excel VBA (5 Suitable Examples)
- Use VBA Abs Function in Excel (9 Examples)
- How to Use Concatenate in Excel VBA (4 Methods)
- Use VBA Randomize Function in Excel (5 Examples)
- How to Use VBA Round Function in Excel (6 Quick Uses)
3. Error While Using VBA FileDateTime Function
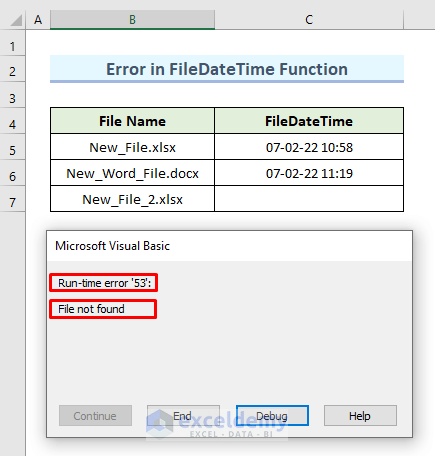
Sometimes we face an error while using the VBA FileDateTime Function. This function returns an error when the path for a specified file is not available. To illustrate this error process clearly, we have deleted the file “New_File_2.xlsx” from Drive D.
Now like the previous method, we will indicate the last modification date & time of the file “New_File_2.xlsx” cell C7. But if we notice the file is no longer available in Drive D. So, let’s see what happens when we try to indicate this file’s last modification date step by step.
STEPS:
- In the beginning, open the VBA Module and insert the following code:
Sub Detect_File()
Range("C7").Value = FileDateTime("D:New_File_2.xlsx")
End Sub- Now, click on Run.

- In the end, we get an error. The name of the error is “Run-time error ‘53’”. We will see a message “File not found” in the message box. This happens because the file is not available in Drive D.
Read More: How to Use VBA IsError Function (6 Examples)
Conclusion
The above article gives you a brief idea about the VBA FileDate Function. To practice yourself, download the practice workbook added with this article. If you feel any confusion just leave a comment in the below box. We will try to answer as soon as possible. Stay tuned with us for more interesting solutions to Microsoft Excel problems.
Related Articles
- How to Use VBA RTrim Function (5 Suitable Examples)
- Use VBA While Wend Statement in Excel (4 Examples)
- How to Use VBA Str Function in Excel (4 Examples)
- Use IsNull Function in Excel VBA (5 Examples)
- How to Use VBA StrComp in Excel (5 Common Examples)

