Creating a Dynamic Email Generator with Templates in Excel
Email is one of the most powerful tools for communication. Automating email generation can save time and ensure consistency in communication. Excel VBA can create a dynamic email generator that allows you to automatically generate personalized emails from templates.
In this article, we’ll create a dynamic email generator with templates in Excel.
Prerequisites
- Microsoft Excel (2016 or newer).
- Basic understanding of Excel.
- Access to the VBA editor (Developer tab enabled).
Step 1: Setting Up Your Excel Workbook
Create the Data Sheet
- Add a new sheet named Data.
- Create columns for your recipient information:
- First Name
- Last Name
- Company
- Department
- Role
- Meeting Topic
- Action Item
- Sender Name

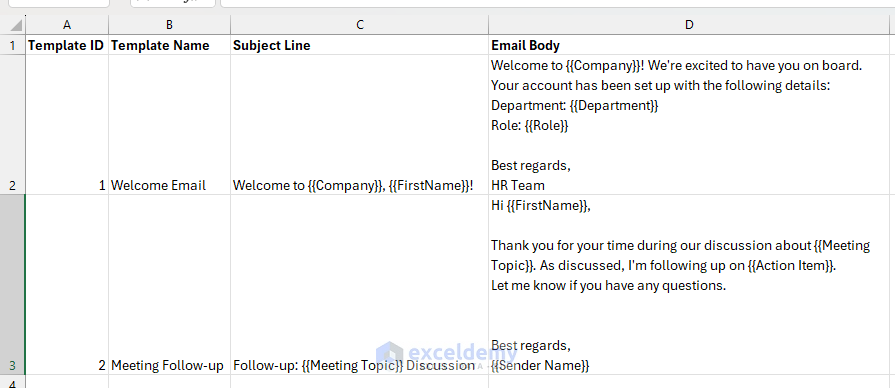
Create the Template Sheet
- Create another sheet named Template.
- Create the following columns:
- Template ID
- Template Name
- Subject Line
- Email Body
Step 2: Creating Email Templates
Create an email template that dynamically inserts values using placeholders such as {{FirstName}}, {{Company}}, {{Department}}, {{Role}}, etc.
Template 1:
Let’s create a template for automated onboarding emails.
Dear {{FirstName}},

Welcome to {{Company}}! We're excited to have you on board.
Your account has been set up with the following details:

Department: {{Department}}
Role: {{Role}}

Best regards,
HR Team
This template is used for automated onboarding emails, where actual values replace the placeholders before sending, ensuring a personalized message for each recipient.
Explanation:
- {{FirstName}}: Placeholder for the employee’s first name.
- {{Company}}: Placeholder for the company’s name.
- {{Department}}: Placeholder for the department where the new employee is assigned.
- {{Role}}: Placeholder for the employee’s job role.
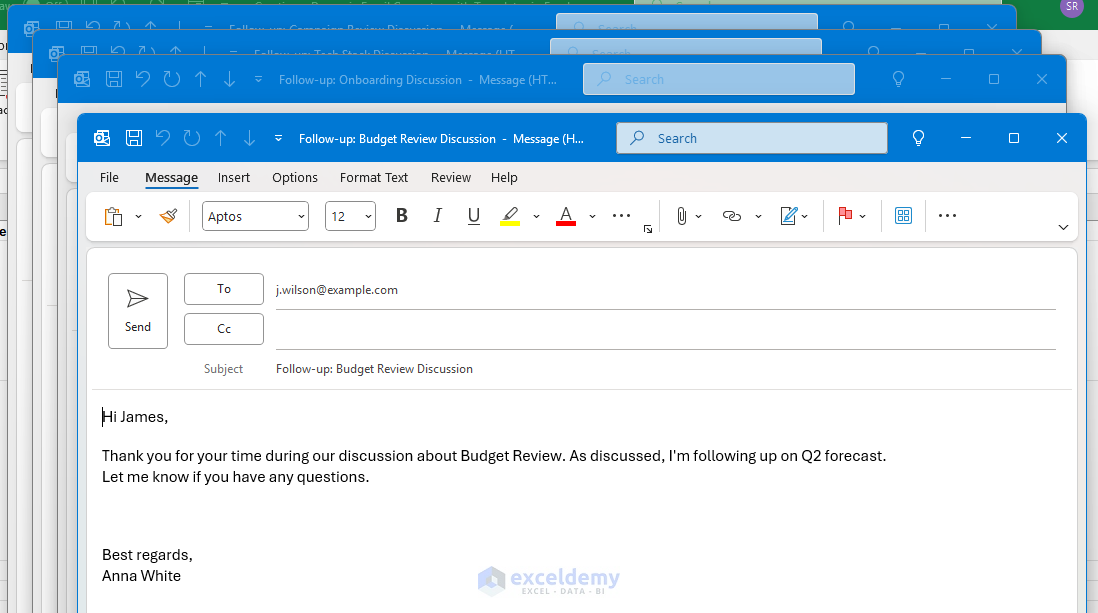
Template 2:
We created another template for post-meeting communications.
Hi {{FirstName}},

Thank you for your time during our discussion about {{Meeting Topic}}. As discussed, I'm following up on {{Action Item}}.
Let me know if you have any questions.

Best regards,
{{Sender Name}}
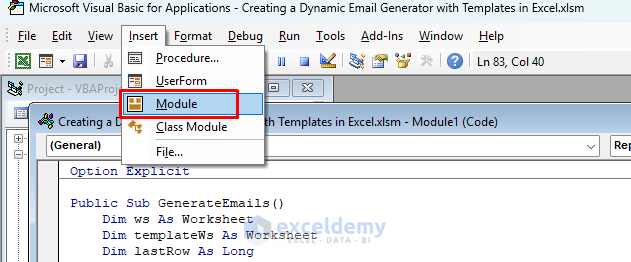
Step 3: Insert the VBA Code
To open the VBA editor:
- Go to the Developer tab >> select Visual Basic.
- Click Insert >> select Module.
- Copy and paste the following code:
Option Explicit

Public Sub GenerateEmails()
    Dim ws As Worksheet
    Dim templateWs As Worksheet
    Dim lastRow As Long
    Dim i As Long
    Dim emailBody As String
    Dim subjectLine As String
    Dim templateID As Long

    ' Set references to worksheets
    Set ws = ThisWorkbook.Sheets("Data")
    Set templateWs = ThisWorkbook.Sheets("Templates")

    ' Find last row with data
    lastRow = ws.Cells(ws.Rows.Count, "A").End(xlUp).Row

    ' Get template ID from user
    templateID = InputBox("Enter the Template ID number:", "Select Template")

    ' Get template text
    subjectLine = GetTemplate("Subject_Line", templateID)
    emailBody = GetTemplate("Email_Body", templateID)

    ' Convert special characters to proper line breaks
    emailBody = Replace(emailBody, "\n", vbNewLine)

    ' Create Outlook items
    Dim outlookApp As Object
    Dim emailItem As Object

    Set outlookApp = CreateObject("Outlook.Application")
    ' Loop through each row of data
    For i = 2 To lastRow
        ' Create new email
        Set emailItem = outlookApp.CreateItem(0)

        With emailItem
            ' Replace placeholders with actual data
            .Subject = ReplaceFields(subjectLine, i, ws)
            .Body = ReplaceFields(emailBody, i, ws)  ' Changed from .HTMLBody to .Body
            .To = ws.Cells(i, 3).Value  ' Email address in column C
            .Display  ' Display email (change to .Send to send automatically)
        End With
    Next i

    Set outlookApp = Nothing
End Sub

Private Function GetTemplate(field As String, templateID As Long) As String
    Dim templateWs As Worksheet
    Dim templateRow As Range

    Set templateWs = ThisWorkbook.Sheets("Templates")

    ' Find the template row
    Set templateRow = templateWs.Columns(1).Find(What:=templateID, LookIn:=xlValues, LookAt:=xlWhole)

    If Not templateRow Is Nothing Then
        Select Case field
            Case "Subject_Line"
                GetTemplate = templateWs.Cells(templateRow.Row, 3).Value
            Case "Email_Body"
                GetTemplate = templateWs.Cells(templateRow.Row, 4).Value
        End Select
    End If
End Function

Private Function ReplaceFields(text As String, rowNum As Long, ws As Worksheet) As String
    Dim result As String
    result = text
    ' Replace all field placeholders with actual data
    result = Replace(result, "{{FirstName}}", ws.Cells(rowNum, 1).Value)
    result = Replace(result, "{{LastName}}", ws.Cells(rowNum, 2).Value)
    result = Replace(result, "{{Company}}", ws.Cells(rowNum, 4).Value)
    result = Replace(result, "{{Department}}", ws.Cells(rowNum, 5).Value)
    result = Replace(result, "{{Role}}", ws.Cells(rowNum, 6).Value)
    result = Replace(result, "{{Meeting Topic}}", ws.Cells(rowNum, 7).Value)
    result = Replace(result, "{{Action Item}}", ws.Cells(rowNum, 8).Value)
    result = Replace(result, "{{Sender Name}}", ws.Cells(rowNum, 9).Value)

    ReplaceFields = result
End Function
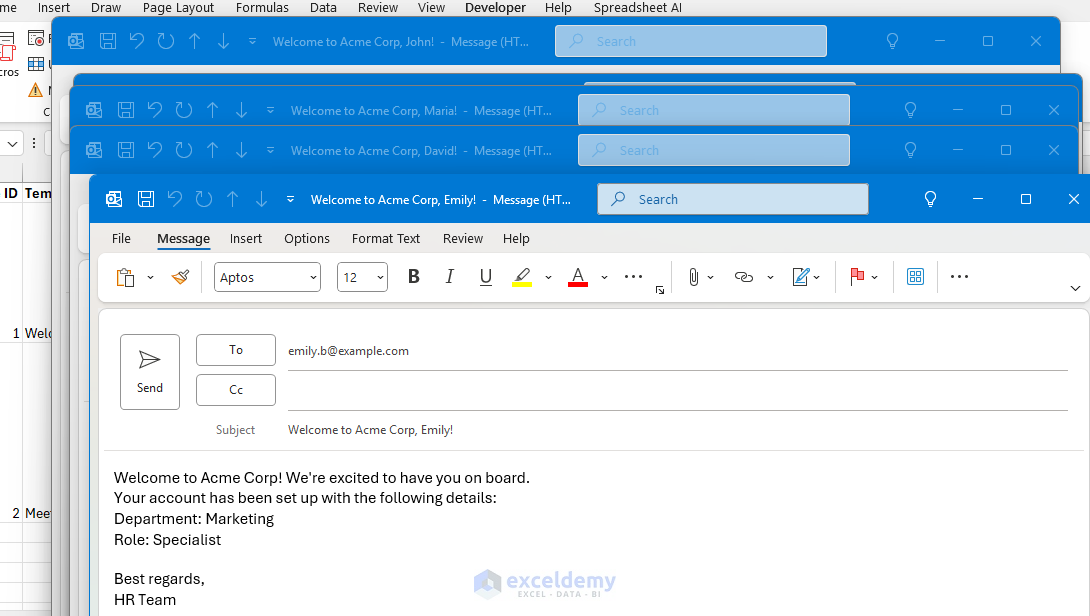
Step 4: Run the Email Generator
- On the Developer tab >> click Macros.
- Select GenerateEmails >> click Run.

- In the Message Box >> enter the Template ID: 1.
- It will send all the mail following template 1.
- Again Run the code.
- In the Message Box >> enter Template ID: 2.

It will send all the mail following template 2.
- Review the generated emails before sending them.
- If review is not required, use .Send property instead of .Display to send all the emails.
Customization Tips
Adding New Placeholder Fields:
- Add a new column in the Data sheet.
- Update the ReplaceFields function in the VBA code to include the new field.
- Add the new placeholder to your email templates using the format {{FieldName}}.
HTML Formatting:
You can include HTML formatting in your email templates:
<p style="color: blue;">This text will be blue</p>
<strong>This text will be bold</strong>
Conclusion
This tutorial will help you set up dynamic email generation in Excel with predefined templates and VBA automation. You can use these templates for business communications, client follow-ups, and automated reminders. This email generator will work as a foundation, you can customize it based on your specific requirements. Just create the template, update the data sheet, and placeholder in the VBA code. Remember to test thoroughly before using it in production environments.
Get FREE Advanced Excel Exercises with Solutions!
