In this article, we will demonstrate 3 practical uses of Excel’s Text to Columns feature: splitting the columns of a table in various ways, extracting the username and domain from email addresses, and using the Advanced option of the Text to Columns Wizard to convert text with trailing minus signs to negative numbers.
Example 1 – Splitting Columns Using the Text to Columns Feature
Best practice when designing a database in Excel is for every column to contain just one field of data. This allows the greatest flexibility when filtering, sorting and analyzing it. When the cells in a column contain multiple fields of information, such as a Full Name consisting of First, Middle and Last Names, the Text to Columns feature is an invaluable tool in separating the data into different columns.
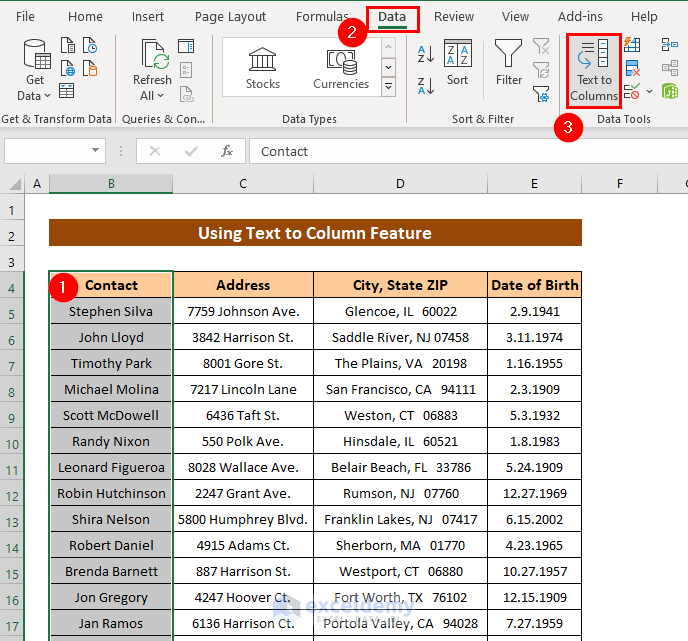
Consider the following dataset, containing the personal details of some people (their Contact Name, Address, Date of Birth, and so on).

The structure of the dataset presents several limitations to our ability to manipulate the data.
For example, suppose we wanted to arrange the names alphabetically by surname. This is complicated with first name and surname stored together in the same column.
Or suppose we wanted to know how many people from Illinois are in the list. Difficult when the whole address is in one column.
How many 20-30 year-olds do we have? Same problem.
The solution is to split the data into separate columns, from where it’ll be much easier to manipulate as desired.
Excel offers 3 tools for splitting the data in a column into other columns:
- The Text to Columns feature,
- The Flash Fill feature (available from Excel 2013 onwards).
- Excel formulas.
We will be focusing on the Text to Columns feature here.
1.1 – Splitting the Names
Let’s first split the names in the Contact column.
Steps:
- Select the whole column, either with the mouse or by pressing CTRL + SHIFT + Down Arrow.
- Go to the Data tab and from the Data Tools group, click on Text to Columns.
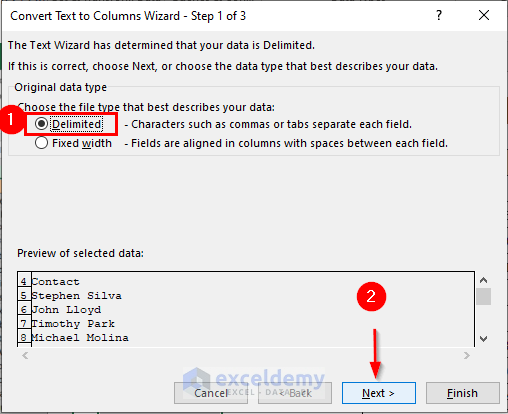
The Convert Text to Columns Wizard box will appear, showing Step 1 of 3.
- By default, the Delimited radio button is selected. Click Next.
We enter Step 2 of 3, where we choose the Delimiters for splitting our data.
- Select the Space.
- In the data preview, scroll down to check the separated data is correct.
- Click Next.

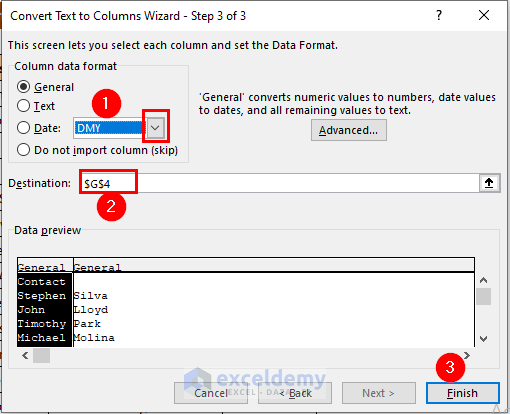
- Set Column data format to General, which should by default be selected.
- Select the Destination field for the output (cell G4).
- Click Finish.
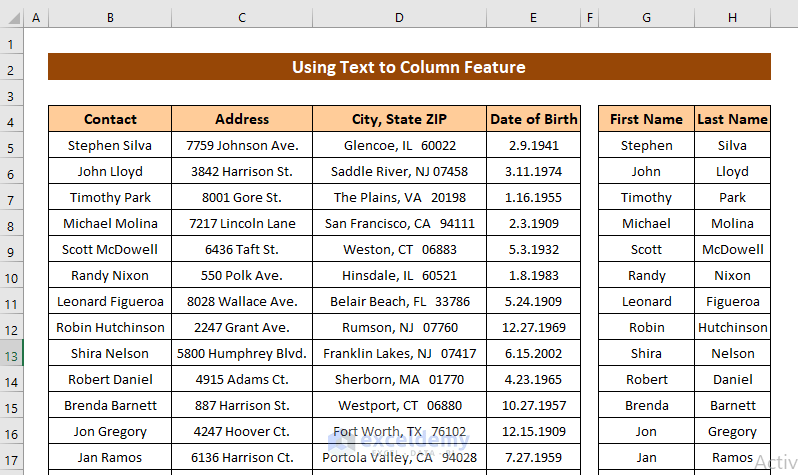
The Contact column is split into First Name and Last Name columns.
Read More: How to Split Text to Columns Automatically with Formula in Excel
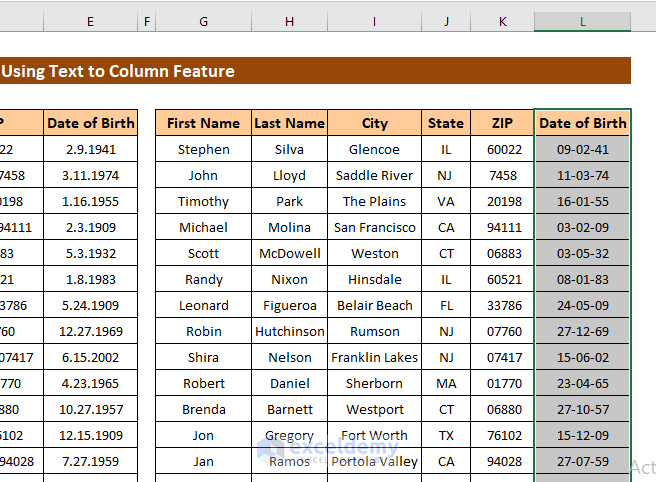
1.2 – Splitting Addresses
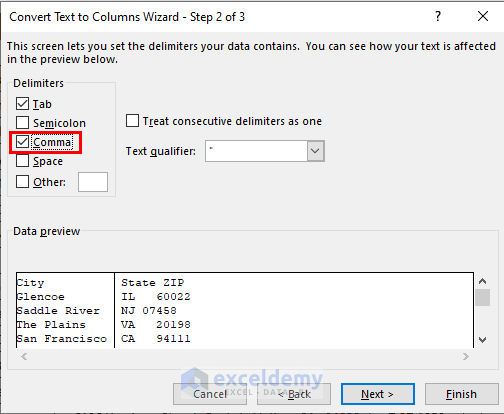
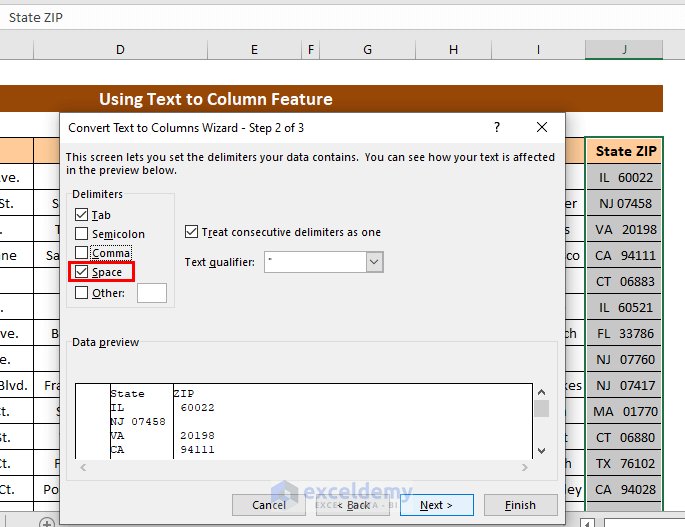
Now let’s separate the City State and ZIP column into its components: City, State, and Zip. Since this column has two types of delimiter (the comma and the space), we’ll have to separate it in two stages.
Steps:
- Open the Wizard following Example 1.1 and separate the column using the Comma delimiter.
- Click Next.
The column is divided into two parts.
- Name the first column City and the second State Zip.
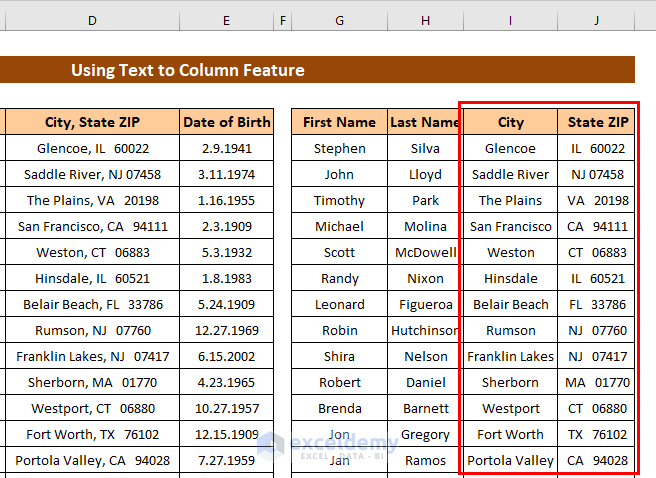
- Then using the same process, divide the State Zip column using the Space delimiter.
1.3 – Converting Text to Dates
Next we’ll convert the Date of Birth column (which consists of the Month, then the Day, then the Year) into a Date format.
Steps:
- Select the Date of Birth column and open the Wizard following Example 1.1.
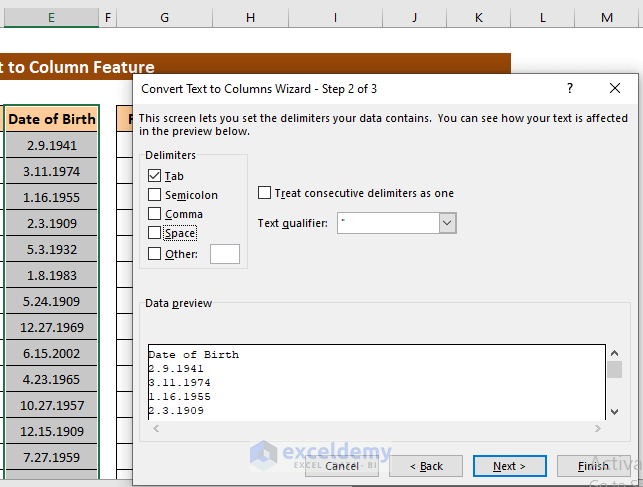
- For the Column data format, select Date and then the MDY option from the drop-down.
- Change the Destination cell to L4.
- Click the Finish button.
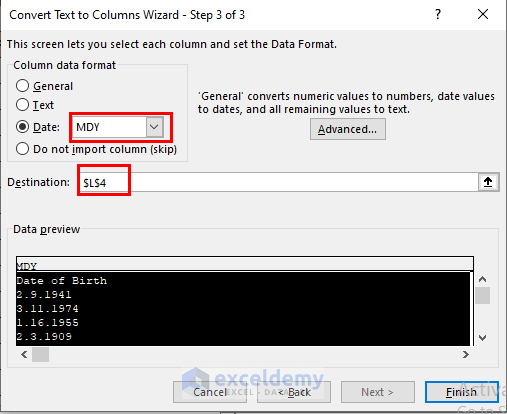
The column is converted into a Date format.
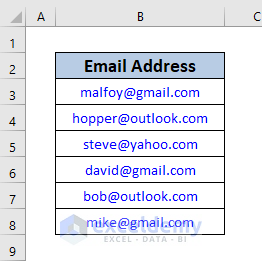
Example 2 – Extracting Domains and Usernames from Email Addresses
The Text to Column feature provides an easy option for splitting Email Addresses into their component Usernames and Domains.
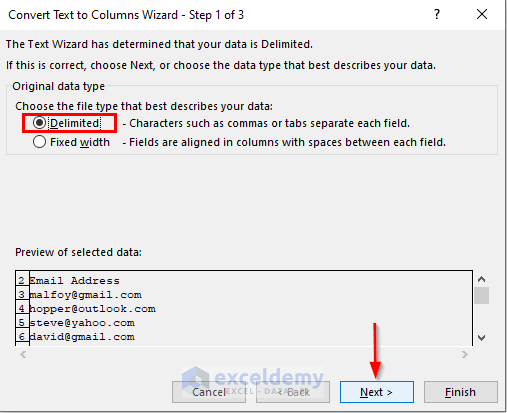
Steps:
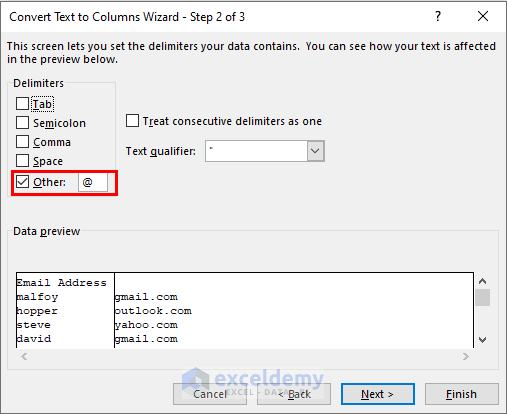
- Select the email addresses to split and open the Convert Text to Columns Wizard as in Example 1.1.
- In Step 1, select Delimited and click Next.
- In Step 2, tick the Other option and enter @ just beside it.
- Click Next.
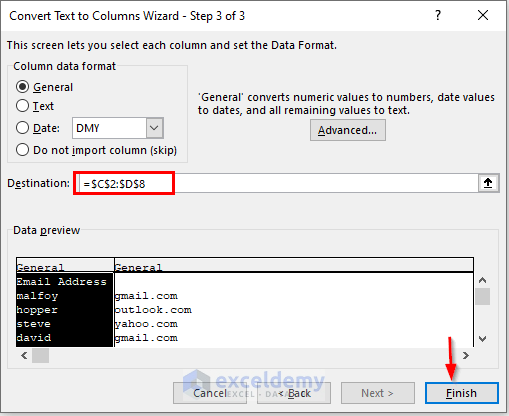
- In Step 3, set the Destination to the range C2:D8 and click Finish.
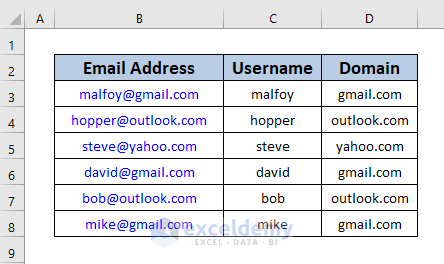
The Usernames and Domains are separated into two columns.
Read More: How to Convert Text to Columns in Excel with Multiple Spaces
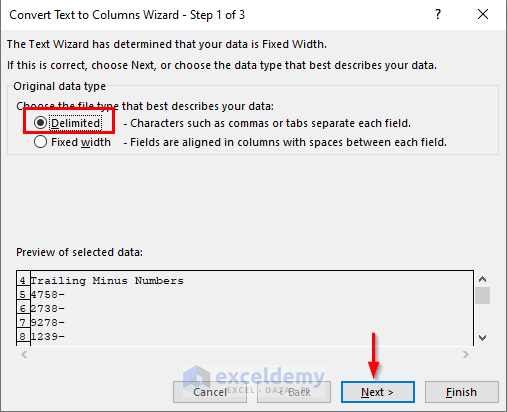
Example 3 – Using the Text to Columns Advanced Option for Negative Numbers
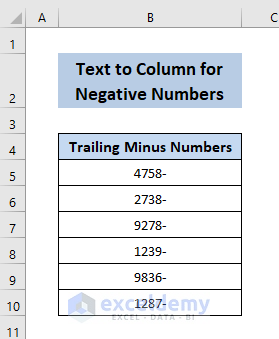
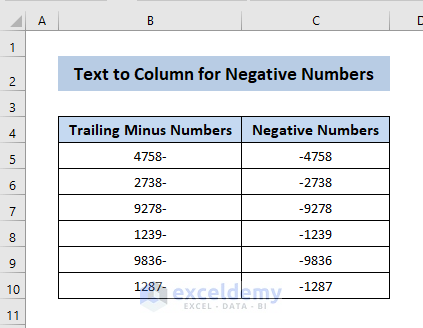
Suppose we have numbers in a column with a trailing minus sign. Let’s convert them into negative numbers.
Steps:
- Select the cells to convert and open the wizard like in Example 1.1.
- In Step 1 of the Wizard, select Delimited and click Next.
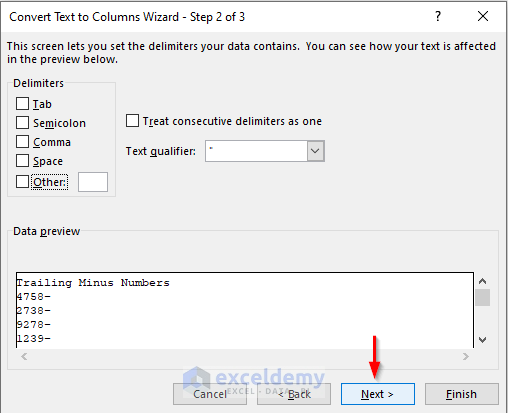
- In Step 2, in the Delimiters section, select nothing (clear all ticks) and click Next.
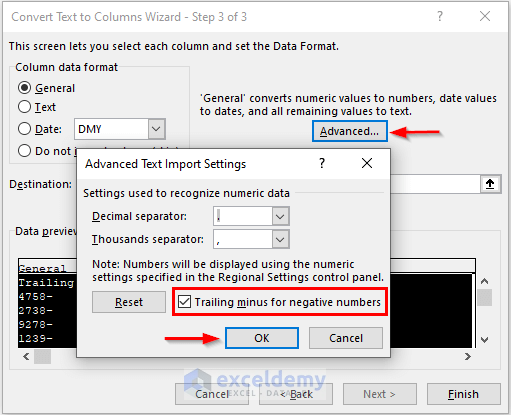
- In Step 3, click the Advanced option.
- In the Advanced Text Import Settings box that opens, tick Trailing minus for negative numbers and click OK.
- Set the Destination and click Finish.
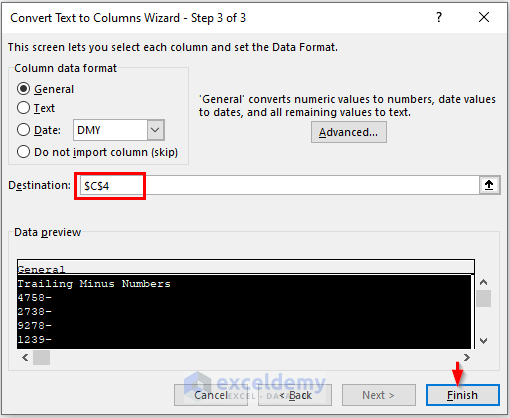
We have negative numbers.
Read More: How to Convert Text to Columns with Multiple Delimiters in Excel
Download Practice Workbook
Related Articles
- Excel Text to Columns Not Working
- How to Use Line Break as Delimiter in Excel Text to Columns
- How to Convert Column to Text with Delimiter in Excel
- [Fixed!] Excel Text to Columns Is Deleting Data
- How to Undo Text to Columns in Excel
- How to Convert Text to Columns Without Overwriting in Excel
<< Go Back to Splitting Text | Split in Excel | Learn Excel
Get FREE Advanced Excel Exercises with Solutions!
