In this article, we will demonstrate some easy methods to sort data in ascending order in Excel. Sometimes it’s difficult to find data of interest from a random dataset. Sorting in ascending or descending order of the data can be helpful to search our desired values in an Excel sheet.
For example, let’s say, we have sales information about some products in the dataset. We want to know how the sales change for different products. If we sort the dataset based on sales in ascending order, we can find out the lowest sales on top and gradually increasing amount in the lower cells. This helps us to understand the change in sales amount whether it’s linear or exponential.
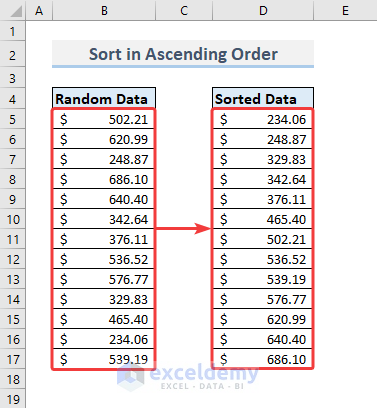
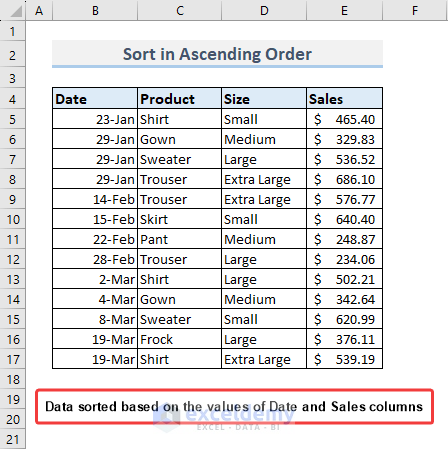
In the following image, you will have a general idea on how to sort in ascending order in Excel and how it affects the data.
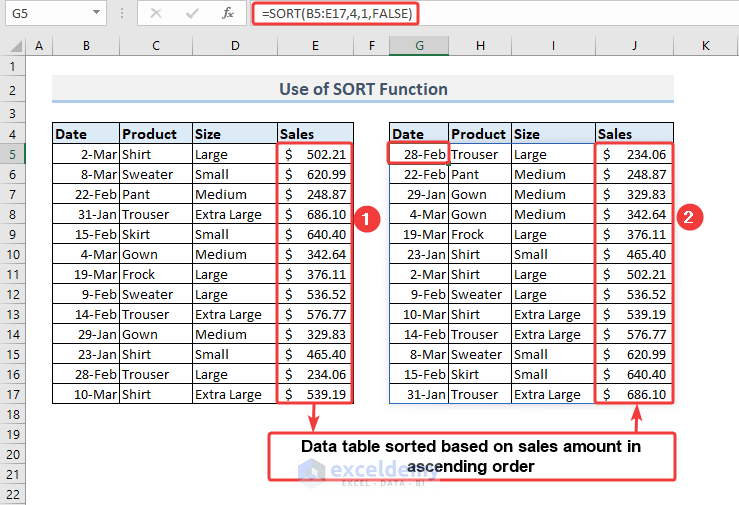
Here, the sales data of different products are sorted using the Sort command.
How to Sort in Ascending Order in Excel (6 Methods)
The Sort feature in Excel can operate differently based on commands. And today we’re focusing on sorting data in ascending order.
In the following example we have some random numbers in a column. After sorting in ascending order, it will look like the following picture:
But when the values have adjacent data or information, the sort command automatically rearranges those data.
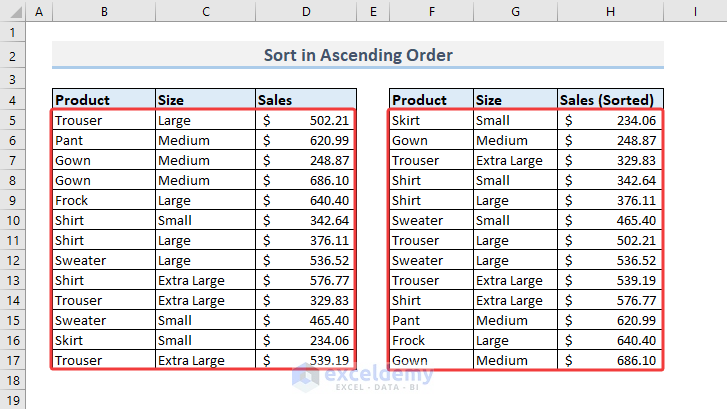
The dataset on the left contains the sales of different products randomly while on the right, the dataset contains the sales amount sorted. But you can also see that the sorting here isn’t only applied to the Sales amount, it also rearranges the corresponding data around the sales amount like the size and product criteria.
Read More: How to Add Sort Button in Excel
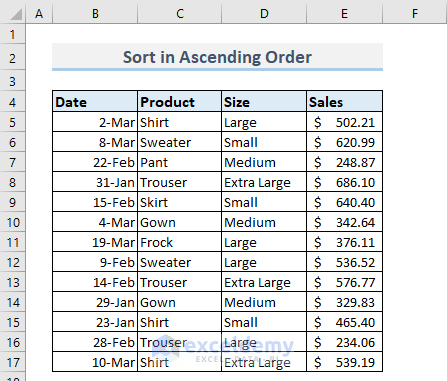
Let’s take a closer look at the sales data for various product types on specific dates within the dataset.
Method 1 – Applying the Sort Feature to Sort Data in Ascending Order
Let’s discuss sorting numbers or values using the Sort feature in Excel. There are two possible ways to sort data within a dataset:
1.1. Sort on Single Column
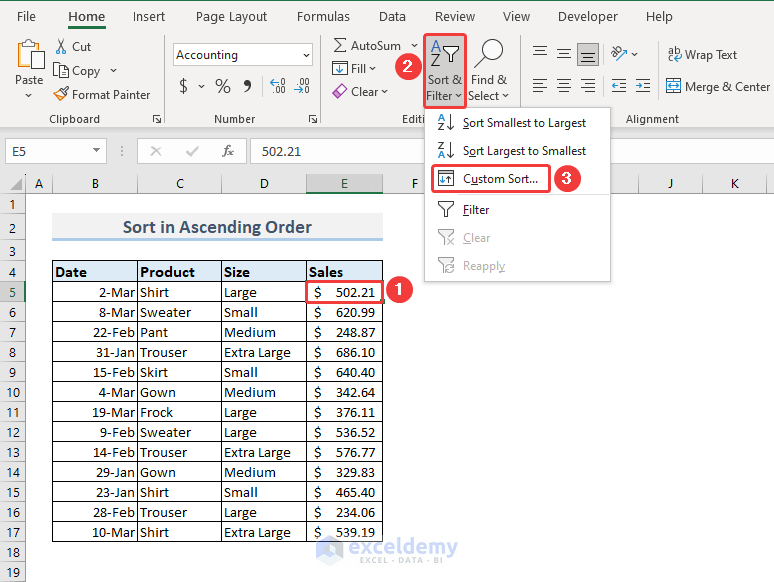
- First, select any cell from the column that you want to sort.
- Next, navigate to the Home tab, click on Sort & Filter, and choose Sort Smallest to Largest.
- As a result, the entire table will be sorted based on the sales values.
It’s worth noting that while it’s not common practice to sort only the numbers and leave other corresponding data unchanged, there are cases where this approach is necessary. In this scenario, we’re sorting only a single column.
In an alternative scenario, we can apply the sorting feature to a specific range of numbers as follows:
- Select the Data Range: Begin by choosing the data range (E5:E17).
- Sort Smallest to Largest: Navigate to the Home tab and click on Sort & Filter. From the dropdown menu, select Sort Smallest to Largest.
- Confirmation Prompt: A warning box will appear, asking what action you want to take with this sorting option. To sort only the E5:E17 range, select Continue with the current selection and then click the Sort
By following these steps, your selected data will be sorted without affecting other data points.
1.2. Sort Multiple Columns (with Sort Priority)
We can apply the sorting feature to sorting multiple columns.
We will sort by dates and sales amount.
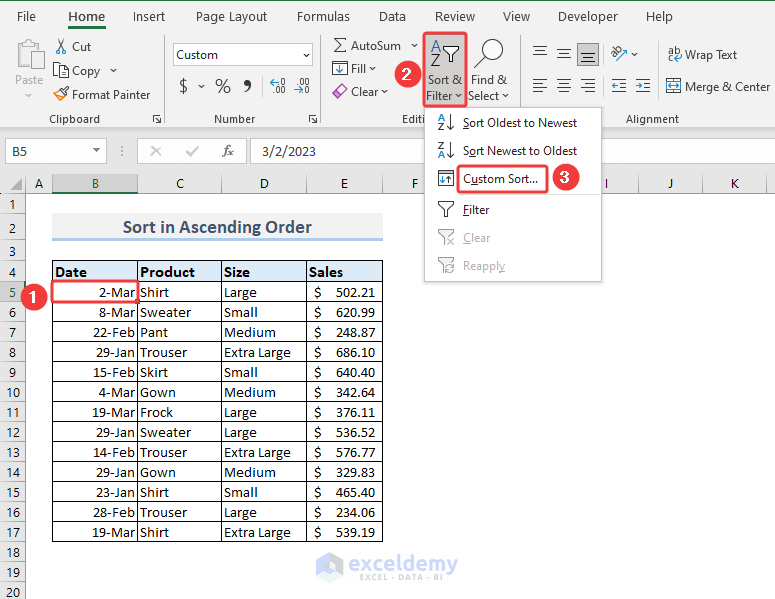
- Begin by selecting any cell within the Date column.
- Next, navigate to the Sort & Filter option and choose Custom Sort.
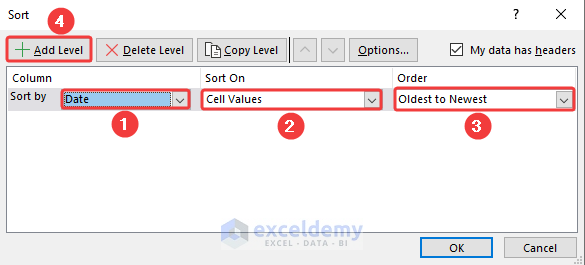
- The Sort dialog box will appear. From the drop-down menus, select Date for the Sort by section.
- Ensure that you set the Sort On option to Cell Values and the order to Oldest to Newest.
- Click on Add Level.

- Similarly, define the sorting parameters for the Sales column and click OK.
Now your dataset is sorted by both dates and sales, allowing you to efficiently sort data across multiple columns. Additionally, you can also find the Sort feature in the Data tab.
Read More: How to Undo Sort in Excel
Method 2 – Sorting Dates from the Context Menu in Ascending Order
In addition to sorting numbers or currencies, we can also sort dates in ascending order. In this section, we’ll utilize the Sort command from the Context Menu. Follow these steps:
- First, select any cell containing dates.
- Next, right-click on that cell and choose Sort>> Sort Oldest to Newest.
After performing these steps, you’ll notice that the dates are now sorted from oldest to most recent, effectively representing an ascending order.
Read More: How to Sort Data by Value in Excel
Method 3 – Sort in Ascending Order Using the Custom Sort Feature
In this section, we’ll explore an essential sorting feature in Excel. While the basic sorting method allows us to arrange data based on the values in a single column or row, there’s another powerful tool: Custom Sort. This feature enables us to sort based on custom priorities.
Here are the step-by-step instructions:
- Select any cell within your dataset.
- Click on Sort & Filter, then choose Custom Sort. Alternatively, you can press Alt + D + S to open the Custom Sort dialog.

- Now, let’s say we want to sort our data by product sizes first, followed by ascending sales amounts. To achieve this:
- In the Sort by box, select the column heading for Size.
- Ensure that the Sort On option is set to Cell Values (which is the default setting).
- Choose Custom List from the Order
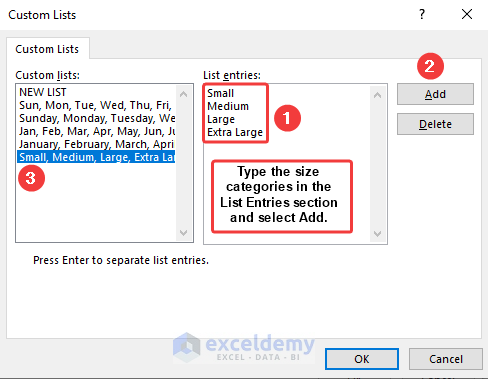
- In the Custom List dialog, input the size categories and click Add.
- Finally, click OK to apply the custom sorting order.
By following these steps, you’ll have your data organized according to your specified priorities.
To sort the Sales of products in ascending order according to their sizes (Small, Medium, Large, and Extra Large), follow the steps below:
- Click Add Level to add another sorting level.
- Now, select Sales in the Sort by
- Click OK. Ensure that the Sort On is set to Cell Values and the Order is set to Smallest to Largest.
Following these steps will help you achieve the desired sorting order.
Read More: How to Sort Alphanumeric Data in Excel
Method 4 – Using SORT Function to Sort in Ascending Order in Excel
Another straightforward method for sorting data in ascending order is to use the SORT function. Let’s walk through the steps:
To sort the dataset based on Sales amount,
- Select a cell where you want to display the sorted dataset. For instance, in this case, we’ll choose cell G5.
- Enter the following formula:
=SORT(B5:E17,4,1,FALSE)
- In this formula:
- B5:E17 represents the base data range.
- The number 4 indicates the column number of the selected data range (which corresponds to the Sales column).
- The values in the Sales column will be sorted in ascending order.
- We’re sorting the data by rows, so we set the by_col argument to FALSE.
- All the methods described above are static. However, by using formulas and an Excel table, we can make this process dynamic.
Let’s convert the dataset into a table. Follow these steps (not shown here):
- Select the data range (for this case, it’s B4:E17).
- Press Ctrl + T to create an Excel table and click OK.
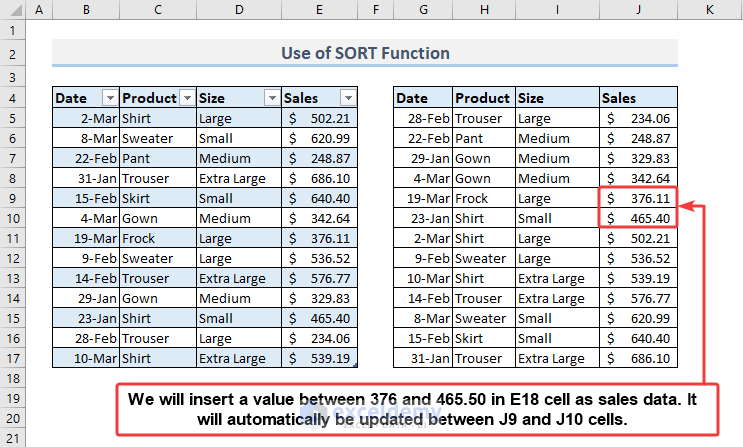
- Now, suppose we want to insert a new entry in the table. Let’s say the sales amount in cell E18 falls between 376 and 50. The table should automatically sort this entry between cells J9 and J10 within the range created by the SORT function.
Method 5 – Sorting Filtered Data in Ascending Order
In this section, we’ll explore how to filter and sort data based on specific values. Let’s walk through the process step by step:
- Select the column heading you want to work with.
- Press Ctrl + Shift + L to activate the filter dropdowns.
- Uncheck the products you want to exclude from the dataset. This will filter out the unwanted data.
- Now, click the drop-down icon next to the column heading labeled ‘Sales’.
- Choose Sort Smallest to Largest. This command will arrange the filtered data in ascending order.
By following these steps, you can easily sort filtered data in ascending order within Excel.
Read More: How to Sort by Color in Excel
Method 6 – How to Sort Row in Ascending Order in Excel
In addition to sorting columns, you can also sort data within a single row.
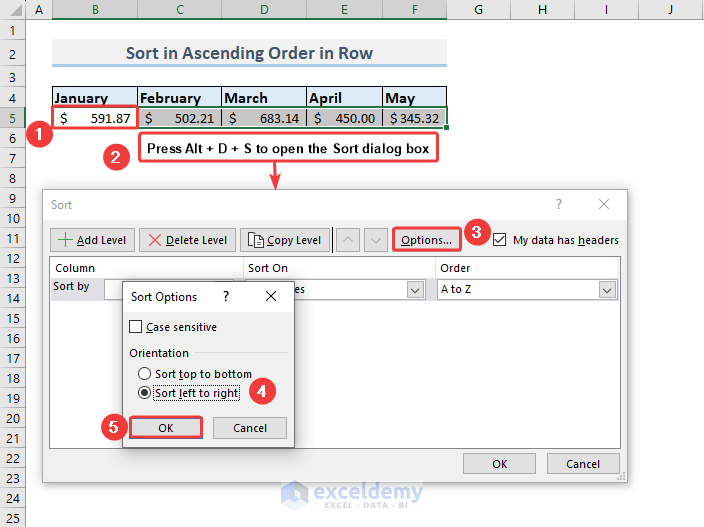
Let’s say you have a dataset with overall sales data across different months. If you want to arrange these sales figures in ascending order, follow these steps:
- Select any cell from the sales row (Row 5).
- Press Alt + D + S to open the Sort dialog box.
- In the Sort dialog box, click on Options to access the Sort Options dialog box.
- Choose Sort left to right and click OK.
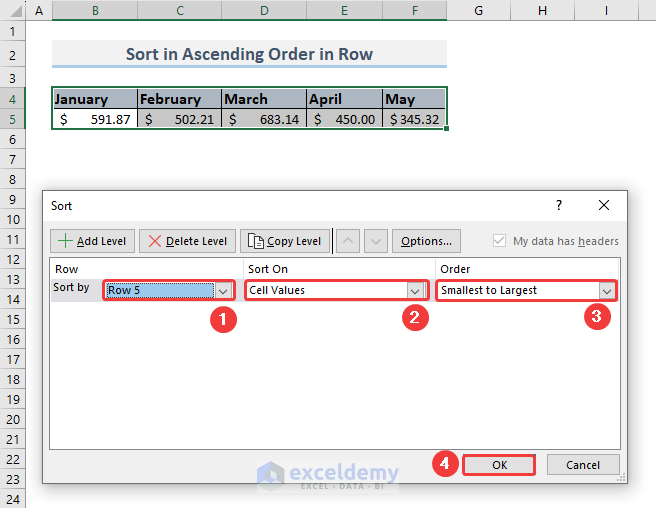
- Back in the Sort dialog box, select Row 5 from the drop-down menu in the Sort by section (since the sales data are in the 5th row).
- Ensure you’ve selected Cell Values and Smallest to Largest in the Sort On and Order sections, respectively.
- Finally, click OK.
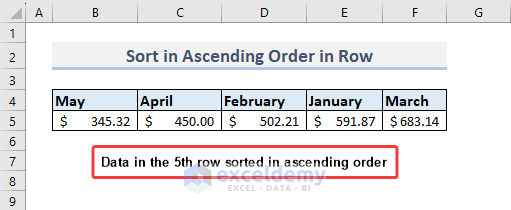
By following these steps, you’ll be able to sort data within a row in ascending order.
Read More: How to Use Excel Shortcut to Sort Data
How to Sort in Alphabetical Order in Excel?
In this scenario, you start by selecting a cell within a column that contains text. Next, navigate to the Sort & Filter menu and choose Sort A to Z. This command will arrange the dataset in alphabetical order based on the text content.
How to Sort Numbers Only Using Formula in Excel?
In this section, we’ll explore a formula that utilizes the SMALL and ROWS functions to sort numerical data in another column.
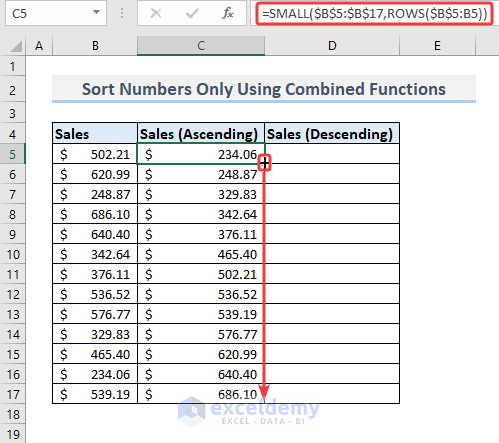
- Copy the formula below:
=SMALL($B$5:$B$17,ROWS($B$5:B5))
- Use the Fill Handle to apply this formula to the lower cells in the column. The Fill Handle will automatically adjust the references as you drag it down.
By doing this, you’ll have the data sorted in ascending order based on the values in the specified range.
To sort the data in descending order, use a different formula that combines the LARGE and ROWS functions:

- Copy the formula below:
=LARGE($B$5:$B$17,ROWS($B$5:B5))
- Drag the Fill Icon to AutoFill the lower cells with the sorted data.
The advantage of this approach is that you can store the sorted data in a separate column while keeping the original data intact. Additionally, this method works dynamically with tables if needed.
How to Sort Rows to Put the Blank Cells at the Bottom or the Top of your Dataset in Excel?
If your data contains blank cells, you can use the Sort command to arrange them at the bottom of your dataset.
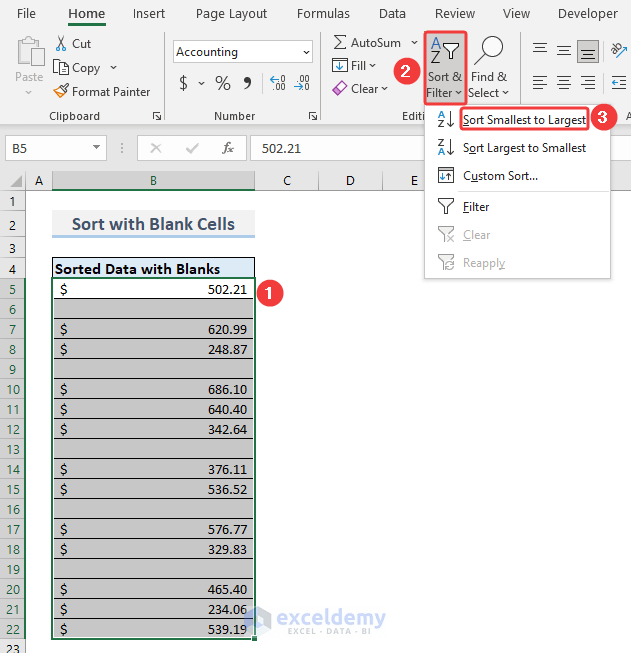
- Select the data range that you want to sort.
- Go to the Sort & Filter menu.
- Choose Sort Smallest to Largest.
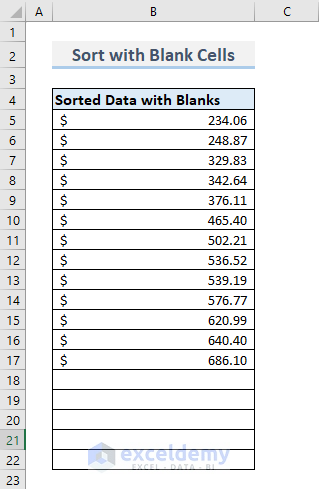
After sorting, the blank cells will be positioned at the bottom.
To sort data while keeping the blank cells at the top, follow these steps:
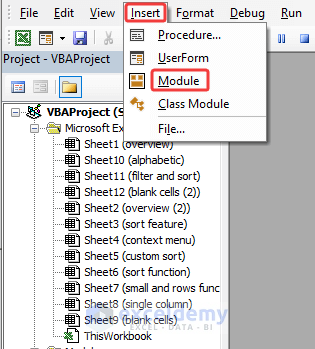
- Press Alt + F11 to open the Visual Basic for Applications (VBA) window.
- Click Insert and choose Module to create a new VBA module.
- Insert the following code into the module:

This VBA code will sort the specified data range while ensuring that blank cells remain at the top. Adjust the title and customize the code as needed for your specific workbook.
This operation is performed by various VBA properties like Range, OrderCustom, MatchCase etc.
An alternative method to sort the data range keeping the blank cells on top is as follows:
- Highlight the data range you want to sort.
- Press Alt + F8 to open the Macro window.
- Execute the Macro. An Input Box will appear.
- Choose the data range that contains blank cells.
- Click OK.
The command will sort the data range, ensuring that blank cells remain at the top.
Things to Remember
When sorting data in ascending order, consider the following potential issues:
- Number Data Stored as Text:
- Ensure that no numerical data is mistakenly stored as text. If this occurs, convert the data from text format to numeric.
- Leading Spaces in the Dataset:
- Leading spaces can interfere with sorting. To address this, use the TRIM function to remove any leading spaces from your dataset.
Download Practice Workbook
You can download the practice workbook from here:
Related Articles
- How to Remove Sort by Color in Excel
- Excel Sort and Ignore Blanks
- How to Sort Data in Excel Using Formula
- How to Remove Sort in Excel
<< Go Back to Sort in Excel | Learn Excel
Get FREE Advanced Excel Exercises with Solutions!
