Method 1 – Transfer Data from One Sheet to Another Using Range. Copy Method in Excel VBA
Steps:
- Hold the Alt + F11 keys in Excel, which opens the Microsoft Visual Basic Applications window.
- Click the Insert button and select Module from the menu to create a module.
![]()
- A new window will open and write the following VBA macro in the Module.
Sub CopyRangeToAnotherSheet()
 Sheets("Dataset").Range("B5:C10").Copy Destination:=Sheets("Range.Copy").Range("B5:C10")
End Sub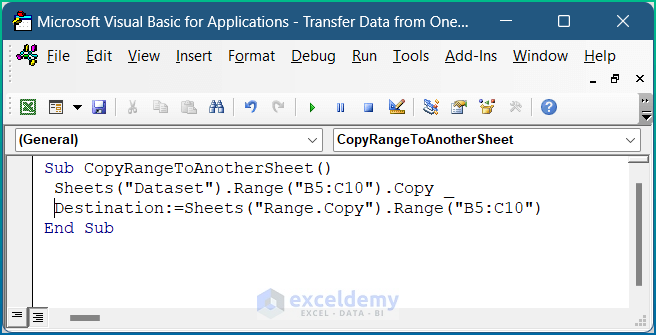
- Press the F5 key to run the VBA code.
![]()
Method 2 – Apply VBA Macro to Move Data from One Active Worksheet to Another in Excel
Steps:
- Open Visual Basic Editor from the Developer tab and Insert a Module in the code window.
- Copy the following code and paste it.
Sub CopyPasteToAnotherActiveSheet()
    'Copy data from source sheet
    Sheets("Dataset").Range("B5:C10").Copy
    'Activate destination sheet
    Sheets("Active Sheet to Another").Activate
    'Select destination range
    Range("B5:C10").Select
    'Paste in the destination
    ActiveSheet.Paste
    Application.CutCopyMode = False
End Sub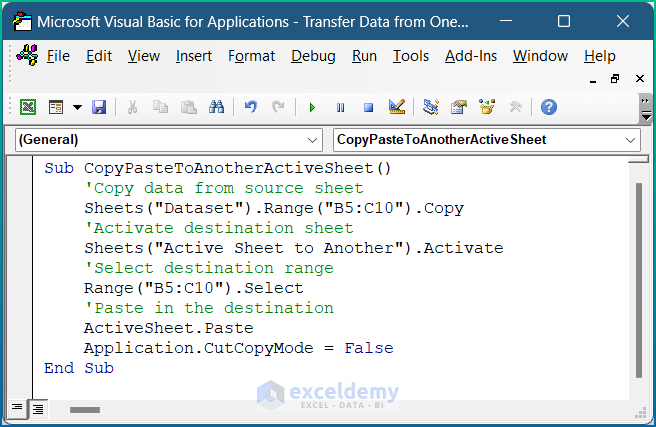
- Run the code shown above and see the result in the following image.
![]()
Method 3 – Paste Copied Data from One Worksheet to Another with PasteSpecial in Macro
Steps:
- Insert a Module in the code window.
- Copy the following code and paste it into the code window.
Sub CopyPasteSpecial()
    Worksheets("Dataset").Range("B5:C10").Copy
    Worksheets("PasteSpecial").Range("B5:C10").PasteSpecial
End Sub
- Run the macro in order to get your desired result.
![]()
Method 4 – Implement Macro to Duplicate Data from One Sheet to Another with USEDRANGE Property
Steps:
- Create a Module in the code window.
- Copy the code below and paste it into the code window.
Sub CopyWithUsedRange()
'Set variables
Dim wsSource As Worksheet
Dim wsTarget As Worksheet
'Set variables for source and destination sheets
Set wsSource = Worksheets("Dataset")
Set wsTarget = Worksheets("USEDRANGE")
'Copy data from the source and Paste in the destination
Call wsSource.UsedRange.Copy(wsTarget.Cells(2, 2))
End Sub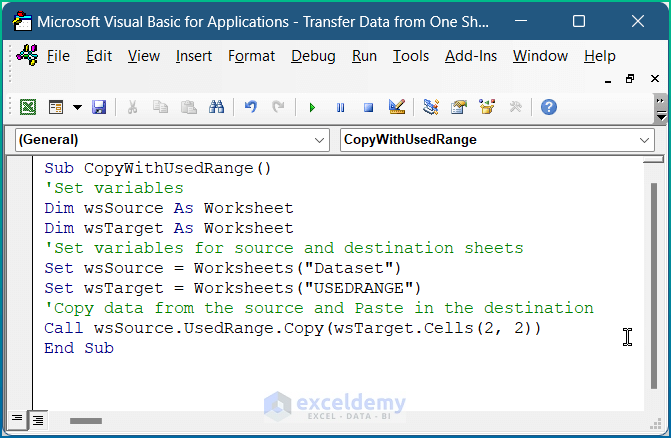
- Receive the final output if you run the VBA.
![]()
Method 5 – Transfer a Single Cell from One Worksheet to Another in Excel Through Macros
Steps:
- Open Visual Basic Editor from the Developer tab and insert a Module in the code window.
- In the code window, copy the following code and paste it.
Sub CopyPasteSingleRangeToAnotherSheet()
Worksheets("Dataset").Range("C5").Copy _
Worksheets("Transferring Single Cell").Range("C5")
End Sub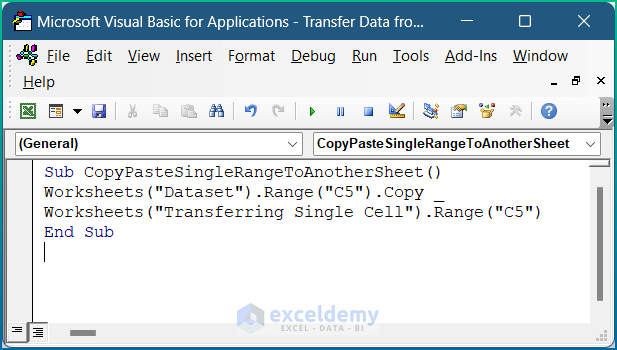
- Hit the Run button to run this code and notice the following image.
![]()
Method 6 – Apply VBA Macros to Move Specific Data from One Sheet to Another
Steps:
- Hold the Alt + F11 keys in Excel, which opens the VBA window.
- Click the Insert button and select Module from the menu to create a module.
- Write the following macro into the module.
Sub CopyPasteSelectedData()
'Set variables
Dim wsSource As Worksheet
Dim wsTarget As Worksheet
'Set variables for source and destination sheets
Set wsSource = Worksheets("Dataset")
Set wsTarget = Worksheets("Transferring Specific Data")
'Copy data from the source
wsSource.Range("B5:C7").Copy
'Paste data in the destination
Call wsTarget.Range("B5:B7").PasteSpecial(Paste:=xlPasteValues)
End Sub
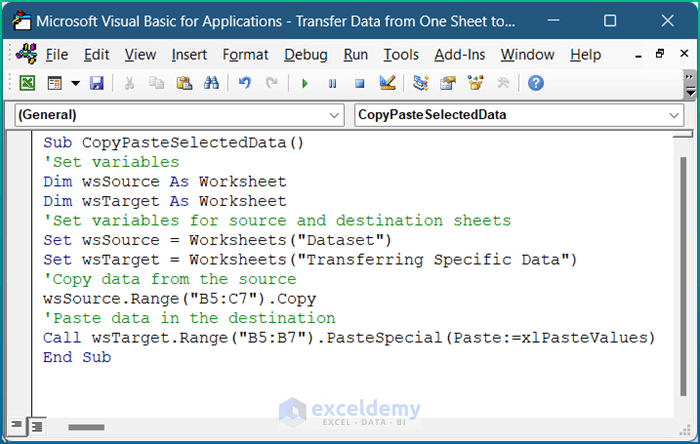
- Get a specific range of data if you run the code.
![]()
Method 7 – Transfer Data from One Sheet to Another in Different Workbooks
Steps:
- Open Visual Basic Editor from the Developer tab and insert a Module in the code window.
- Copy the following code and paste it into the code window.
Sub CopyOneFromAnotherSavedWorkbook()
    Workbooks("Transfer Data from One Sheet to another Using Macros.xlsm") _
    .Worksheets("Transfer to Different Workbooks").Range("B2:C10").Copy _
    Workbooks("Destination Workbook.xlsx").Worksheets("Sheet1").Range("B2")
End Sub
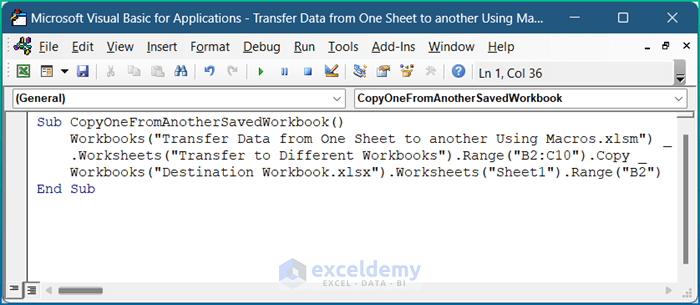
- Run the code, and it will transfer the data to a new open and saved workbook.
![]()
Things to Remember
- First, you do not need to select or activate the workbooks, worksheets, or even ranges. This is because the code already specifies those details.
- Then, you must reference the correct file extension in the Workbooks property.
- Next, the process is the same for inserting a Module in the VBA window for every method.
- After that, make sure the works are micro-enabled, and the file name is saved as .xlsm; otherwise, the code will not work for those files.
You can download the workbook used for the demonstration from the download link below.
Related Articles
- How to Pull Data From Another Sheet Based on Criteria in Excel
- Excel Formula to Get First 3 Characters from a Cell(6 Ways)
- Extract Text After a Character in Excel (6 Ways)
- How to Extract Month from Date in Excel (5 Quick Ways)
- Excel Macro: Extract Data from Multiple Excel Files (4 Methods)
- How to Extract Year from Date in Excel (3 Ways)


I am on Windows 11 and do not have a developer tab on my program. Can one perform this function using other macros or functions? ? ?
Hello, ARIZONA AMBER! To enable Developer tab, you have to follow this procedure: Go to Excel Options > Customize Ribbon > Customize the Ribbon > Main Tabs > (Check) Developer tab.