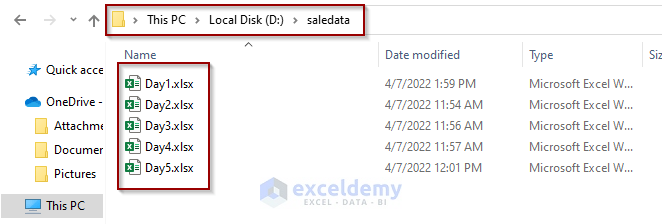
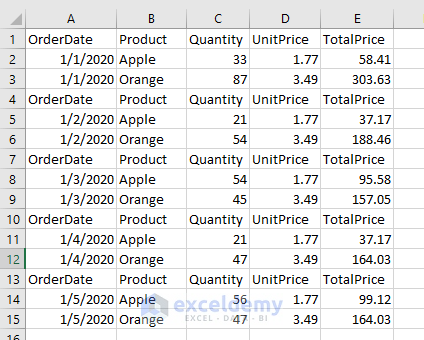
We have multiple Excel files in a folder. We’ve created a folder named saledata in D:/ to hold the Excel files.
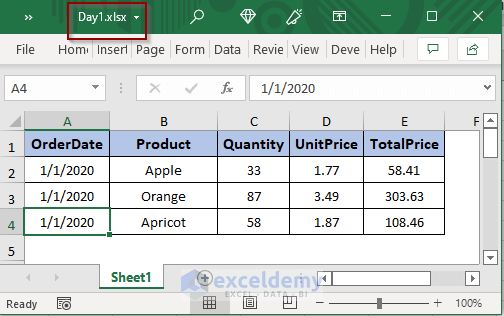
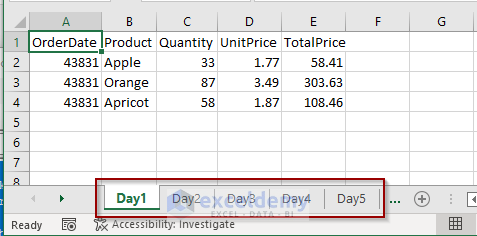
The Excel files contain sale data for 5 consecutive days for a fruit shop. In the file named Day1.xlsx, we have the sale details of the products of the date 1/1/2020.
We want to extract this sales data from the Excel files and collect it into one single file in a different location.
Things We Should Learn First
We’ll use the FileSystemObject object to access the computer’s file system to get the files inside the folder.
We need to put the folder path correctly to get access to the Excel files in it. To get the folder location:
- Open the folder
- Click on the address bar in the Windows File Explorer.
- Copy the highlighted address with Ctrl + C.
We’ll use the For Each loop to loop through all the Excel files inside the folder and the For Next Loop to extract data from the source files and paste them to the new file.
How to Write Code in the Visual Basic Editor
- Right-click on the sheet name.
- Choose the View Code option.
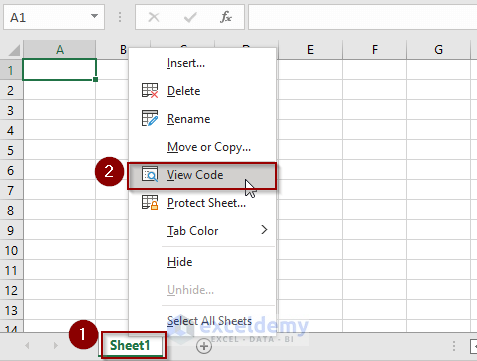
- Put your macro in the visual basic editor.

- Press F5 to run the code.
Method 1 – Run a Macro to Extract Data from Multiple Excel Files to a Single Workbook
Part 1.1 – Collect the Extracted Data into Different Worksheets
- Copy and paste the macro into the visual code editor and press F5 to run it.
Sub ExtractDataToDifferentSheets()
On Error GoTo HandleError
Application.ScreenUpdating = False
Dim objectFlieSys As Object
Dim objectGetFolder As Object
Dim file As Object
Set objectFlieSys = CreateObject("Scripting.FileSystemObject")
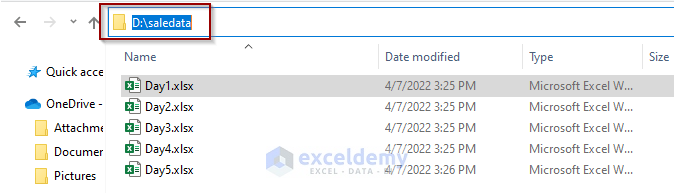
Set objectGetFolder = objectFlieSys.GetFolder("D:\saledata") ' The folder location of the source files.
Dim counter As Integer
counter = 1
For Each file In objectGetFolder.Files
Dim sourceFiles As Workbook
Set sourceFiles = Workbooks.Open(file.Path, True, True)
Dim rowsNumber As Integer
rowsNumber = sourceFiles.Worksheets("sheet1").UsedRange.rows.Count
Dim colsNumber As Integer
colsNumber = sourceFiles.Worksheets("sheet1").UsedRange.Columns.Count
Dim rows, cols As Integer
For rows = 1 To rowsNumber
For cols = 1 To colsNumber
Application.Workbooks(1).ActiveSheet.Cells(rows, cols) = _
sourceFiles.Worksheets("Sheet1").Cells(rows, cols)
Next cols
Next rows
rows = 0
Dim worksheetName As String
worksheetName = Replace(sourceFiles.Name, ".xlsx", "")
sourceFiles.Close False
Set sourceFiles = Nothing
With ActiveWorkbook
.ActiveSheet.Name = worksheetName
counter = counter + 1
If counter > .Worksheets.Count Then
.Sheets.Add After:=.Worksheets(.Worksheets.Count)
End If
.Worksheets(counter).Activate
End With
Next
HandleError:
Application.EnableEvents = True
Application.ScreenUpdating = True
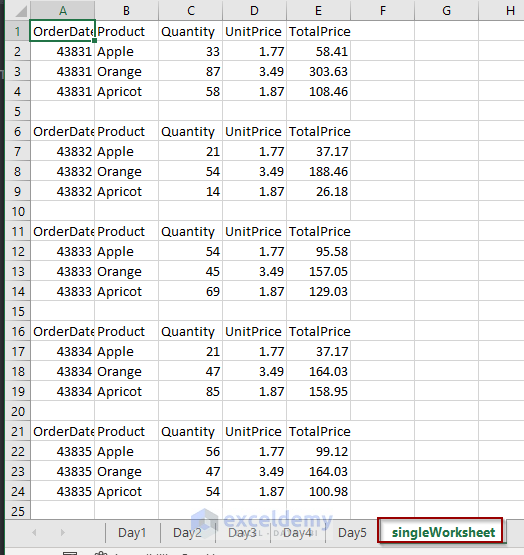
End SubWe’ve successfully extracted and collected the data into 5 different sheets in the same workbook. We configured the code to create new sheets in the workbook according to the number of Excel files in the folder. The created sheets are named according to the source file names (Day1, Day2….) with the extracted data in it.
Part 1.2 – Extract Data into a Single Worksheet
- Copy, paste, and then run the following macro in the visual basic editor.
Sub ExtractDataToSingleFile()
    On Error GoTo HandleError
    Application.ScreenUpdating = False
    Dim objectFileSys As Object
    Dim objectGetFolder As Object
    Dim file As Object
    Set objectFileSys = CreateObject("Scripting.FileSystemObject")
    Set objectGetFolder = objectFileSys.GetFolder("D:\saledata") ' The folder location for the source files.
    Dim counter As Integer
    counter = 0
    For Each file In objectGetFolder.Files
        Dim sourceFiles As Workbook
        Set sourceFiles = Workbooks.Open(file.Path, True, True)
        Dim rowsNumber As Integer
        rowsNumber = sourceFiles.Worksheets("sheet1").UsedRange.rows.Count
        Dim colsNumber As Integer
        colsNumber = sourceFiles.Worksheets("sheet1").UsedRange.Columns.Count
        Dim rows, cols As Integer
        For rows = 1 To rowsNumber
            For cols = 1 To colsNumber
                Cells(rows + counter, cols) = sourceFiles.Worksheets("Sheet1").Cells(rows, cols)
            Next cols
        Next rows
        counter = counter + rows
        rows = 0
        sourceFiles.Close False
        Set sourceFiles = Nothing
    Next
HandleError:
    Application.EnableEvents = True
    Application.ScreenUpdating = True
End Sub- Here is the output in the following screenshot.
Read More: How to Pull Data from Multiple Worksheets in Excel
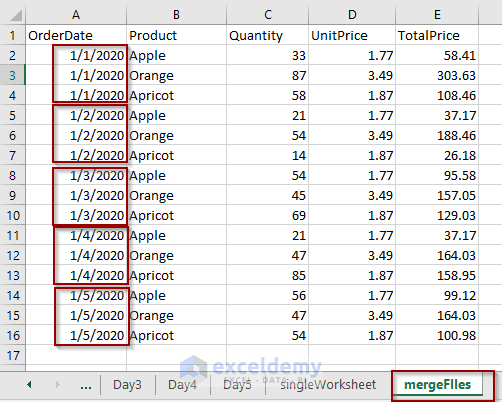
Method 2 – Extract and Then Merge Data from Multiple Excel Files to a Single File Using a Marco
As every dataset in the files in the folder has a header, we’ll keep the header only for the first file.
- Copy and paste the following macro into the visual basic editor.
Sub ExtractMergeDataFromMultipleFiles()
Dim i As Long
Dim currentRow As Long
Dim row As Long
Dim wBook As workBook
For i = 1 To 5 Step 1
Set wBook = Workbooks.Open("D:\saledata" & "\Day" & i & ".xlsx")
With wBook.Sheets("Sheet1")
If i = 1 Then
row = 1
Else
row = 2
End If
Do Until .Range("A" & row).Value = vbNullString
currentRow = currentRow + 1
For n = 0 To 4 Step 1
Me.Range("A" & currentRow).Offset(columnoffset:=n).Value = .Range("A" & row).Offset(columnoffset:=n).Value
Next n
row = row + 1
Loop
End With
wBook.Close True
Next i
Set wBook = Nothing
End Sub- The following screenshot shows the merged dataset.
Code Explanation:
In the code, there are two loops. The first For Next loop was set for 5 iterations as we have 5 files in the folder.
For i = 1 To 5 Step 1And we set the second loop to iterate 5 times (n=0 to 4) as we have 5 columns in our dataset.
For n = 0 To 4 Step 1
Method 3 – Set a Range to Extract Data from Multiple Files to a Single Workbook Using a Macro in Excel
We want to extract only the first two rows of data from each of the Excel files.
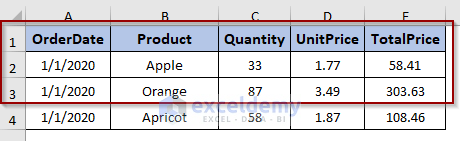
- Set the range as A1:E3 in the following macro.
- Copy and paste in the visual basic editor.
Sub ExtractDataMuilpleFiles()
    Dim location As String, files As String
    Dim eFiles() As String
    Dim rowCount As Long, fileNum As Long
    Dim wBook As Workbook, masterSheet As Worksheet
    Dim srcRng As Range, dstRng As Range
    Dim rowNum As Long, calType As Long
    ' Put the folder location
    location = "D:\saledata"
    ' This will put a Slash if necessary
    If Right(location, 1) <> "\" Then
        location = location & "\"
    End If
    files = Dir(location & "*.xl*")
    If files = "" Then
        MsgBox "Not Found"
        Exit Sub
    End If
    fileNum = 0
    Do While files <> ""
        fileNum = fileNum + 1
        ReDim Preserve eFiles(1 To fileNum)
        eFiles(fileNum) = files
        files = Dir()
    Loop
    With Application
        calType = .Calculation
        .Calculation = xlCalculationManual
        .ScreenUpdating = False
        .EnableEvents = False
    End With
    Set masterSheet = ActiveWorkbook.ActiveSheet
    rowNum = 1
    If fileNum > 0 Then
        For fileNum = LBound(eFiles) To UBound(eFiles)
            Set wBook = Nothing
            On Error Resume Next
            Set wBook = Workbooks.Open(location & eFiles(fileNum))
            On Error GoTo 0
            If Not wBook Is Nothing Then
                On Error Resume Next
                ' Put the Range to Extract Data from
                With wBook.Worksheets(1)
                    Set srcRng = .Range("A1:E3")
                End With
                If Err.Number > 0 Then
                    Err.Clear
                    Set srcRng = Nothing
                Else
                    If srcRng.Columns.Count >= masterSheet.Columns.Count Then
                        Set srcRng = Nothing
                    End If
                End If
                On Error GoTo 0
                If Not srcRng Is Nothing Then
                    rowCount = srcRng.rows.Count
                    If rowNum + rowCount >= masterSheet.rows.Count Then
                        MsgBox "Not enough rows in target worksheet."
                        masterSheet.Columns.AutoFit
                        wBook.Close savechanges:=False
                        GoTo ExitTheSub
                    Else
                        Set dstRng = masterSheet.Range("A" & rowNum)
                        With srcRng
                            Set dstRng = dstRng. _
                                            Resize(.rows.Count, .Columns.Count)
                        End With
                        dstRng.Value = srcRng.Value
                        rowNum = rowNum + rowCount
                    End If
                End If
                wBook.Close savechanges:=False
            End If
        Next fileNum
        masterSheet.Columns.AutoFit
    End If
ExitTheSub:
    With Application
        .ScreenUpdating = True
        .EnableEvents = True
        .Calculation = calType
    End With
End Sub
We’ve extracted only two rows of data from the dataset of each source files to the newly created worksheet.
Set your own data range in the following line of the macro.
Set srcRng = .Range("A1:E3")Read More: How to Pull Data from Multiple Worksheets in Excel VBA
Method 4 – Extract Data from Selected Files into One Workbook Using a Macro in Excel
We want to select and extract data only from three files in the folder.
- Copy and paste the following macro into the visual basic editor.
Private Declare Function SetCurrentDirectoryA Lib _
"kernel32" (ByVal lpPathName As String) As Long
Sub ChDirNet(szPath As String)
SetCurrentDirectoryA szPath
End Sub
Sub ExtractDataFromSelectedFiles()
Dim eLocation As String
Dim rowCount As Long, filesNum As Long
Dim wBook As Workbook, masterSheet As Worksheet
Dim srcRng As Range, dstRng As Range
Dim rowNum As Long, calType As Long
Dim saveLocation As String
Dim fileName As Variant
With Application
calType = .Calculation
.Calculation = xlCalculationManual
.ScreenUpdating = False
.EnableEvents = False
End With
saveLocation = CurDir
' Change this to the path\folder location of the files.
ChDirNet "D:\saledata"
fileName = Application.GetOpenFilename(filefilter:="Excel Files (*.xl*), *.xl*", _
MultiSelect:=True)
If IsArray(fileName) Then
Set masterSheet = ActiveWorkbook.ActiveSheet
rowNum = 1
For filesNum = LBound(fileName) To UBound(fileName)
Set wBook = Nothing
On Error Resume Next
Set wBook = Workbooks.Open(fileName(filesNum))
On Error GoTo 0
If Not wBook Is Nothing Then
On Error Resume Next
With wBook.Worksheets(1)
Set srcRng = .Range("A1:E4")
End With
If Err.Number > 0 Then
Err.Clear
Set srcRng = Nothing
Else
If srcRng.Columns.Count >= masterSheet.Columns.Count Then
Set srcRng = Nothing
End If
End If
On Error GoTo 0
If Not srcRng Is Nothing Then
rowCount = srcRng.rows.Count
If rowNum + rowCount >= masterSheet.rows.Count Then
MsgBox "not enough rows in target worksheet."
masterSheet.Columns.AutoFit
wBook.Close savechanges:=False
GoTo ExitTheSub
Else
Set dstRng = masterSheet.Range("A" & rowNum)
With srcRng
Set dstRng = dstRng. _
Resize(.rows.Count, .Columns.Count)
End With
dstRng.Value = srcRng.Value
rowNum = rowNum + rowCount
End If
End If
wBook.Close savechanges:=False
End If
Next filesNum
masterSheet.Columns.AutoFit
End If
ExitTheSub:
With Application
.ScreenUpdating = True
.EnableEvents = True
.Calculation = calType
End With
ChDirNet saveLocation
End Sub- Run the macro by pressing F5.
- Go to the folder location in the file explorer.
- Select the desired files.
- Click Open.
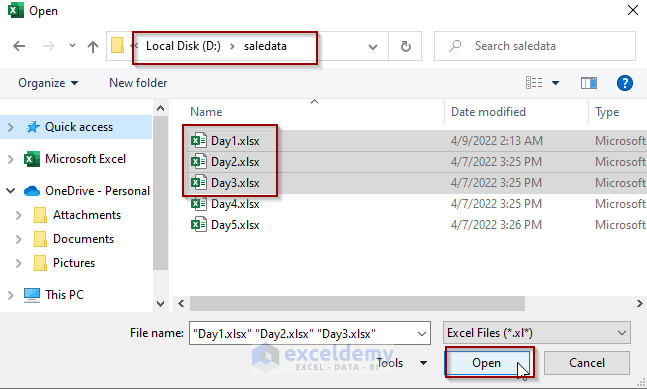
- The macro extracts the data to the new worksheet.
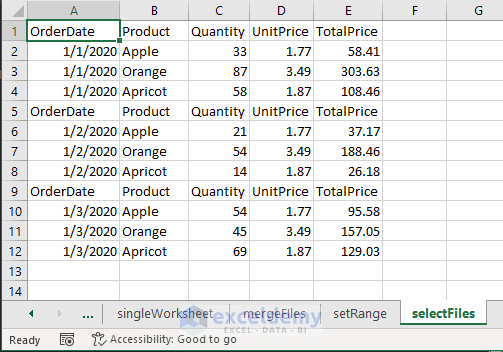
Here in the code, we set the range as A1:E4 i.e., the whole dataset from the source files to extract and collect as output.
Things to Remember
All the macros we used in the above examples search data in the worksheet named “Sheet1” i.e., sheet number 1 from the source workbook, and then extract them to the new workbook.
Download the Practice Workbook
Related Articles
- How to Pull Values from Another Worksheet in Excel
- Pull Same Cell from Multiple Sheets into Master Column in Excel
- Extract Data from One Sheet to Another Using VBA in Excel
- How to Get Data from Another Sheet Based on Cell Value in Excel
- How to Pull Data From Another Sheet Based on Criteria in Excel
<< Go Back To Extract Data Excel | Learn Excel
Get FREE Advanced Excel Exercises with Solutions!

Hello,
Thank you for what you are doing here. I would like to use “1. Run a Macro to Extract Data from Multiple Excel Files to a Single Workbook” however it only grabs the first file in the folder and doesnt change the worksheet name. Any idea why this would happen? the only thing I changed from your code is the file path
Thank you!
Hi Jeff V,

Thanks for reaching us. You have informed us here that the aforementioned code is not giving your expected out. But in my case, I am getting the correct outputs by extracting data from different workbooks into one. I think yours will also work fine if you notice the following matters.
• Firstly, copy the exact path name where your desired files are saved.
• Put down the correct sheet name of your saved workbooks in the following indicated areas.
After modifying all of these factors, run your final code.
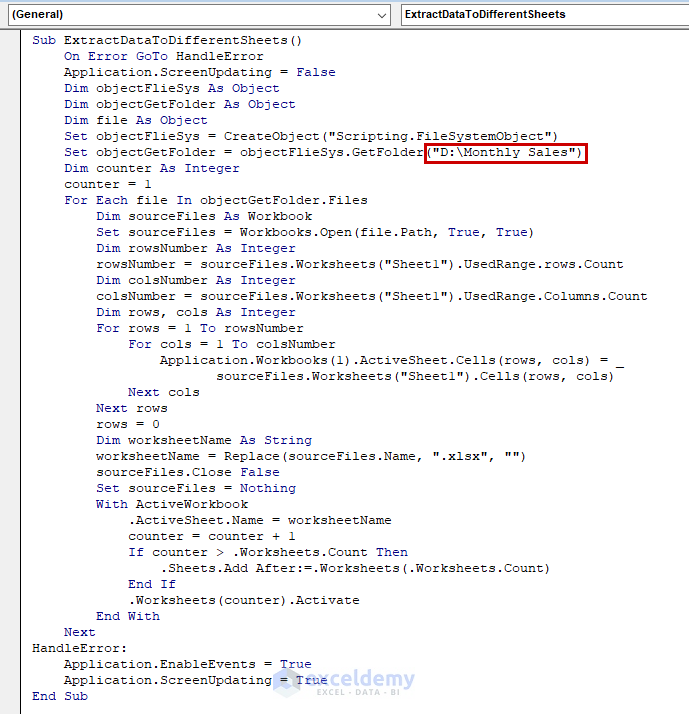
Sub ExtractDataToDifferentSheets()
On Error GoTo HandleError
Application.ScreenUpdating = False
Dim objectFlieSys As Object
Dim objectGetFolder As Object
Dim file As Object
Set objectFlieSys = CreateObject(“Scripting.FileSystemObject”)
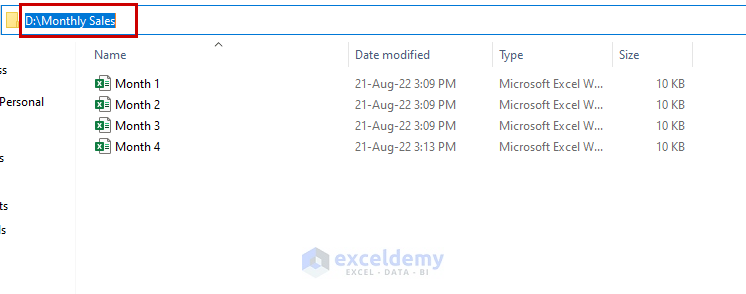
Set objectGetFolder = objectFlieSys.GetFolder(“D:\Monthly Sales”)
Dim counter As Integer
counter = 1
For Each file In objectGetFolder.Files
Dim sourceFiles As Workbook
Set sourceFiles = Workbooks.Open(file.Path, True, True)
Dim rowsNumber As Integer
rowsNumber = sourceFiles.Worksheets(“Sheet1”).UsedRange.rows.Count
Dim colsNumber As Integer
colsNumber = sourceFiles.Worksheets(“Sheet1”).UsedRange.Columns.Count
Dim rows, cols As Integer
For rows = 1 To rowsNumber
For cols = 1 To colsNumber
Application.Workbooks(1).ActiveSheet.Cells(rows, cols) = _
sourceFiles.Worksheets(“Sheet1”).Cells(rows, cols)
Next cols
Next rows
rows = 0
Dim worksheetName As String
worksheetName = Replace(sourceFiles.Name, “.xlsx”, “”)
sourceFiles.Close False
Set sourceFiles = Nothing
With ActiveWorkbook
.ActiveSheet.Name = worksheetName
counter = counter + 1
If counter > .Worksheets.Count Then
.Sheets.Add After:=.Worksheets(.Worksheets.Count)
End If
.Worksheets(counter).Activate
End With
Next
HandleError:
Application.EnableEvents = True
Application.ScreenUpdating = True
End Sub
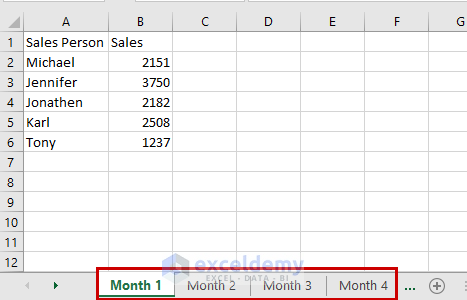
Finally, you will get the following sheets in a single workbook.
Hi what modifications should be fade if i want to combine files with more than one sheets.
Hello, HARVEINDRAN!
Please check the following articles. Hopefully, this will solve your problem!
https://www.exceldemy.com/excel-combine-data-from-multiple-sheets/
https://www.exceldemy.com/combine-multiple-excel-files-into-one-workbook-separate-sheets/
Hey thank u so much for this guide and making it so easy to understand. There’s any chance that u can explain how to extract info from selected cells in a worksheet?
Hello, DANIEL.
Thanks for reading our articles.
Look at the below link. Hopefully, you will get your solution.
https://www.exceldemy.com/extract-data-from-one-sheet-to-another-in-excel-using-vba/
For example, you can use the following code:
Sub Extract_Data()Selection.CopySheets("Dataset2").ActivateRange("F4").SelectActiveSheet.PasteApplication.CutCopyMode = FalseEnd SubEnter your sheet name instead of Dataset2 in the 3rd line. Change the cell range in the 4th line. Hope you will get desired output. If your problem is yet solved, then let us know.
Regards.
-Alok Paul
Author at ExcelDemy
I HAVE SOME WORKBOOK IN DIFFERENT FOLDERS, SALE DATA > YEAR(2023,2022,2021) > MONTH(JAN,FEB) AND THEN EXCEL WORK BOOK . I WANT TO COLLECT SALE DATA FROM ALL 3 YEARS.
IS IT POSSIBLE?
Hi BICKY,
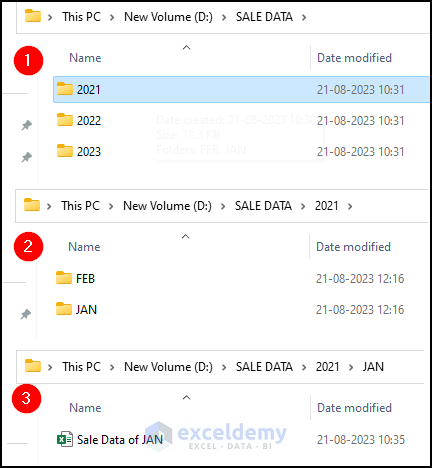
Thank you for your comment. According to your comment, I understand that you have a folder named SALE DATA and in that folder, you have another 3 folders named 2021, 2022 and 2023. Each sales year folder has two folders (JAN, and FEB) and then an Excel workbook. You want to collect sales data from all 3 years in a single workbook.
To solve this issue follow the below steps:
● Insert a new module and copy and paste the following code.
● Set the base folder path and the target sheet where you want to collect the data according to your PC.
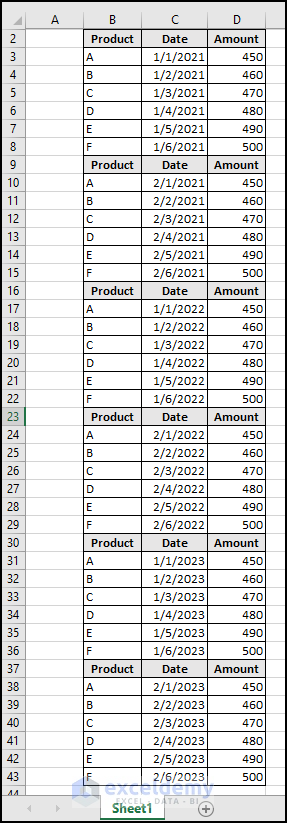
● Run the macro by pressing F5.
You can see that the macro successfully extracted data to the new worksheet. You can download the Excel file below.
Answer.xlsm
Hopefully, you will be able to solve your problem now. Please feel free to reach out to us with any other questions or you can send us your Excel files as well.
Regards
Nujat Tasnim
Exceldemy.
2. Extract and Then Merge Data from Multiple Excel Files to a Single File Using a Marco
Explanation mentioned in this article for the given macro is not sufficient.
I am getting run time error 1004: Application or object defined error.
I want to copy header from first file and ignore header for latter files.
Hello Onkar
Thanks for your invaluable feedback!
When copying data from the Excel files, you wanted a sub-procedure to copy only the header from the first file and skip the header row for the subsequent files. Currently, you are getting the runtime error 1004 with the existing code, which is typically caused by issues with object references or out-of-bound ranges.
Don’t worry! I have reviewed your problem and improved the existing sub-procedure to fulfil your goal. Please check the following:
Improved Excel VBA Sub-procedure:
Hopefully, with the code, you will not get any runtime error, and you will be able to copy the header only from the first filter, skipping the header row for the other files. I have attached the solution workbook used to solve your problem. You can download it for better understanding. Good luck.
DOWNLOAD SOLUTION WORKBOOK
Regards
Lutfor Rahman Shimanto
Excel & VBA Developer
ExcelDemy
Hello Onkar,
Please try this updated VBA code. Replace “C:\YourFolderPath\” with the path to your files. This updated code will ensures headers are copied only from the first file.
Regards
ExcelDemy
Hi Demy & everyone,
Thanks for this side and codes you were putting in here. I have to admit, that I`m neither a programming person nor Excel Pro but need to do basically the same task: incorprating certain cells from different Excel files in one. Difficulty here is the following:
All Excel files have the same name RUZ101.CSV but placed in different folders (In some cases there are there are 2 or more files in a folder with a number attached to the name RUZ101_1 , RUZ101_2 … etc)
Every Excel file has the date as a folder name (eg. 2023/230414/ )
The column with data is always the same (F), but the amount of the cells (65 to 70) and the position are different.
The upside is that the relevant data of Cells start always with the word “Tagesbericht” and ends with “Bericht gelöscht”. Saying that I would need to have the date of that file as a first cell of the coulmn (can be found always 3 lines above the the cell “Tagesbericht”) and there is no relavant data after the String “Bericht gelöscht”
Hello Ondrej,
Thank you for sharing your detailed requirements. I understand that you’re looking to consolidate specific data from multiple RUZ101*.CSV files located within date-named folders into a single Excel workbook. Given the structure and constraints you’ve described, I can provide you with a VBA macro that automates this process.
Ensure that all your RUZ101*.CSV files are organized within a main directory, with each set of files placed in subfolders named by date (e.g., 2023/230414/). The folder structure should look something like this:
Replace “C:\Path\To\Your\MainDirectory\” with the actual path to your main directory containing the date-named folders.
The macro assumes that Sheet1 in your master workbook is where you want the consolidated data. If not, change “Sheet1” to the appropriate sheet name.
Regards
ExcelDemy
This is really great help! For reference, I used method 2 which is to combine data from different files into 1 worksheet. I have 3 questions:
1. What if the filename I have for the different files follow this format: “FRS 25-00001 – Name of Company”? I need the company name for each file as it pertains to a different company.
2. What if I need to copy more than 1 row? The code on method 2 above just picks up the first row after the header. In each file, the number of rows to copy may differ. I need to copy all rows that have data. In some rows, there are blank cells but we still need to copy the row as is. When we get to a row that is entirely blank, that is when we move to the next file.
3. What if in the future we add more files into the folder, do we need to change the code again to include the additional file?
Hello Jeremy,
Thank you for your kind words! I’m glad Method 2 was helpful. Let’s address your questions one by one:
Extracting Company Names: You can modify the code to extract the company name from the file name. Assuming the name always comes after ” – ” in the filename, you can use VBA string functions to parse and store the company name when reading each file.
Copying Multiple Rows: Update the code to loop through all rows with data. You can use Do While or For loops to check if the row is entirely blank and copy only rows with data. Here’s a simple way:
This will stop once it encounters an entirely blank row.
Handling Additional Files: The code already loops through all files in the folder. As long as you place new files in the same folder, you shouldn’t need to change the code. Just re-run the macro to include the new files.
Regards
ExcelDemy
I was blocked…is it because I copied and pasted my code into this box so that it can be checked?
Hello Jeremy,
Sorry to hear the issue. It’s possible that the system flagged your comment due to the code content, as some platforms automatically block or filter comments containing extensive code for security reasons. I recommend removing or formatting sensitive parts and sharing a summary instead. Alternatively, if you still need help with the code, consider uploading it to a code-sharing platform and sharing the link here.
Let me know if you need further guidance!
Regards
ExcelDemy
Hello Shamima!
Wow you reply fast! Again, I am very thankful. I failed to mention that I am no where near being a programmer and I am really just trying to research each item I need to do in excel. As such, I am afraid I do not know how to go about your tips for items 1 & 2 and where to incorporate it.
How do I share the current code that I have so that you could help me out?
Hello Jeremy,
Thank you for your kind words! I’m always happy to help. Since you’re not a programmer, don’t worry—I’ll guide you through it step by step.
To share your current code, here’s what you can do:
Format it directly in the comment: Add backticks (`) before and after the code to format it neatly.
Example:
Your VBA code here
Use a code-sharing platform: Upload the code to a site like Pastebin or GitHub and share the link here.
Updated the VBA code that addresses all three user concerns from the first comment:
Key Changes:
Extract Company Name: Uses Mid and InStr functions to extract the company name from the filename.
Copy Multiple Rows: Loops through all rows until an entirely blank row is encountered.
Handle Additional Files: Automatically processes all .xlsx files in the specified folder without needing manual code changes.
Regards
ExcelDemy