
Power BI is a powerful business analytics tool to visualize and share insights from your data. If you have data in Excel files that updates frequently (e.g., sales reports or inventory logs), connecting it “live” to Power BI means the dashboard can refresh automatically to reflect changes—without manual re-imports.
In this tutorial, we show how to pull live Excel data into Power BI dashboards.
Method 1: Using OneDrive or SharePoint to Pull Live Excel Data
Step 1: Prepare Your Excel Data
Before connecting Excel to Power BI to pull live data into dashboards, structure your Excel data properly.
- Format as a Table:
- Select your data range.
- Go to the Insert tab >> select Table or press Ctrl + T.
- Check “My table has headers”.
- Click OK.

- Name Your Table:
- Go to the Table Design tab >> type Table Name.
- Give your table a meaningful name (e.g., “SalesData”).

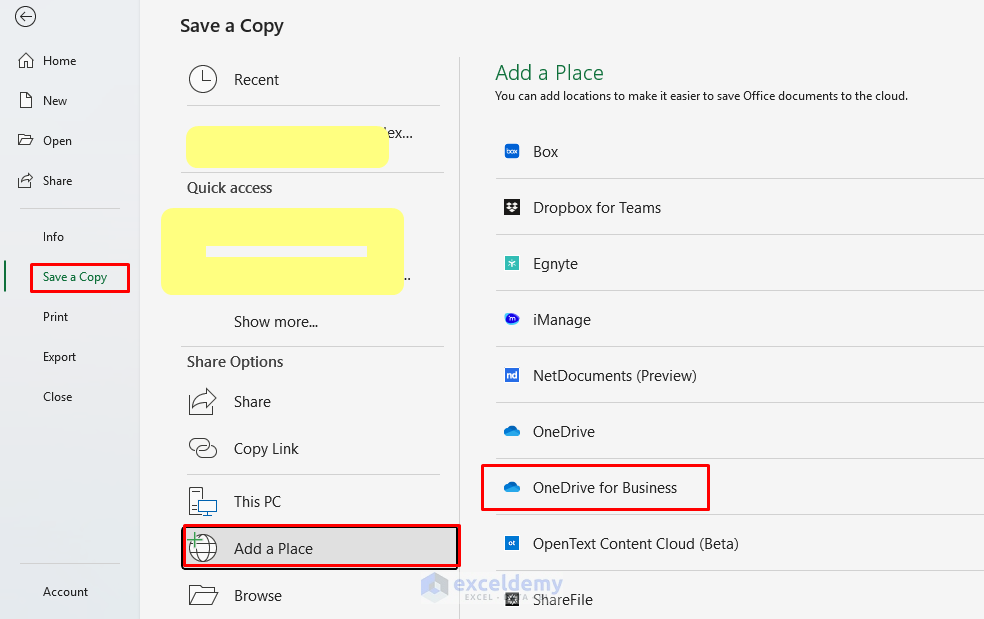
Step 2: Upload Excel to OneDrive/SharePoint
- Save your Excel file to OneDrive for Business or SharePoint Online.
- Ensure the file is accessible and you have proper permissions.
Note: Personal OneDrive also works, but it has some limitations.
Get the File URL:
- Open OneDrive/SharePoint.
- Locate the Excel file >> click the three dots (…) >> select Open in Excel.

- Click Copy link.

- The link should look like: “https://companyname.sharepoint.com/sites/teamname/Shared%20Documents/SalesData.xlsx”.
Step 3: Connect Power BI to Cloud-Based Excel
- In Power BI Desktop, sign in with your Microsoft account.
- Go to the Home tab >> click Get data >> select SharePoint Folder (for SharePoint/OneDrive sites) or Web (for direct sharing links).
- Click Connect.
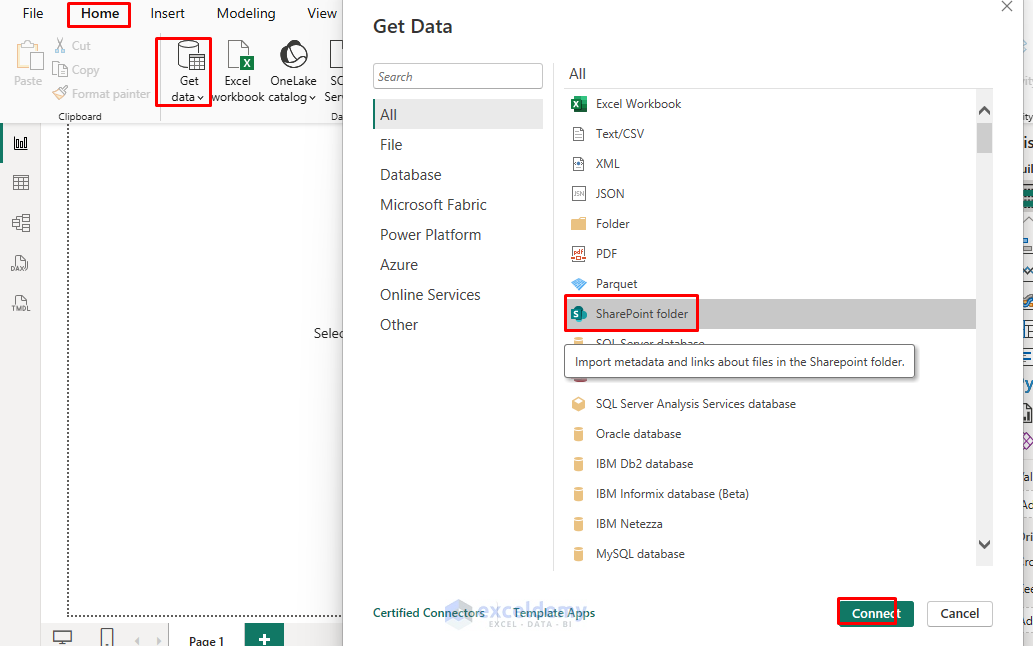
- If using SharePoint Folder, paste the site URL (e.g., https://companyname.sharepoint.com/sites/teamname) and authenticate. Power BI will list files on the site.
- If using a direct Web link, paste the file’s sharing URL. Depending on your tenant settings, you may need to ensure the link is downloadable.
- Select your tables and click Load.

Whenever you update the file in OneDrive/SharePoint, Power BI dashboards update on refresh automatically.
Note: Make sure Power BI and SharePoint/OneDrive are signed in with the same organizational account. Using different accounts can cause authentication errors and prevent automatic refresh from working properly.
Step 4: Publish to Power BI Service
- Go to the Home ribbon >> click Publish.
- Select your workspace destination “My workspace.”
- Click Select.

Step 5: Configure Scheduled Refresh
Open Power BI Service to configure the scheduled refresh that pulls live Excel data into your dashboards.
- Navigate to your workspace.
- Click on My workspace.
- Find your semantic model >> click the … (more options).
- Select Settings.

- Expand Refresh.
- Turn on Configure a refresh schedule.
- Select Refresh frequency >> Daily.
- Optionally set a specific time.
- Click Apply.

Power BI Service now automatically checks your Excel file in OneDrive about every hour and updates your dashboard—no gateway, no manual upload.
Quick Tip: If you move the Excel file to another folder later, Power BI will lose the link. Keep it in the same OneDrive path or update the file path in the dataset settings.
Method 2: Connect to Excel Live Data Through Power BI Service
By using the Power BI Service web interface, you can pull live Excel data directly into the service.
Step 1: Browse or Upload Excel Data
- Go to Power BI >> click Create >> select Get data.

- Choose a data source: Excel workbook or SharePoint.

- Select the Excel data table.
- Click Create a report or Transform data.
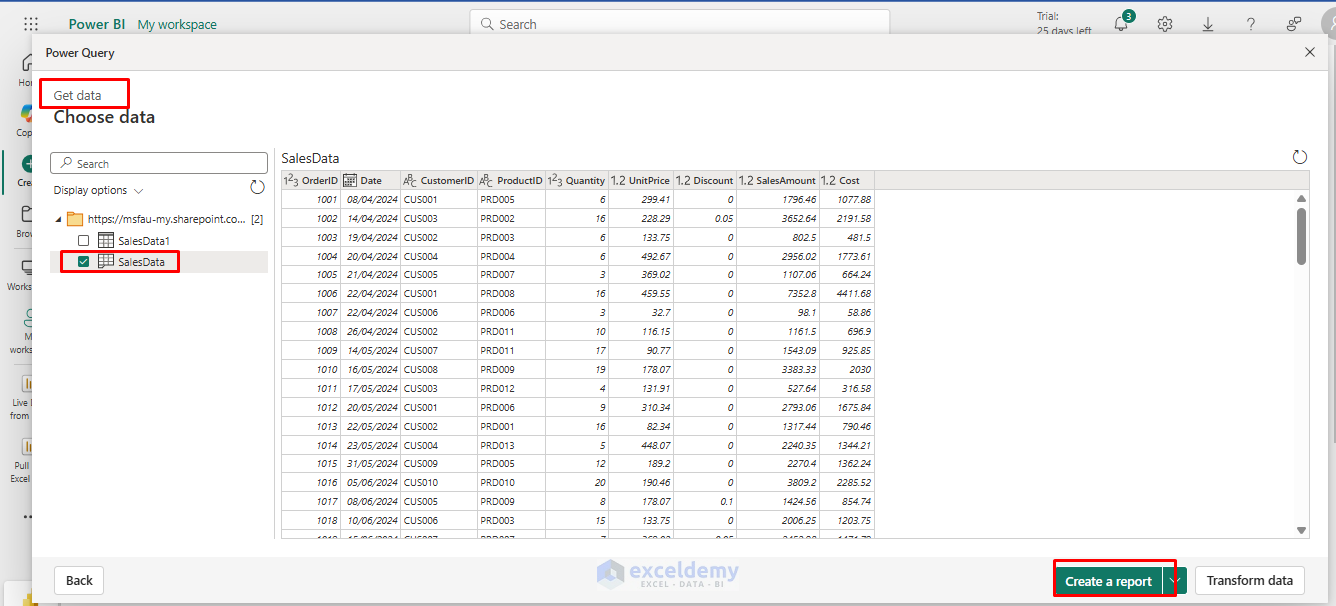
- Create a folder in My workspace >> insert Semantic model name.
- Click Create.

Step 2: Pick Upload or Link to File
- Upload file: Makes a copy of the data (not live).
- Link to file: Links directly to the Excel workbook.
- Any update in Excel syncs within about one hour.
- Click Next and schedule a refresh.

Method 3: Connecting Local Excel Files to Power BI
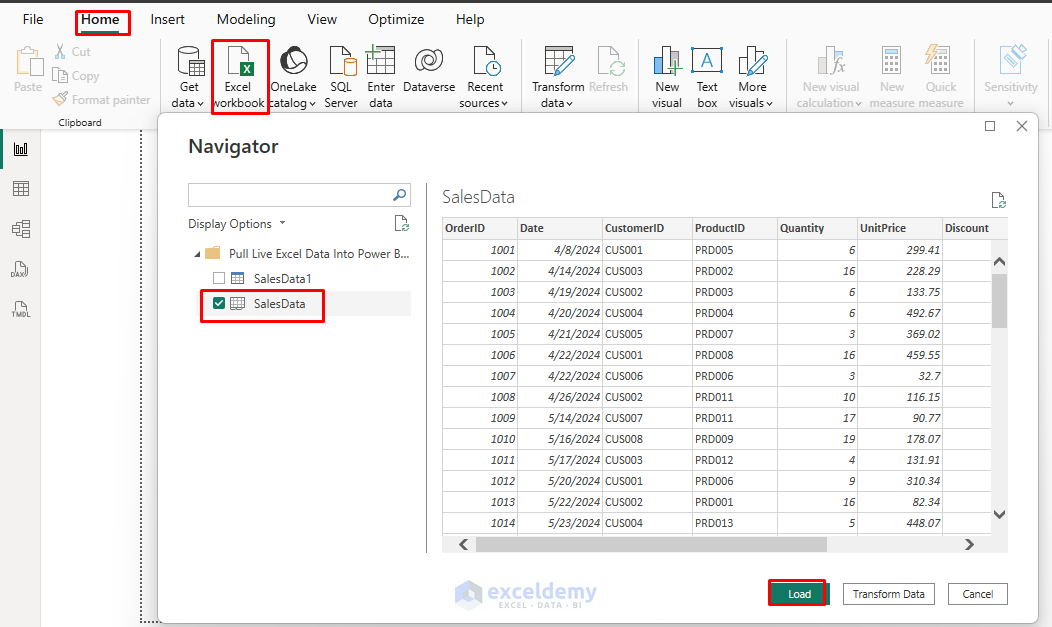
Step 1: Connect Power BI to Excel
- Open Power BI Desktop.
- Go to the Home tab >> from Get data >> select Excel workbook from the list.
- Browse to your Excel file and click Open.
- In the Navigator window, check the tables/sheets you want to import.
- Choose between:
- Load: Imports data directly into Power BI.
- Transform data: Opens Power Query Editor for data cleaning.
Manual Refresh:
For local files, Power BI Desktop refreshes data when you click the Refresh button, but it won’t update automatically while the report is open.
To enable automatic updates:
- Go to the Home tab >> click Refresh.

Step 3: Set Up a Gateway for Scheduled Refresh (Local Files)
If your Excel workbook is stored on your computer or a shared drive, use an on-premises data gateway so Power BI Service can access and refresh it automatically.
- Download & Install Gateway:
-
- Download the Gateway >> choose Standard mode >> sign in with your Power BI Pro account.
- Register Gateway:
- Give it a name and recovery key >> finish setup >> confirm status is Online in Power BI Service under Manage connections and gateways.
- Add Data Source:
- Create a new data source.
- Type: File >> set full path (e.g., C:\Data\Sales.xlsx) >> authenticate with Windows credentials >> test connection.
Step 4: Map Your Dataset to the Gateway
- Publish the report to Power BI Service.
- In Power BI Service >> select My workspace.
- Find the semantic model >> click the (…) three dots.
- Click Settings.
- Under Gateway and cloud connections, toggle:
- Use an on-premises or VNet data gateway.
- Click On.
- Select your configured gateway name.
- Under Map to data source, choose the data source you created earlier (e.g., LocalExcelSource).
- Click Apply.
Step 5: Enable Scheduled Refresh
- Expand Refresh.
- Turn on Configure a refresh schedule.
- Select Refresh frequency >> Daily.
- Optionally set a specific time.
- Click Apply.
Now your Power BI Service dataset automatically refreshes from your local Excel file through your on-premises gateway.
Remember: If you turn off the computer hosting the file or gateway, the refresh will fail until it’s back online.
Monitoring and Maintenance
- Refresh history: Review in dataset settings to catch failures early.
- Data accuracy: Compare dashboard results with the source Excel periodically.
- Performance metrics: Monitor load times and optimize as needed.
- User feedback: Gather input on data freshness requirements.
Conclusion
By following the above methods and steps, you can pull live Excel data into Power BI dashboards. Connecting Excel to Power BI transforms static spreadsheets into dynamic, shareable dashboards. While local Excel files work for basic needs, storing files in OneDrive or SharePoint provides the most robust solution for live data updates. With proper setup and maintenance, your Power BI dashboards will deliver real-time insights to your team automatically.
Get FREE Advanced Excel Exercises with Solutions!
