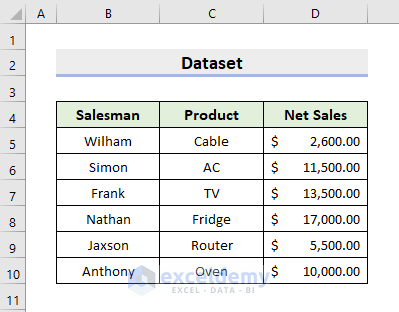
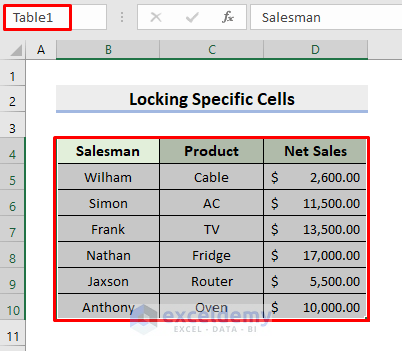
To demonstrate how to lock and unlock cells in Excel, we’ll use the following dataset containing Salesman, Product, and Net Sales in the range B4:D10.
Example 1 – Lock All Cells in an Excel Worksheet with VBA
STEPS:
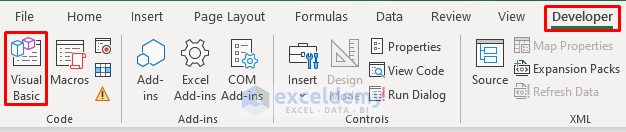
- Go to Developer ➤ Visual Basic.
- The VBA window pops out.
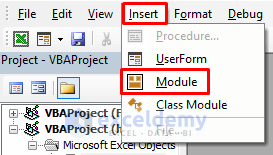
- In it, select Insert ➤ Module.
- Copy the below code and paste it into the Module box that opens.
Sub AllCells()
Sheets("All Cells").Cells.Locked = True
Sheets("All Cells").Protect
End Sub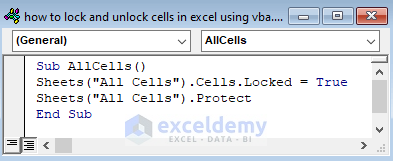
- Save the file and press the F5 key to run the code.
Now, when you try to edit or modify any cell, a warning dialog box as shown below appears.

Read More: Excel VBA to Lock Cells without Protecting Sheet
Example 2 – Lock Specific Cells with VBA
Let’s now only lock specific cells. We’ll also insert a check box to toggle locking and unlocking them.
STEPS:
- Name the cell range B4:D10 as Table1.
- Click Developer ➤ Insert ➤ Check Box.
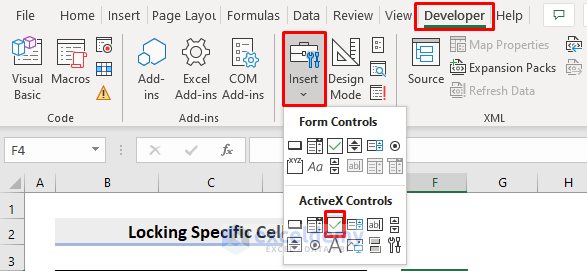
- Place the check box in the desired location.
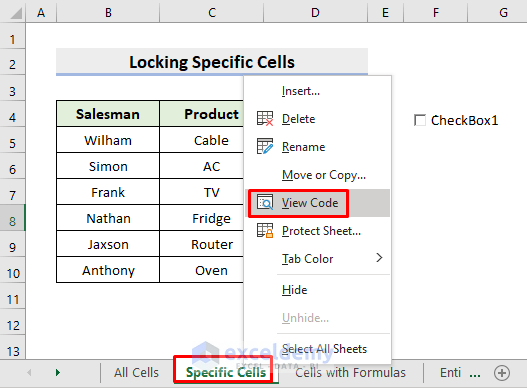
- Right-click on the sheet name.
- Select View Code from the context menu.
- Input the following code into the pop-out dialog box.
Private Sub CheckBox1_Click()
Range("Table1").Select
On Error Resume Next
If CheckBox1.Value = True Then
Selection.Locked = False
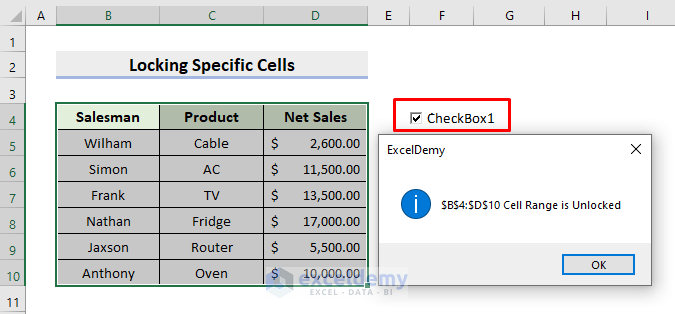
MsgBox Selection.Address & " Cell Range is Unlocked", vbInformation, "ExcelDemy"
Else
Selection.Locked = True
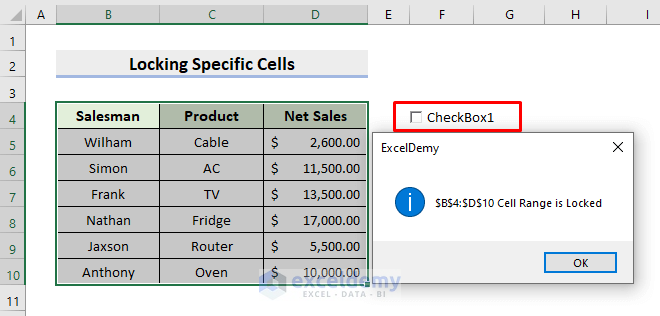
MsgBox Selection.Address & " Cell Range is Locked", vbInformation, "ExcelDemy"
End If
End Sub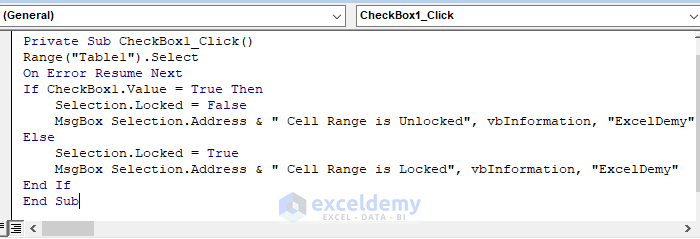
- Save the file and run the code by pressing the F5 key.
- Checking the checkbox will unlock the cells and return a dialog box as demonstrated below.
- Conversely, unchecking the checkbox will lock the cells.
Example 3 – Lock Only Cells with Formulas with VBA
Now let’s lock only cells containing a formula.
STEPS:
- Open the Module box by following the steps in Example 1.
- Enter the following code into the box:
Sub LockCellsWithFormulas()
For Each Rng In ActiveSheet.Range("B5:D10")
If Rng.HasFormula Then
Rng.Locked = True
Else
Rng.Locked = False
End If
Next Rng
ActiveSheet.Protect "111"
End Sub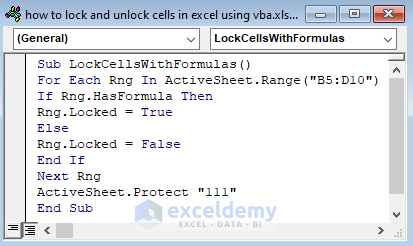
- Click the RunSub button to run the code.
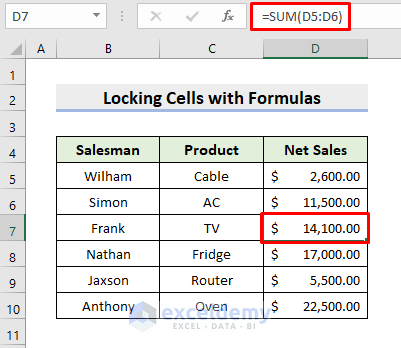
All cells containing a formula are locked, for example D7.
Read More: Lock a Cell after Data Entry Using Excel VBA with Message Box Notification Before Locking
Example 4 – Lock the Entire Worksheet Except for a Few Cells with VBA
In the following code, the range B5:D10 will remain unlocked, while the rest of the worksheet will be locked.
Sub WorksheetExceptFewCells()
Dim wb As Workbook
Set wb = ActiveWorkbook
wb.Sheets("Entire Worksheet Except Few").Range("B5:D10").Locked = False
wb.Sheets("Entire Worksheet Except Few").Protect passowrd = "111"
End Sub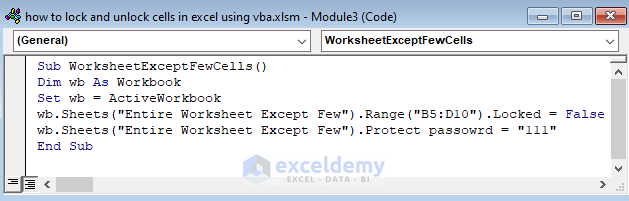
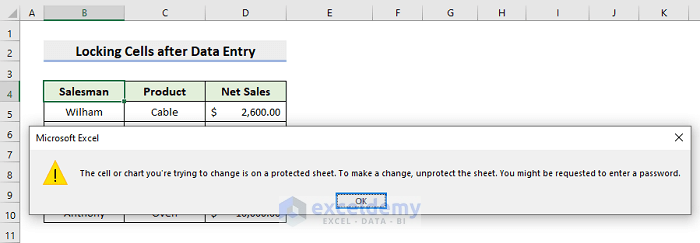
Example 5 – Lock Cells after Data Entry using VBA
In this example, we’ll input data into the range B4:D10, after which the cells in this range will be locked.
STEPS:
- Right-click on the sheet name and select View Code.
- Input the following code in the dialog box:
Dim rg As Range
Dim str As String
Private Sub Worksheet_BeforeDoubleClick(ByVal Target As Range, Cancel As Boolean)
If Not Intersect(Range("B4:D10"), Target) Is Nothing Then
    Set rg = Target.Item(1)
    str = rg.Value
End If
End Sub
Private Sub Worksheet_Change(ByVal Target As Range)
    Dim xg As Range
    On Error Resume Next
    Set xg = Intersect(Range("B4:D10"), Target)
    If xg Is Nothing Then Exit Sub
    Target.Worksheet.Unprotect Password:="111"
    If xg.Value <> str Then xg.Locked = True
    Target.Worksheet.Protect Password:="111"
End Sub
Private Sub Worksheet_SelectionChange(ByVal Target As Range)
If Not Intersect(Range("B4:D10"), Target) Is Nothing Then
    Set rg = Target.Item(1)
     str = rg.Value
End If
End Sub
- Run the code by pressing the RunSub button or the F5 key.
- Enter data values in the range.
The range will be locked automatically after data entry. Attempts to edit further will return this warning dialog box:
Example 6 – Unlock Cells with VBA
Use the following code to unlock any locked cells in an Excel workbook:
Sub UnlockCells()
Sheets("Unlock Cells").Cells.Locked = False
Sheets("Unlock Cells").Unprotect
End Sub
How to Lock and Unlock Cells in Excel Without VBA
The Format Cells feature can be used to lock/unlock cells in Excel, without the need for VBA code.
STEPS:
- Select the desired range to lock/unlock.
- Press the Ctrl and 1 keys together. The Format Cells dialog box opens.
- Under the Protection tab, check/uncheck the Locked box as required.
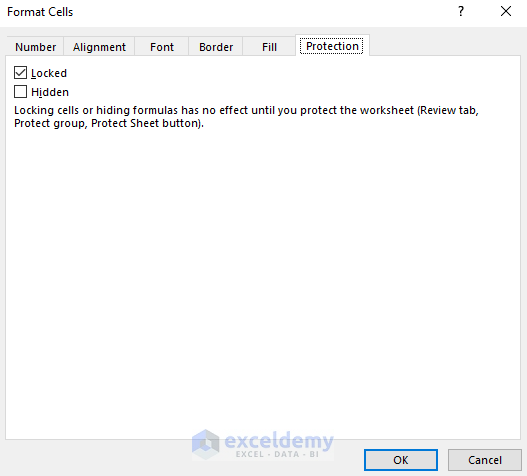
NOTE Locking any cells in Excel will have no effect unless the worksheet itself is Protected.
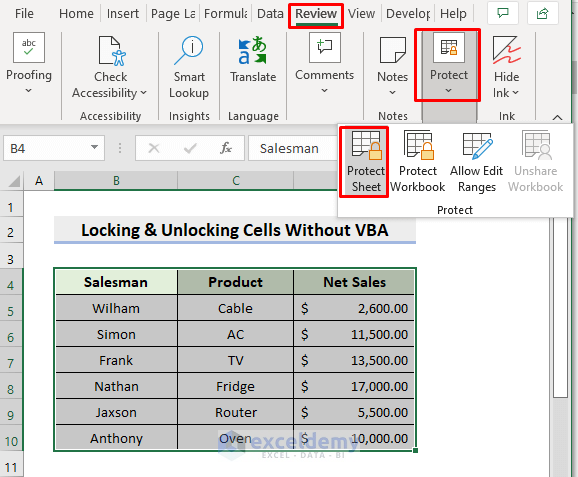
To protect the worksheet:
- Click on the Review tab.
- Select Protect Sheet from the Protect drop-down.
- The sheet will be protected.
Download Practice Workbook
Related Articles
- Excel VBA to Protect Range of Cells
- How to Protect Specific Columns Using VBA in Excel
- How to Hide Formula in Excel Using VBA

