Method 1 – Unprotect a Single Workbook with a Password in Excel VBA
Task: Unprotect the workbook named workbook_1.xlsx inside the Exceldemy folder using VBA code. The password used to protect the workbook is 123456.
Code: Insert the following code in the visual basic editor of workbook_1.xlsx and press F5 to run it.
Sub UnprotectWorkbookWithPassword()
Workbooks("workbook_1.xlsx").Unprotect Password:=123456
End Sub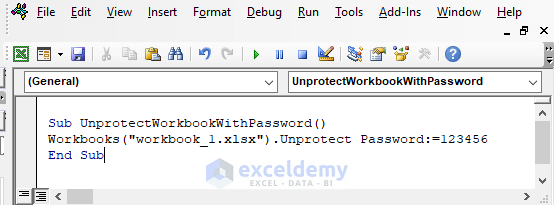 Output: Right–clicking on the sheet name shows the enabled options i.e., insert, delete, rename, move or copy, hide, and more. The Protect Sheet button is not highlighted.
Method 2 – Excel VBA Code to Unprotect Active Workbook with Password
Task: To configure our code to unprotect only the active workbook protected with a password. Open multiple workbooks, unprotect only the active workbook.
Code: Insert the following code inside the visual basic editor of workbook_1.xlsx and press F5 to run it.
Sub UnprotectWorkbookWithPassword()
ActiveWorkbook.Unprotect Password:=123456
End Sub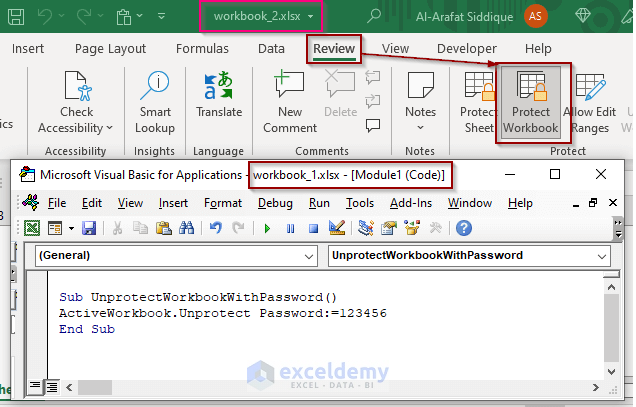
We’re running the code inside the visual basic editor for the workbook_1.xlsx workbook. The workbook_2.xlsx is the active workbook. The code will unprotect the active workbook instantly.
Method 3 – Unprotect the Current Workbook with a Password in Excel VBA
Task: Unprotect only the current workbook (workbook_1.xlsx in this example) with a password.
Code: Insert the following code inside the visual basic editor of workbook_1.xlsx and press F5 to run it.
Sub UnprotectWorkbookWithPassword()
ThisWorkbook.Unprotect Password:=123456
End Sub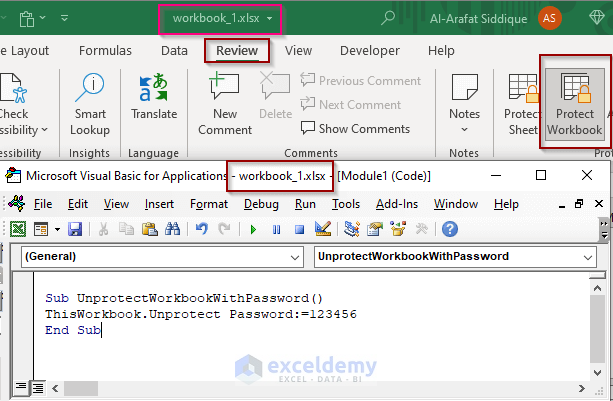
The screenshot shows the running code in the visual basic editor of the workbook_1.xlsx workbook. It’ll unprotect the current workbook.
Method 4 – Apply VBA Code to Unprotect All Open Workbooks with the Same Password
Task: There are multiple protected workbooks with the same password open. Configure the code to unprotect them all.
Solution: Use a For…Each loop to apply the Workbook.Unprotect method to all the open workbooks.
Code: Insert the following code inside the visual basic editor and press F5 to run it.
Sub UnprotectWorkbookWithPassword()
  Dim wbook As Workbook
    For Each wbook In Workbooks
        wbook.Unprotect Password:=123456
    Next wbook
End Sub
Method 5 – Unprotect All Open Workbooks with Different Passwords
Task: There are multiple protected workbooks with different passwords open. We want to configure our code that’ll unprotect them all.
Problem Analysis: The 4 workbooks in the Exceldemy folder, workbook_3.xlsx and workbook_4.xlsx have different passwords than the other workbooks. We need to set the passwords individually for each of the workbooks.
Code: Insert the following code inside the visual basic editor and press F5 to run it.
Sub UnprotectWorkbookWithPassword()
Workbooks("workbook_1.xlsx").Unprotect Password:=123456
Workbooks("workbook_2.xlsx").Unprotect Password:=123456
Workbooks("workbook_3.xlsx").Unprotect Password:=111111
Workbooks("workbook_4.xlsx").Unprotect Password:="password"
End Sub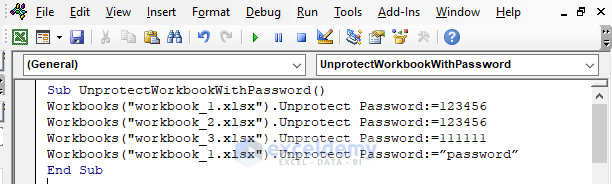
Method 6 – Run a VBA Code to Unprotect All Workbooks Except Specific Ones
Task: Unprotect all the opened workbooks protected with the same password except the workbook_2.xlsx.
Solution: Apply an If…Then…Else statement to check the workbook name. If the conditional finds the workbook then it’ll leave it protected and unprotect the others.
Code: Insert the following code inside the visual basic editor and press F5 to run it.
Sub UnprotectWorkbookWithPassword()
  Dim wbook As Workbook
    For Each wbook In Workbooks
    If wbook.Name = "workbook_2.xlsx" Then
        wbook.Protect (123456)
    Else
        wbook.Unprotect (123456)
    End If
    Next wbook
End Sub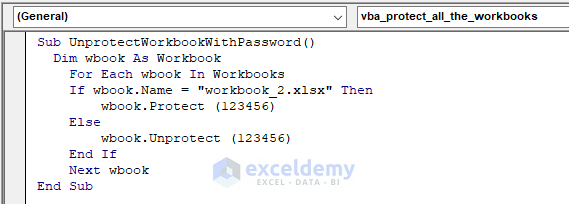
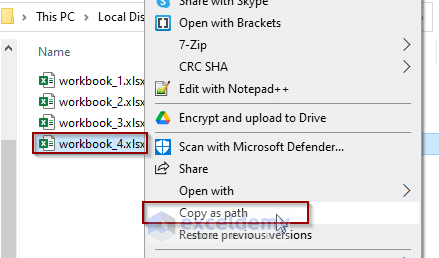
Method 7 – Unprotect a Closed Workbook with Password in Excel VBA
Task: Need to unprotect a closed workbook that is protected with a password.
Solution: Specify the workbook location. Open the method to open the workbook before applying the Workbook. Unprotect method with a password. To get the exact file location, press Shift and right-click on the workbook to copy the path.
Code: Insert the following code inside the visual basic editor and press F5 to run it.
Sub UnprotectWorkbookWithPassword()
Dim wbook As Workbook
Set wbook = Workbooks.Open("D:\Exceldemy\workbook_4.xlsx")
Application.ScreenUpdating = False
wbook.Unprotect (123456)
wbook.Close SaveChanges = True
Application.ScreenUpdating = True
End Sub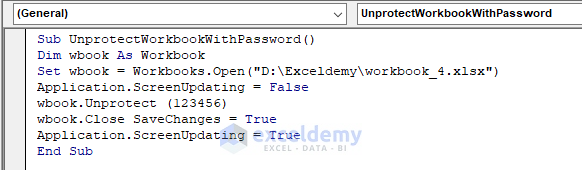
Things to Remember
- The password argument of the Unprotect method is case-sensitive.
Download Practice Workbook
Download this practice workbook to exercise while you are reading this article.
Related Articles
- How to Unprotect Excel Sheet with Password Using VBA
- Excel VBA: Unprotect All Sheets
- Excel VBA: Protect Workbook with Password
- Excel VBA to Protect Sheet but Allow to Select Locked Cells
- Excel VBA: How to Unprotect Excel Sheet Without Password

