Method 1 – Make Dataset Ready
- Make the dataset ready.
- Select a cell and type or paste the path location. Because you need to assign the cell in the VBA code later.
- We are using a dataset of height and weight. From the dataset, you can see that Cell B14 contains the path location.

Method 2 – Open Visual Basic Editor
- Open the Visual Basic Editor.
- Go to the Developer tab in the ribbon and select Visual Basic.
- Press Alt + F11 to open it.
- Press Fn + Alt + F11 to open the Visual Basic Editor.

Method 3 – Module Window Opening
- Open the Module window from the Visual Basic window.
- Click on the Insert tab and select Module. It will open the Module window.

Method 4 – Type VBA Code
- In the Module window, type the code below:
Sub Save_as_File_Using_Path()
Dim Wks1 As Worksheet
Dim Wkb1 As Workbook
Dim xPath As String
Dim FileName As String
Dim Wks2 As Worksheet
Dim Wkb2 As Workbook
Set Wkb1 = ThisWorkbook
Set Wks1 = Wkb1.Worksheets("Weight Info")
xPath = Wks1.Range("B14")
FileName = xPath & "\" & Wks1.Range("B2") & ".xlsx"
Wks1.Range("B2:C11").Copy
Set Wkb2 = Workbooks.Add
Set Wks2 = Wkb2.ActiveSheet
With Wks2.Range("B2:C11")
.PasteSpecial (xlPasteValues)
.PasteSpecial (xlPasteFormats)
Wks2.Range("B2:C11").Columns.AutoFit
End With
Application.DisplayAlerts = False
Wkb2.SaveAs FileName:=FileName, FileFormat:=xlWorkbookDefault
Wkb2.Close
Application.DisplayAlerts = True
End Sub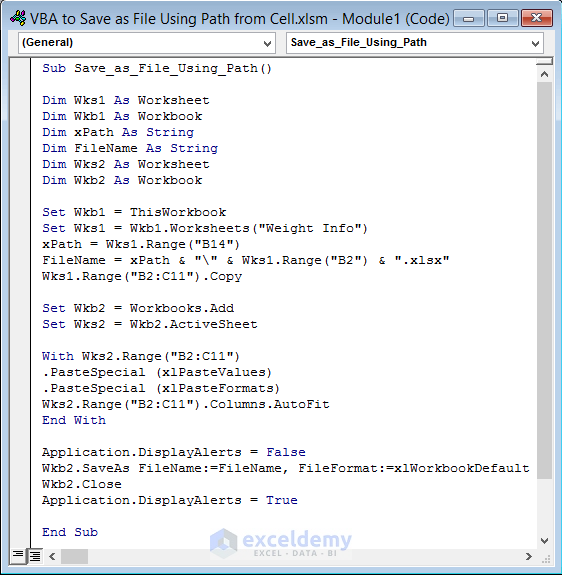
This code will create a copy of the active workbook and save it as a file in the path location stored in a cell.
VBA Code Explanation
Dim Wks1 As Worksheet
Dim Wkb1 As Workbook
Dim xPath As String
Dim FileName As String
Dim Wks2 As Worksheet
Dim Wkb2 As Workbook
Wks1 and Wkb1 are the variables to indicate the active worksheet and workbook respectively. Wks2 and Wkb2 represent the new worksheet and workbook that will be saved in the path location. xPath and FileName denote the path location and name of the file.
xPath = Wks1.Range("B14")This command is used to denote the path location. It means the value of Cell B14 of the active worksheet will be the path location. You need to change the path location when you will work with this code on your PC. Otherwise, it won’t work.
FileName = xPath & "\" & Wks1.Range("B2") & ".xlsx"We wanted to save the file as an excel file. So, we have used the FileName = xPath & “\” & Wks1.Range(“B2”) & “.xlsx” command. If you want to save it in .xlsm format, type .xlsm in place of the .xlsx of this command.
Wks1.Range("B2:C11").CopyWe just wanted to copy range B2:C11 from the current sheet. We used the Wks1.Range(“B2:C11”).Copy command. Change it according to your needs.
With Wks2.Range("B2:C11")
.PasteSpecial (xlPasteValues)
.PasteSpecial (xlPasteFormats)
Wks2.Range("B2:C11").Columns.AutoFit
End With
We used this portion to paste the values into the new sheet and to AutoFit column’s width.
Application.DisplayAlerts = False
Wkb2.SaveAs FileName:=FileName, FileFormat:=xlWorkbookDefault
Wkb2.Close
Application.DisplayAlerts = True
We used commands to save the file as a workbook.
Method 5 – Save and Run VBA Code
- Save the code first and then, run it.
- Hit Ctrl + S on the keyboard.
- Press the F5 key to run the code.
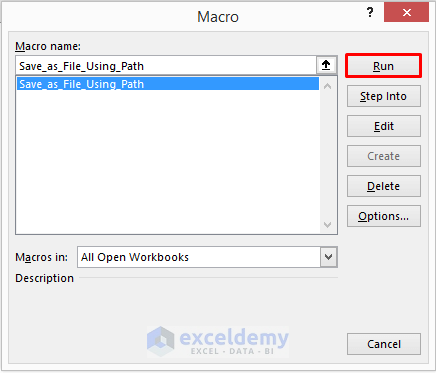
- Navigate to the Developer tab and select Macros. The Macro window will appear after this.

- From the Macro window, select the desired code and click on Run.
Method 6 – Check Saved File in Path Location
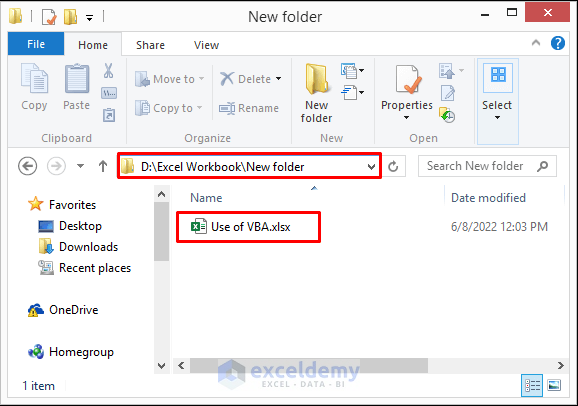
- After running the code, open the folder that was denoting the path location in Cell B14.
- In the desired location, you will see the excel file.
Method 7 – View Saved as File with Microsoft Excel
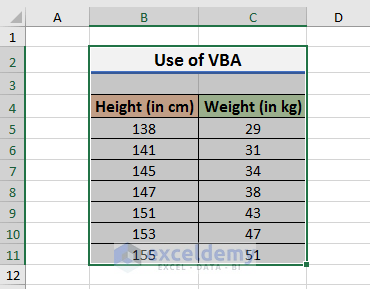
- Open the Excel file and you will see the dataset. It indicates that the VBA code actually worked.
Download Practice Book
Download the practice book here.
Related Articles
- Excel VBA to Save File with Variable Name
- Excel VBA: Save Workbook Without a Prompt
- Create New Workbook and Save Using VBA in Excel
- How to Use Macro to Save Excel File with New Name
- How to Save Excel Macro Files as Filename from Cell Value
- Excel VBA to Save Workbook in Specific Folder with Date
- Excel VBA: Save Workbook in Specific Folder

