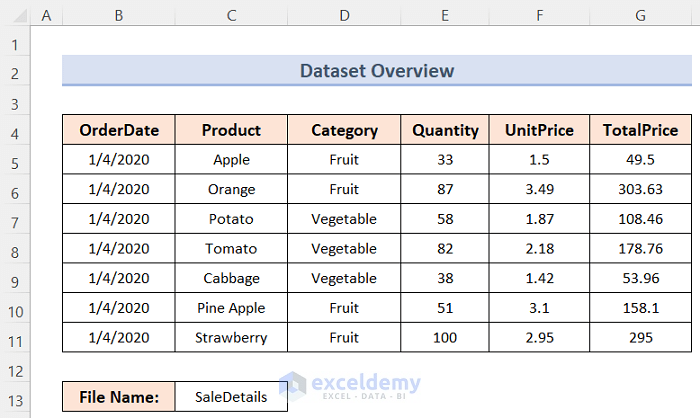
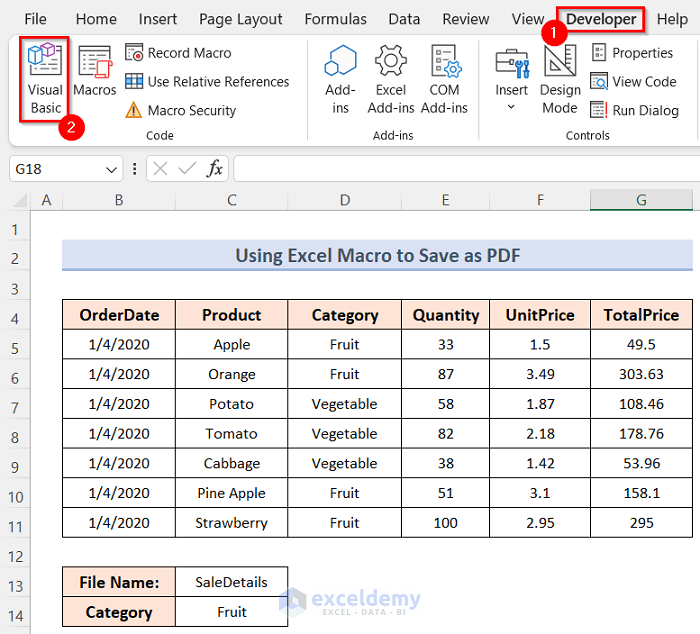
Dataset Overview
To demonstrate the methods, we have taken the following dataset of the Sales history of some products in a shop.
Method 1 – Using VBA Code
Steps
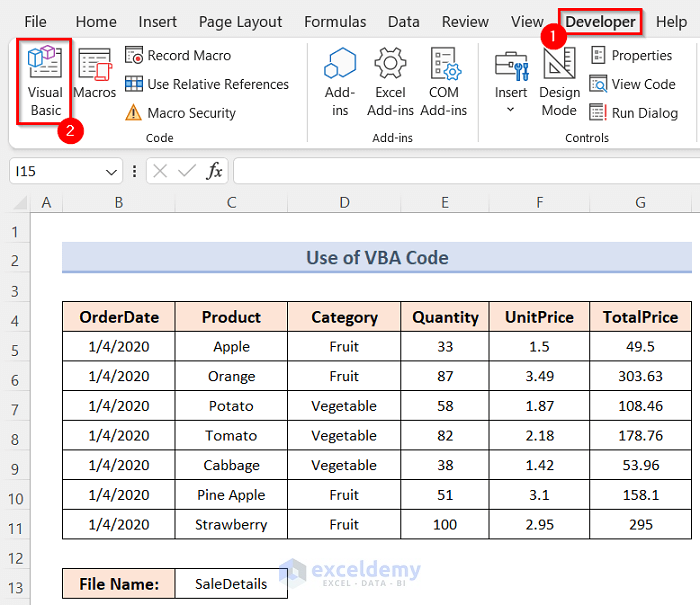
- Open the Microsoft Visual Basic editor by going to the Developer tab and clicking on Visual Basic.
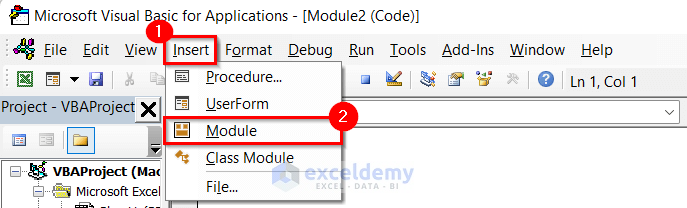
- Insert a new module by clicking on the Insert tab and selecting Module.
- Copy and paste the following VBA code into the module:
Sub File_Name_As_Cell_Value()
Dim File_Name As String
Dim Destination As String
Application.DisplayAlerts = False
Destination = "C:\ExcelDemy\"
File_Name = Range("C13").Value & ".xlsx"
ActiveWorkbook.SaveAs Destination & File_Name, xlOpenXMLWorkbook
Application.DisplayAlerts = True
ActiveWorkbook.Close
End Sub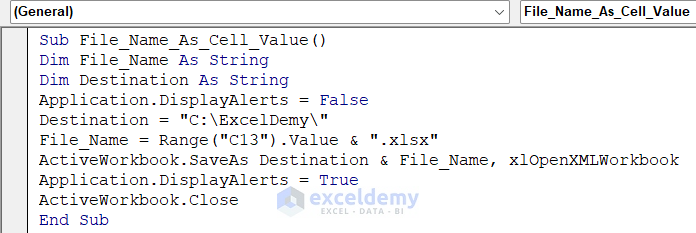
- Run the code by clicking the Run option or pressing F5.
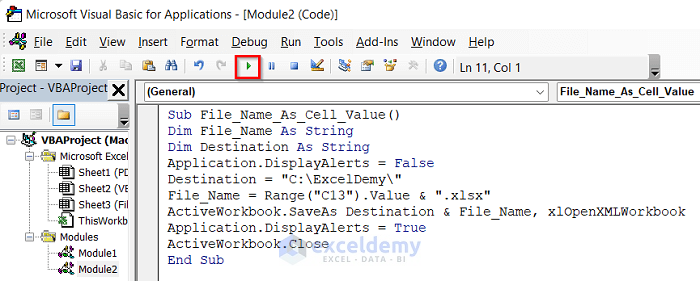
- The resulting XLSX file will be saved in the specified folder on your C drive, named after the cell value (e.g., SaleDetails).

Read More: How to Use Macro to Save Excel File with New Name
Method 2- Filtering Data Based on a Cell Value
2.1 Save as XLSM File
Using a VBA code, we will filter our dataset to display the sales history of the Fruits only and then save the file.
Steps
- Open the Microsoft Visual Basic editor.

- Insert a new module – click on the Insert tab and select Module.

- Copy and paste the following VBA code:
Sub save_cell_value()
Sheets("Filter").Range("B4").AutoFilter Field:=3, Criteria1:=Cells(13, 3).Value
On Error Resume Next
ActiveWorkbook.SaveAs filename:="C:\ExcelDemy\" + Cells(13, 3).Value
End Sub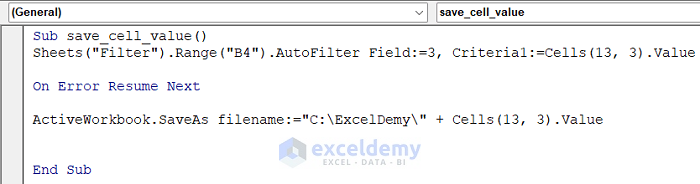
- Run the code to filter the dataset and display only the Fruit item’s sales history.
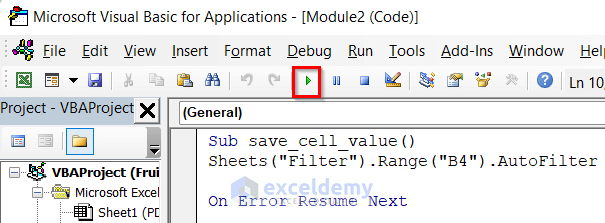
- The resulting XLSM file will be saved in the specified folder.
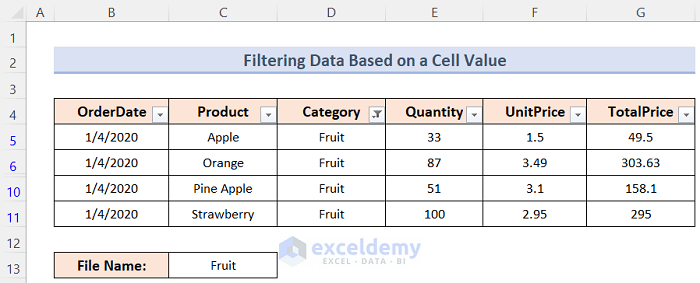
- If you go to the C drive and open the ExcelDemy folder, you will see an XLSM file named after the cell value (Fruit) of your dataset as shown below.

Read More: How to Save a Copy as XLSX Using Excel VBA
2.2 Save as PDF File
Using a VBA code, we will again filter our dataset to display the sales history of the Fruits only and then save the file.
Steps
- Open the Microsoft Visual Basic editor.
- Insert a new module – click on the Insert tab and select Module.
- Copy and paste the following VBA code:
Option Explicit
Sub FilterBasedOnCellValueAnotherSheet()
Dim category As Range
Dim filename As String
With Worksheets("Filter")
Set category = .Range("C14")
End With
With Worksheets("Filter")
With .Range("B4:G11")
.AutoFilter Field:=3, Criteria1:=category, VisibleDropDown:=True
End With
End With
filename = "C:\ExcelDemy\" & Range("C13").Value
ActiveSheet.ExportAsFixedFormat Type:=xlTypePDF, filename:= _
filename, Quality:=xlQualityStandard, IncludeDocProperties _
:=True, IgnorePrintAreas:=False, OpenAfterPublish:=False
End Sub
- Run the code to filter the dataset and display only the Fruit item’s sales history.

- The resulting PDF file will be saved in the specified folder.
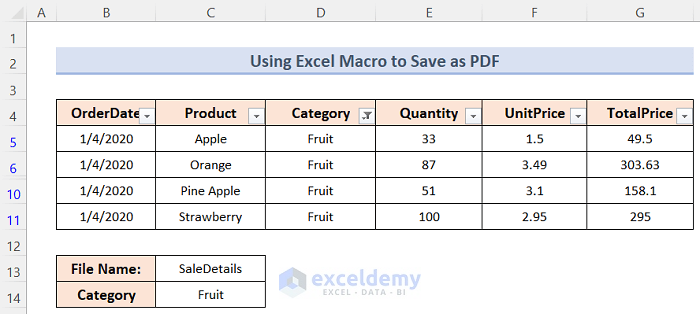
- Check the ExcelDemy folder on your C drive to find the saved files according to the cell values (e.g., SaleDetails or Fruit).

Read More: Excel VBA to Save Workbook in Specific Folder with Date
Key Points to Remember
- Use of VBA Code Method (XLSX):
- Converts the file directly to an XLSX format.
- VBA code is not included in the resulting XLSX file.
- Saved in the specified folder.
- Filtering Data and Saving as XLSM File Method (XLSM):
- Converts the file to an XLSM format.
- VBA code is available only in the destination folder file.
- Saved in the specified folder.
- Filtering Data and Saving as PDF File Method (PDF):
- Converts the file to a PDF format.
- VBA code is available both in your workbook and the destination folder file.
- Saved in the specified folder.
Download Practice Workbook
You can download the practice workbook from here:
Related Articles
- Excel VBA Save as File Format
- Excel VBA to Save as File Using Path from Cell
- Excel VBA to Save File with Variable Name
- Excel VBA: Save Workbook Without a Prompt
- Create New Workbook and Save Using VBA in Excel
- Excel VBA: Save Workbook in Specific Folder
- Excel VBA: Save Workbook as New File in Same Folder

