Dataset Overview
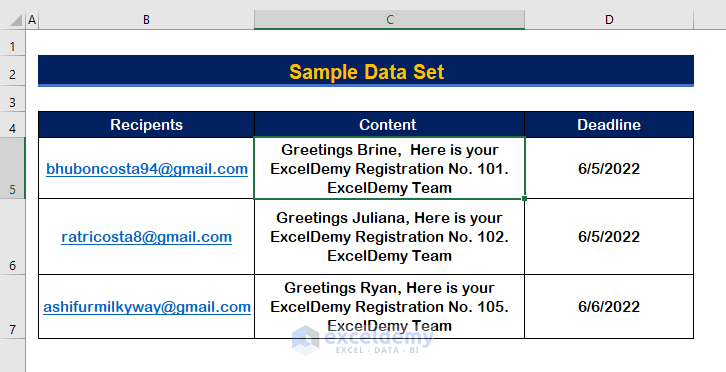
We’ve included a sample data set in the image below to demonstrate the difference after running the VBA codes to stop the prompting. While saving the file, we’ll use VBA codes to disable the display alert message.
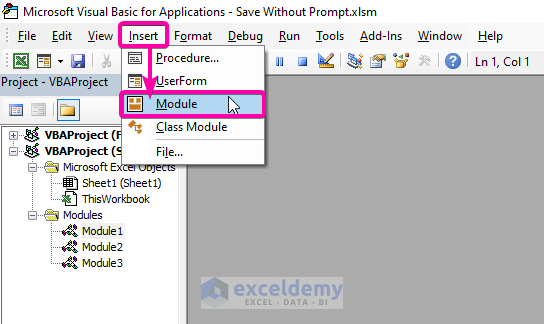
Step 1 – Create a Module to Enter VBA Code
- Press Alt + F11 to open the VBA Macro.
- Click on the Insert tab.
- Select Module to create a new module.
Read More: Create New Workbook and Save Using VBA in Excel
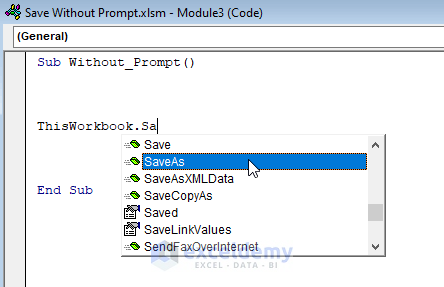
Step 2 – Insert SaveAs Function in Code
- To use the SaveAs function in this workbook, enter (), and select SaveAs from the list of available functions.
Read More: How to Save a Copy as XLSX Using Excel VBA
Step 3 – Add File Address and Name in VBA Code
- Go to the file location and copy the address.
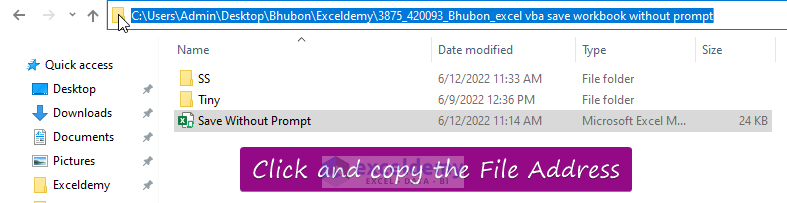
- Paste the address under the Filename argument of the SaveAs function.
- Enter the file name.
- Close the address and the file name with inverted commas (” “).

- After adding the address, enter a comma and enter 52 for the FileFormat argument.

- That is how the final codes will appear.
Sub Without_Prompt()
ThisWorkbook.SaveAs "C:\Users\Admin\Desktop\Bhubon\Exceldemy\3875_420093_Bhubon_excel vba save workbook without prompt\Save Without Prompt", 52
End Sub
Read More: Excel VBA Save as File Format
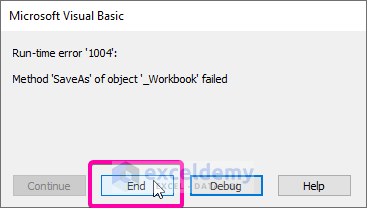
Step 4 – Run VBA Code and Check for Error
- A prompt message will pop up because we didn’t disable the Alerts message.
- Click No.

- Finally, click on End.
Step 5 – Enter a Code to Disable the Prompt Message
- To disable the prompt message, we need to disable the DisplayAlerts message.
- Set the DisplayAlerts option to False to prevent prompting.
- Enter the following codes in the Module:
Sub Without_Prompt()
'Command to not to show the Prompt
Application.DisplayAlerts = False
'Apply command to save the file
'In the File Name argument give the file name and address
ThisWorkbook.SaveAs "C:\Users\Admin\Desktop\Bhubon\Exceldemy\3875_420093_Bhubon_excel vba save workbook without prompt\Save Without Prompt", 52
Application.DisplayAlerts = True
End Sub

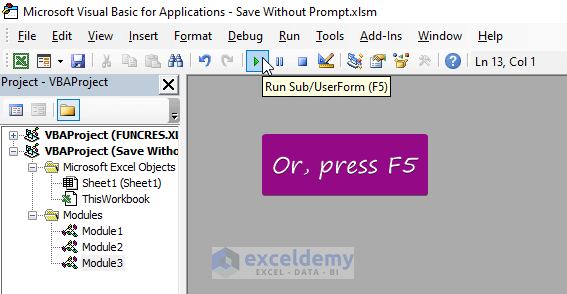
Step 6 – Run VBA Code After Disabling DisplayAlerts Command
- Click the Run button or press F5 to execute the VBA codes.
- No alerting message will be prompted now.

Step 7 – Check Final Result
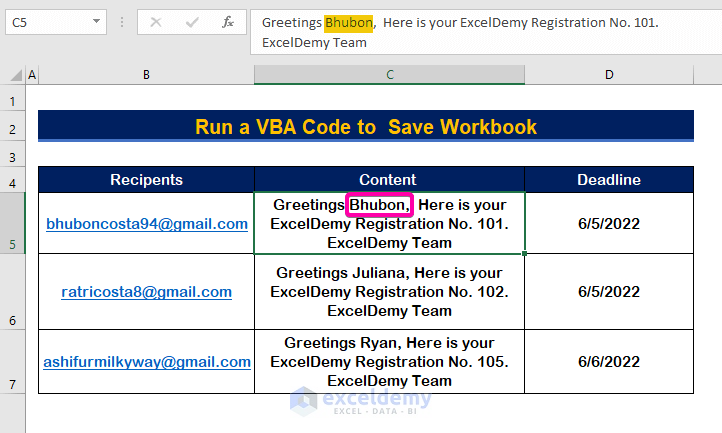
- In your sample data set, change the recipient’s name from Brine to Bhubon.

- Press F5 to run the program, and no message will pop up.
- Close the worksheet without saving it.
- Open the file and verify that it has been saved with the latest changes you made.
Download Practice Workbook
You can download the practice workbook from here:
Related Articles
- Excel VBA: Save Workbook in Specific Folder
- How to Use Macro to Save Excel File with New Name
- Excel VBA: Save Workbook as New File in Same Folder
- Excel VBA to Save File with Variable Name
- Excel VBA to Save Workbook in Specific Folder with Date
- Excel VBA to Save as File Using Path from Cell
- How to Save Excel Macro Files as Filename from Cell Value


if the new file is opened with the same name, it will be prompted
Dear HARIRI,
When you use the following command in your code, the prompt will not appear.
Application.DisplayAlerts = False
However, if you want to open a new file in the same name in the same folder, there may be two scenarios. You might be able to do that without any obstacles because you have a file with .xlsm extension only with that name and no .xlsx file with that name. But if you have two files with same name in same folder, one with .xlsm extension and another with .xlsx extension, then you cannot open a new Excel file in that folder. Prompt will appear to warn you that there is a folder with the same name and you will have to discard that action or have to modify the file name.