The Basic Syntax of an Input Box in Excel VBA
The basic Syntax of an inputbox is given below:
InputBox(Prompt, Title, Default, XPos, YPos, HelpFile, HelpContextID)This will pop up an empty box (in some cases with a predefined or preloaded value). The value inserted by the user is generally stored in a variable and from there the value is used in other places or functions. The parameters include:
- Prompt (required): This is the message that shows up in the input box to tell the user to type something in. It could be a string variable or a string expression.
- Title (optional): This is the name that will show up in the input box’s title bar. It could be a string variable or a string expression. If you don’t use this parameter, the application’s name will show up in the title bar.
- Default (optional): This is the value that shows up in the box by default. It could be a string variable or a string expression. If you don’t include this parameter, the input box will show up with nothing in it.
- XPos(Optional) and YPos(Optional): XPos and YPos are optional parameters that tell where the input box is on the screen in relation to the top left corner. Both of the parameters are numbers. If you leave these out, the input box will show up in the middle of the screen.
- HelpContextID and HelpFile: HelpFile and HelpContextID are optional parameters that are used to show help for the input box that is relevant to the current situation. If you put these parameters in the input box, a Help button will show up. When the user clicks the Help button, the HelpFile and HelpContextID parameters are sent to the help system, which then shows the right help topic. The HelpFile parameter tells the program where to find the help file. The HelpContextID parameter tells the program what the help topic’s context ID is.
Is It Possible to Create an Input Box with Options in Excel VBA?
The traditional Excel input box does not allow users to choose between options. You only can enter values or accept a range of cells from the user. Multiple-option choice boxes are generally unsupported.
However, you can use VBA programming to create a user form that includes multiple checkboxes or a list box. The user can then select one or more options from the list and click a button to submit the choices.
Alternatively, you can use Excel’s built-in data validation feature to create a drop-down list with multiple choices. This allows users to select one option from a list of choices, but does not allow for multiple selections at once.
Userform – the Best Way to Create an Input Box with Options in Excel
Here’s an example of an input box that is created using the VBA Userform. You can modify the input data types, ranges of data, etc.
Definition: A user form is part of a software program’s graphical user interface (GUI). It lets users interact with the program by entering data or making choices. It usually has input fields, checkboxes, dropdown menus, buttons, and other controls that let users tell the application what to do. User forms are often used in software to do things like enter data, set up settings, and make changes. They can help improve the user experience by making the interface for interacting with the app easy to understand and use.
The UserForm control or components can be added using the VBA code or manually by using the toolbox. Then those inputs can be manipulated according to the need of the user. The whole process is going to be given below in details.
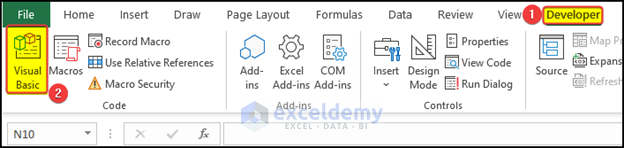
How to Launch the VBA Editor in Excel
- Press Alt+F11 or use the Visual Basic command from the Developer tab
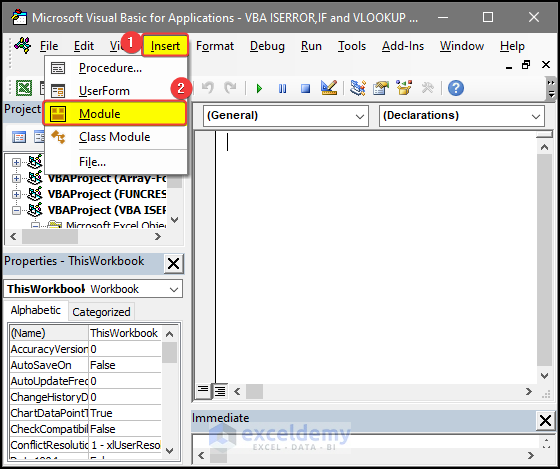
- Go to Insert and select Module, and you will get an editor where you can put code.
Note: If you can’t find the Developer tab in the ribbon, then you need to enable the Developer tab.
Excel VBA: How to Create an Input Box with Options (with Steps)
Step 1 – Creating a UserForm for an Input Box with Options
- Go to the Developer tab in the worksheet and then click on Visual Basic.
- Click on Insert and select UserForm.
Read More: How to Use Excel VBA InputBox with Example
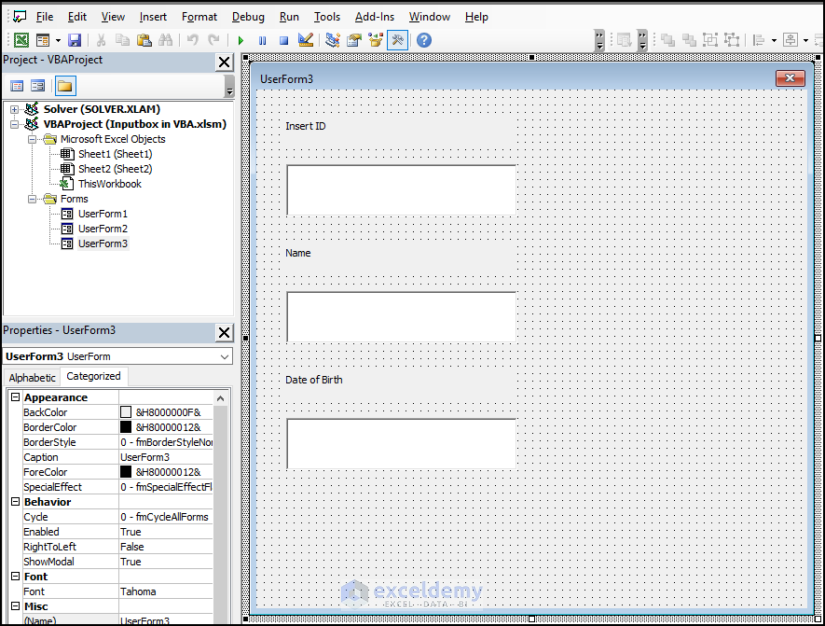
Step 2 – Insert TextBoxes and Labels to Add Options in VBA Input Box
- Select the Textbox tool from the toolbox and then draw the textbox inside the UserForm editor.
- Select the Label tool from the toolbox and then again draw the label on the UserForm.
- From the properties window, edit the caption of the label and set it to Insert ID.
- Repeat the same process to enter two more text boxes and their labels.
- Set the labels to Name and Date of Birth.
Read More: Excel VBA: Create InputBox with Multiple Inputs
Step 3 – Insert a Combo Box and Label for Dropdown List in Excel
- Enter a Combo Box from the toolbox and add another label.
- Change the Label caption to Department.
Read More: Excel VBA Input Box with Drop Down List
Step 4 – Insert the Option Buttons to Create an Input Box
- Enter a frame inside the UserForm using the toolbox.
- Enter the OptionButton from the toolbox inside the added frame and add a label for it.
- Change the Label caption to Department.
- Repeat the same process to add another OptionButton from the toolbox and its Label.
- Change the first OptionButton Label to Male and the second OptionButton label to Female.
Step 5 – Insert Checkboxes
- Enter a frame inside the UserForm using the toolbox.
- Insert a checkbox inside the frame and add a label.
- Change the Label caption to Data Analysis.
- Repeat the process to add four more CheckBoxes from the toolbox and Label them.
- Change the Label captions to Machine Learning, Artificial Intelligence, Big Data, and Power BI.
Step 6 – Insert the Buttons
- Select the Command Button from the toolbox and place it at the bottom of the form.
- Repeat the same process twice.
- Change the captions to Submit, Reset, and Cancel.
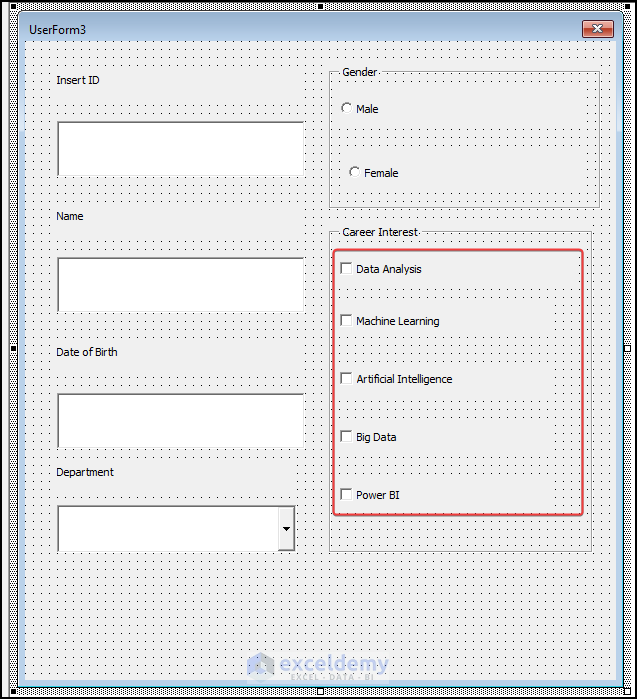
Step 7 – Change the Alignment of the Components
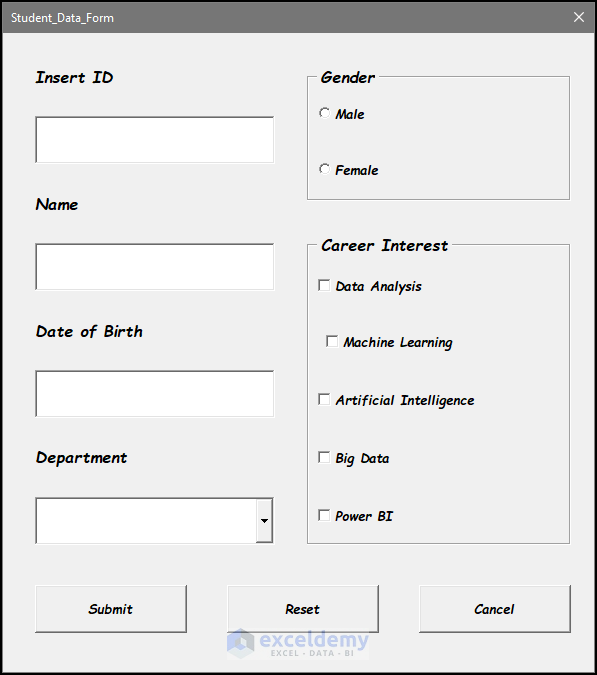
- Move the elements so they look more organized like in the image below.
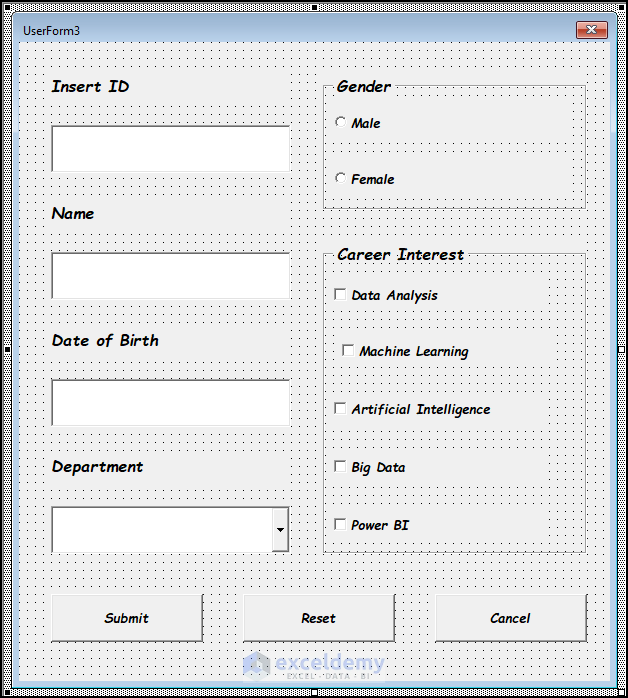
Step 8 – Change Font Sizes and Styles
- See the video above for changing the font.
- The final outcome will look like the below image.
Step 8 – Set the VBA Code for Initializing the UserForm
| Command Button | Sub-procedure |
|---|---|
| Submit | CommandButton1 |
| Reset | CommandButton2 |
| Abort | CommandButton3 |
For Textboxes
| TextBox | Sub-procedure |
|---|---|
| Employee ID | TextBox1 |
| Name | TextBox2 |
| Region | TextBox3 |
| Product | TextBox4 |
- Enter the following code into the VBA module.
Private Sub UserForm_Initialize()
ComboBox2.AddItem "Computer Science"
ComboBox2.AddItem "Software Engineering"
ComboBox2.AddItem "Statistics"
End Sub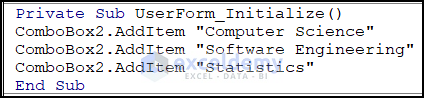
- This part of the code will run when the UserForm initializes.
- This code will add the names of the items as “Computer Science”, “Software Engineering”, and “Statistics” into the combobox.
- If we run the code experimentally now, we can see that the items are now added in the combobox and we can change and choose the items from a dropdown list as shown in the image below.

Step 9 – Write Code for the Cancel and Reset Buttons
Code for Unloading the UserForm
Private Sub CommandButton2_Click()
Unload Me
End Sub
Code for the Cancel button
Private Sub CommandButton3_Click()
    Dim myCtrl As Control
    For Each myCtrl In Me.Controls
    If TypeOf myCtrl Is MSForms.TextBox Or TypeOf myCtrl Is MSForms.ComboBox _
    Or TypeOf myCtrl Is MSForms.OptionButton Or TypeOf myCtrl Is MSForms.CheckBox Then
            myCtrl.Value = ""
        End If
    Next myCtrl
End Sub
Code Breakdown
Private Sub CommandButton3_Click()- The first line of the code declares a new variable ctrl of the Control type. This variable will be used to loop through all the controls on the user form.
 Dim myctrl As Control
For Each myctrl In Me.Controls- The For Each statement starts a loop that iterates through each control in the Me.Controls collection, which contains all the controls on the user form.
If TypeOf myctrl Is MSForms.TextBox Or TypeOf myctrl Is MSForms.ComboBox Or TypeOf myctrl Is MSForms.OptionButton Or TypeOf ctrl Is MSForms.CheckBox Then- The If statement checks whether each control is of one of four types: MSForms.TextBox, MSForms.ComboBox, MSForms.OptionButton, or MSForms.CheckBox. These are all common types of form controls that can accept user input.
myctrl.Value = ""- If the control is one of these types, the Value property of the control is set to an empty string using the code myctrl.Value = “”. This effectively clears the contents of the control.
- The loop continues until it has checked all the controls in the Me.Controls collection.
End If
    Next myctrl
End Sub
When the loop is complete, the subroutine ends, and the contents of all the designated form controls are cleared.
- This part of the code is for the Reset button. When this button is clicked, all of the UserForm controls are going to be reset and set back to the initial condition.
Read More: How to Use VBA Input Box with Buttons in Excel
Step 10 – Write code for Male OptionButton and Female OptionButton
For Optionbutton1:
Private Sub OptionButton1_Change()
If OptionButton1 = True Then
gender = "Male"
ElseIf OptionButton2 = True Then
gender = "Female"
End If
End Sub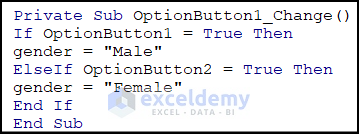
Code Breakdown
Private Sub OptionButton1_Change()- The first line of the code is the declaration of the sub procedure with the keyword “Private”. This means that the sub procedure can only be accessed within the UserForm module.
If OptionButton1 = True Then
gender = "Male"- The second line of the code checks whether the value of OptionButton1 is true. If the value of OptionButton1 is true, the code assigns the string “Male” to the variable “gender”.
ElseIf OptionButton2 = True Then
gender = "Female"- If the value of OptionButton1 is not true, then the ElseIf statement in the code checks whether the value of OptionButton2 is true. If the value of OptionButton2 is true, then the code assigns the string “Female” to the variable “gender”.
End If
End Sub- The End If statement closes the If…ElseIf… block, and the End Sub statement indicates the end of the subprocedure.
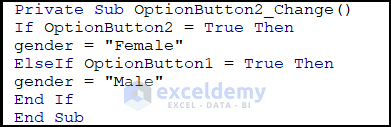
For Optionbutton2:
Private Sub OptionButton2_Change()
If OptionButton2 = True Then
gender = "Female"
ElseIf OptionButton1 = True Then
gender = "Male"
End If
End Sub
Code Breakdown
- This part of the code denotes any changes in the optionbutton, which means if there is any change in the status of the optionbutton, then this code will execute.
OptionButton2_Change()- The first line of the code is a declaration of the sub procedure with the keyword “Private” which means that it can only be accessed within the UserForm module.
If OptionButton2 = True Then
gender = "Female"- The second line checks if the value of OptionButton2 is true, which means that the user has selected this option. If it is true, the code assigns the string “Female” to the variable “gender”.
ElseIf OptionButton1 = True Then
gender = "Male"- The third line checks if the value of OptionButton1 is true, which means that the user has selected this option instead of OptionButton2. If it is true, the code assigns the string “Male” to the variable “gender”.
End If
End Sub- The End If statement closes the If…ElseIf… block, and the End Sub statement indicates the end of the sub procedure.
Step 11 – Use VBA Code for the Submit Button
Code for CheckBoxes
Dim career_choice() As String
If CheckBox1.Value = True Then
ReDim Preserve career_choice(i)
career_choice(i) = "Data Analysis"
i = i + 1
End If
If CheckBox2.Value = True Then
ReDim Preserve career_choice(i)
career_choice(i) = "Machine Learning"
i = i + 1
End If
If CheckBox3.Value = True Then
ReDim Preserve career_choice(i)
career_choice(i) = "Artificial Intelligence"
i = i + 1
End If
If CheckBox4.Value = True Then
ReDim Preserve career_choice(i)
career_choice(i) = "Big Data"
i = i + 1
End If
If CheckBox5.Value = True Then
ReDim Preserve career_choice(i)
career_choice(i) = "Power BI"
i = i + 1
End If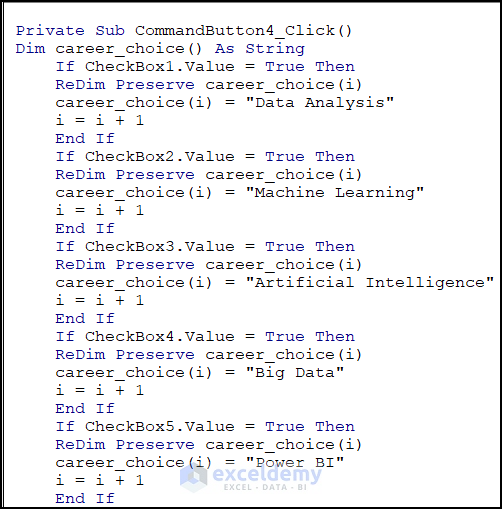
Check Whether User Keep Any Input Empty and Correct Data Format
If TextBox1.Value = "" Or TextBox2.Value = "" Or TextBox4.Value = "" _
Or ComboBox2.Value = "" Or Len(gender) = 0 Or i = 0 Then
MsgBox "Enter all the input values properly"
GoTo ErrorHandler
ElseIf Not IsDate(TextBox4.Value) Then
MsgBox "Please enter a valid date in the format mm/dd/yyyy."
GoTo ErrorHandler
Else
Code Breakdown
If TextBox1.Value = "" Or TextBox2.Value = "" Or TextBox4.Value = "" _
Or ComboBox2.Value = "" Or Len(gender) = 0 Or i = 0 Then
MsgBox "Enter all the input values properly"
GoTo ErrorHandler- The first line of the code checks whether any of the input values are empty or null. If any of the input values are empty, the code displays a message box with an error message “Enter all the input values properly” and jumps to the ErrorHandler sub-procedure.
ElseIf Not IsDate(TextBox4.Value) Then
MsgBox "Please enter a valid date in the format mm/dd/yyyy."
GoTo ErrorHandler- The second line of the code checks whether the date entered in TextBox4 is a valid date format. If the date format is invalid, the code displays a message box with an error message “Please enter a valid date in the format mm/dd/yyyy” and jumps to the ErrorHandler sub procedure.
Else- If both the conditions are false, it means that all the input values are valid, and the code executes the statements under the Else block.
Place Values in the Worksheet If Inputs Are Alright
lastRow = ActiveSheet.Cells(ActiveSheet.Rows.Count, 3).End(xlUp).Row
ActiveSheet.Cells(lastRow + 1, 2).Value = TextBox1.Value
ActiveSheet.Cells(lastRow + 1, 3).Value = TextBox2.Value
ActiveSheet.Cells(lastRow + 1, 4).Value = TextBox4.Value
ActiveSheet.Cells(lastRow + 1, 5).Value = ComboBox2.Value
ActiveSheet.Cells(lastRow + 1, 6).Value = gender
On Error Resume Next
For i = 0 To UBound(career_choice)
If IsEmpty(ActiveSheet.Cells(lastRow + 1, 7).Value) Then
ActiveSheet.Cells(lastRow + 1, 7).Value = career_choice(i)
Else
ActiveSheet.Cells(lastRow + 1, 7).Value = ActiveSheet.Cells(lastRow + 1, 7) _
.Value & ", " & career_choice(i)
End If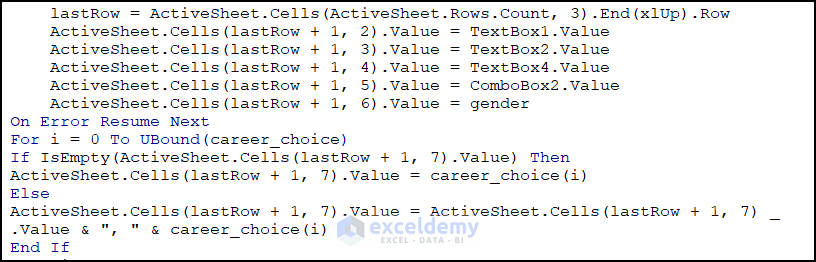
Code Breakdown
lastRow = ActiveSheet.Cells(ActiveSheet.Rows.Count, 3).End(xlUp).Row- The first line of the code calculates the last row in the worksheet by finding the last non-empty cell in column 3 (C) and storing its row number in the variable “lastRow”.
ActiveSheet.Cells(lastRow + 1, 2).Value = TextBox1.Value
ActiveSheet.Cells(lastRow + 1, 3).Value = TextBox2.Value
ActiveSheet.Cells(lastRow + 1, 4).Value = TextBox4.Value
ActiveSheet.Cells(lastRow + 1, 5).Value = ComboBox2.Value
ActiveSheet.Cells(lastRow + 1, 6).Value = gender- The next five lines of the code assign the values of TextBox1, TextBox2, TextBox4, ComboBox2, and “gender” to the cells in the next available row in columns 2 (B) to 6 (F) of the worksheet.
On Error Resume Next- The next line of the code begins an error handling block using the On Error Resume Next statement. This statement causes the program to continue execution if an error occurs in the following statements.
For i = 0 To UBound(career_choice)- The For loop that follows runs from i = 0 to the upper bound of the “career_choice” array, which presumably contains a list of career choices selected by the user in the UserForm.
If IsEmpty(ActiveSheet.Cells(lastRow + 1, 7).Value) Then
ActiveSheet.Cells(lastRow + 1, 7).Value = career_choice(i)
Else
ActiveSheet.Cells(lastRow + 1, 7).Value = ActiveSheet.Cells(lastRow + 1, 7) _
.Value & ", " & career_choice(i)
End If- Inside the For loop, the code checks whether the cell in column 7 (G) of the next available row is empty using the IsEmpty function. If the cell is empty, the code assigns the value of the first career choice in the “career_choice” array to the cell. If the cell is not empty, the code appends the next career choice in the “career_choice” array to the existing value of the cell, separated by a comma and a space.
Code for Autofitting the Columns and Set the Inputs Back to Initial State
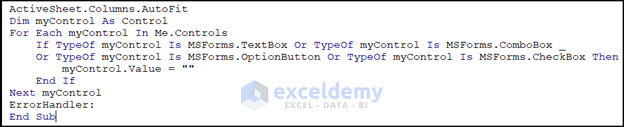
ActiveSheet.Columns.AutoFit
Dim myControl As Control
For Each myControl In Me.Controls
    If TypeOf myControl Is MSForms.TextBox Or TypeOf myControl Is MSForms.ComboBox _
    Or TypeOf myControl Is MSForms.OptionButton Or TypeOf myControl Is MSForms.CheckBox Then
        myControl.Value = ""
    End If
Next myControl
ErrorHandler:
End Sub
Code Breakdown
ActiveSheet.Columns.AutoFit- The first line of the code, ActiveSheet.Columns.AutoFit, adjusts the width of all columns in the active worksheet to fit their contents. This has nothing to do with clearing the form controls, but it may be useful for formatting purposes.
Dim myctrl As Control- The second line of the code declares a new variable myctrl of the Control type. This variable will be used to loop through all the controls on the user form.
For Each myctrl In Me.Controls- The For Each statement starts a loop that iterates through each control in the Me.Controls collection, which contains all the controls on the user form.
       If TypeOf myctrl Is MSForms.TextBox Or TypeOf myctrl Is MSForms.ComboBox _
Or TypeOf myctrl Is MSForms.OptionButton Or TypeOf myctrl Is MSForms.CheckBox Then- The If statement checks whether each control is of one of four types: MSForms.TextBox, MSForms.ComboBox, MSForms.OptionButton, or MSForms.CheckBox. These are all common types of form controls that can accept user input.
myctrl.Value = ""- If the control is one of these types, the Value property of the control is set to an empty string using the code myctrl.Value = “”. This effectively clears the contents of the control.
     End If
    Next myctrl
ErrorHandler:- This part of the code will set the column width to autofit to its contents.
- Then after the cell width are being autofitted, the next part of the code will remove the code inputs and set the input text boxes into the initial states.
Read More: How to Handle VBA InputBox Cancel Button in Excel
Step 12 – Insert a Button in the Worksheet to Launch the UserForm
- Go to the Developer tab and click on the Command Button from the Insert option.
- Right-click on the Command Button and click on the Properties from the Properties window.
- Alter the caption to Input Student Data.
- Right-click on the command button and then click on the View Code button.
- In the code editor window, enter the following code:
Private Sub CommandButton1_Click()
Student_Data_Form.Show
End Sub- Click on the Save icon.
How to Use the Excel Input Box to Fill Cell
We can add random text or our desired inputs in the worksheet’s certain cell using the input box. For this, we can use the following code:
Sub InputBoxFillCell()
Dim userInput As Variant
userInput = InputBox("Enter your input:", "Input Box")
ActiveCell.Value = userInput
End Sub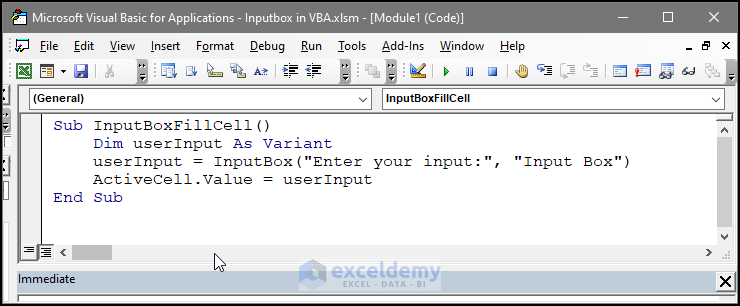
- We can select the cell where we can enter the input value. Then, we can run the code to pop up the input box.
- In the input box we can enter the input value and press OK.
- After pressing OK, we can see that the selected cell now has the input value.
Things to Remember
- Input values need to be in the proper type. You can fix the types in the input box input values. If the user enters values other than the set type, you can set up warnings.
- Always remember to validate your output results. Check the output result by matching several input and output values.
Download the Practice Workbook
Related Articles
- How to Create Yes-No InputBox with Excel VBA
- Excel VBA InputBox with Multiple Lines
- Excel VBA: InputBox with Password Mask


Hi, Thank you so much for this blog. It has been super useful for me. May I know how would you attach a dataset into Input box to return a value in the excel ?
Greetings Pooja,
You might want to know how you can attach a whole dataset to the worksheet. For this, you can follow this article from our website. In this article, you will know how you can attach values to the worksheet from the inputbox values. If your query is related to something else, please elaborate on your problem with examples.