How to Launch a VBA Editor in Excel
To launch the VBA Editor, click on the Developer Tab from Excel Ribbon and select the Visual Basic option. If your Excel Ribbon does not have the Developer Tab, you need to manually add it. Read this article to learn how to add Developer Tab in Excel ribbon.
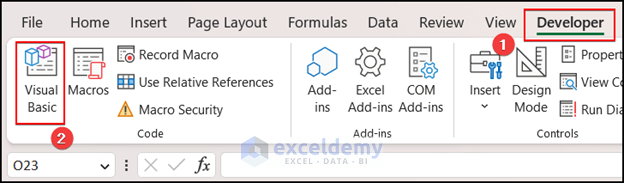
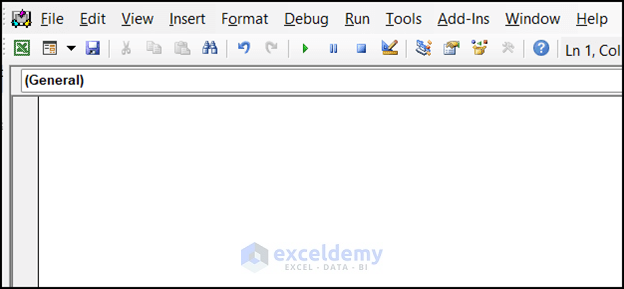
After clicking on Visual Basic, Excel will open the VBA Editor Window. In this window, you can enter your VBA code.
Mask Password in Inputbox with Excel VBA
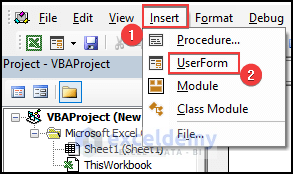
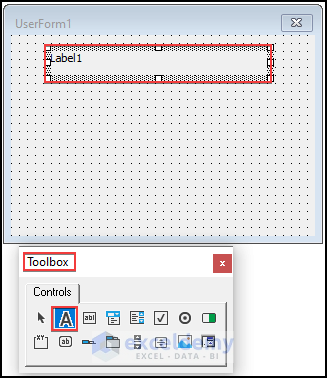
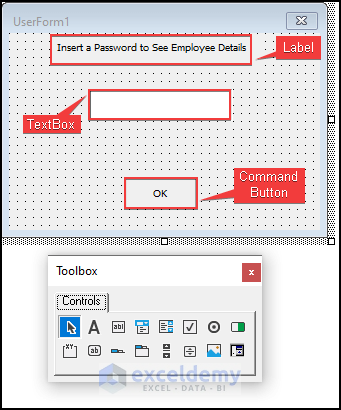
Step 1 – Insert UserForm
- Right-click on the code window. Insert ➪ UserForm.
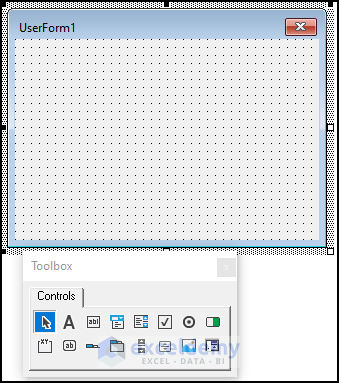
- You have inserted UserForm1. This will show a Toolbox Controls as well.
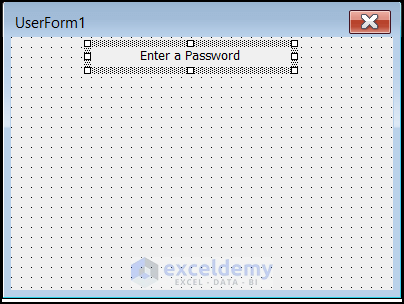
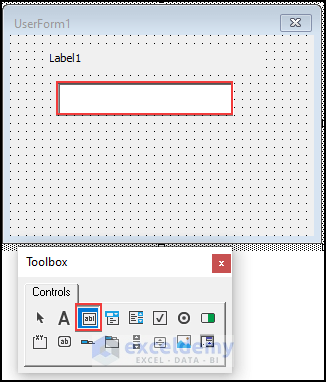
Step 2 – Add Label and Textbox from Controls
- Insert a Label from Controls. Edit the caption of the label as “ Enter a Password”.
- Align the Caption of the Label by setting the TextAlign Property to fmTextAlignCenter.
- Insert a Textbox to the UserForm from Controls.
Read More: Excel VBA: Custom Input Box (7 Examples)
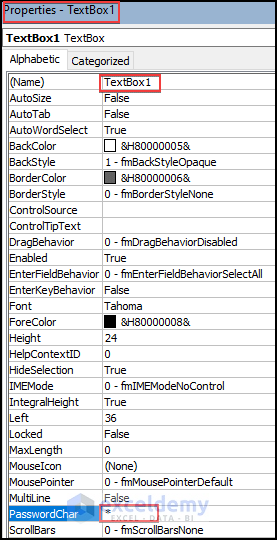
Step 3 – Edit UserForm TextBox Properties
- In the TextBox1 properties you will see PasswordChar. Set PasswordChar as an asterisk symbol “*”. When you enter anything into the Textbox it will be hidden with a * symbol.
Read More: How to Use Excel VBA InputBox with Example
Excel VBA: InputBox with Password Mask
Here are 2 examples where we can run a code with masked Password.
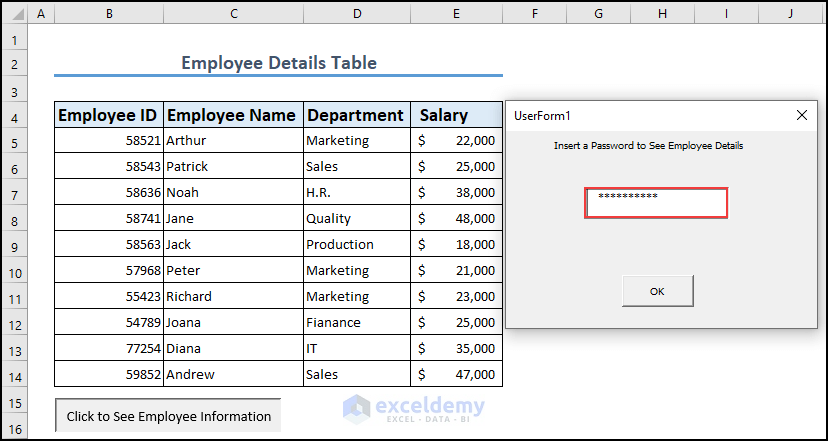
Example 1 – Check Employee Details with VBA Userform InputBox with Masked Password
For illustration, we have a dataset where Employee ID, Name, Department, and Salary is given. We can see the details in a MsgBox by using Vlookup.
To do this task a VBA code is needed. Our goal is to run the code with a masked password.
- Insert a UserForm in VBA code editor.
- Insert a Label, a TextBox, and a CommandButton from Controls Toolbox.
- Add the following code in CommandButton1_click.
- Run this code to see the result by Pressing Alt+F5.
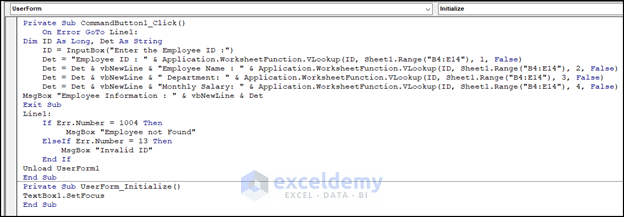
Private Sub CommandButton1_Click()
On Error GoTo Line1:
Dim ID As Long, Det As String
ID = InputBox("Enter the Employee ID :")
Det = "Employee ID : " & Application.WorksheetFunction.VLookup(ID, Sheet1.Range("B4:E14"), 1, False)
Det = Det & vbNewLine & "Employee Name : " & Application.WorksheetFunction.VLookup(ID, Sheet1.Range("B4:E14"), 2, False)
Det = Det & vbNewLine & " Department: " & Application.WorksheetFunction.VLookup(ID, Sheet1.Range("B4:E14"), 3, False)
Det = Det & vbNewLine & "Monthly Salary: " & Application.WorksheetFunction.VLookup(ID, Sheet1.Range("B4:E14"), 4, False)
MsgBox "Employee Information : " & vbNewLine & Det
Exit Sub
Line1:
If Err.Number = 1004 Then
MsgBox "Employee not Found"
ElseIf Err.Number = 13 Then
MsgBox "Invalid ID"
End If
Unload UserForm1
End Sub
️ Code Breakdown
Private Sub CommandButton1_Click()- This is a Sub procedure named CommandButton1_Click that is triggered when a user clicks on a CommandButton on a user form.
On Error GoTo Line1- The first line of the code is an error-handling statement that redirects the program flow to a line labelled as Line1 in case an error occurs during the execution of the code.
Dim ID As Long, Det As String- The next line declares 2 variables: ID and Det. ID is of Long data type and Det is of String data type.
ID = InputBox("Enter the Employee ID :")- The third line of the code displays an input box that prompts the user to enter an Employee ID. The value entered by the user is assigned to the ID variable.
Det = "Employee ID : " & Application.WorksheetFunction.VLookup(ID, Sheet1.Range("B4:E14"), 1, False)
Det = Det & vbNewLine & "Employee Name : " & Application.WorksheetFunction.VLookup(ID, Sheet1.Range("B4:E14"), 2, False)
Det = Det & vbNewLine & " Department: " & Application.WorksheetFunction.VLookup(ID, Sheet1.Range("B4:E14"), 3, False)
Det = Det & vbNewLine & "Monthly Salary: " & Application.WorksheetFunction.VLookup(ID, Sheet1.Range("B4:E14"), 4, False)- The next few lines of the code use the Application.WorksheetFunction.VLookup function to retrieve employee information from a range of cells (B4:E14) in Sheet1 of the workbook. The function is used four times to retrieve four pieces of information (employee ID, name, department, and monthly salary) corresponding to the employee ID entered by the user. The retrieved information is concatenated into a single string variable Det using the ‘&’ operator and the ‘vbNewLine’ constant, which inserts a new line character in the string.
MsgBox "Employee Information : " & vbNewLine & Det
Exit Sub
Line1:
    If Err.Number = 1004 Then
         MsgBox "Employee not Found"
    ElseIf Err.Number = 13 Then
        MsgBox "Invalid ID"
    End If
Unload UserForm1
End Sub
The MsgBox function is used to display a message box with the employee information retrieved from the worksheet. If an error occurs during the execution of the code, the error-handling code will be triggered, which will display an appropriate error message to the user. The UserForm1 is then unloaded, which closes the form.
Vba Code for initializing the UserForm:
Private Sub UserForm_Initialize()
TextBox1.SetFocus
End Sub
️ Code Breakdown
Private Sub- It is a VBA code that defines the beginning of a procedure that is specific to an object in the workbook or document.
UserForm_Initialize()- It is the name of the procedure that is being defined. This procedure will automatically execute when you initialize the UserForm.
SetFocus- It is a VBA code that sets the focus on the first text box on the UserForm. This means that when the UserForm is initialized, the cursor will be placed in the first text box.
This VBA code initializes a UserForm and sets the focus on the first text box to make it easier for the user to input data.
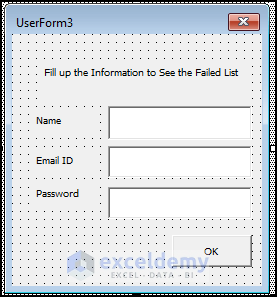
Example 2 – Filter Students with VBA Macro and Restrict Code with Masked Password in UserForm InputBox
We will filter the details of the students who have failed, but you have to enter a password to see the failed list.
- Insert a UserForm. Add a Label, 3 TextBoxes, and a CommandButton.
- Edit the captions.
- Insert the code in the CommandButton1_Click window.
- To see the output, Run the code by entering Alt+F5.
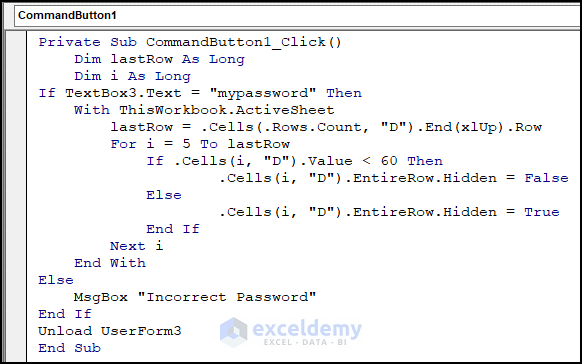
Private Sub CommandButton1_Click()
Dim lastRow As Long
Dim i As Long
If TextBox3.Text = "mypassword" Then
With ThisWorkbook.ActiveSheet
lastRow = .Cells(.Rows.Count, "D").End(xlUp).Row
For i = 5 To lastRow
If .Cells(i, "D").Value < 60 Then
.Cells(i, "D").EntireRow.Hidden = False
Else
.Cells(i, "D").EntireRow.Hidden = True
End If
Next i
End With
Else
MsgBox "Incorrect Password"
End If
Unload UserForm3
End Sub
️ Code Breakdown
This VBA code will run when a user clicks on a Command Button named “CommandButton1“.
Dim lastRow As Long
Dim i As Long- This 2 lines declare 2 variables: “lastRow” and “i“. We will use “lastRow” to find the last row with data in column D of the active worksheet, and “i” to loop through the rows of the worksheet.
If TextBox3.Text = "mypassword" Then
    With ThisWorkbook.ActiveSheet
lastRow = .Cells(.Rows.Count, "D").End(xlUp).Row- Check if the text entered in a TextBox named “TextBox3” is equal to the string “mypassword“. If the password is correct, the code will proceed to the next step. With the active worksheet, find the last row with data in column D using the “End” method and the “xlUp” constant. We set the variable “lastRow” as the row number of the last row with data.
For i = 5 To lastRow
            If .Cells(i, "D").Value < 60 Then
                    .Cells(i, "D").EntireRow.Hidden = False
            Else
                    .Cells(i, "D").EntireRow.Hidden = True
            End If
        Next i
End With- Loop through the rows of the worksheet, starting from row 5 (assuming that the first four rows are headers). For each row, check if the value in column D is less than 60. If it is, unhide the entire row using the “Hidden” property. If not, hide the entire row.
Else
    MsgBox "Incorrect Password"
End If
Unload UserForm3
End Sub- Once the loop is complete, unload the UserForm3 to close it.
We designed this code to filter a worksheet based on a password and a condition in column D. If the password is correct, it will show rows where the value in column D is less than 60, and hide rows where the value in column D is greater than or equal to 60. Otherwise, it will display a message box saying “Incorrect Password” and exit the subroutine.

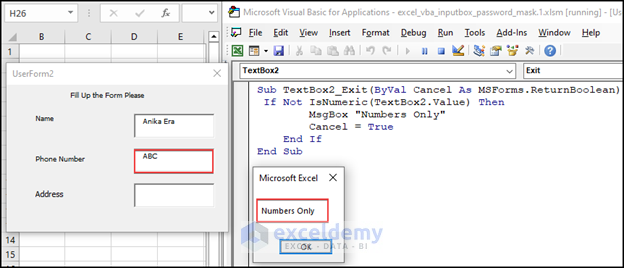
How to Create Inputbox Through Excel VBA UserForm That Takes Only Number
In some cases, the value of TextBox must be a number. For example, Phone Numbers are always numeric. You can write a VBA code to accept only numeric value in an Inputbox.
Add the following code in TextBox2_Exit event and run the code to see the result.
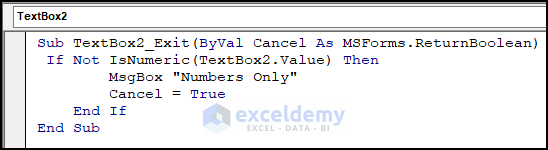
Sub TextBox2_Exit(ByVal Cancel As MSForms.ReturnBoolean)
If Not IsNumeric(TextBox2.Value) Then
MsgBox "Numbers Only"
Cancel = True
End If
End Sub
️ Code Breakdown
Sub TextBox2_Exit(ByVal Cancel As MSForms.ReturnBoolean)- This is the subroutine declaration portion. It indicates that the code is associated with the “Exit” event of the TextBox2 control. The Cancel argument is of type MSForms.ReturnBoolean, which allows the code to cancel the focus change if necessary.
If Not IsNumeric(TextBox2.Value) Then- This is an If statement that checks whether the value in TextBox2 is numeric. The IsNumeric() function returns True if the value is a number, and False otherwise.
MsgBox "Numbers Only"- This line displays a message box with the text “Numbers Only” if the value in TextBox2 is not numeric.
Cancel = True- This line sets the Cancel argument to True, which cancels the focus change and prevents the user from moving to another control on the UserForm.
Read More: Excel VBA: Create InputBox with Multiple Inputs
Frequently Asked Questions (FAQs)
1. How do I Use InputBox in Excel VBA?
Open the VBA editor in Excel by pressing ALT+F11. Select the module or sheet where you want to add the InputBox Code. Add the code below:
Sub Example()
    Dim Input As Integer
    Input = InputBox("Give a number between 1 & 100:", "Number Input", 50, 1, 100)
    MsgBox "You have given " & userInput & "."
End Sub
In this code InputBox function prompts the user to enter a number between 1 and 100. We set the title of the input box is as “Number Input”.
2. How to hide passwords in VBA?
To hide passwords, insert a UserForm in the VBA editor. In the UserForm, insert a TextBox from Controls. Set the PasswordChar Property of the TextBox to an asterisk symbol. When you run this code, it will hide your entered characters in the TextBox.
Download Practice Workbook
Related Articles
- How to Create Yes-No InputBox with Excel VBA
- How to Use VBA Input Box with Buttons in Excel
- Excel VBA InputBox with Multiple Lines
- Excel VBA Input Box with Drop Down List
- Excel VBA: Input Box with Options
- How to Handle VBA InputBox Cancel Button in Excel

