Example 1 – Customizing an Input Box with a Custom Prompt Message
Steps:
- After opening a new module, insert the following code and run it by hitting the Run icon-
Sub customize_prompt_message_inputbox()
lookup_text = InputBox("Enter the employee name:")
Set Rng = Range("B5:E14")
result = WorksheetFunction.VLookup(lookup_text, Rng, 4, False)
MsgBox "The employee salary is: " & "$" & result
End Sub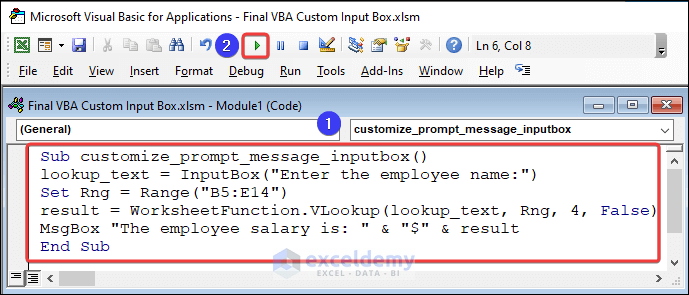
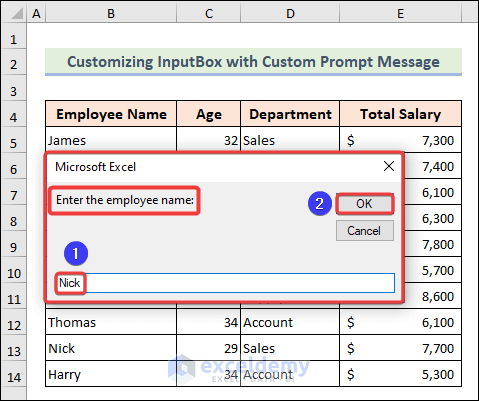
- An Input Box will pop up according to the provided string. We will put a name as input and press OK.
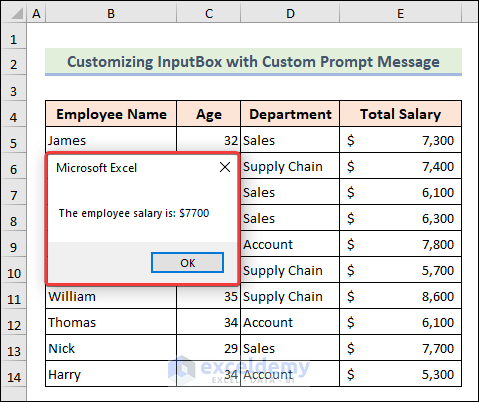
- You’ll get a customized message box.
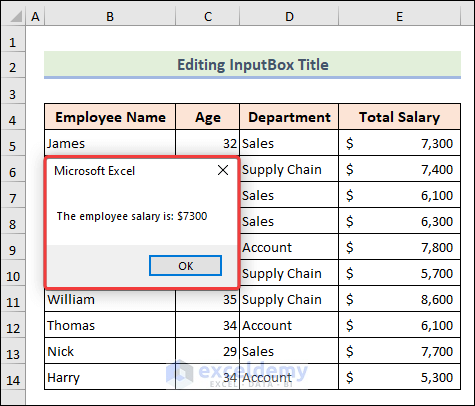
Example 2 – Editing the InputBox Title for a Custom Input Box
You can edit the InputBox title as well.

Steps:
- Insert a module and use the following code inside:
Sub customize_prompt_message_inputbox()
lookup_text = InputBox("Enter the employee name:", _
"Name Input")
Set Rng = Range("B5:E14")
result = WorksheetFunction.VLookup(lookup_text, Rng, 4, False)
MsgBox "The employee salary is: " & "$" & result
End Sub
- Click the Run icon or hit the F5 key from the keyboard to run.
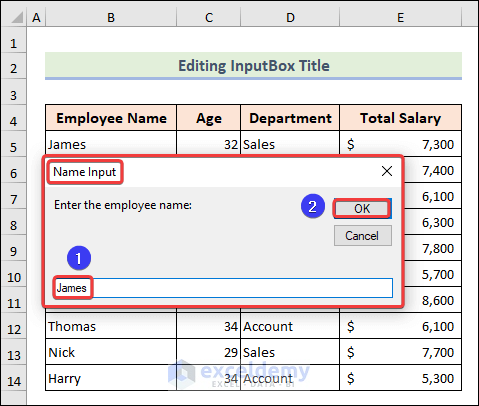
- You have the title for the InputBox named Name Input.
- Put a name and click OK.
- You have the employee salary for the given name.
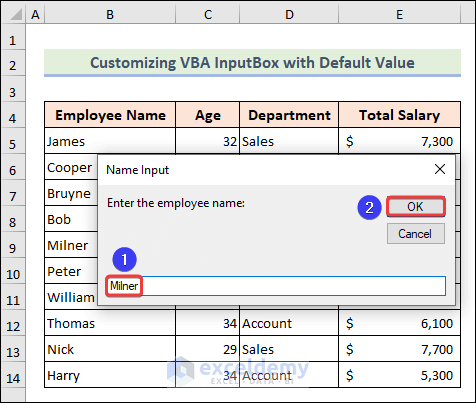
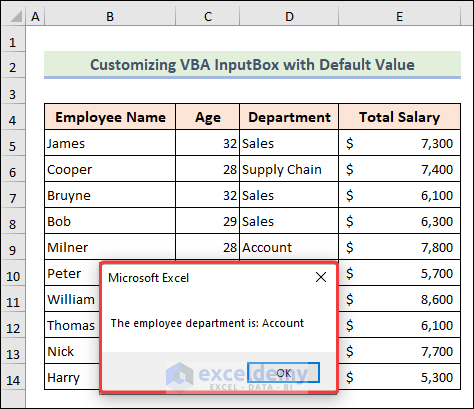
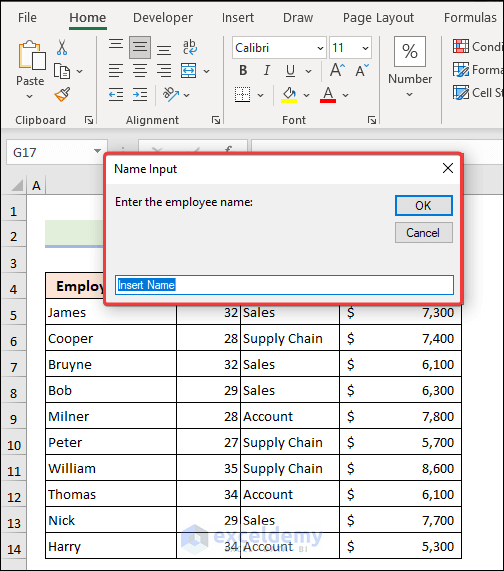
Example 3 – Customizing VBA Input Box with Default Value
Here’s an example of a default input value.

Steps:
- Insert a new module, place the below code, and Run.
Sub InputBox_Default_Value()
lookup_text = InputBox("Enter the employee name:", _
"Name Input", "Insert Name")
Set Rng = Range("B5:E14")
result = WorksheetFunction.VLookup(lookup_text, Rng, 3, False)
MsgBox "The employee department is: " & result
End Sub
- You have a default value inside the InputBox.
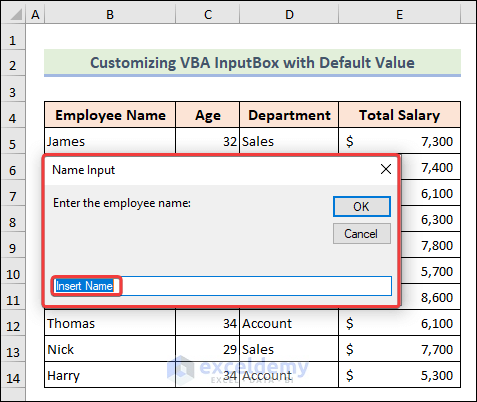
- Put a name inside the box and select OK.
- The final output will be in our hands.
Example 4 – VBA Input Box with Custom Positions
The InputBox appears in the center of the screen, but you can customize the position of the dialog box by specifying the X and Y coordinates.
Steps:
- Open a new module, insert the code below, and run it.
Sub InputBox_Custom_Positions()
lookup_text = InputBox("Enter the employee name:", _
"Name Input", "Insert Name", 1800, 3000)
Set Rng = Range("B5:E14")
result = WorksheetFunction.VLookup(lookup_text, Rng, 2, False)
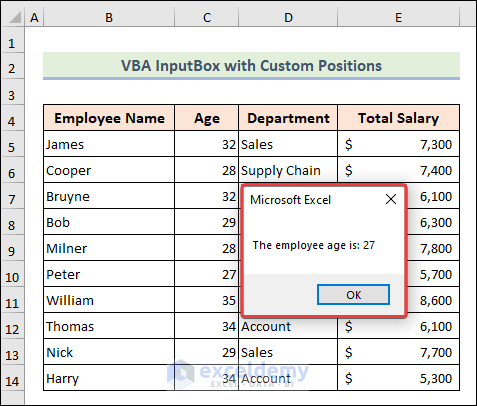
MsgBox "The employee age is: " & result
End Sub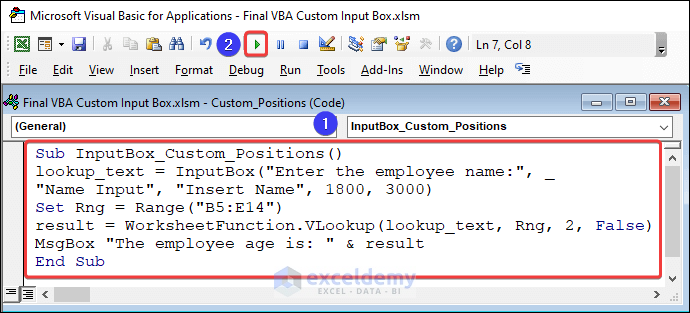
- You have the InputBox placed according to the given coordinates.

- To check whether the code is working, input a name and click OK.
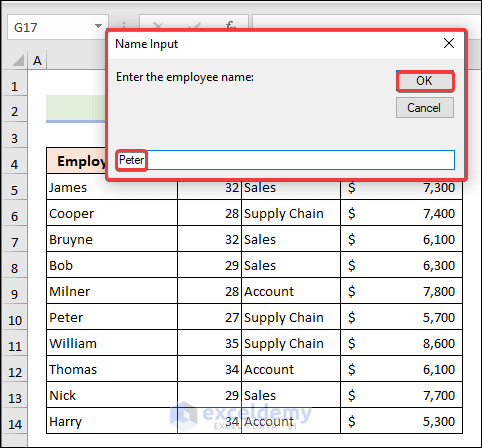
- You have the final result for the given name.
Example 5 – Adding a Help Section to for an InputBox
The InputBox has limited options for customizing the appearance and behavior of the dialog box. A Helpfile is a separate document that provides additional information to the user.

Steps:
- Insert a module, insert the below code into it, and hit Run.
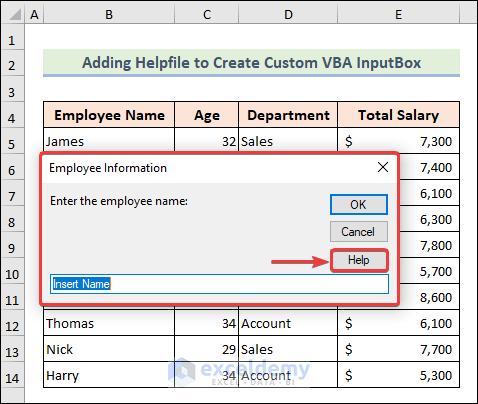
Sub InputBox_helpfile()
lookup_text = InputBox("Enter the employee name:", _
"Employee Information", "Insert Name", , , _
helpFilePath = "E:\Employee Data", HelpContextID = 10)
Set Rng = Range("B5:E14")
result = WorksheetFunction.VLookup(lookup_text, Rng, 3, False)
MsgBox "The employee department is: " & result
End Sub
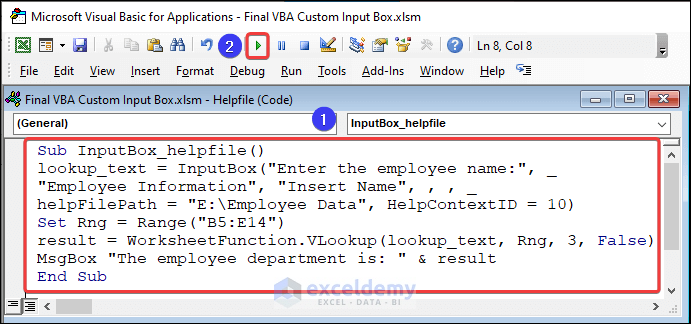
- Click the Help button to get instructions for filling out the input fields.
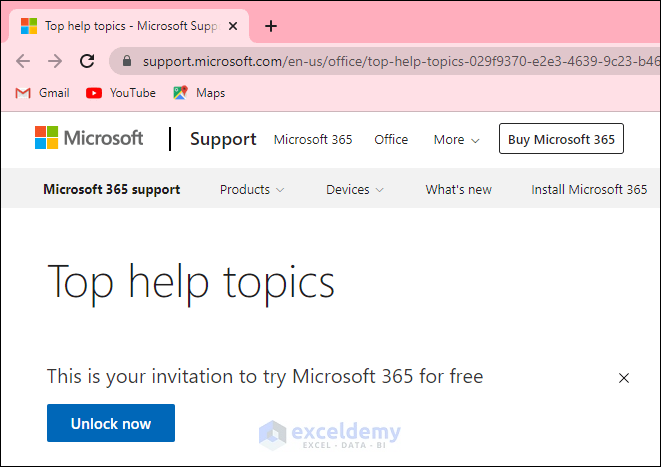
- A tab will be opened in your browser, since that’s the details of the file we’ve used.
Example 6 – Inserting a VBA Input Box That Takes a Specific Data Type
When using an InputBox, it is often helpful to specify the expected data type of the input, such as a number, date, or string. By specifying the data type of the input, the program can validate the user’s input and ensure that it is in the correct format. This can help prevent errors or unexpected results when the input is used later in the program. Check out the list box below to learn about various specific data types.
| Type Number | Type Validation |
|---|---|
| 0 | Formula is acceptable |
| 1 | Numeric value acceptable |
| 2 | Text value acceptable |
| 4 | Logical value like TRUE or False acceptable |
| 8 | Cell reference acceptable |
| 16 | Error values like #N/A, #DIV/0 acceptable |
| 64 | Array of values is acceptable |
We get an error due to putting text input, as we have defined a numeric data type in the code.
Case 1 – Take Numeric Value Only
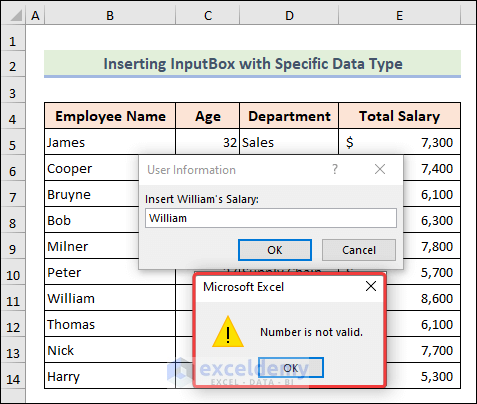
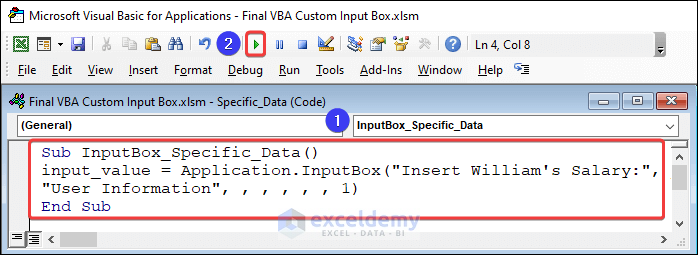
- Open a new module and insert the code with a numeric value of 1 as an acceptable data type.
Sub InputBox_Specific_Data()
input_value = Application.InputBox("Insert William’s Salary:", _
"User Information", , , , , , 1)
End Sub- Press the F5 key to run the code.
- You get an InputBox. We will put a text value to check whether it’s working.
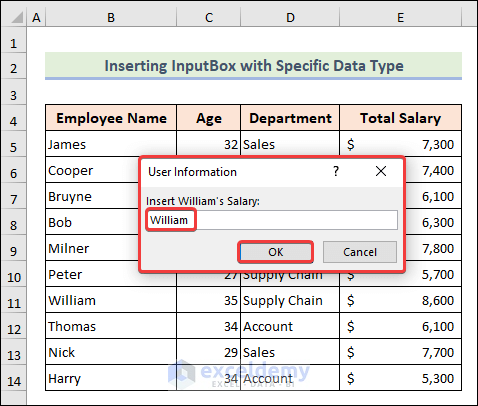
- We have a warning message as we have inserted a text value.

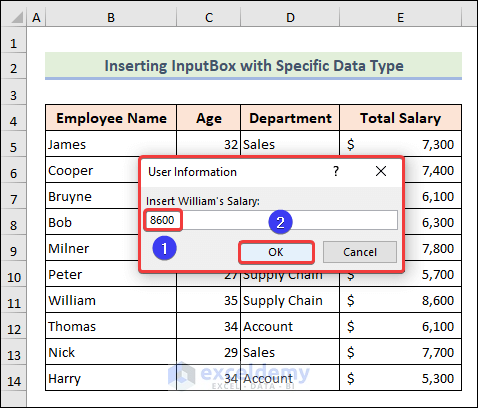
- If we put a numeric value, the code will run appropriately.
Case 2 – Take Only Strings
- Change the data type to 2 and run the code by clicking Run.
Sub InputBox_Specific_Data()
input_value = Application.InputBox("Insert employee name:", _
"User Information", , , , , , 2)
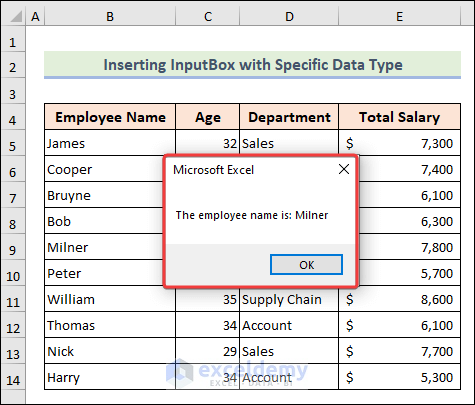
MsgBox "The employee name is: " & input_value
End Sub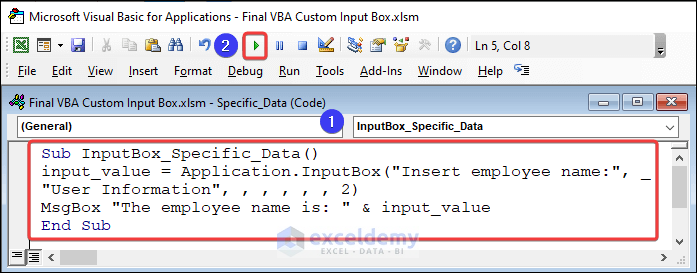
- Put a name and press OK.
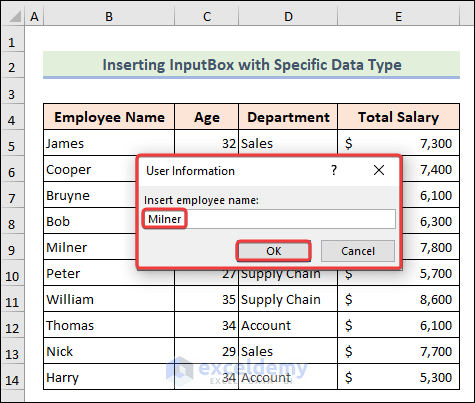
- We have the expected output with the proper specific data type.
Example 7 – Customizing an Input Box with Multiple Lines
You can also customize your InputBox with linefeed and carriage return. Check the table below for the constants you can use.
| Constant | Equivalent Chr Function | Description |
|---|---|---|
| vbLf | Chr(10) | Linefeed |
| vbCr | Chr(13) | Carriage return |
| vbCrLf | Chr(13) and Chr(10) | Both Carriage return and linefeed |
| vbNewLine | Chr(13) and Chr(10) for Windows Chr(13) for mac |
New line character for specific platform |
Using the vbNewLine adds a new line just below the prompt line.

Steps:
- After inserting a module, insert the code below and run it.
Sub InputBox_Multiple_Line()
lookup_text = InputBox("Enter the employee name:" & vbNewLine & _
"(From the employee records in the worksheet)")
Set Rng = Range("B5:E14")
result = WorksheetFunction.VLookup(lookup_text, Rng, 2, False)
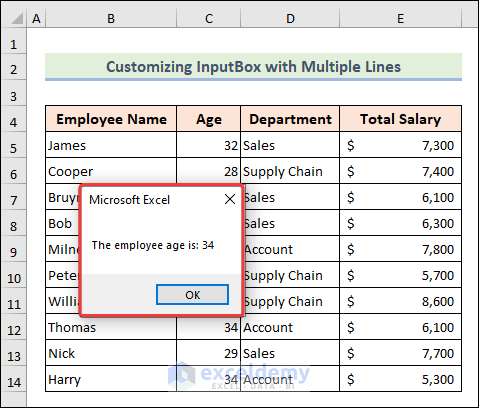
MsgBox "The employee age is: " & result
End Sub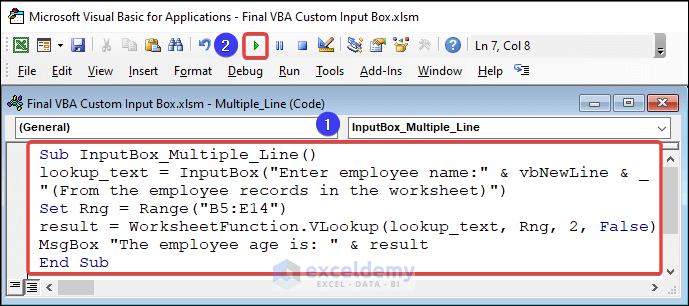
- You get a new line just below the prompt string.
- Put a name inside the box and press OK.

- You get the output.
How to Create a Custom Input Box with Multiple Inputs in Excel VBA
Here’s an example of an InputBox that accepts multiple input values.
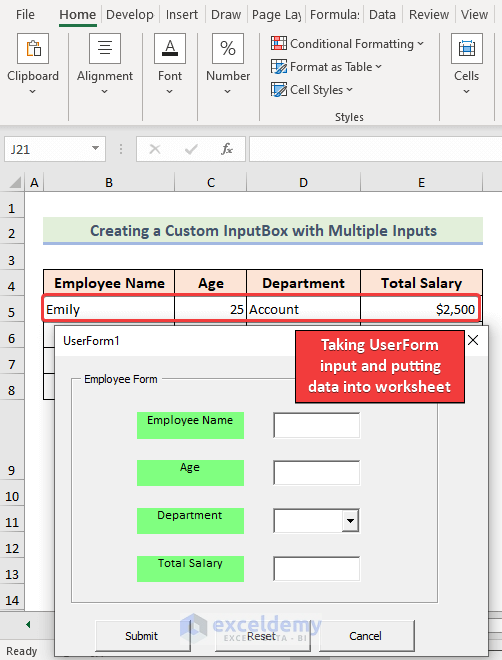
Step 1 – Creating the UserForm Window
- Launch the Visual Basic window >> click on Insert >> select UserForm.
- Insert Labels using the ToolBox and change the name of Labels using the Caption option from the Properties window.
- Change the Font style and size to match your choice.
- Change the Height, Left, and Width values to 20, 30, and 80 to position the labels.
- Selecting all the Labels, change the BackColor to light green using the BackColor code- &H0080FF80&.
- Insert 3 TextBoxes and 1 ComboBox for collecting values.
- Place them inside a Frame and name them Employee Form.
- Create 3 CommandButton for submitting, resetting, and canceling input values.
- In a new worksheet, define the name Department for the department name and combine it using the RowSource option.
Step 2 – Writing the Code and Running the UserForm
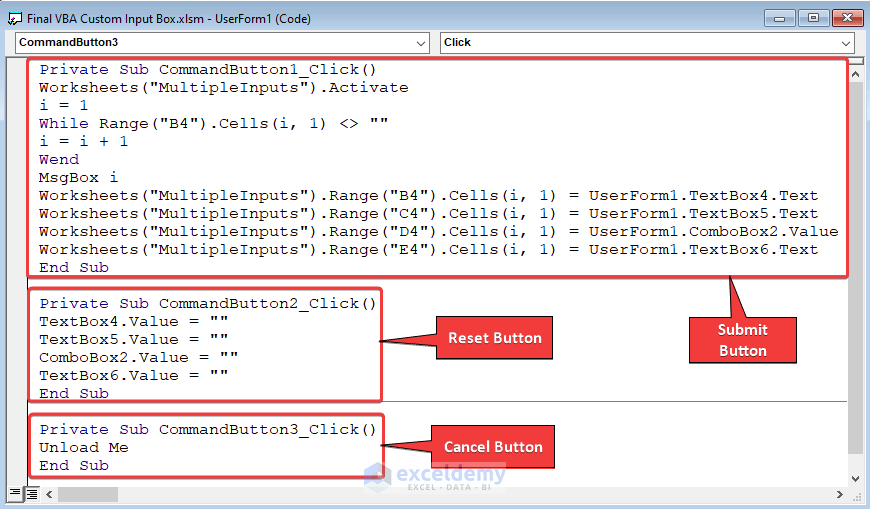
- Use the below code for all three CommandButtons.
Submit Button:
Private Sub CommandButton1_Click()
Worksheets("MultipleInputs").Activate
i = 1
While Range("B4").Cells(i, 1) <> ""
i = i + 1
Wend
MsgBox i
Worksheets("MultipleInputs").Range("B4").Cells(i, 1) = UserForm1.TextBox4.Text
Worksheets("MultipleInputs").Range("C4").Cells(i, 1) = UserForm1.TextBox5.Text
Worksheets("MultipleInputs").Range("D4").Cells(i, 1) = UserForm1.ComboBox2.Value
Worksheets("MultipleInputs").Range("E4").Cells(i, 1) = UserForm1.TextBox6.Text
End Sub
Reset Button:
Private Sub CommandButton2_Click()
TextBox4.Value = ""
TextBox5.Value = ""
ComboBox2.Value = ""
TextBox6.Value = ""
End Sub
Cancel Button:
Private Sub CommandButton3_Click()
Unload Me
End Sub- Run the UserForm. You successfully created a custom InputBox with multiple inputs.
How to Check If the Cancel Button Was Clicked in an Input Box
Method 1 – Employing the Input Box Function
We need a box where a Cancel button will be included. Besides the null result, we’ll put a message if the user clicks the Cancel button.
Steps:
- Put the code and run it by hitting the Run
Sub InputBox_Cancel_button()
Input_Name = InputBox("Insert Employee name", _
"Employee Information")
If Input_Name = cancel Then
MsgBox "You clicked Cancel."
Else
MsgBox "You entered: " & Input_Name
End If
End Sub
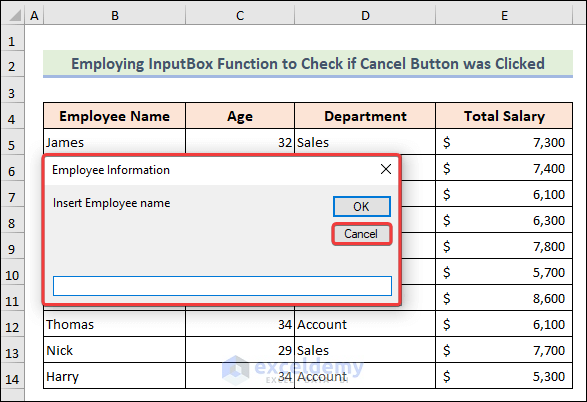
- After the InputBox appears, press Cancel.
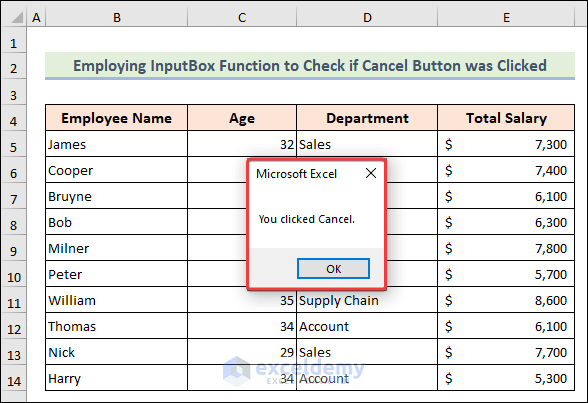
- A MsgBox will appear confirming the user clicked the Cancel button.
Method 2 – Using the Application.InputBox Method Without Selecting a Cell Range
Steps:
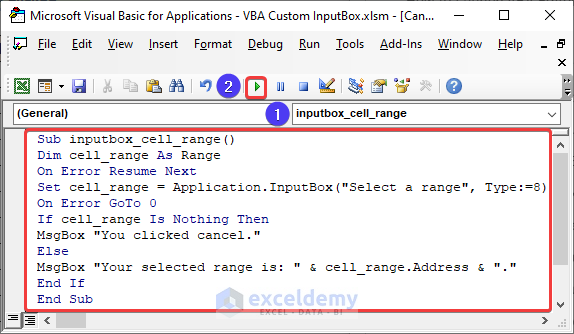
- Place the code below and Run.
Sub inputbox_cell_range()
Dim cell_range As Range
On Error Resume Next
Set cell_range = Application.InputBox("Select a range", Type:=8)
On Error GoTo 0
If cell_range Is Nothing Then
MsgBox "You clicked cancel."
Else
MsgBox "Your selected range is: " & cell_range.Address & "."
End If
End Sub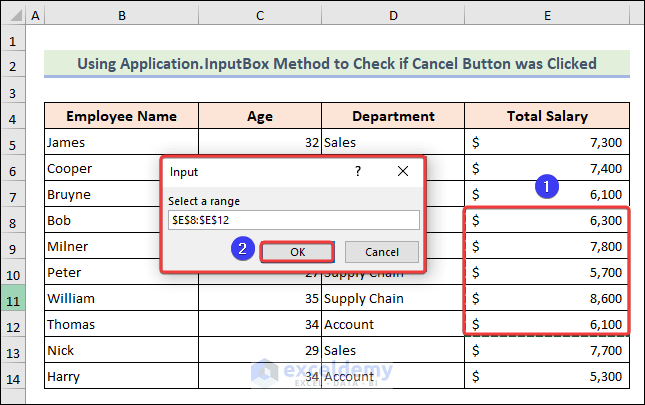
- An InputBox will appear where you can choose your desired cell range.

- A MsgBox with the chosen cell range will be displayed.
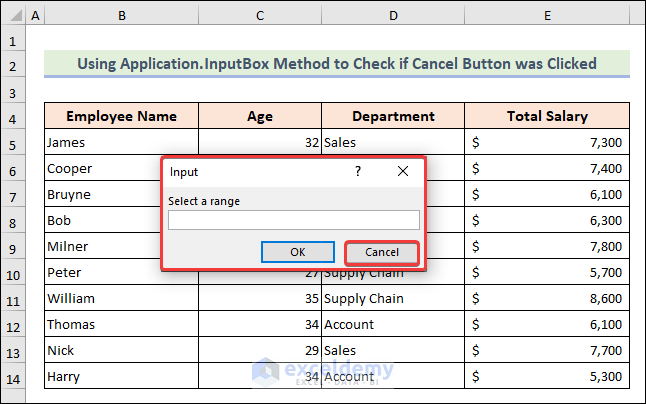
- Without selecting the cell range, click the Cancel button.
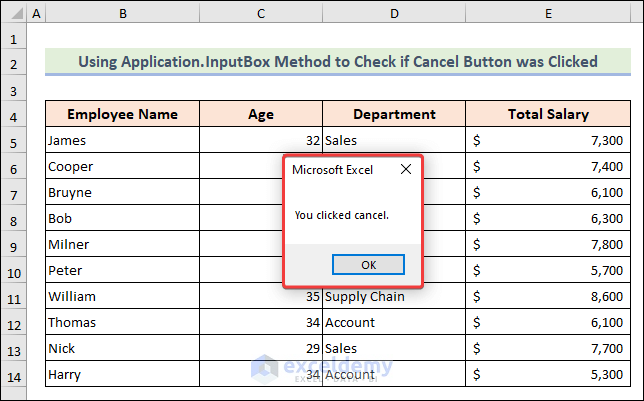
- A MsgBox will confirm that you pressed the Cancel button.
Things to Remember
- The application method is mostly used to set the input data type. If it is not used, then try to provide a specific data type.
- Like other functions, InputBox can accept up to 255 arguments.
Frequently Asked Questions
What are the pros and cons of using Excel VBA Custom InputBox?
A custom InputBox in VBA offers several advantages, such as improved user experience, data accuracy, and customization options. However, there are also potential drawbacks, such as confusing interfaces, time-consuming development, restrictive validation checks, and compatibility limitations.
How do I retrieve the input values from a custom InputBox?
To retrieve the input values from a custom InputBox, you need to reference the values of the controls on the form. For example, if you have a text box for the user to enter their name, you can retrieve the value of the text box using the Text property.
How do I handle validation and error checking in a custom InputBox?
You can handle validation and error checking in a custom InputBox by using conditional statements and an error handling code. For example, you can check if the user has entered a valid email address before allowing them to submit the form, or you can display an error message if the user leaves a required field blank.
Download the Practice Workbook

