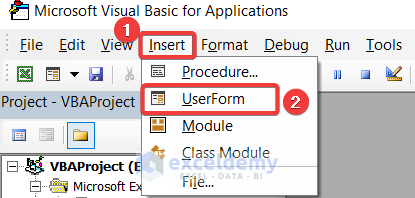
Method 1 – Insert User Form to Create InputBox with Multiple Inputs in Excel
The Visual Basic window will open. We’ll insert an UserForm from the Insert option where we’ll create the UserForm.
Insert different controls in the UserForm according to our needs.
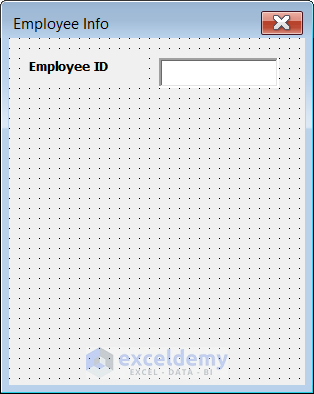
The UserForm will now look like this:

Method 2 – Create Fields in VBA UserForm
Add Controls in the UserForm. Add a total of four sets of Label and TextBox in our UserForm. We’ll add a Label which is Label1, and TextBox and edit the caption of Label1 as Employee ID. Make the font bold for design purposes. You may watch the following video to see how we’ve done this:
Create a TextBox which is TextBox1 to take the input from the user. We’ll align Tops the TextBox1 with Label1. Remember to first select Label1 and then press and hold the Shift key while selecting TextBox1 for aligning. Watch the following video to view the process.
The UserForm will now look like this:
Method 3 – Creating Other Sets of Label and TextBox by Copy Paste Method to Create InputBox with Multiple Inputs
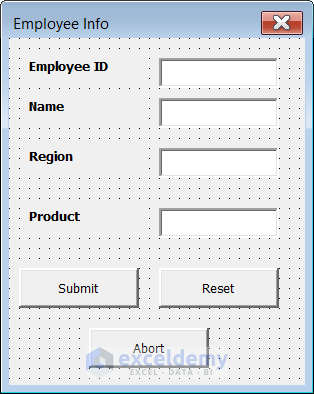
Label1 and TextBox1; make another three sets of these setups by copying and pasting them. Make the alignment of all the Labels to Lefts and then all the TextBoxes to Lefts. Watch the following video to see how to do that.
Method 4 – Editing Captions of Labels
Set the captions of the Labels accordingly. Set the captions of Label2, Label3, and Label4 as Name, Region, and Product respectively. To learn how to accomplish that, watch the video below.
Method 5 – Adding CommandButton in VBA UserForm
Add three CommandButton to our UserForm from the Toolbox. Watch the following video to see how we’ll add them.
Edit the Captions of the CommandButtons from the Properties window. Set the captions of CommandButton1, CommandButton2, and CommandButton3 as Submit, Reset, and Abort.
Adjust the position of the Controls and shape of the UserForm accordingly.
The UserForm will look like this:
Method 6 – Insert Macros for Individual Components of VBA UserForm to Create InputBox with Multiple Inputs
| Command Button | Sub-procedure |
|---|---|
| Submit | CommandButton1 |
| Reset | CommandButton2 |
| Abort | CommandButton3 |
For Textboxes:
| TextBox | Sub-procedure |
|---|---|
| Employee ID | TextBox1 |
| Name | TextBox2 |
| Region | TextBox3 |
| Product | TextBox4 |
Add code to the Controls. Add codes to all the TextBoxes that are TextBox1, TextBox2, TextBox3, and TextBox4 as well as to all the CommandButtons that are CommandButton1, CommandButton2, and CommandButton3. Insert code to CommandButton1. Click Submit(CommandButton1), the data in all the TextBoxes are transferred into the next available row in the worksheet and the focus is set to TextBox1. If any of the TextBox is empty, an error message will show up saying “Please input all the data before submitting”.
For Submit Button (CommandButton1):
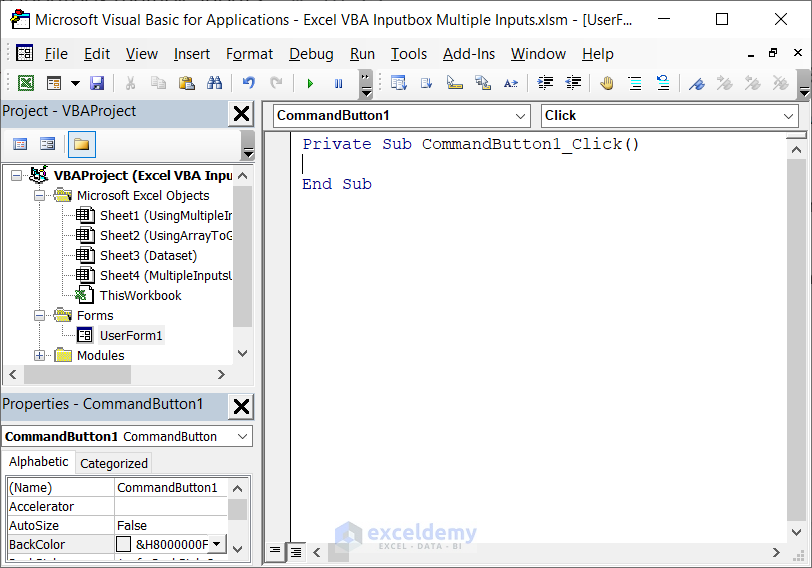
Right Click on CommandButton1. The code window will open. Watch the following video to see how it looks.
It’ll look like this:
Now type the following code:
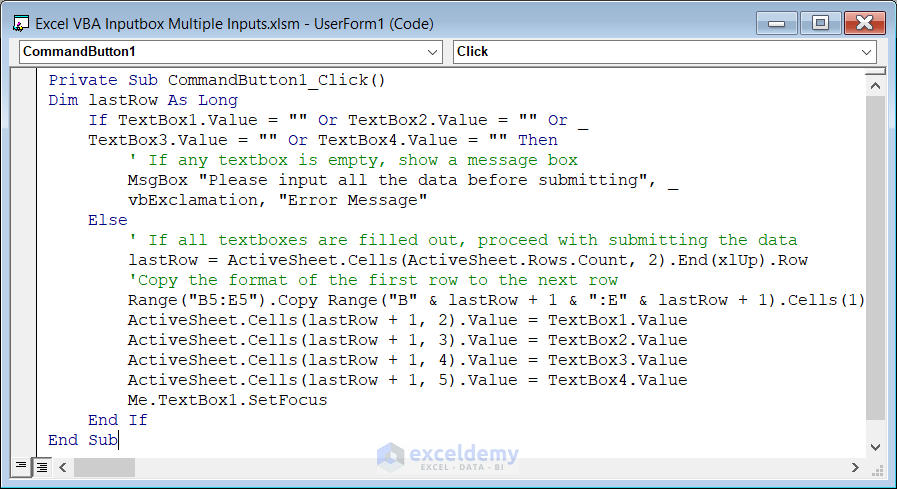
Private Sub CommandButton1_Click()
Dim lastRow As Long
If TextBox1.Value = "" Or TextBox2.Value = "" Or TextBox3.Value = "" Or TextBox4.Value = "" Then
' If any textbox is empty, show a message box
MsgBox "Please input all the data before submitting", vbExclamation, "Error Message"
Else
' If all textboxes are filled out, proceed with submitting the data
lastRow = ActiveSheet.Cells(ActiveSheet.Rows.Count, 2).End(xlUp).Row
'Copy the format of the first row to the next row
Range("B5:E5").Copy Range("B" & lastRow + 1 & ":E" & lastRow + 1).Cells(1)
ActiveSheet.Cells(lastRow + 1, 2).Value = TextBox1.Value
ActiveSheet.Cells(lastRow + 1, 3).Value = TextBox2.Value
ActiveSheet.Cells(lastRow + 1, 4).Value = TextBox3.Value
ActiveSheet.Cells(lastRow + 1, 5).Value = TextBox4.Value
Me.TextBox1.SetFocus
End If
End Sub
Code Breakdown:
Private Sub CommandButton1_Click()- This is a private procedure named CommandButtion1_Click.
Dim lastRow As Long- Declares a variable named lastRow as a Long data type.
If TextBox1.Value = "" Or TextBox2.Value = "" Or TextBox3.Value = "" Or TextBox4.Value = "" Then
MsgBox "Please input all the data before submitting", vbExclamation, "Error Message"- If statement to check if any of the four TextBox controls (TextBox1, TextBox2, TextBox3 and TextBox4) are empty. If it found any of the TextBox controls empty, it will display a message box with an error message asking the user to input all the data.
Else- If all the TextBox controls are filled out, the Else block is executed.
lastRow = ActiveSheet.Cells(ActiveSheet.Rows.Count, 2).End(xlUp).Row- Sets the value of the lastRow to the last row number in column B that contains data.
Range("B5:E5").Copy Range("B" & lastRow + 1 & ":E" & lastRow + 1).Cells(1)- Copy the format of the first row (cells B5 to E5) to the next blank row using the Copy method of the Range object. Determine the next blank row by adding 1 to the value of lastRow.
ActiveSheet.Cells(lastRow + 1, 2).Value = TextBox1.Value
ActiveSheet.Cells(lastRow + 1, 3).Value = TextBox2.Value
ActiveSheet.Cells(lastRow + 1, 4).Value = TextBox3.Value
ActiveSheet.Cells(lastRow + 1, 5).Value = TextBox4.Value- Write the values of the four TextBox controls to the worksheet using the Value property of the Cells object. The row number used for the write is the value of lastRow plus 1.
Me.TextBox1.SetFocus- Uses the SetFocus method to move the focus back to TextBox1, ready for the user to input the next data set.
End If- If statement ends.
For Reset Button (CommandButton2)- Add the following code against CommandButton2 which is Reset. Click on this button, the TextBoxes will be reset and we’re ready to take another set of inputs.
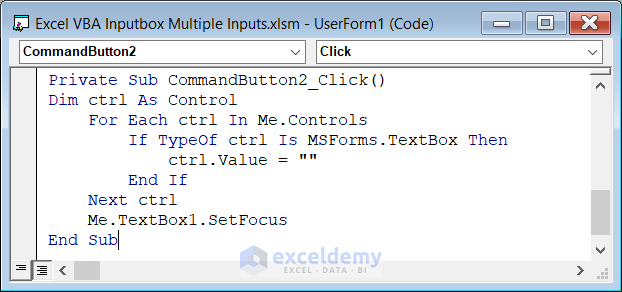
Private Sub CommandButton2_Click()
Dim ctrl As Control
For Each ctrl In Me.Controls
If TypeOf ctrl Is MSForms.TextBox Then
ctrl.Value = ""
End If
Next ctrl
Me.TextBox1.SetFocus
End Sub
Code Breakdown:
Private Sub CommandButton2_Click()- This is a private procedure named CommandButton2_Click. This code is triggered when the user clicks on CommandButton2 that is the Reset button.
Dim ctrl As Control- A variable named ctrl represents a control on the form.
For Each ctrl In Me.Controls
If TypeOf ctrl Is MSForms.TextBox Then
ctrl.Value = ""
End If
Next ctrl- This set of statements loops through each control on the form using a For Each loop and checks if the control is a TextBox using the TypeOf operator. If the control is a TextBox, set its Value property to an empty string to clear its contents.
Me.TextBox1.SetFocus- This statement sets the focus to TextBox1.
End Sub- The sub procedure ends.
Now we want that when we click on the Reset that is CommandButton3, it’ll unload the UserForm. To do so, we will add the code in a similar fashion.
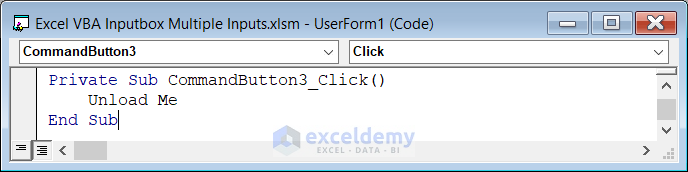
Private Sub CommandButton3_Click()
Unload Me
End Sub
Code Breakdown:
This set of code Unloads the UserForm when we click the CommandButton3 which is the Abort button.
We’ll code against Textbox1 to set the focus to TextBox2 when the user will press the ENTER key. Watch the following video to see how we’ve done this.
The image of the code looks like this:
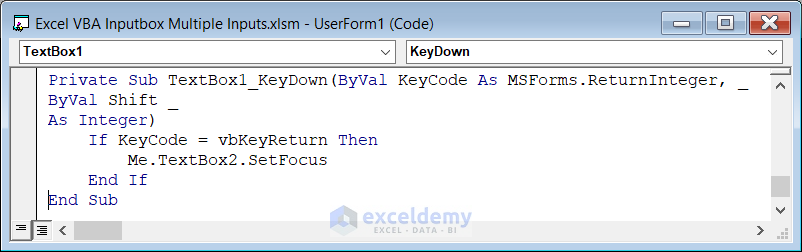
Private Sub TextBox1_KeyDown(ByVal KeyCode As MSForms.ReturnInteger, ByVal Shift As Integer)
If KeyCode = vbKeyReturn Then
Me.TextBox2.SetFocus
End If
End Sub
Code Breakdown:
This set of code checks if user has pressed the ENTER key. If so, then it sets focus to TextBox2.
We’ll do it for all the remaining TextBoxes. The code for TextBox2 looks like this:
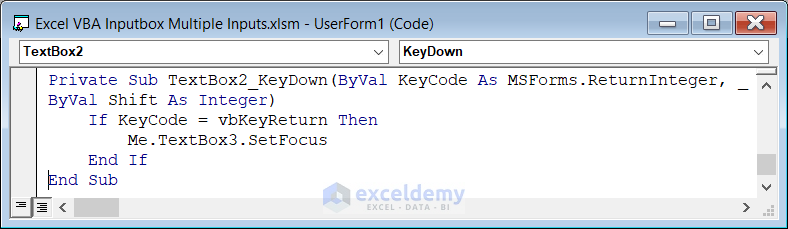
Private Sub TextBox2_KeyDown(ByVal KeyCode As MSForms.ReturnInteger, ByVal Shift As Integer)
If KeyCode = vbKeyReturn Then
Me.TextBox3.SetFocus
End If
End Sub
Code Breakdown:
This set of code checks if user has pressed the ENTER key. If so, then it sets focus to TextBox3.
The code for TextBox3 will look like this:
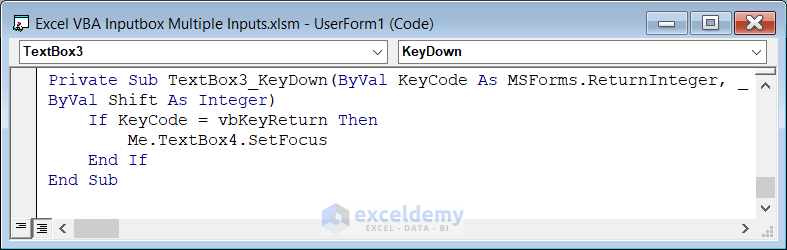
Private Sub TextBox3_KeyDown(ByVal KeyCode As MSForms.ReturnInteger, ByVal Shift As Integer)
If KeyCode = vbKeyReturn Then
Me.TextBox4.SetFocus
End If
End Sub
Code Breakdown:
This set of code checks if you have pressed the ENTER key. If so, then it sets focus to TextBox4.
For TextBox4, the code looks like this:
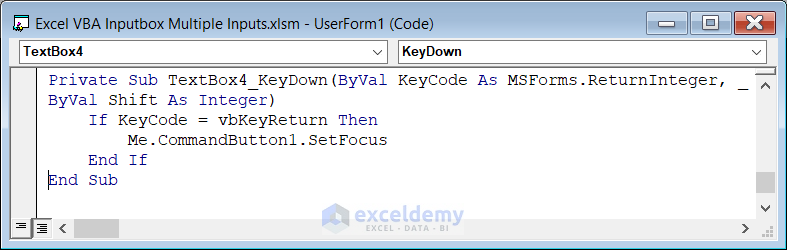
Private Sub TextBox4_KeyDown(ByVal KeyCode As MSForms.ReturnInteger, ByVal Shift As Integer)
If KeyCode = vbKeyReturn Then
Me.CommandButton1.SetFocus
End If
End Sub
Code Breakdown:
This set of code checks if user has pressed the ENTER key. If so, then it sets focus to CommandButton1 that is the Submit button.
Method 7 – Creating Button to Launch The UserForm
Watch the following video to see how we’ve created a shape and assigned the UserForm to it.
Create and assign a shape in the Excel worksheet so that whenever we click on that shape, our UserForm launches. From the worksheet in Excel goto Insert > Illustrations > Shapes > Rectangle: Rounded Corners. Then type “Input Data”, the user may guess the use of the shape. Press ENTER, it will set our shape now.
Right click on the shape and select Assign Macro from the options. Open a list of macros and also select the macro associated with this shape. Go to New option and type the following code to launch the UserForm1 whenever we click this shape.
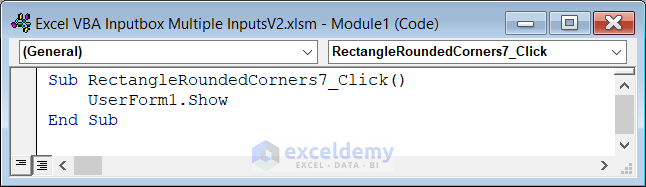
Sub RectangleRoundedCorners7_Click()
UserForm1.Show
End Sub
Code Breakdown:
When the shape is clicked, the UserForm is launched.
Method 8 – Testing Our UserForm to Insert Multiple Inputs in VBA InputBox
The video shows how our UserForm works.
Test our UserForm. Click on the shape in the Excel worksheet and our UserForm will launch. Input the data accordingly. And we’ll get multiple inputs in Excel VBA InputBox.
How to Take Only Numbers in VBA InputBox
Watch the following video to get a glimpse of how InputBox takes only numbers as input.
The type of input is strictly specified and we need to maintain this. The Employee ID must be numeric. Set the code accordingly so that it takes only numeric characters as input against Employee ID and shows error messages otherwise.
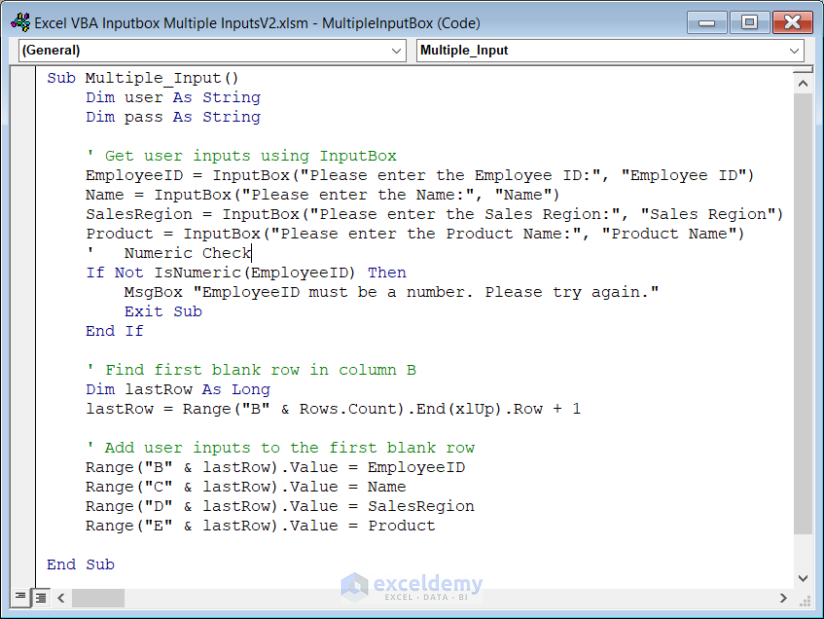
Sub Multiple_Input()
Dim user As String
Dim pass As String
' Get user inputs using InputBox
EmployeeID = InputBox("Please enter the Employee ID:", "Employee ID")
Name = InputBox("Please enter the Name:", "Name")
SalesRegion = InputBox("Please enter the Sales Region:", "Sales Region")
Product = InputBox("Please enter the Product Name:", "Product Name")
'   Numeric Check
If Not IsNumeric(EmployeeID) Then
MsgBox "EmployeeID must be a number. Please try again."
Exit Sub
End If
' Find first blank row in column B
Dim lastRow As Long
lastRow = Range("B" & Rows.Count).End(xlUp).Row + 1
' Add user inputs to the first blank row
Range("B" & lastRow).Value = EmployeeID
Range("C" & lastRow).Value = Name
Range("D" & lastRow).Value = SalesRegion
Range("E" & lastRow).Value = Product
End Sub
Code Breakdown:
Major portion of the code is already explained. So, I’m now explaining only the unique portion:
If Not IsNumeric(EmployeeID) Then
MsgBox "EmployeeID must be a number. Please try again."
Exit Sub
End If- IsNumeric function is used to check whether the value of EmployeeID is a number. If the value is not numeric, the code shows the text in the MsgBox and exits the current subroutine. The code will not execute any further and the user will need to enter a valid numeric value for Employee ID before the code can proceed.
Watch the following video to see how it works.
Frequently Asked Questions
1. What is the difference between InputBox and Application.InputBox in Excel VBA?
InputBox is a basic VBA function that displays a simple input prompt and returns the entered value as a string. Application.InputBox provides more control over the InputBox window, allowing for customization of the window title, message prompt, default value, input type, and other options. It also provides the ability to return input values in a variety of data types. In summary, while InputBox is simple and suitable for basic input prompts, Application.InputBox provides greater flexibility and control over the input window and value returned.
2. What is the maximum length of InputBox in Excel VBA?
The maximum length of InputBox in Excel VBA is approximately 1024 characters. This means that any message or prompt displayed in the InputBox cannot exceed this limit.
Things to Remember
When working with InputBox in Excel VBA, you should remember a couple of things like these:
- Always provide a prompt that clearly indicates what type of input you are expecting from the user.
- Press and Hold the Shift key while selecting multiple Controls simultaneously in UserForm.
- Validate the user’s input to ensure that it meets the required format.
By following these best practices, you may use the InputBox function effectively in your Excel VBA code to prompt the users to take multiple inputs clearly and in a user-friendly manner.
Download Practice Workbook
You may download the Practice Workbook and practice yourself.
Related Articles
- How to Create Yes-No InputBox with Excel VBA
- Excel VBA Input Box with Drop Down List
- Excel VBA: InputBox with Password Mask
- Excel VBA: Input Box with Options
- How to Handle VBA InputBox Cancel Button in Excel

