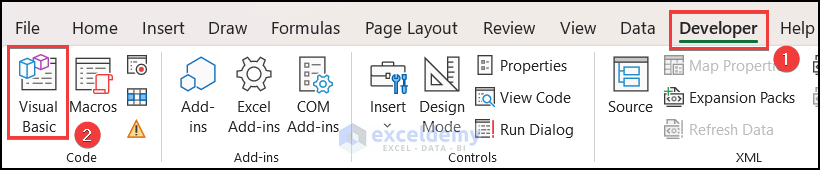
Method 1 – Creating a Blank UserForm
- Go to the top ribbon, press on the Developer, and then press on the Visual Basic option from the menu.
- Use ALT + F11 to open the “Microsoft Visual Basic for Applications” window if you don’t have the Developer tab added.
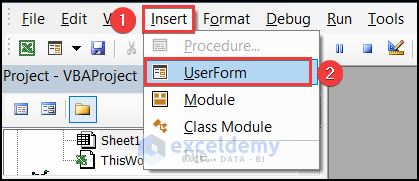
- A window named “Microsoft Visual Basic for Applications” will appear. The top menu bar, press on the “Insert” And a menu will appear. Select the “UserForm’” option.
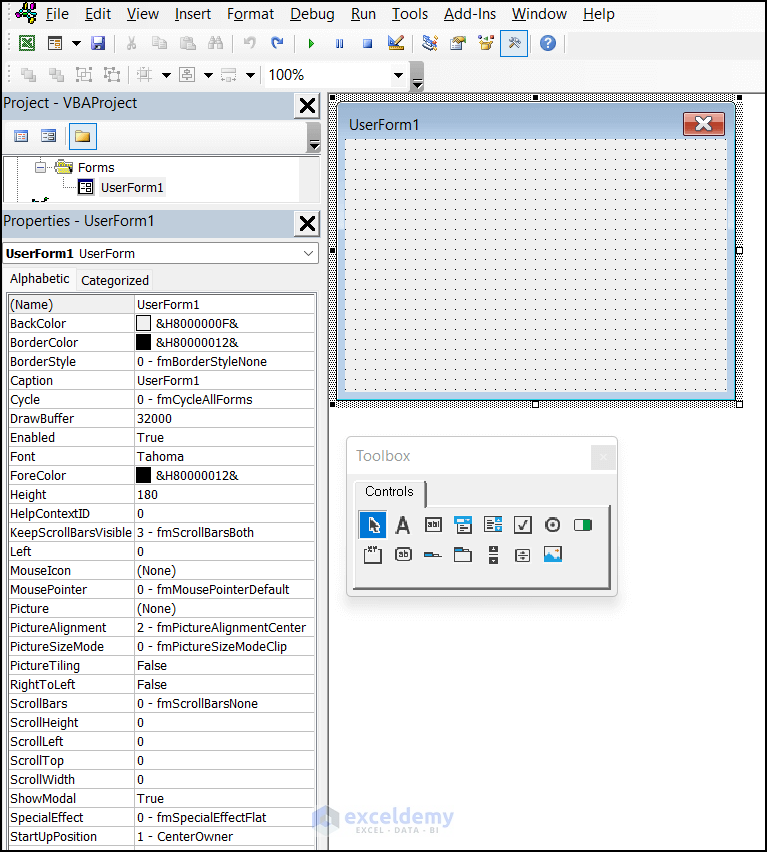
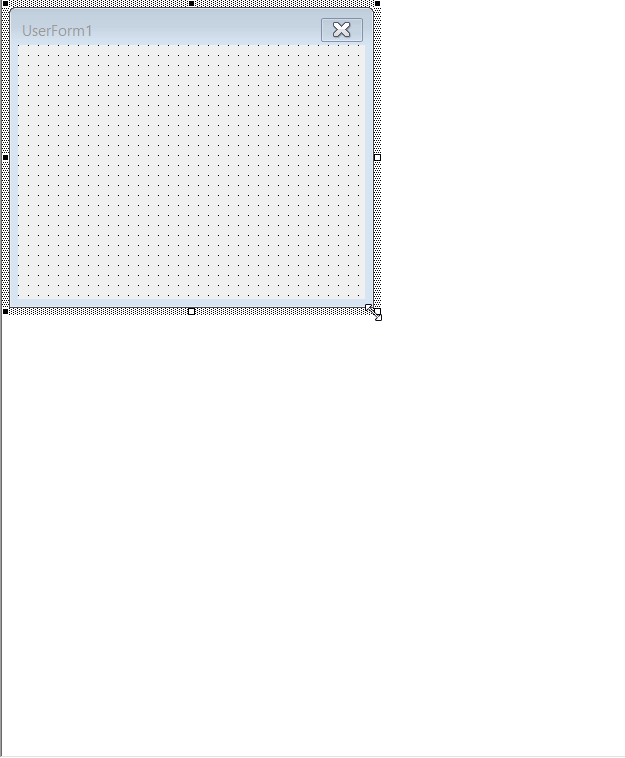
- Create a blank UserForm with the title “UserForm1”. Now, we will make a custom interface as needed. There you will find another pop-up window titled Toolbox. This is where you will create all the buttons, lists, boxes, etc.
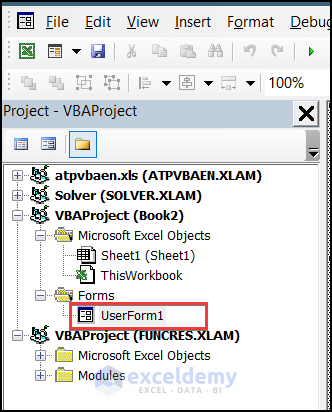
- The UserForm window closes then, double click on the VBAProject >> Forms >> UserForms1, the window will appear again.
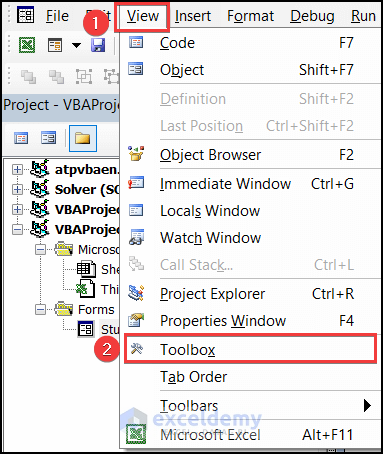
- Go to the View tab and click on the Toolbox, the Toolbox window will appear again.
Method 2 – Resizing the UserForm
You have to resize the user form as per your need. Click on the right-bottom corner with the mouse cursor and drag it to resize.
Method 3 – Creating a Label
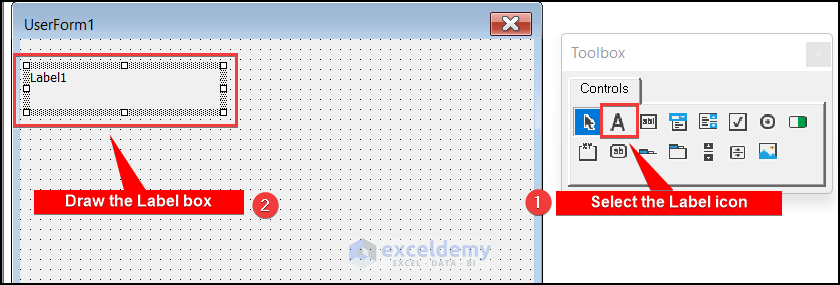
- To create a Label, click on the Label icon in the Toolbox.
- Draw a box shape in the UserForm with mouse clicking.
- A Label box will be created. You have to modify
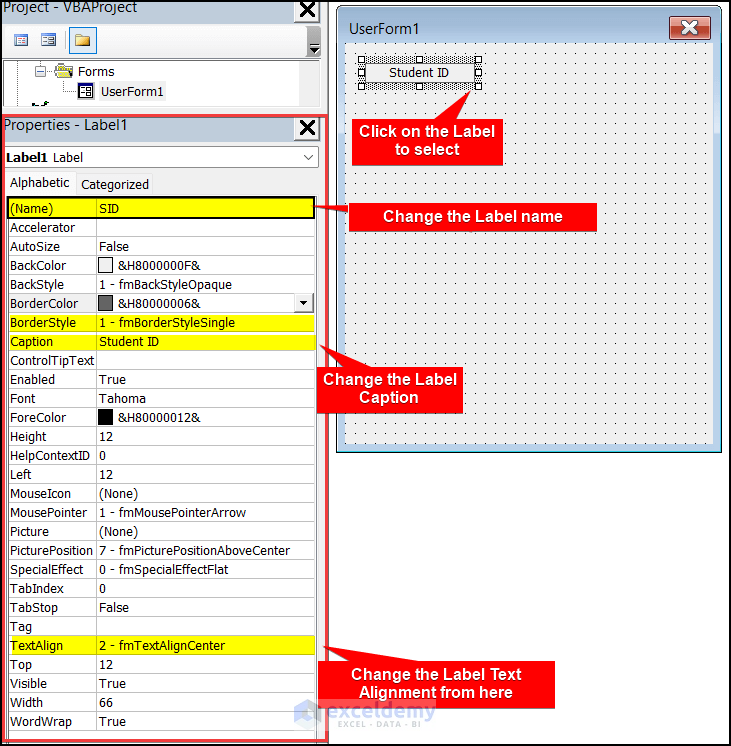
- Click on the Label You will see a window named “Property” will be opened in the left side. If, in any case, you won’t find that, right–click on the Label and select the “Property” option.
- In the Property window, Change the Label name in the Name this name is very important because in the VBA code you have to use this name to call it.
- Select the BorderStyle = 1 to create a border around the box.
- Write “Student ID” in the Caption Caption is that which you want to show as the label.
- Change the TextAlign = 2, which is the center
Method 4 – Creating Necessary Text Boxes
- For the label box, you have to select the Text Box
- Draw a rectangle in the Userform to create a text box in the suitable position.
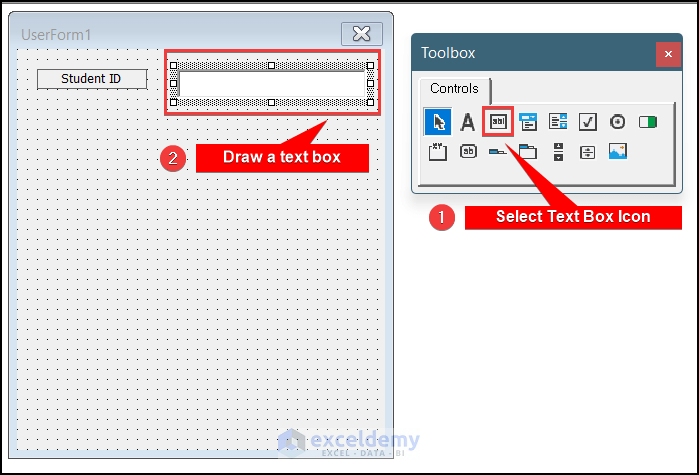
- Creating the text box, go to the Property window. Change the name to “SIDbox”.
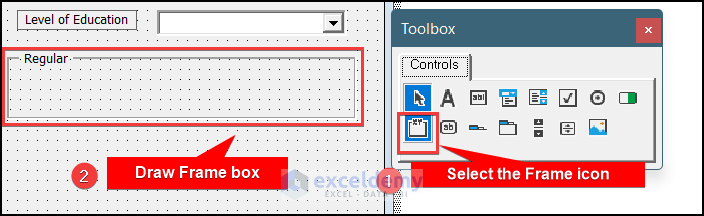
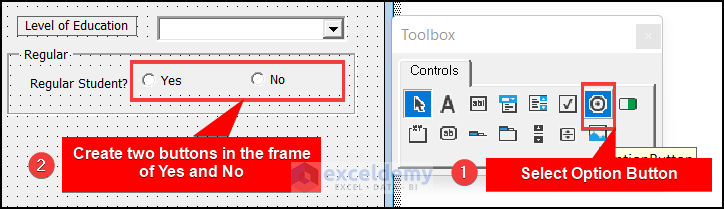
Method 5 – Creating Yes and No Button in UserForm Frame
- Select the Frame icon in the Toolbox and draw a box in the UserForm.
- Go to the Properties and give a name and a caption for the frame.
- Create two Option Buttons inside the frame for Yes and No.
- Creating the Option Buttons, go to the properties and give the proper Name and Caption.
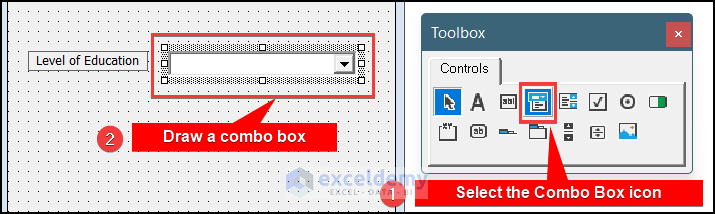
Method 6 – Creating Drop-down Menu with Combo Box
To take the Date input, you can create a drop-down list using Combo Box. For date input, you have to create 3 combo boxes for the day, month, and year. With this UserForm, we created another combo box drop-down menu for selecting the Level of Education.
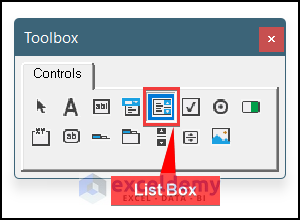
Method 7 – Creating a ListBox
Create a list box in the UserForm. The difference between the combo box and the list box is that in the combo box, you have to select only one option, but in the List box, you can select multiple options.
Method 8 – Creating Command Button for Submit, Clear, and Cancel Commands
To create submit, cancel, or clear buttons, you have to create command buttons. Follow the same methods mentioned before also for creating the Command Buttons.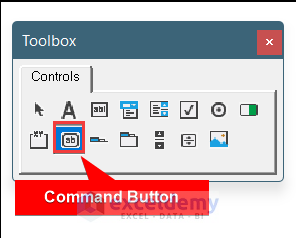
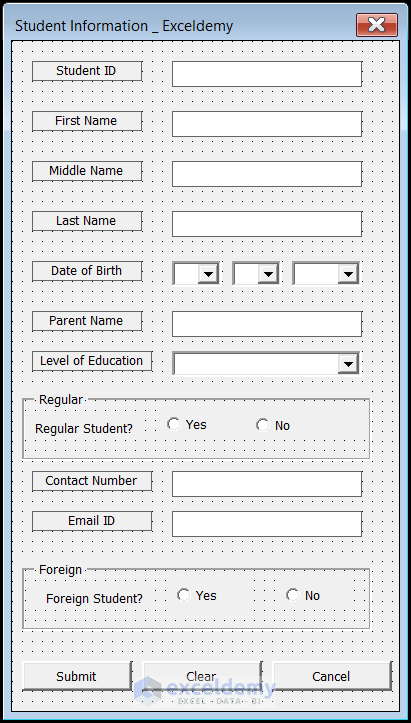
Method 9 – Giving Names and Captions of Boxes in UserForm
- Name: It is used to call the boxes of the UserForm in the VBA code. Its necessary to give a proper name.
- Caption: It is the text that is shown in the UserForm. For the Labels, Option Buttons, Command Buttons, or frames, captions are the display text on the UserForm.
The VBA code is created according to these names.
| Control | Name | Caption |
|---|---|---|
| Label | SID | Student ID |
| Label | FirstName | First Name |
| Label | MidName | Middle Name |
| Label | LastName | Last Name |
| Label | ParentName | Parent Name |
| Label | ParentName | Contact Number |
| Label | dateofbirth | Date of Birth |
| Label | tLevel | Level of Education |
| Label | RegStuden | Regular Student? |
| Label | Email ID | |
| Label | foreignstudent | Foreign Student? |
| TextBox | SIDbox | – |
| TextBox | fnamebox | – |
| TextBox | mnamebox | – |
| TextBox | lnamebox | – |
| TextBox | pnamebox | – |
| TextBox | contactbox | – |
| TextBox | mailbox | – |
| ComboBox | day | – |
| ComboBox | month | – |
| ComboBox | year | – |
| ComboBox | edulevel | – |
| OptionButton | Regularyes | Yes |
| OptionButton | Regularno | No |
| OptionButton | ForeignYes | Yes |
| OptionButton | ForeignNo | No |
| Frame | Regular | Regular |
| Frame | foreign | Foreign |
| CommandButton | SubmitCommand | Submit |
| CommandButton | ClearCommand | Clear |
| CommandButton | CancelCommand | Cancel |
- You have created a UserForm. It’s not ready yet to take data entry from users. You have to write VBA code to make it usable.
Method 10 – Inserting VBA Code to Initialize the UserForm
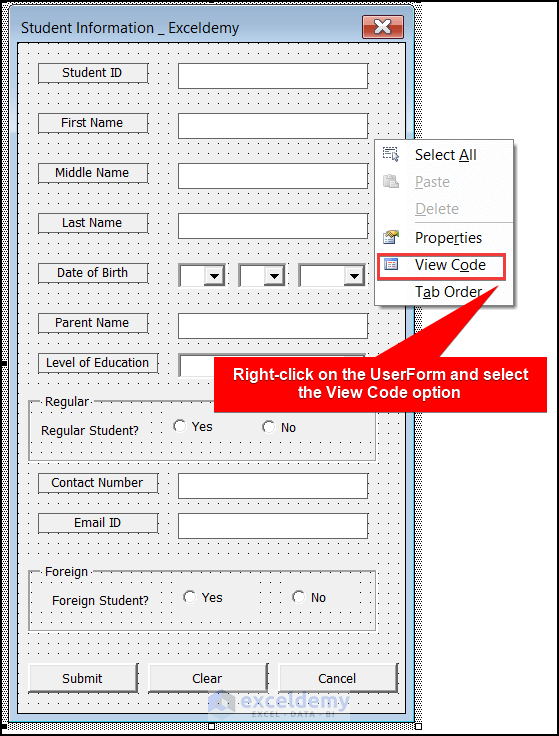
- Double-click on the UserForm to insert the VBA code. Right-click on the UserForm and select the View Code
- In the blank module paste the VBA Code given below:
Private Sub UserForm_Initialize()
SIDbox.Value = ""
fnamebox.Value = ""
mnamebox.Value = ""
lnamebox.Value = ""
mailbox = " "
pnamebox = " "
day.Clear
month.Clear
year.Clear
With day
.AddItem "1"
.AddItem "2"
.AddItem "3"
.AddItem "4"
.AddItem "5"
.AddItem "6"
.AddItem "7"
.AddItem "8"
.AddItem "9"
.AddItem "10"
.AddItem "11"
.AddItem "12"
.AddItem "13"
.AddItem "14"
.AddItem "15"
.AddItem "16"
.AddItem "17"
.AddItem "18"
.AddItem "19"
.AddItem "20"
.AddItem "21"
.AddItem "22"
.AddItem "23"
.AddItem "24"
.AddItem "25"
.AddItem "26"
.AddItem "27"
.AddItem "28"
.AddItem "29"
.AddItem "30"
.AddItem "31"
End With
With month
.AddItem "JAN"
.AddItem "FEB"
.AddItem "MAR"
.AddItem "APR"
.AddItem "MAY"
.AddItem "JUN"
.AddItem "JUL"
.AddItem "AUG"
.AddItem "SEP"
.AddItem "OCT"
.AddItem "NOV"
.AddItem "DEC"
End With
With year
.AddItem "2017"
.AddItem "2018"
.AddItem "2019"
.AddItem "2020"
.AddItem "2021"
.AddItem "2022"
End With
edulevel.Clear
With edulevel
.AddItem "Level 5"
.AddItem "Level 6"
.AddItem "Level 7"
.AddItem "Level 8"
.AddItem "A Level"
.AddItem "O Level"
End With
ForeignNo.Value = True
Regularno.Value = True
SIDbox.SetFocus
End Sub
VBA Code Explanation:
Private Sub UserForm_Initialize()- Created a Private Sub to initialize the UserForm.
SIDbox.Value = ""
fnamebox.Value = ""
mnamebox.Value = ""
lnamebox.Value = ""
mailbox = " "
pnamebox = " "- Making the text boxes blank to take new user input.
day.Clear
month.Clear
year.Clear
edulevel.Clear- Clearing the Combo boxes to take new user input.
With day
.AddItem "1"
.AddItem "2"
.AddItem "3"
.AddItem "4"
.AddItem "5"
.AddItem "6"
.AddItem "7"
.AddItem "8"
.AddItem "9"
.AddItem "10"
.AddItem "11"
.AddItem "12"
.AddItem "13"
.AddItem "14"
.AddItem "15"
.AddItem "16"
.AddItem "17"
.AddItem "18"
.AddItem "19"
.AddItem "20"
.AddItem "21"
.AddItem "22"
.AddItem "23"
.AddItem "24"
.AddItem "25"
.AddItem "26"
.AddItem "27"
.AddItem "28"
.AddItem "29"
.AddItem "30"
.AddItem "31"
End With- Assign items to the drop-down list for the day value of the date. It can be from 1 to 31.
With month
.AddItem "JAN"
.AddItem "FEB"
.AddItem "MAR"
.AddItem "APR"
.AddItem "MAY"
.AddItem "JUN"
.AddItem "JUL"
.AddItem "AUG"
.AddItem "SEP"
.AddItem "OCT"
.AddItem "NOV"
.AddItem "DEC"
End With- Assigning items to the drop-down list of the month value of date. It can be from January to December.
With year
.AddItem "2017"
.AddItem "2018"
.AddItem "2019"
.AddItem "2020"
.AddItem "2021"
.AddItem "2022"
End With- Assigning items to the drop-down list of the year value of date. I have listed the years from 2017 to 2022 in the list.
With edulevel
.AddItem "Level 5"
.AddItem "Level 6"
.AddItem "Level 7"
.AddItem "Level 8"
.AddItem "A Level"
.AddItem "O Level"
End With- Assigning the available levels the institutions offer in the Education Level drop-down menu.
ForeignNo.Value = True- Setting the option No selected for the Foreign Student
Regularno.Value = True- Setting the option No selected for the Regular Student
SIDbox.SetFocus- Setting focus on the value of student ID.
End Sub- Thus, the sub will end.
Method 11 – Inserting VBA Code for Putting UserForm Data into WorkSheet
After taking the user input, you must store the data in a worksheet. Paste this VBA code in the Module:
Private Sub SubmitCommand_Click()
Dim emptyRow As Long
Sheet1.Activate
emptyRow = WorksheetFunction.CountA(Range("A:A")) + 1
Cells(emptyRow, 1).Value = SIDbox.Value
Cells(emptyRow, 2).Value = fnamebox.Value
Cells(emptyRow, 3).Value = mnamebox.Value
Cells(emptyRow, 4).Value = lnamebox.Value
Cells(emptyRow, 5).Value = day.Value & "/" & month.Value & "/" & year.Value
Cells(emptyRow, 6).Value = pnamebox.Value
If ForeignYes.Value = True Then
Cells(emptyRow, 7).Value = "Yes"
Else
Cells(emptyRow, 7).Value = "No"
End If
Cells(emptyRow, 8).Value = edulevel.Value
If Regularyes.Value = True Then
Cells(emptyRow, 9).Value = "Yes"
Else
Cells(emptyRow, 9).Value = "No"
End If
Cells(emptyRow, 10).Value = contactbox.Value
Cells(emptyRow, 11).Value = mailbox.Value
End Sub
VBA Code Explanation:
Private Sub SubmitCommand_Click()- Creating a new Private Sub which will come to action when the Submit button is pressed.
Dim emptyRow As Long- Creating a new variable of Long
Sheet1.Activate- Activating the Sheet1 so, the aftward commands will be effective for the sheet1 of the workbook.
emptyRow = WorksheetFunction.CountA(Range("A:A")) + 1- This code finds the first empty row of the worksheet, where the data from the UserForm can be stored.
Cells(emptyRow, 1).Value = SIDbox.Value
Cells(emptyRow, 2).Value = fnamebox.Value
Cells(emptyRow, 3).Value = mnamebox.Value
Cells(emptyRow, 4).Value = lnamebox.Value
Cells(emptyRow, 5).Value = day.Value & "/" & month.Value & "/" & year.Value
Cells(emptyRow, 6).Value = pnamebox.Value- Assigning Student Id in column A, First Name in column B, Middle Name in Column C, Last Name in column D, and so on.
If ForeignYes.Value = True Then
Cells(emptyRow, 7).Value = "Yes"
Else
Cells(emptyRow, 7).Value = "No"
End If- If the user selects the Yes option in Foreign frame then the code will insert “Yes” in column G of the active row else will insert “No”.
Cells(emptyRow, 8).Value = edulevel.Value- Inserting the level of education in column H of the active row.
If Regularyes.Value = True Then
Cells(emptyRow, 9).Value = "Yes"
Else
Cells(emptyRow, 9).Value = "No"
End If- If the user selects the Yes option in the Regular frame then the code will insert “Yes” in column I of the active row else will insert “No”.
 Cells(emptyRow, 10).Value = contactbox.Value
 Cells(emptyRow, 11).Value = mailbox.Value
End Sub- Inserting the Contact Number and Mail Id in columns J and K and ending the sub.
Method 12 – Adding VBA Code to Close UserForm Window
To close or cancel the UserForm window, you have to insert this VBA code into the module. This code will activate when the user clicks on the Cancel button.
Private Sub CancelCommand_Click()
Unload Me
End Sub
Method 13 – Adding VBA Code to Clear UserForm
After taking one input, if you want to insert another input in the UserForm then you have to clear the previous input first and initialize the UserForm. To clear the UserForm, you will click on the Clear button and the following VBA code will come into action. Add this code with the previous code in the same module.
Private Sub ClearCommand_Click()
Call UserForm_Initialize
End Sub
Method 14 – Adding VBA Code to Create a Command Button to Open UserForm
You can easily run the code and open the UserForm by pressing on the Run option, which will open some other options, and select the Run Sub/UserForm. Also, you can simply press F5 to run the code. But, this is a clumsy and slow process. So, to make it more user-friendly, you can create a command button in the Excel worksheet. For this, follow the steps below:
- Go to the Developer tab in the top ribbon.
- Click on the Insert option and select the Command Button under the ActiveX control
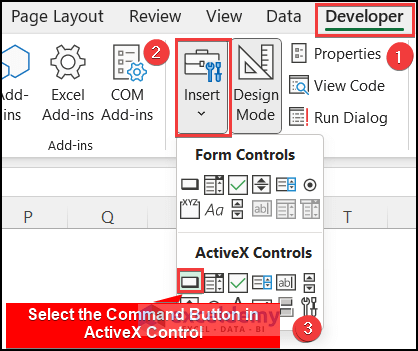
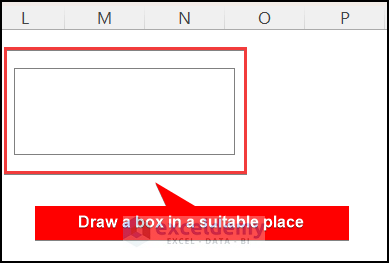
- Draw a rectangle box in a suitable region to create the command button.
- Right–click on the button and select the View Code

- In the module, paste the following code.
Private Sub CommandButton1_Click()
StudentInformation.Show
End Sub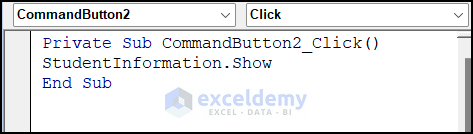
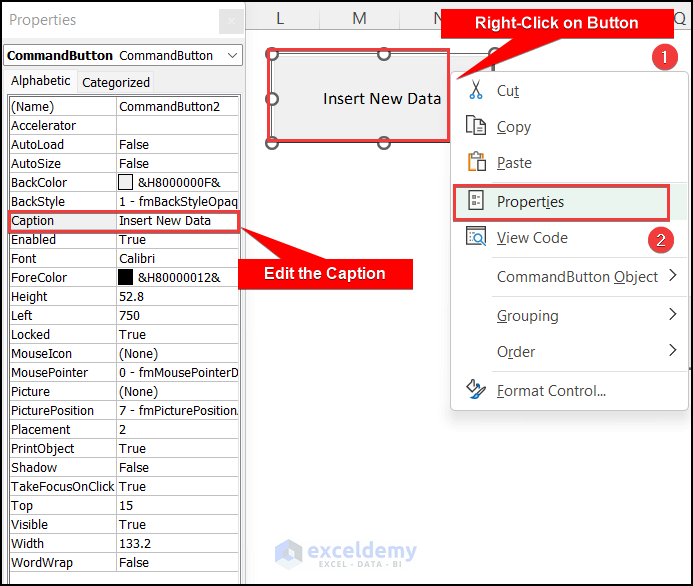
- To rename the code, right–click on the button and go to the Properties
- Remove the text in the Caption box and give a suitable name for the button.
Your Excel VBA UserForm is ready to use.
Last Step: Testing the Userform
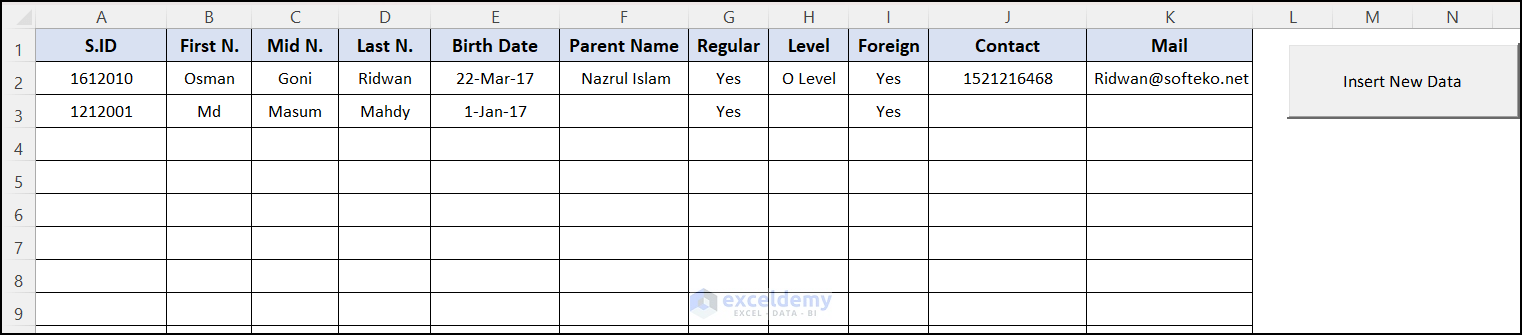
Test the UserForm. Click on the command button in the worksheet. As a result, the UserForm window will appear.

- Give the required data in the blank boxes of the UserForm and press the Submit
- You will see the data inputted in the UserForm are stored in the assigned columns in the
- The UserForm is working completely fine.
Download Practice Workbook
You can download the practice workbook from here:
Related Articles
- How to Write VBA Code in Excel (With Easy Steps)
- Types of VBA Macros in Excel (A Quick Guide)
- What You Can Do with VBA (6 Practical Uses)
- Introduction to VBA Features and Applications
- 6 Best Excel VBA Programming Books (For Beginners & Advanced Users)

