Step 1 – Prepare the Excel File
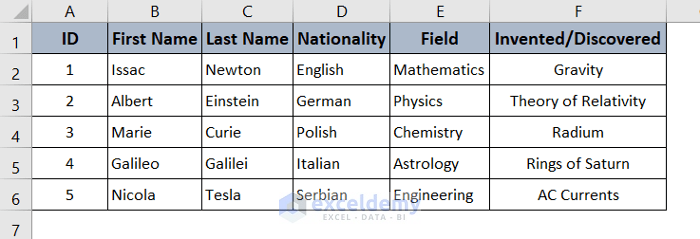
- Create an Excel file with the dataset if you don’t have one already. If you have one, make sure the dataset starts at cell A1. We are using the following dataset.
- You can have multiple sheets in your Excel file but can only use one sheet to auto populate a Word document from Excel.
Step 2 – Go to the Word Document
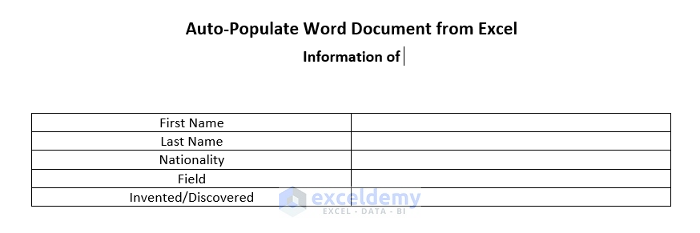
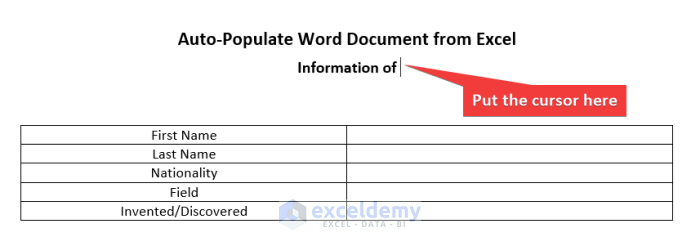
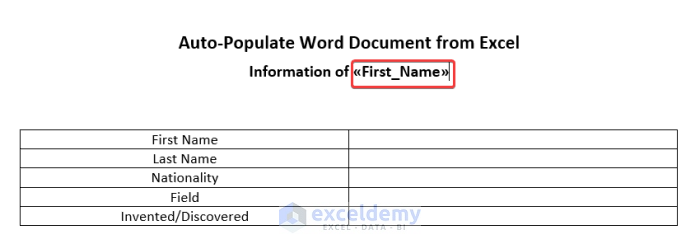
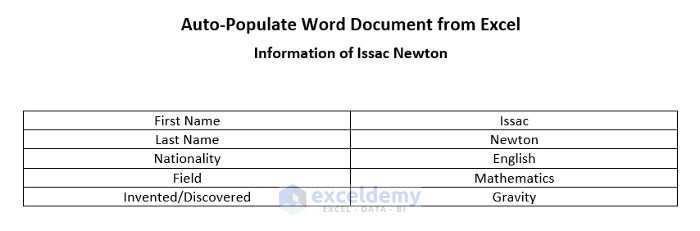
- We have created the following table in Word to put all the information separately for easier understanding.
Read More: How to Put a Large Excel Table into Word
Step 3 – Go to the Mailings Tab
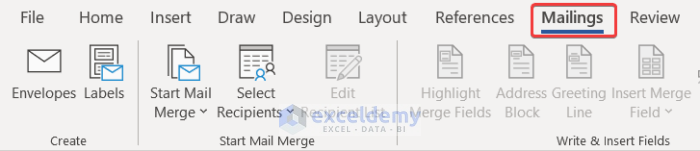
- In the Word document, select the Mailings tab from your ribbon.
Step 4 – Select the Excel Sheet as Recipient
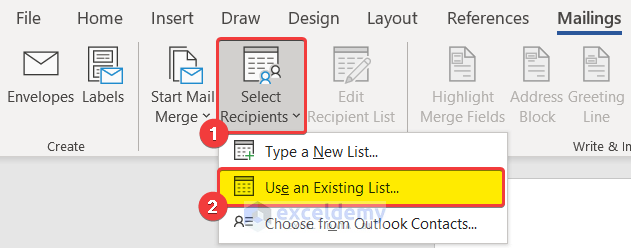
- Click on Select Recipients and select Use an Existing List from the drop-down menu.
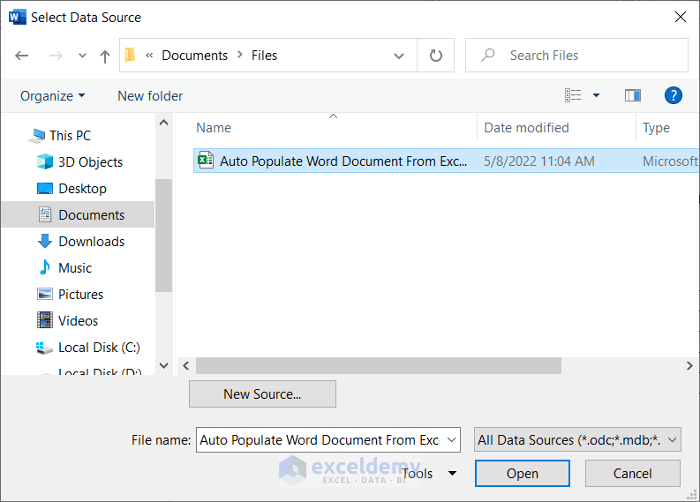
Step 5 – Select the Excel File
- A Select Data Source window will pop up.
- Navigate to your Excel file and select it.
Step 6 – Select the Sheet
- If you have multiple spreadsheets within one Excel file, carefully select the one you want to export from. In this file, we have only one named Dataset.
- Check the First row of data containing column headers if you have headers in your dataset. We have headers on my dataset so we have checked as you can see from the figure.
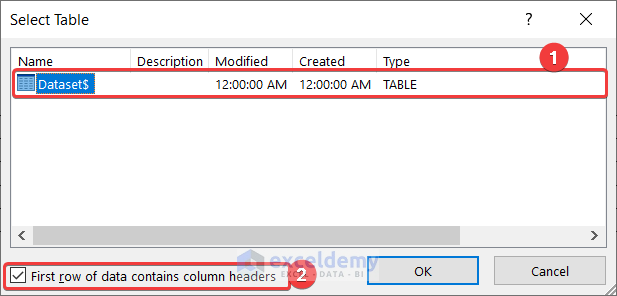
- Click on OK.
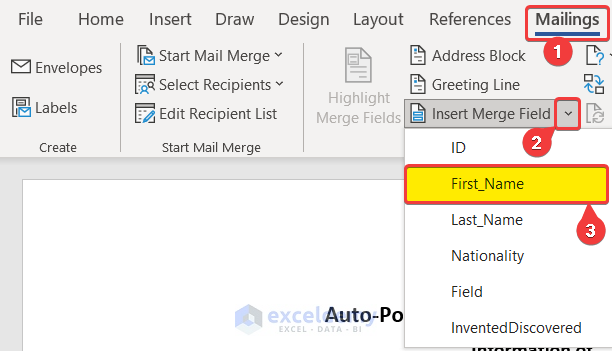
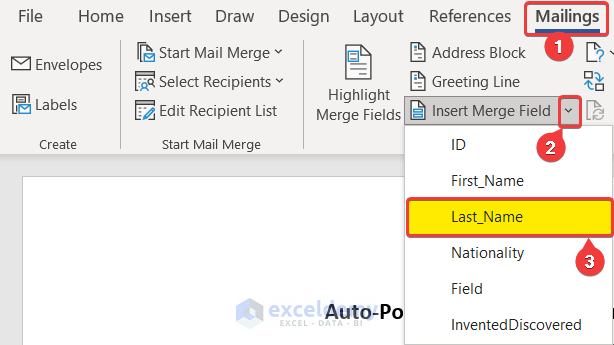
Step 7 – Insert a Merge Field
- Select the position where you want the merged field.
- Go to the Mailings tab in your ribbon.
- In the Write and Insert Field group, you can find the Insert Merge Field.
- Click on the arrow beside it.
- From the drop-down list, select First_Name.
You will have something like this.
- Repeat the same process, but this time select Last_Name from the drop-down menu to enter the last name.
- Here’s the result.
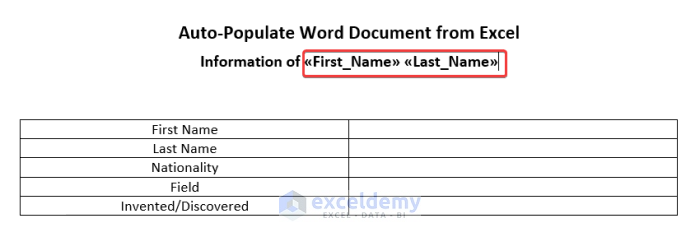
In the field of <<First_Name>> all the first names and in the field of <<Last_Name>> all the last names will be iterated.
Read More: How to Insert Excel Table into Word
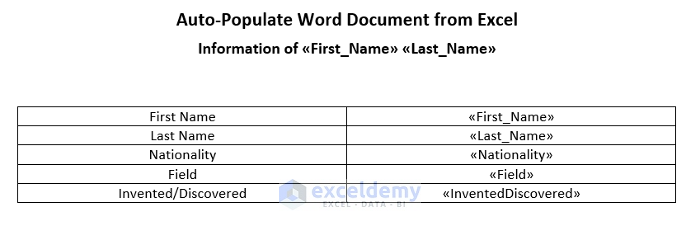
Step 8 – Repeat the Above Step as Many Times as You Need
- For this dataset, you can auto-import ID, First Name, Last Name, Nationality, Field, and Invented/Discovered data into the Word file. Import the desired sections from the drop-down menu.
Read More: How to Create Multiple Word Documents from Excel
Step 9 – Preview Results
- Select Preview Results from the Mailings tab.
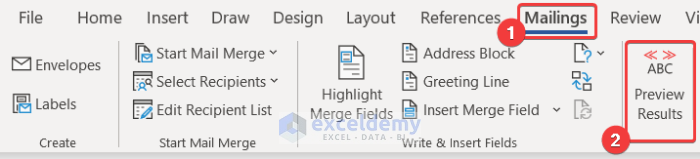
- It will show a preview of the first result.
- To preview the other ones, in the Mailing tab, under the Preview Results group, click on the arrows to switch to other results.

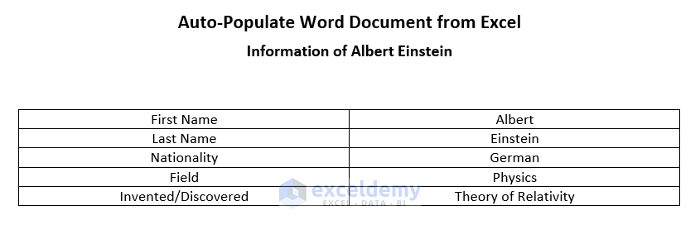
- Here’s the second result.
Step 10 – Save the Word File
- Save the Word file by going to the File tab and selecting the Save As command.

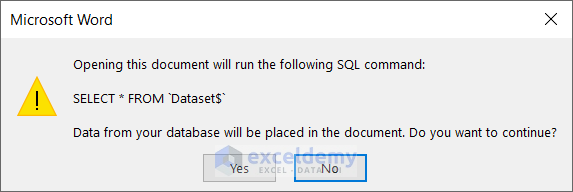
- You can also save the file as a .docx file. Select Yes in the warning box that pops up when you open up the Word file.
Download the Practice Files
Related Articles
- How to Copy Table from Excel to Word
- How to Paste Excel Table into Word Fit to Page
- How to Copy Excel Table to Word with Gridlines
- How to Paste Excel Table into Word in Landscape
- How to Add Drop-Down List in Word from Excel
- How to Insert Excel Table into Word with Formulas
<< Go Back to Export Excel to Word | Export Data from Excel | Learn Excel
Get FREE Advanced Excel Exercises with Solutions!

This was really helpful, thank you. Is there a way for you to add data to the spreadsheet which would then automatically update the recipients in word?
For example, very time I add a new patient to the excel spreadsheet, I need to “select recipients > use an existing list” and choose the excel file again.
Hello, SAF. I am glad it was helpful to you. As for your problem, you don’t need to reupload every time you enter new patient names in Excel.
You can select “Edit Recipient List”> select the file name in the “Data Source” section and hit refresh. It will automatically update the recipients’ list up to the latest entry.
Thank you, this was the most enjoyed reading time for the day. Very well written and so detailed . You forgot the printing part, but while reading the comment section I found your answer.
Hello, Nabil sellami!
Thanks for your appreciation. To get more enjoyable articles stay in touch with ExcelDemy.
Regards
ExcelDemy
Hi Abrar, thank you so much for sharing this. Do you happen to know how I can save and print each pages? Thank you in advance!
Hi Kheiy. Yes, there is an easy way to do that. Go to the Mailings tab on the word file and select Finish & Merge. Then select Print Documents from the drop-down. After that, you can find the option to print all pages or a particular range if you want.
Very helpful thanks.
First of all, I want to say thank you for this very helpful post, it really helped me alot
I was wondering if the result could be all on one page and when that page is full it could go to the next page and so on
Hi FADYA,
Thanks for your appreciation.
When we auto-populate Word documents from Excel it automatically generates data in individual documents for each data.
However, you can go to the View tab and then click on Web Layout from the Views group to see all the values in a single layout.
hello,
I wish to produce a mail merge that includes an excel spreadsheet chart that is unique for each customer e.g.include an invoice (spreadsheet) for each customer showing goods they purchase this month.
Mailmerge is simple to achieve but to get the data for the individual customers details from within the data that contains the customer name, address.
Appreciate any help that you can provide.
Stuart
Thank you for your inquiry. Regrettably, Microsoft Word does not have the capability to perform a mail merge with Excel charts. Although there are third-party add-ins that claim to provide this functionality, we cannot vouch for their security, and therefore, we do not recommend their use.
Perhaps, you may post this query on Microsoft Community, where experts can direct you to a trusted alternative.
Regards,
ExcelDemy
HI,
Thank you so much for making this tutorial, it is very useful.
I want to make a document where I can generate a table with different information for each person (like the example above with IsaacNewton, AlbertEinstein, and MarieCurie) however when I change the results preview it changes every table to the same record (i.e. every table is IsaacNewton, then every one becomes AlbertEinstein etc. but I want them to all be their own person). Do you have any advice for how to change this?
Thanks in advance.
Hello, Elena.
Thank you for your kind words. Now, what I can understand from your query is that when you navigate through the preview results, you can only see just one individual’s information rather than everyone’s information. If you exactly follow the steps outlined above, you should be able to see all of the persons’ information in the preview result. Hence, I encourage that you carefully follow the instructions outlined above and observe whether or not your problem is resolved. If your issue persists, you can upload your file to our Exceldemy Forum(https://exceldemy.com/forum/). We will do our best to find a solution.
Thank you, really helpful and easy to follow. Is there a way to save each sheet indivudually as a doc automatically?
Hi MIGUEL,
We are glad, you asked the questions. It’s quite easy to import data from separate sheets and save it as separate documents. Simply, use the following code in a new module of VBA. Only, you have to change the file directory to save the doc file.
After running the code, you will see the doc files created according to your dataset.
How do i get this coding screen up to complete this?
Hello Joe Diver,
You’ll need to open the Visual Basic for Applications (VBA) editor in Excel. Here’s how:
1. In Excel, press Alt + F11 → this will bring up the coding screen (VBA editor).
2. In the VBA editor, go to Insert > Module and paste the code there.
3. Close the editor and run the macro from Developer > Macros in Excel.
If the Developer tab isn’t visible, you can enable it from File > Options > Customize Ribbon > check Developer.
You can explore this article: Learn Excel Macros & VBA Programming (Free Tutorial & 50++ Examples)
Regards,
ExcelDemy
In 1990 I bought a wonderful program called Ragtime. I could create a template with a spreadsheet on page one and a Will that followed was populated by the data in the cells.
It is now 33 years later and this can’t be done anymore? The steps here are crazy.
Absurd. Or more likely, less profitable
Thanks, GENE for your comment. As you mentioned in your comment, RagTime is a specialized publishing tool with advanced layout and design capabilities. It may be a better choice for complex design and layout requirements for your mail merge documents. If you’re comfortable with a specialized tool, RagTime is a good option. However, if your needs are simple and you’re already familiar with Excel, using it for mail merging can be practical and efficient. So overall it depends on your requirements and in which platform you are used to do your work.
Regards
Aniruddah
Team Exceldemy
Thank you for the information. How would you do multiple line items? For example, like a purchase form.
Qty Description Model/Catalog/Item# Unit Price Total Price
1 Tape logic 1 tape logic 1 1 1
3 Tape logic 2 tape logic 2 1 3
When I followed the steps it only put in the first line item.
Hello RYAN,
Thank you for sharing your experience.
I believe you want to auto-populate Word documents from multiple Excel data like a purchase form. The reason you were able to display only one item after following the above steps is that the Mailings feature merges through only one entity for each line.
However, it is possible to display every line of the Purchase form using 2 easy steps.
Let’s start creating the dataset as per your requirements:
Afterward, let’s create another dataset in Word and follow the steps 3 to 9 of this article. Thus, we get the first line data according to your dataset. Now, we can toggle through each line data using the toggle buttons.
Or, we can display the desired number of lines in a single Word file.
Go to Finish & Merge >> Edit Individual Documents.
Put the number of lines you want to populate >> OK.
As a result, you get all the lines of data in your Word file.
Regards,
Yousuf Khan Shovon
I would like to automatically update a word document (that contains every persons information) as the excel sheet is automatically updated from the form.
This is for a Conflict of Interest Register.
Hello VICTORIA SHARP
Thank you for reaching out and sharing your requirements. Based on your comment, it seems like you’re looking for a dynamic link between your Excel sheet and Word document to ensure that any updates in the Excel sheet reflect immediately in the Word document.
The solution provided in the article serves this purpose quite effectively. Using the Mail Merge feature in Word, you can connect your Excel sheet (containing the Conflict of Interest Register data) and your Word document.
So, do not hesitate to follow the steps outlined in the article to establish the connection between the two. Once set up, any changes you make to the Excel sheet will automatically propagate to the Word document when you update the merge fields. This way, you can maintain an accurate and current Conflict of Interest Register without manual effort. Good luck.
Regards
Lutfor Rahman Shimanto
ExcelDemy
Hi,
Thanks! for this excellent article.
However, my requirement is rather more complex:
1. Automatically populate the Word document with all rows in the excel, into one Word document and no separate file.
2. Dynamically select different excel file each time with same table structure (i.e. same table and columns names but different data values)
3. Only apply (repeat) to selected potation of the Word document. as other part of word document is populated by from Quick Parts –> Document property (in SharePoint library) and they should not be repeated.
Hello Shantosh Kumar Dwivedi,
Thank you for your kind words! I’m glad you found the article helpful. For your specific requirements, you can achieve this using Mail Merge with VBA in Word, along with some automation techniques. Here’s how you can approach each point:
Populate all rows into a single Word document:
1. Instead of creating separate Word files, use the NEXT RECORD field in Mail Merge to insert all rows into the same document.
2. Alternatively, a VBA macro can loop through the Excel data and append each row dynamically to a designated section of the Word document.
Dynamically select different Excel files:
1. This can be handled by adding a VBA script that allows the user to browse and select an Excel file dynamically.
2. The script would ensure that the selected file maintains the same structure (column names) while updating the data.
Repeat only a selected portion of the Word document:
1. You can achieve this by inserting a Content Control or a specific table within Word where the repeated content is dynamically inserted.
2. Since some sections are populated via Quick Parts (Document Property in SharePoint), ensure that the VBA script or Mail Merge only updates the designated area while keeping the SharePoint metadata intact.
Regarding: How to Auto Populate Word Document from Excel (with Quick Steps)
Thank you very much, this was very well put-together.
I face a slightly different challenge.
My aim is to have either a Word or PowerPoint document whose content I can change in batches every time the textbook (I teach English) changes.
To do this, I think I need to have my data (sentences, spellings, unit numbers, etc) in a table format which I can edit before exporting/importing into Word / PowerPoint.
So your tutorial here gave me an insight into the kind of thing, but not the specific things, necessary to do this.
Simply put, I want to tell Excel to export one record to one Word page or PowerPoint slide, because Word and PowerPoint are obviously better for students in class. So a spreadsheet with 50 records would generate a 50-page Word or PowerPoint file.
I wonder if this can be done, and if you already have an internet page showing something like it.
With many thanks.
Hello Matthew,
Thank you so much for your kind words! Your idea is excellent — using Excel to create one page per record in Word or one slide per record in PowerPoint is definitely possible, and many teachers would find that very useful.
To keep things simple:
Yes, you can use VBA (macro) in Excel to export data row-by-row into either Word or PowerPoint. Here’s an example for Word, where each row becomes one new page:
VBA Example: One Row = One Page in Word
What you need:
1. Excel with your data (e.g., Unit in Column A, Sentence in Column B).
2. Microsoft Word installed.
3. Press Alt + F11 in Excel → Insert a module → Paste the code → Run it.
If you’re looking to do this with PowerPoint, the idea is similar, just using PowerPoint objects instead of Word.
Regards
ExcelDemy