Inserting a new column in your Excel spreadsheet allows you to include additional data or categories for analysis. Inserting columns properly is a critical Excel skill for organizing information and expanding your data set.
In this Excel tutorial, you will learn everything about how to insert a column in Excel.
The following dataset contains four columns: Product, Product Code, Color, and Price. We will add a column named Size between the Color and the Price columns.
6 Ways to Insert a Column in Excel
You will learn how to insert a column in Excel by taking advantage of processes like the column heading context menu, keyboard shortcuts, mouse techniques, and even Excel VBA.
Here are 6 ways to insert a column in Excel:
Using the Column Heading Context Menu
Using the column heading context menu is the most fundamental approach to formatting rows and columns in Excel.
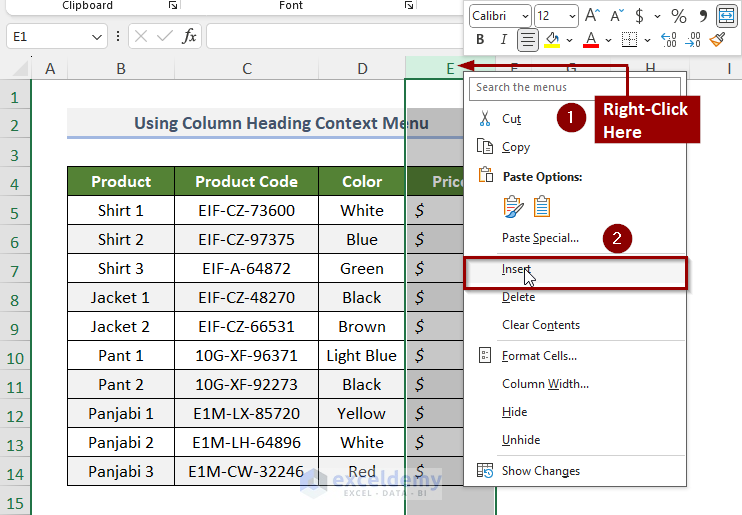
To insert a column in Excel using the column heading context menu:
- Right-click on the column heading to open the context menu.
- Select the Insert option.
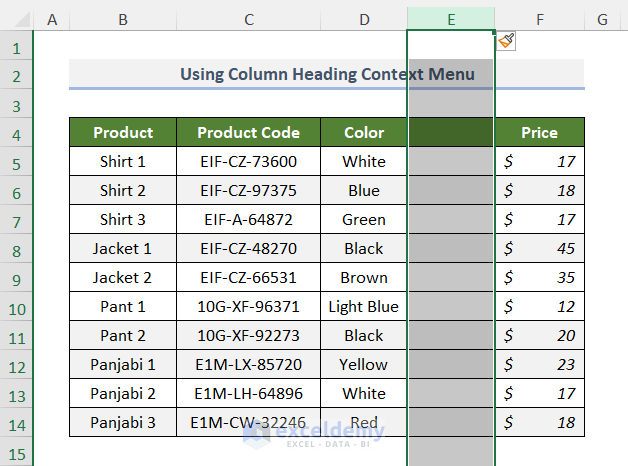
You’ll now have a new column inserted on the left of the selected column in Excel.
Applying Keyboard Shortcut
A keyboard shortcut allows you to perform actions quickly without the need to navigate through menus using the mouse.
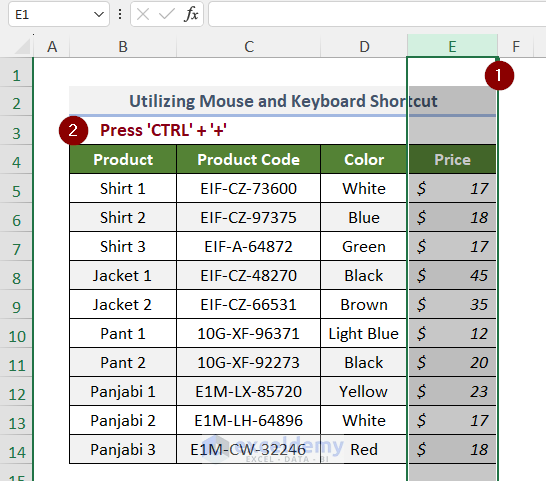
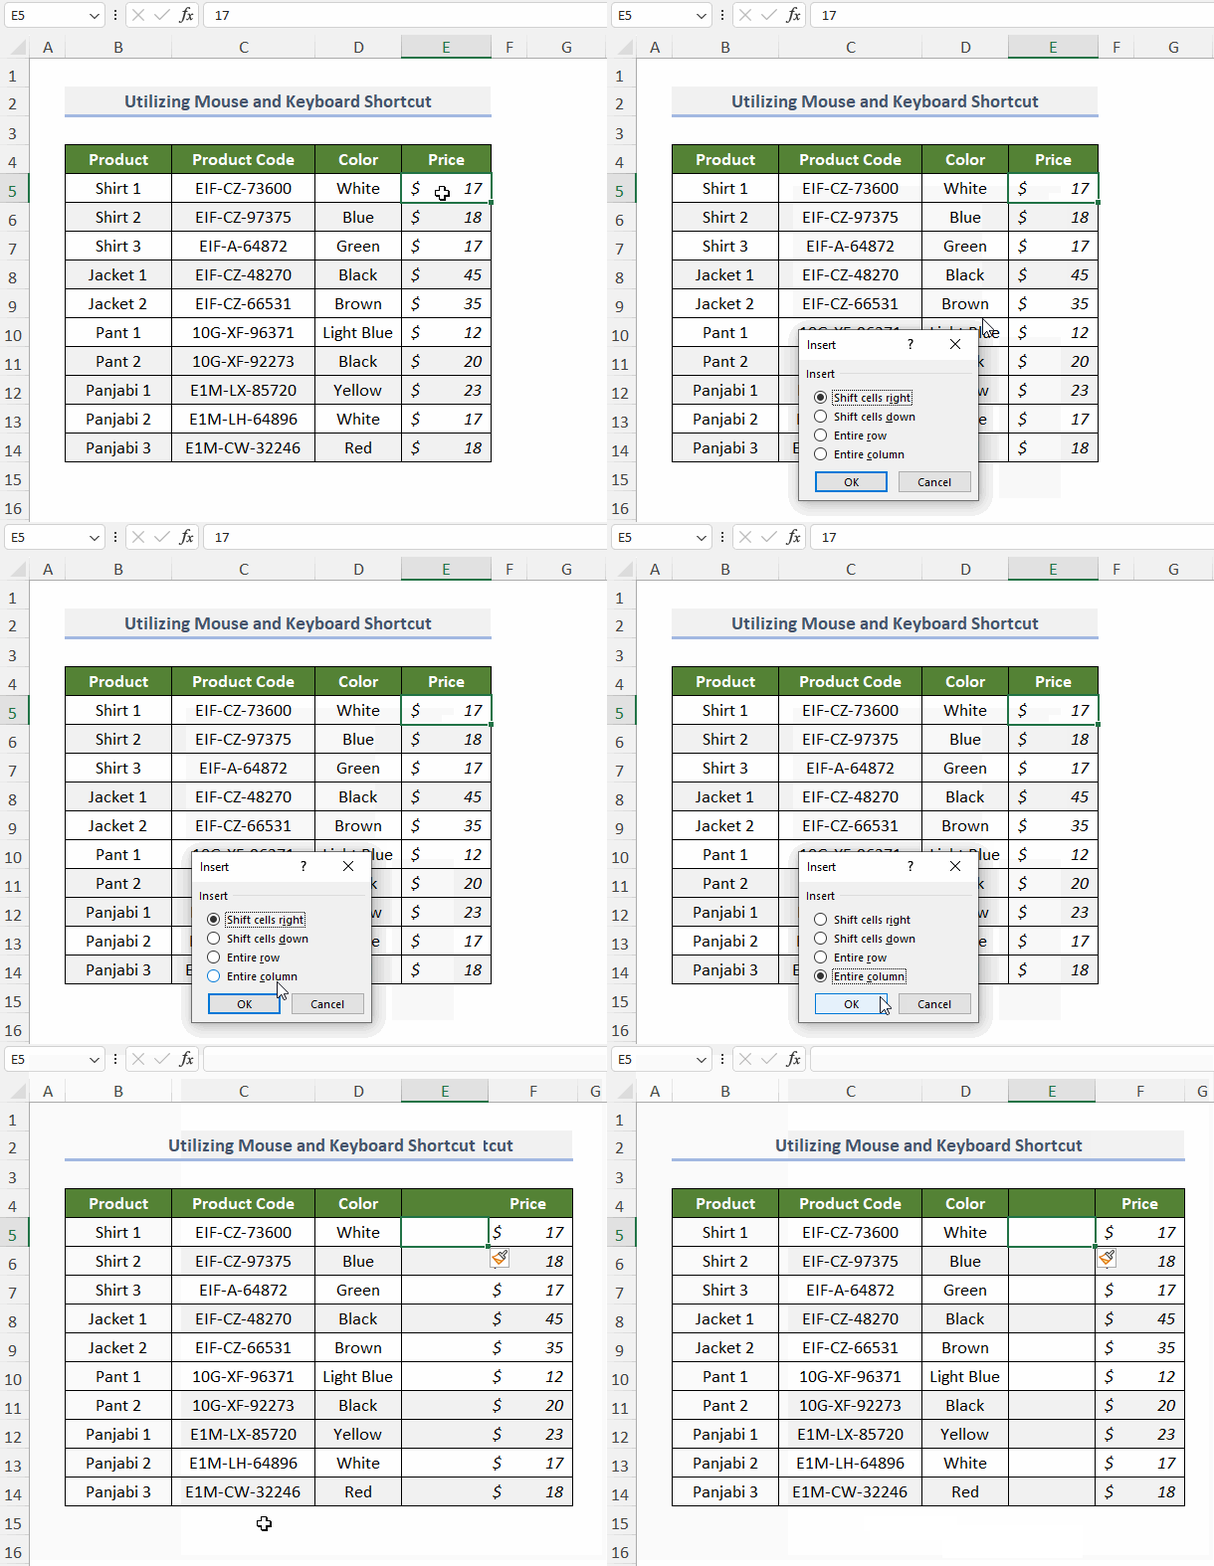
To insert a column using a keyboard shortcut:
- Select a column heading.
- Use the keyboard shortcut ‘CTRL’ + ‘+’ to insert a new column.
Note: Use the shortcut ‘CTRL’ + ‘SHIFT’ + ‘=’ for keyboards and laptops without a Num Pad to insert a new column
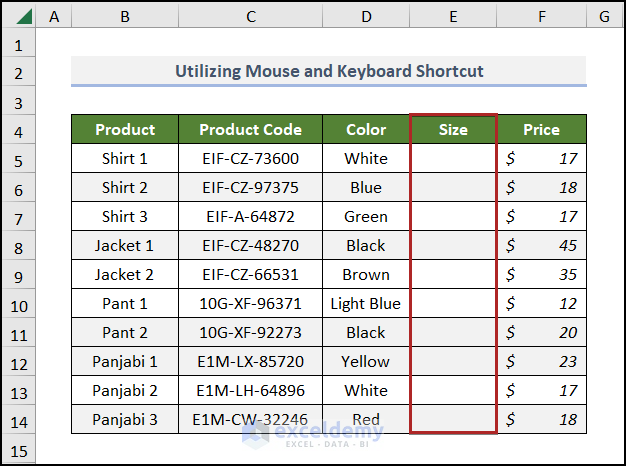
Thus, a new column will be inserted on the left of the selected column.
Alternatively, if you have selected only one cell or a range of cells instead of the entire column, Excel will provide you with additional insert options when using the keyboard shortcut. In this menu, select the Entire column option to insert a new column:
Clicking-and-Dragging with Mouse
Excel allows you to click and drag to move selected cells, and this technique can be used to insert a new column where needed.
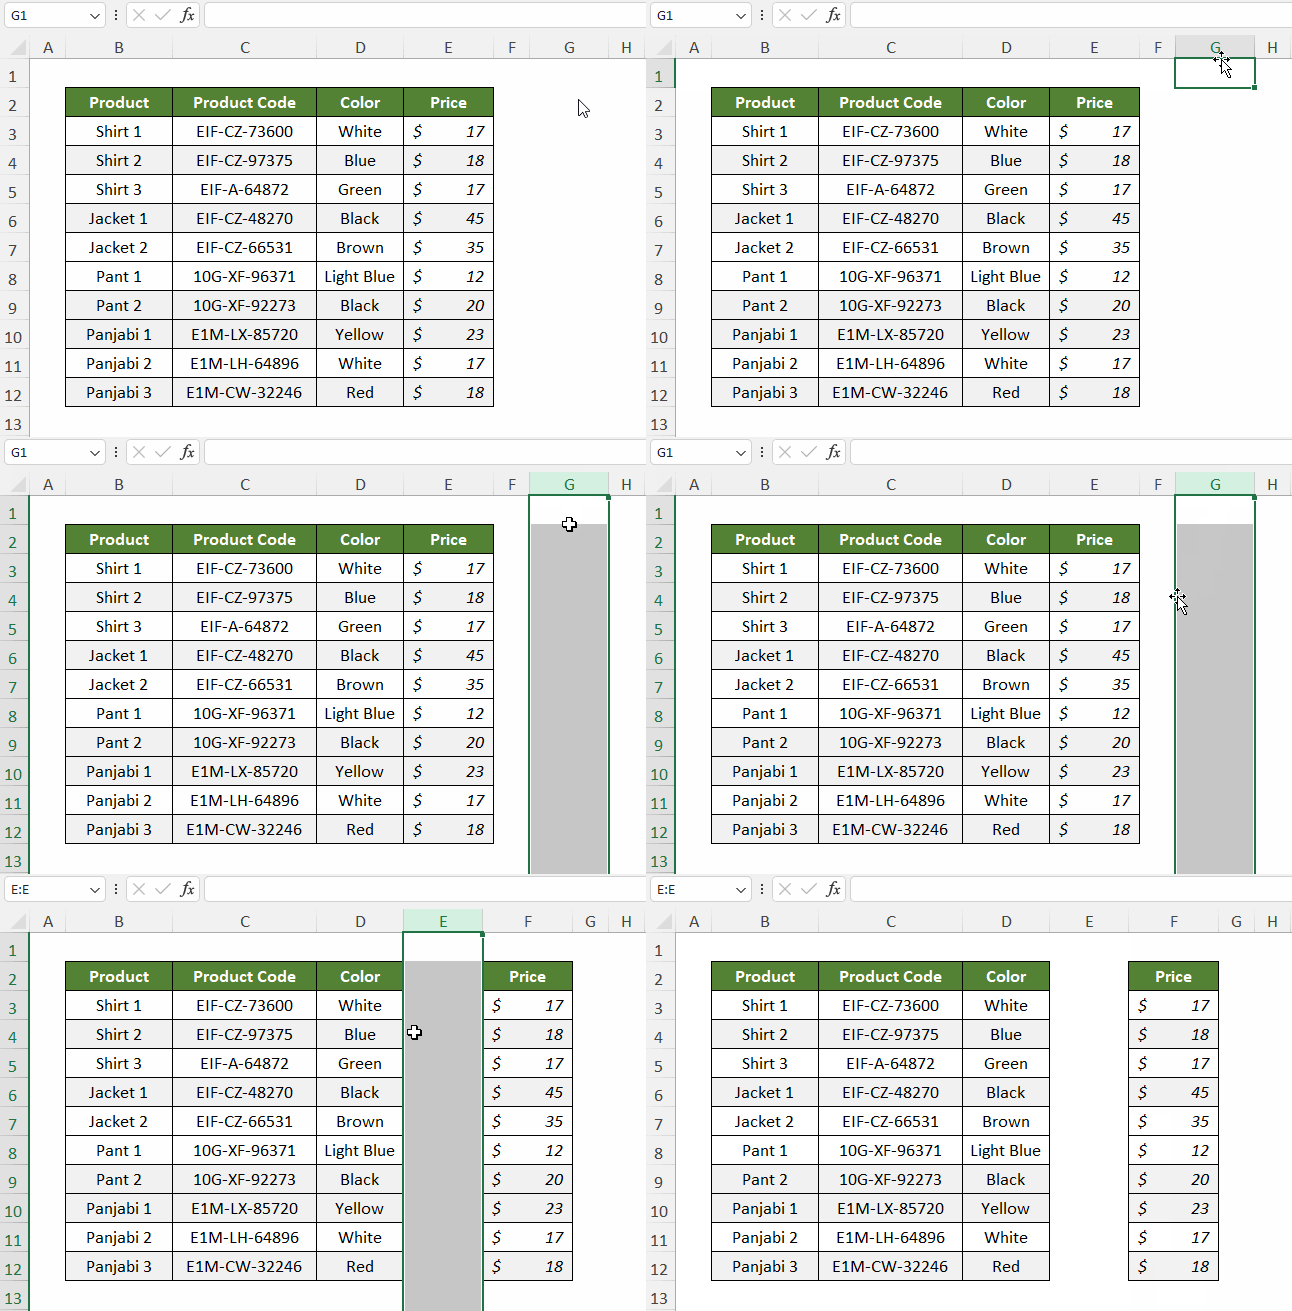
Here’s how we can click and drag with the mouse to insert a column in Excel:
- Click on the heading of a blank column to select it.
- Bring the mouse cursor to the edge of the selection until it turns into a black cross with arrows.
- Hold the SHIFT key.
- Click and drag the blank column to a new position.
Note: Inserting a column in this way will not include the formatting of the data table. Also, this method will not work properly if the destination has any merged columns.
Using Fill Handle
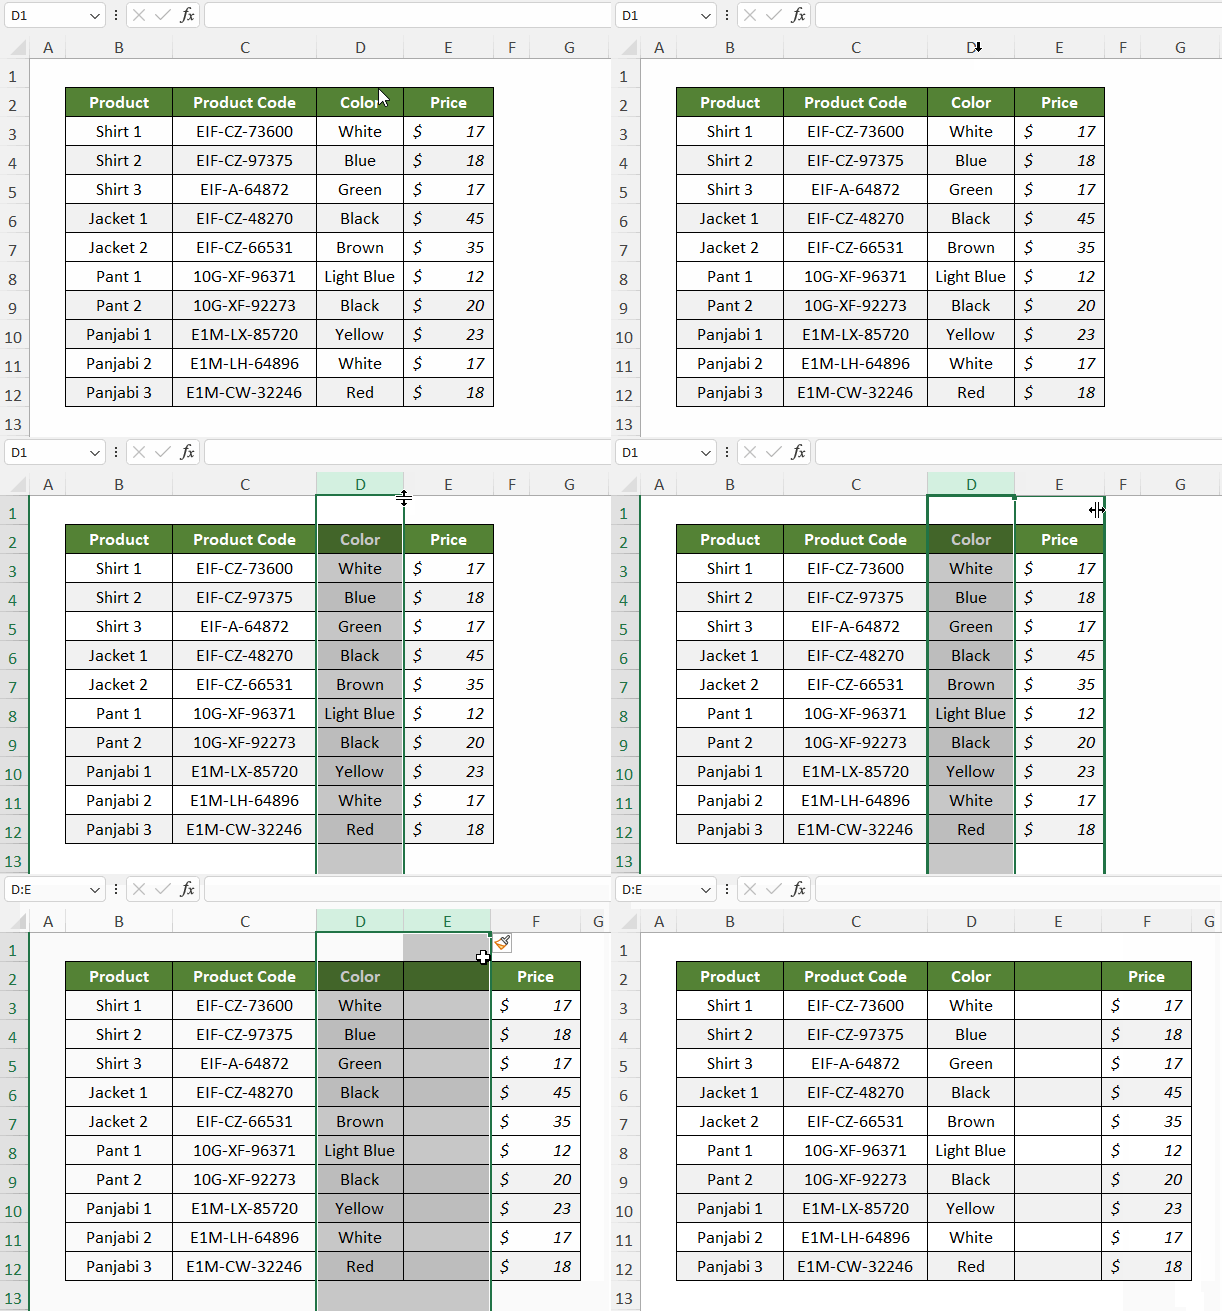
Excel’s Fill Handle can be used to insert a new column into a spreadsheet. Here’s how:
- Select a column heading.
- Move the mouse cursor to the small square of the Fill Handle on the top-right of the selection.
- Hold SHIFT until the cursor changes.
- Click and drag the selection to insert a new column.
Note: This method will not work properly if the destination has any merged columns.
Using Insert Command
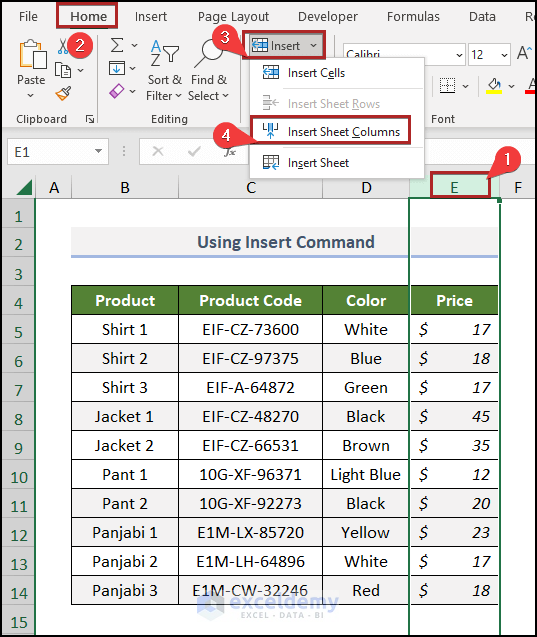
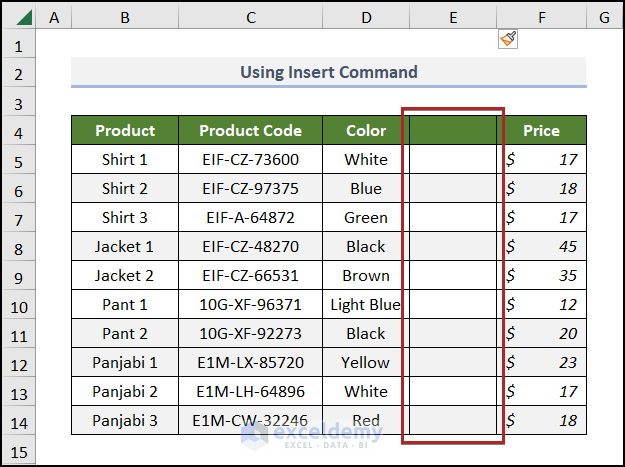
You can manually use the Insert command from the Ribbon to add a column in Excel. Follow the steps below:
- Select a column heading.
- Go to the Home tab > Cells group > Insert drop-down > Insert Sheet Columns.
Thus, a new column is inserted on the left of the selected column in Excel.
Using VBA Code
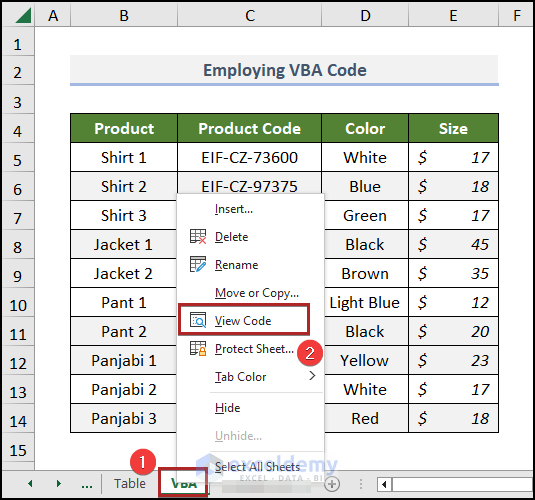
To insert a column in Excel using VBA, you can use the “Columns” property along with the “Insert” method. Follow the steps below:
- Right-click on the sheet name.
- On the context menu, select the View Code option.
The Microsoft Visual Basic for Applications window will appear, and Excel will automatically insert a code module for this sheet.
- In the code module, paste the two following sub-procedures:
Sub Insert_Column() Range("E1").EntireColumn.Insert End Sub Sub Column_Name() Dim Name: Name = Split("Size") Sheet6.Range("E4").Resize(1, UBound(Name) + 1) = Name End Sub - Save the file and go back to the Excel sheet.
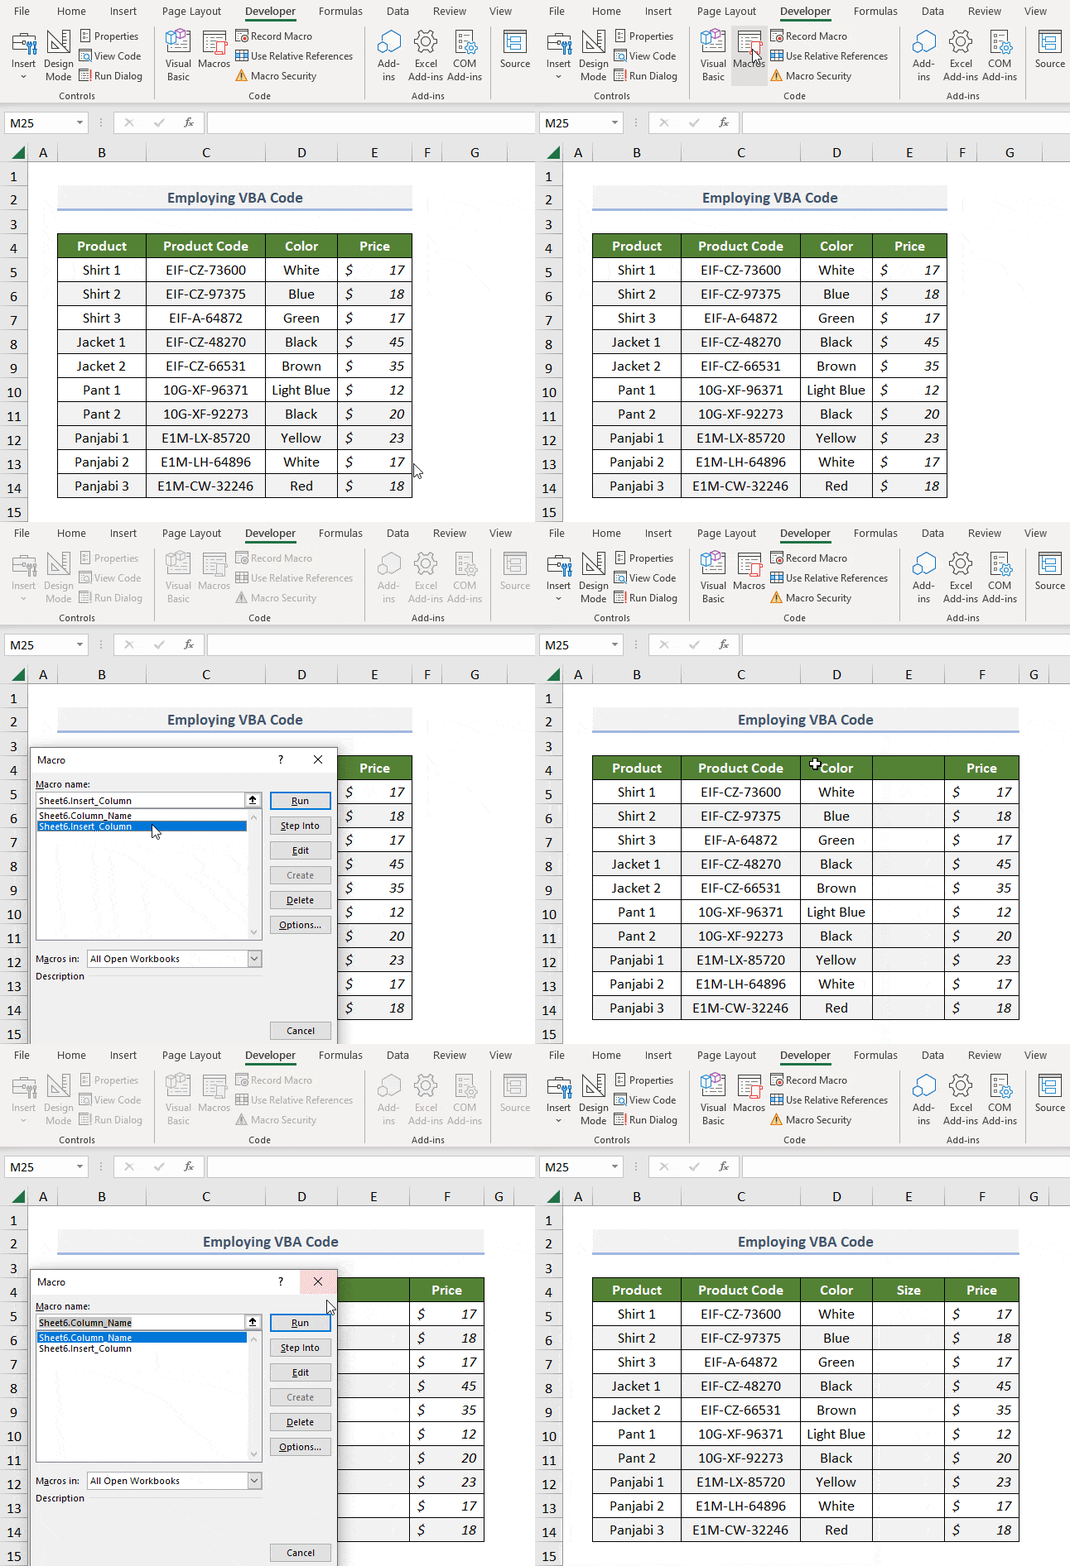
- Go to the Developer tab > Macros. The macro-dialog box will appear.
- Select the created Macro > Run.
You can see a new column has formed.
How to Insert a Column into a Formatted Excel Table
Sometimes a new column is needed for a formatted Excel table. It is useful for expanding your dataset, accommodating new calculations or analyses, categorizing data more effectively, and meeting evolving user requirements.
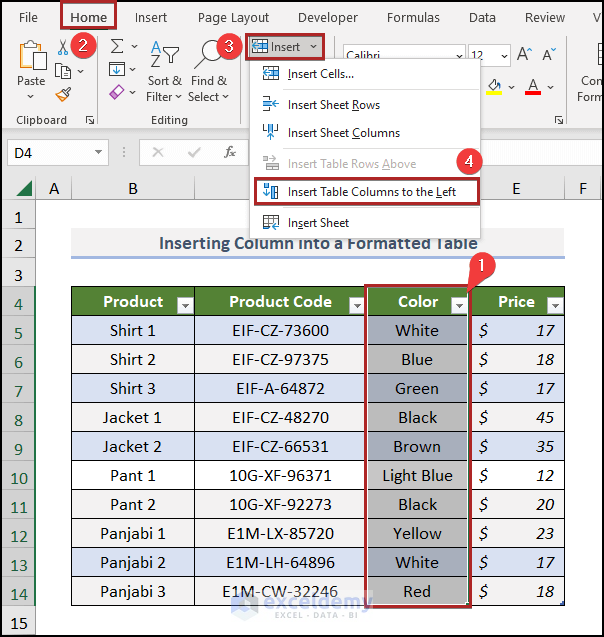
To add a column on the left side of the chosen column to an Excel Table:
- Select the column range of the table.
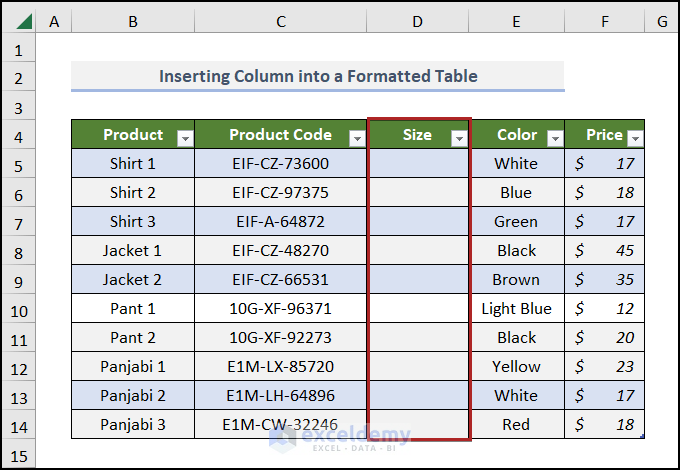
- Go to the Home tab > Cells group > Insert drop-down > Insert Table Columns to the Left.
You can see a new column formed before the chosen column.
Note: When a sheet is protected, certain actions, such as inserting columns in a table, can become restricted.
Download Excel Workbook
You may download the following Excel workbook for better understanding and practice.
Conclusion
Inserting a column in Excel is a basic yet powerful skill that enhances data management capabilities. By following the procedures outlined in this guide, like using the Insert feature from the context menu or efficiently applying keyboard shortcuts, you can effortlessly add columns to your Excel sheets, improving the organization and analysis of your data. This tutorial also shows how to use Excel VBA to help you perform this task automatically.
I hope this tutorial was helpful for you. Let us know your queries and feedback in the comment section.
Frequently Asked Questions
Does the Insert command work the same way for both Windows and Mac versions of Excel?
Yes, the process for inserting a column is generally consistent across different versions of Excel.
Is there a way to insert a column using a formula or a function?
No, inserting a column is a structural change in Excel, and it’s typically done through the “Insert” command. Formulas or functions are used for calculations within cells but are not directly related to column insertion.
Can I insert multiple columns at once in Excel?
Yes, you can insert multiple columns simultaneously. Select the number of existing columns equal to the number you want to insert, and then use the “Insert” command. The new columns will be added to the left of the selected columns.
Get FREE Advanced Excel Exercises with Solutions!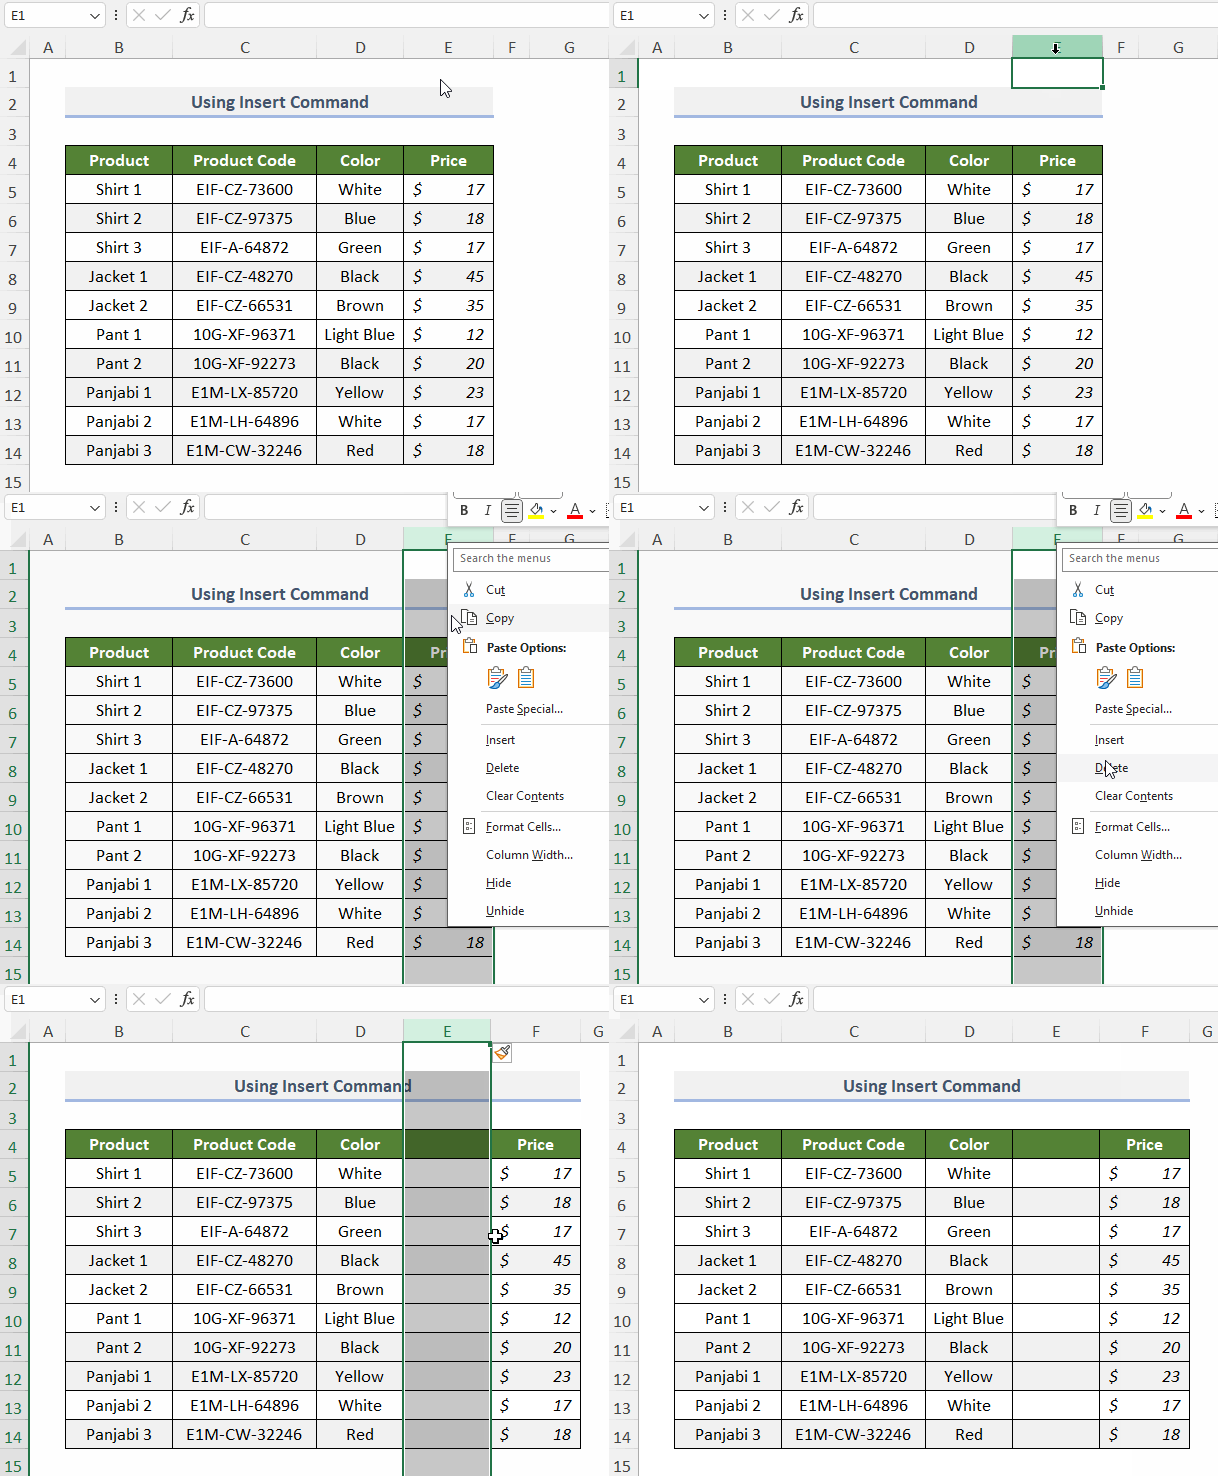
 The Microsoft Visual Basic for Applications window will appear, and Excel will automatically insert a code module for this sheet.