
When data is stored across several Excel workbooks, copying and pasting everything into one file can quickly become repetitive and error-prone. Excel provides several ways to consolidate data automatically, depending on whether you need a simple summary, a live connection, or a reusable workflow.
In this tutorial, we will show 5 ways to consolidate data from multiple workbooks automatically. From Power Query to VBA, you can choose the approach that best fits your data.
1. Consolidate Multiple Workbooks with Power Query from a Folder
This is the gold standard for consolidating many workbooks with identical structure (e.g. “Sales_Jan.xlsx”, “Sales_Feb.xlsx”, etc.). It’s fully automatic, refreshable, and handles new files added later without any code changes. Best for monthly, weekly, or departmental files that share the same structure.
Suppose you have monthly sales data in different workbooks stored in one folder, and you want to consolidate all that data into one workbook automatically.
Steps:
- Move all source workbooks into one folder
- Open a new Excel workbook
- Go to the Data tab >> click Get Data >> select From File >> choose From Folder
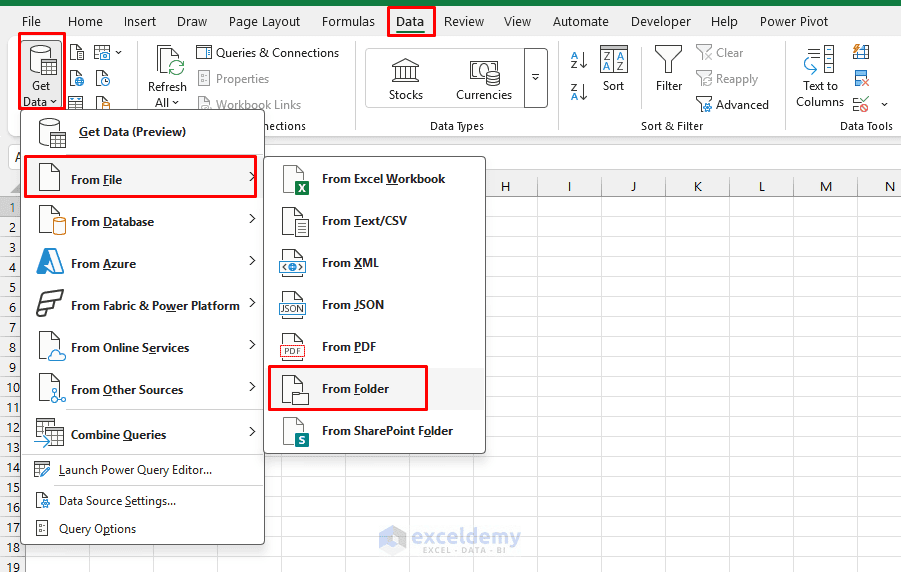
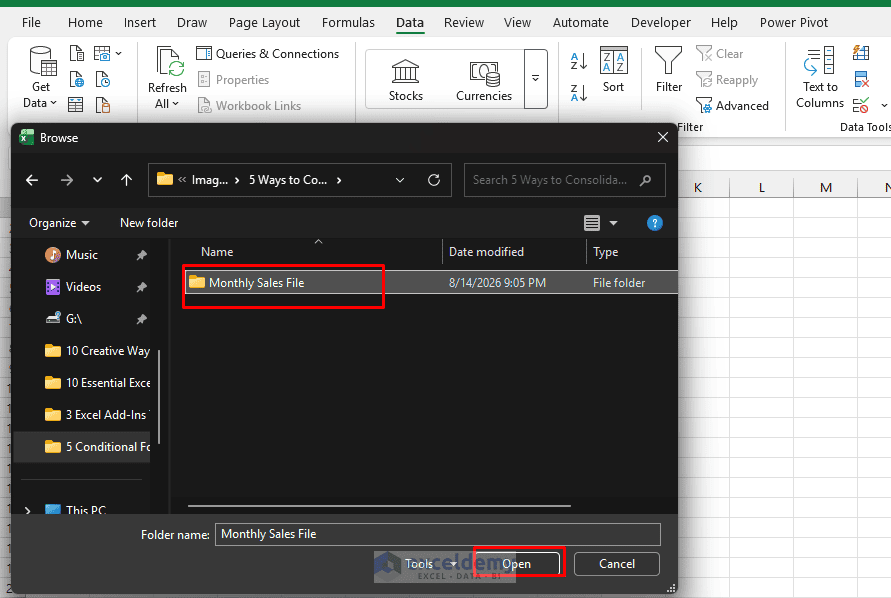
- Browse and select the folder containing the workbooks
- Click Open
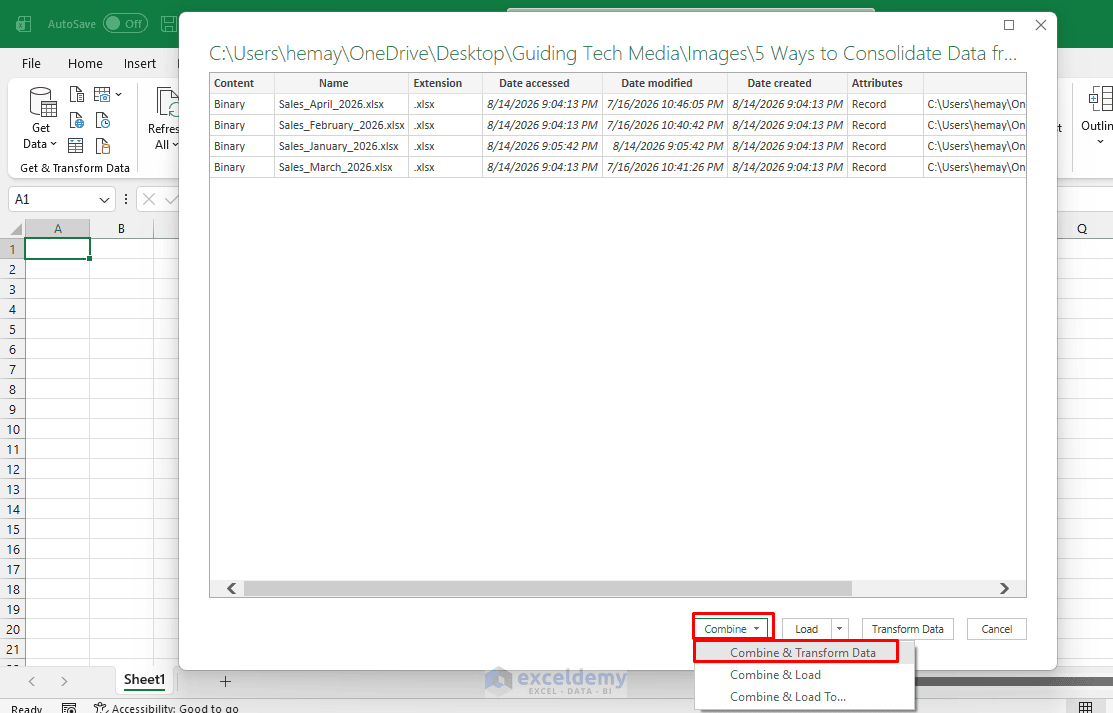
- Excel displays all files found in the folder
- Click Combine >> select Combine & Transform Data
- Select the worksheet or table containing the required data
- Click OK
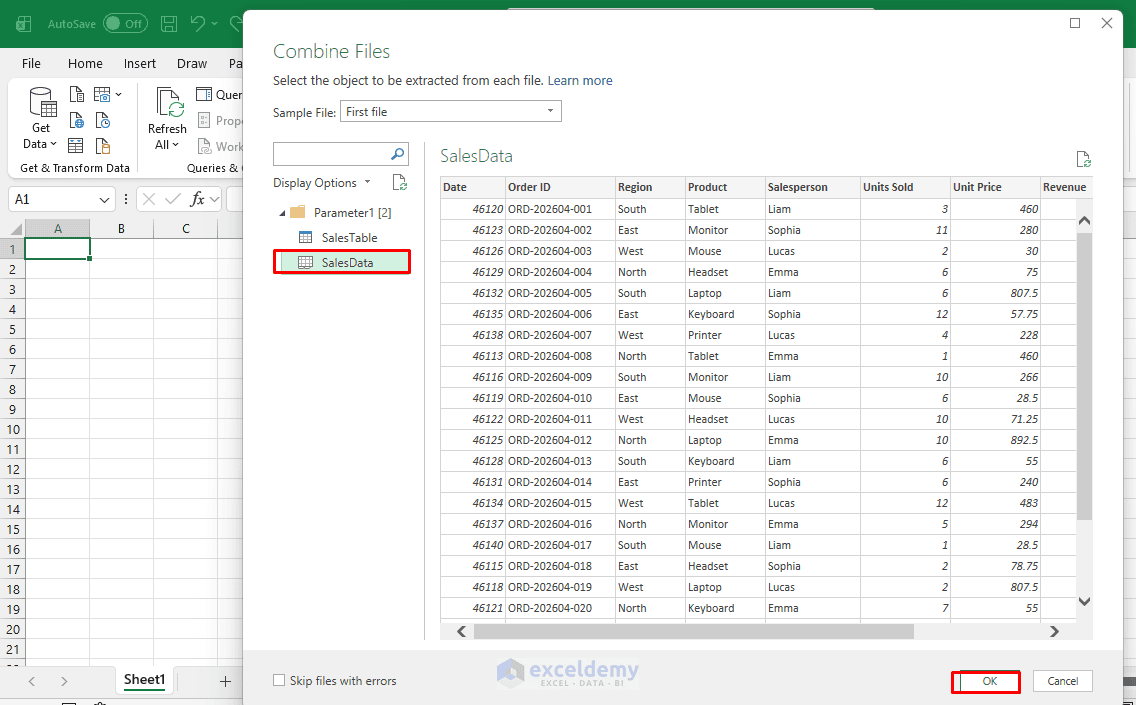
Power Query combines the records from all workbooks into one query. Check the data in the Power Query Editor and remove any unnecessary columns if required.
- Go to the Home tab >> click Close & Load
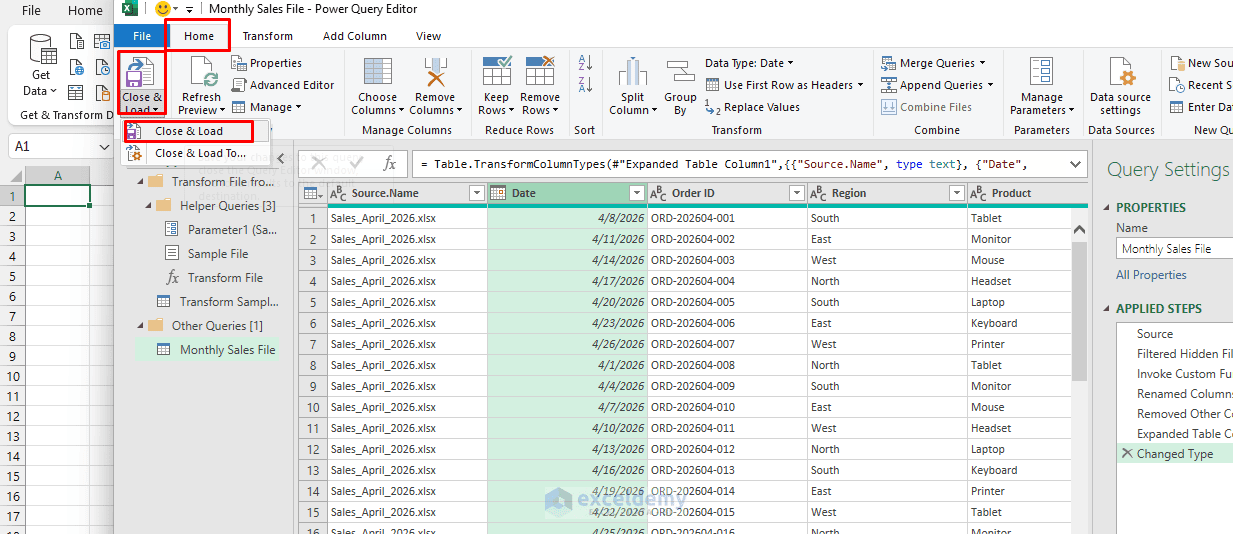
- Excel loads the consolidated dataset into the workbook
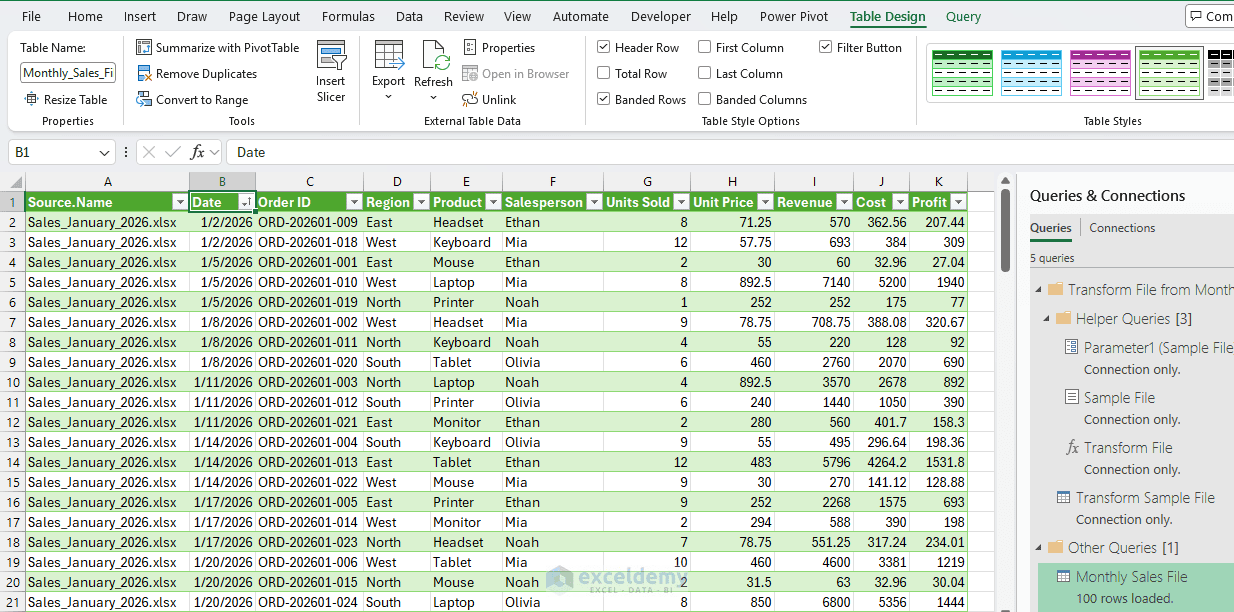
Automatically Add New Workbooks
The biggest advantage of this method is that you do not need to repeat the process when another workbook is added.
- For example, place May.xlsx inside the same folder
- Then open the consolidated workbook
- Go to the Data tab >> select Refresh All
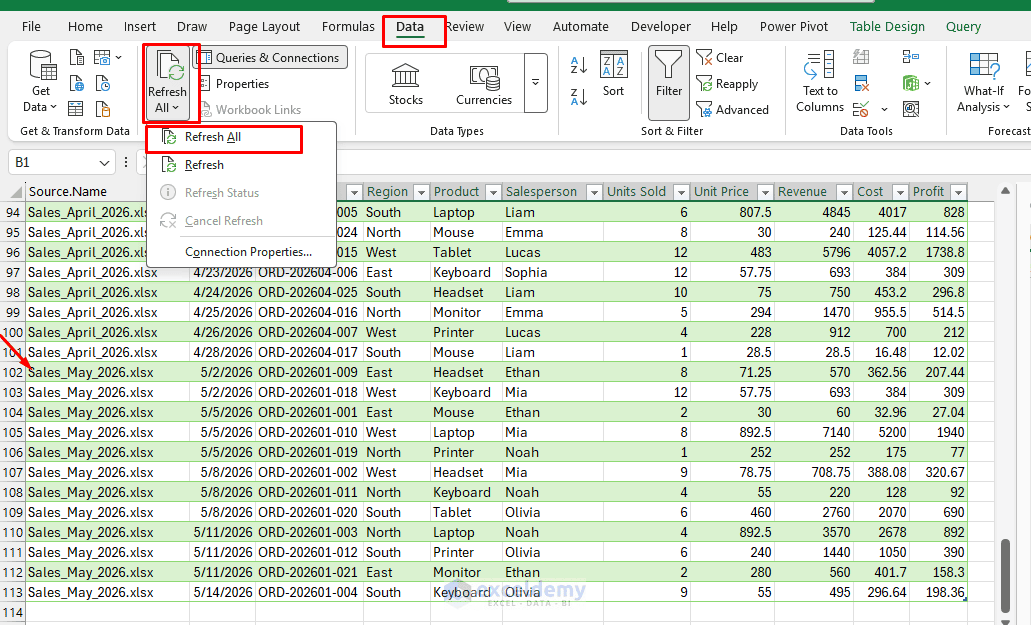
Power Query automatically includes the new workbook.
Tip: Keep the column names and structure consistent across all source workbooks. Otherwise, Power Query may create additional columns or return missing values.
2. Append Data from Multiple Workbooks with Power Query
Instead of connecting to an entire folder, you can create a separate query for each workbook and then append the queries together. Best for combining selected workbooks when the files are stored in different folders or have already been imported separately.
Suppose you don’t want to combine all files from one folder — you only want to combine specific workbooks. In that case, you can use the Append Queries option.
Step 1: Import the First Workbook
- Open the destination workbook
- Go to the Data tab >> click Get Data >> select From File >> choose From Excel Workbook
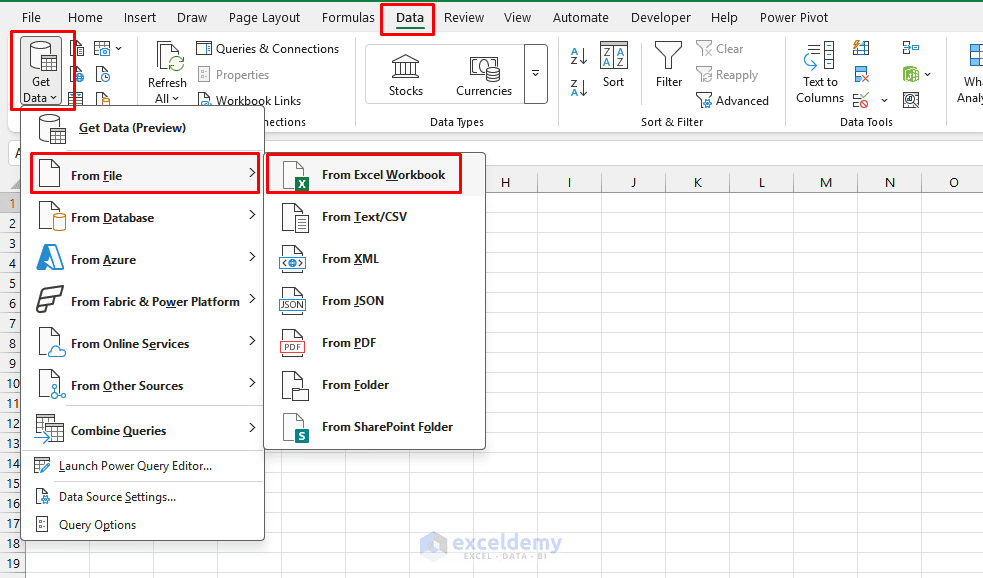
- Browse and select Sales_January.xlsx
- Choose the required worksheet or table
- Click Transform Data
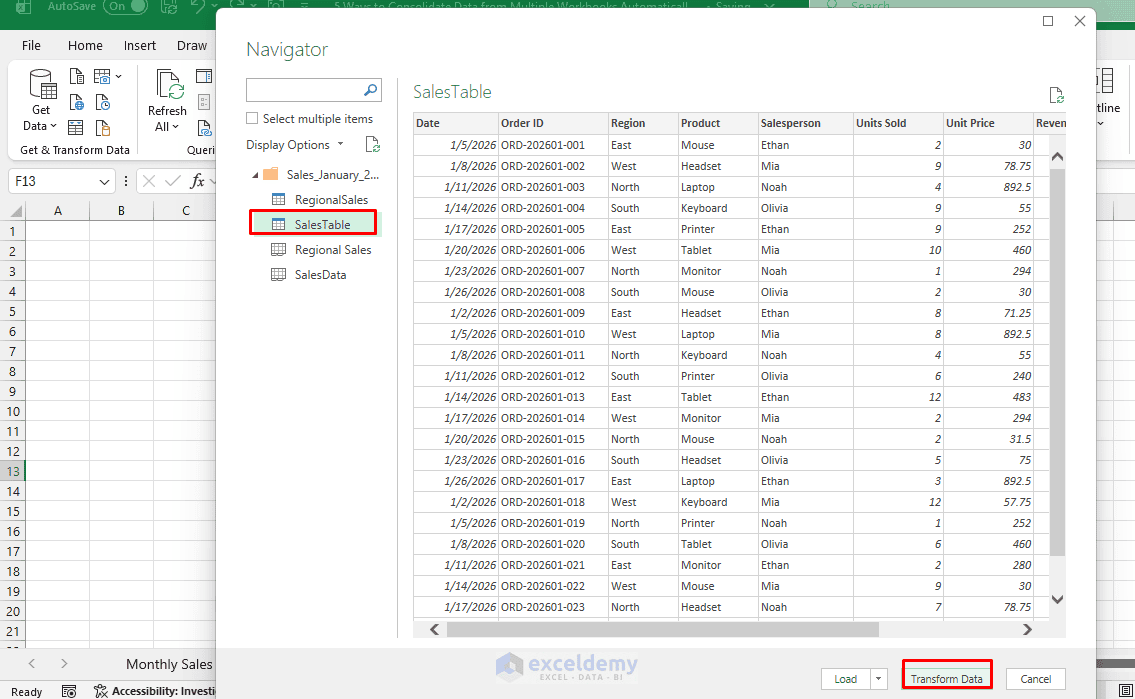
Step 2: Create a Connection
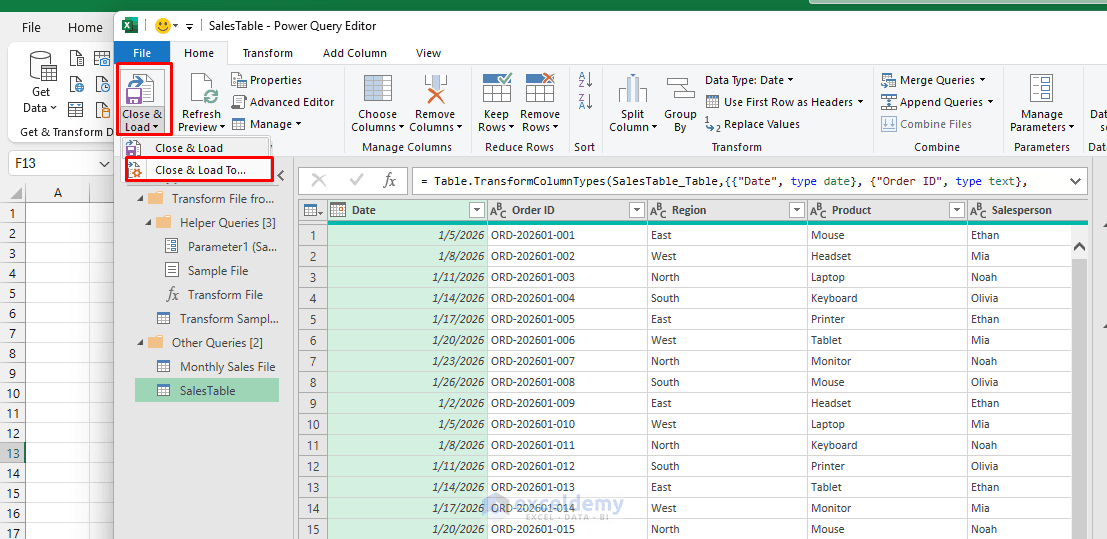
After the query opens,
- Go to the Home tab >> select Close & Load To
- Choose: Only Create Connection
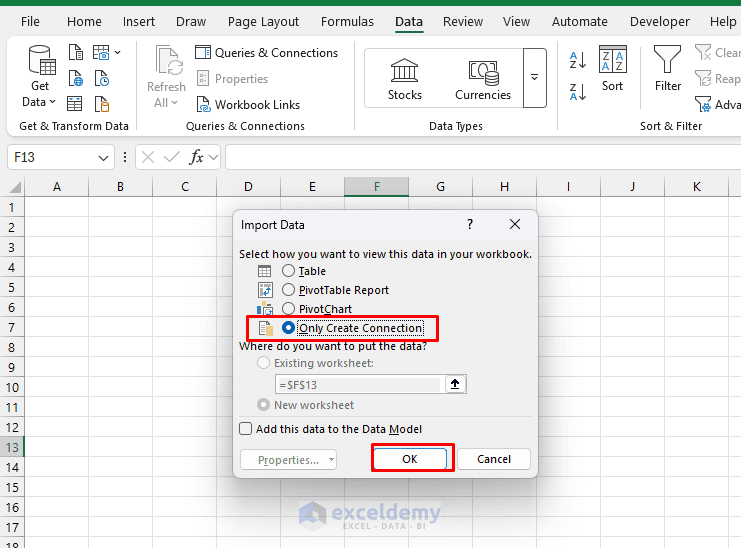
- Repeat the same process for the remaining workbooks
Step 3: Append the Queries
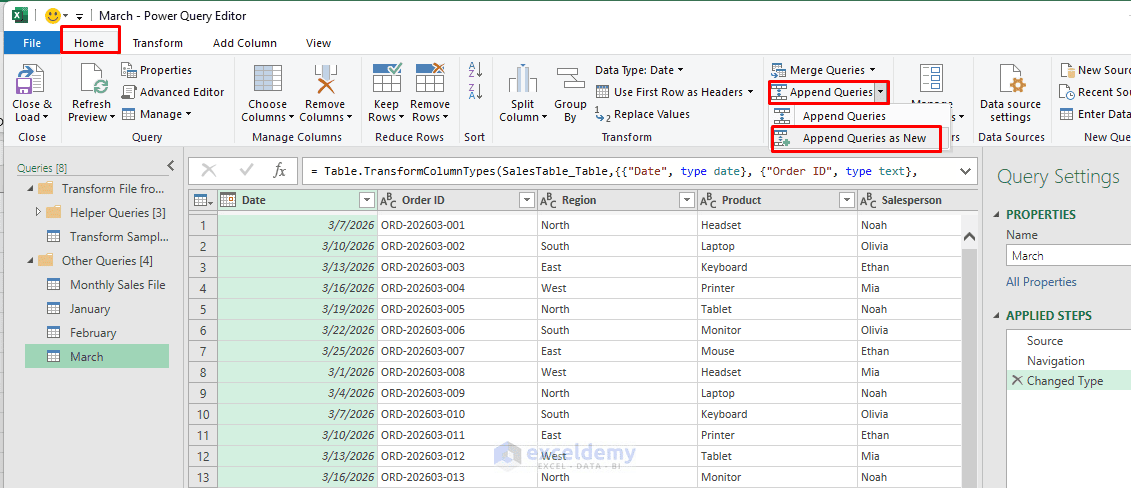
- Open the Power Query Editor
- Go to the Home tab >> select Append Queries >> select Append Queries as New
- Select Three or more tables
- Select January, click Add, then repeat for February and March
- Click OK
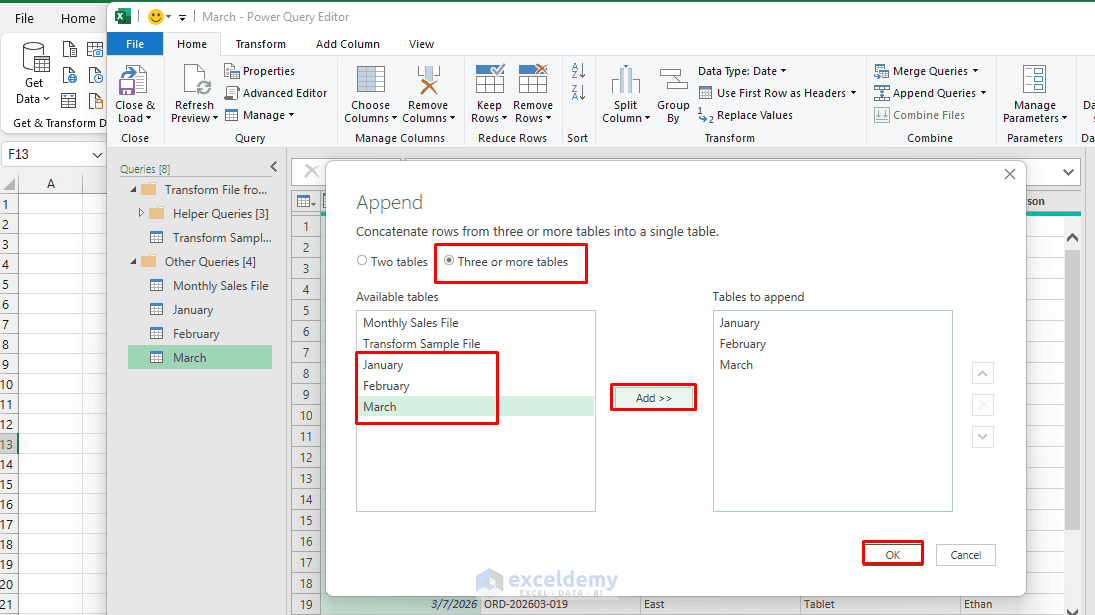
- Power Query stacks the records vertically
- Go to the Home tab >> click Close & Load
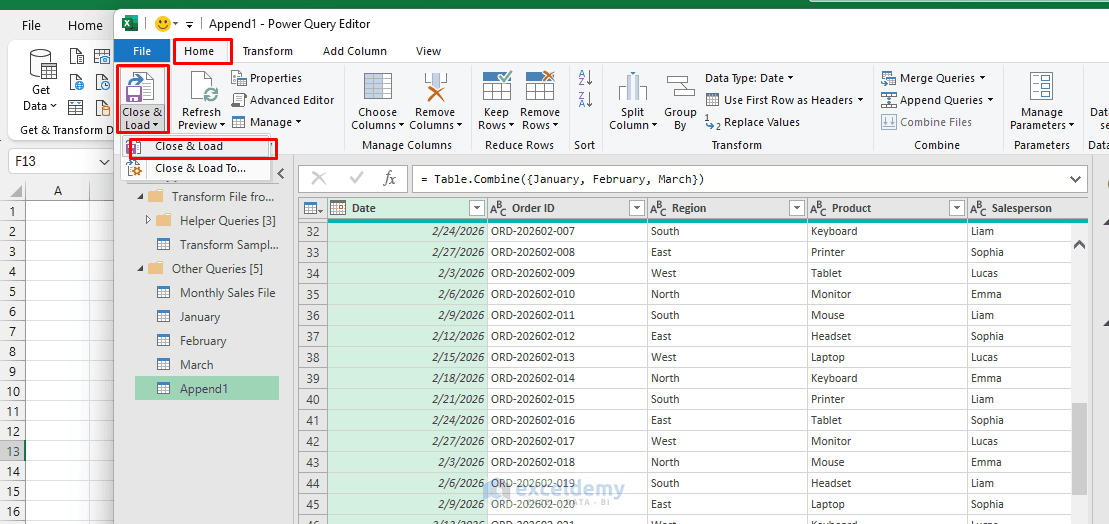
- The selected workbooks are consolidated automatically
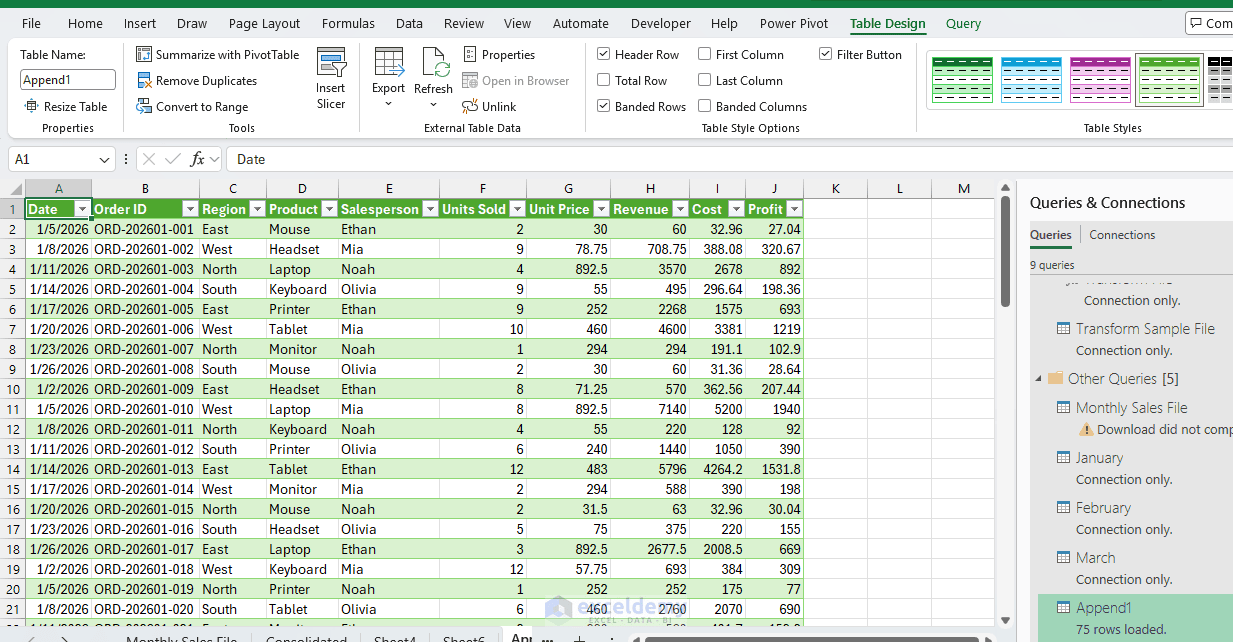
- Whenever the source workbooks change, go to Data >> Refresh All
- This will update the consolidated table
3. Consolidate Workbooks Automatically with VBA
A VBA macro can open every workbook in a folder, copy its data, and place all records into a master worksheet. This is useful for repetitive consolidation tasks where you want a one-click solution.
Suppose every workbook contains data in a worksheet named SalesData, with headers in row 1.
Steps:
- Open the workbook that will contain the consolidated data
- Go to the Developer tab >> select Visual Basic, or press Alt + F11 to open the Visual Basic Editor
- Click Insert >> select Module
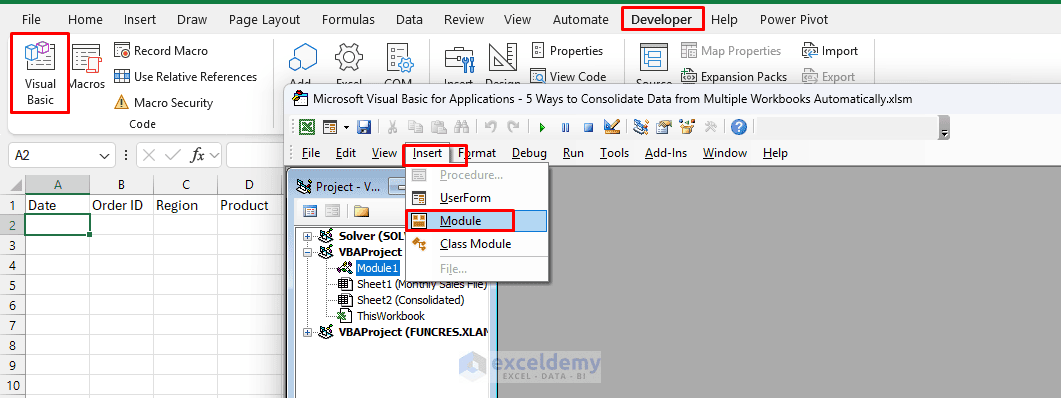
- Paste the following VBA code:
Sub ConsolidateWorkbooks()

    Dim FolderPath As String
    Dim FileName As String
    Dim SourceWB As Workbook
    Dim SourceWS As Worksheet
    Dim DestinationWS As Worksheet
    Dim LastRow As Long
    Dim DestinationRow As Long

    Application.ScreenUpdating = False

    FolderPath = "C:\Sales Files\"

    Set DestinationWS = ThisWorkbook.Worksheets("Consolidated")

    DestinationWS.Rows("2:" & DestinationWS.Rows.Count).ClearContents

    DestinationRow = 2

    FileName = Dir(FolderPath & "*.xlsx")

    Do While FileName <> ""

        Set SourceWB = Workbooks.Open(FolderPath & FileName)
        Set SourceWS = SourceWB.Worksheets("SalesData")

        LastRow = SourceWS.Cells(SourceWS.Rows.Count, "A").End(xlUp).Row

        SourceWS.Range("A2:J" & LastRow).Copy _
            DestinationWS.Cells(DestinationRow, 1)

        DestinationRow = DestinationWS.Cells( _
            DestinationWS.Rows.Count, "A").End(xlUp).Row + 1

        SourceWB.Close SaveChanges:=False

        FileName = Dir

    Loop

    Application.ScreenUpdating = True

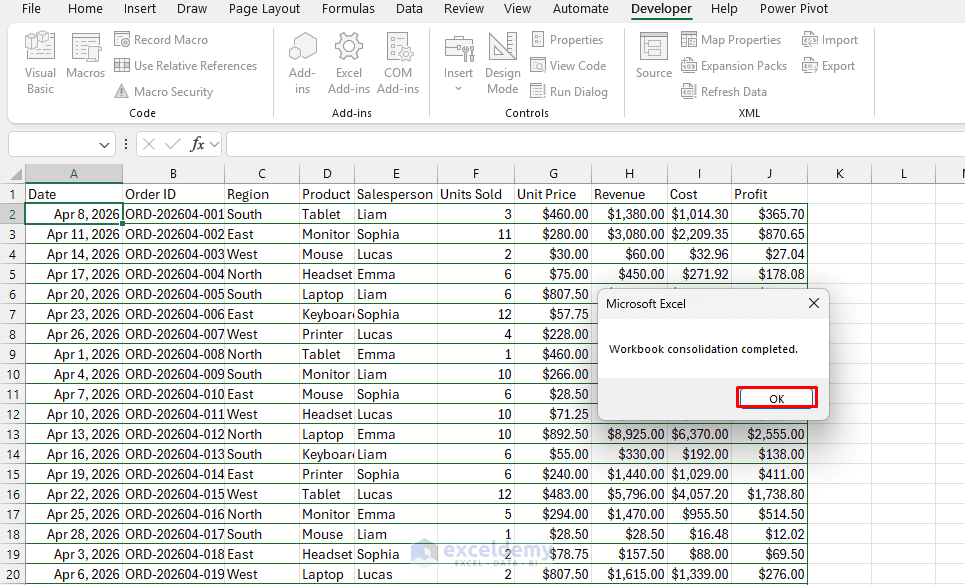
    MsgBox "Workbook consolidation completed."

End Sub
Modify the Folder Path:
- Change
FolderPath = "C:\Sales Files\"to the path of the folder containing your workbooks - Also make sure the destination workbook contains a worksheet named Consolidated with headers already entered in row 1
Run the Macro:
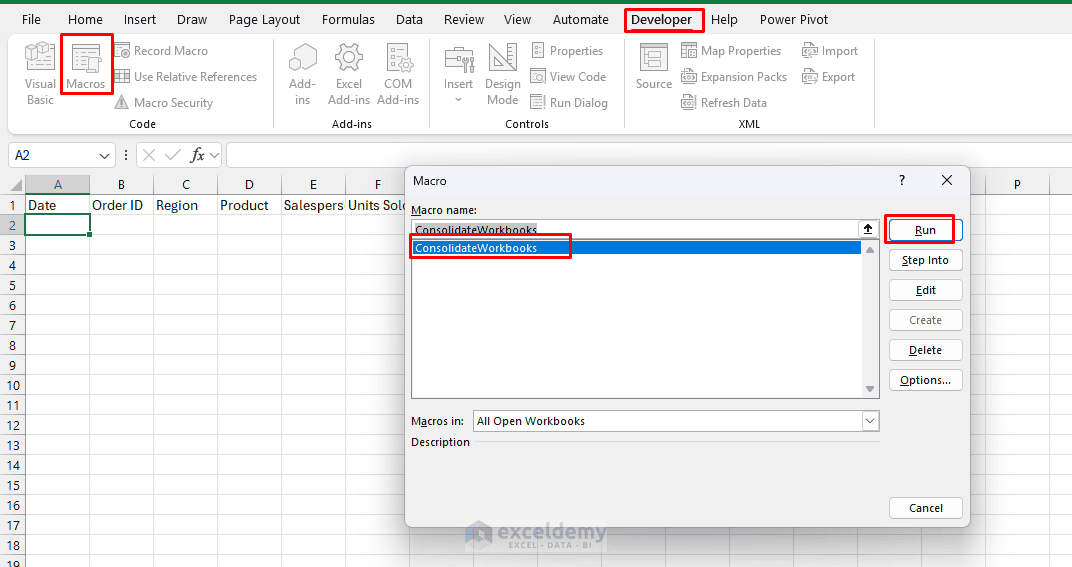
- Go to the Developer tab >> select Macros
- Choose ConsolidateWorkbooks
- Click Run
Excel goes through every .xlsx workbook in the specified folder and combines the data.
4. Consolidate Workbook Summaries with Excel’s Consolidate Tool
Often overlooked, this native tool (not to be confused with Power Query) is designed specifically for summing or averaging numeric data from multiple ranges. It is ideal when each workbook has the same layout and you need totals rather than row-level detail.
Suppose three workbooks each contain a similar summary, and you want one workbook containing the combined totals.
Steps:
- Open the destination workbook
- Select the cell where the consolidated report should begin
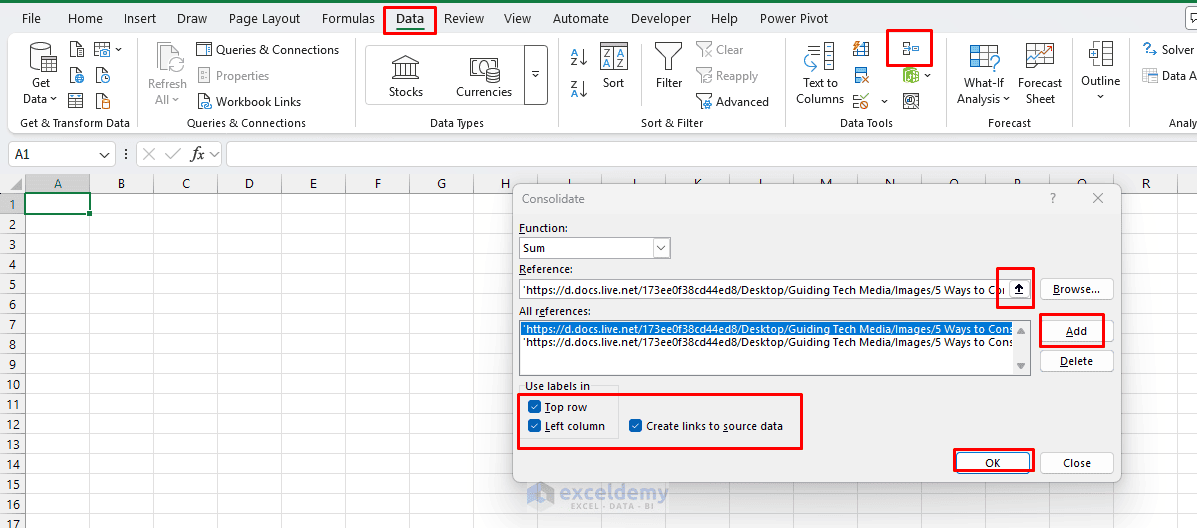
- Go to the Data tab >> select Consolidate
- From the Function list, select an operation (e.g. Sum, Average, Count, Max, Min)
- For sales totals, select Sum
- Click inside the Reference box
- Click Browse and select the first workbook
- Select the required range >> click Add
- Repeat the process for the remaining workbooks
- Select Top row and Left column if your ranges contain labels
- Select Create links to source data if you want Excel to maintain links with the original workbooks
- Click OK
- Excel creates a consolidated summary
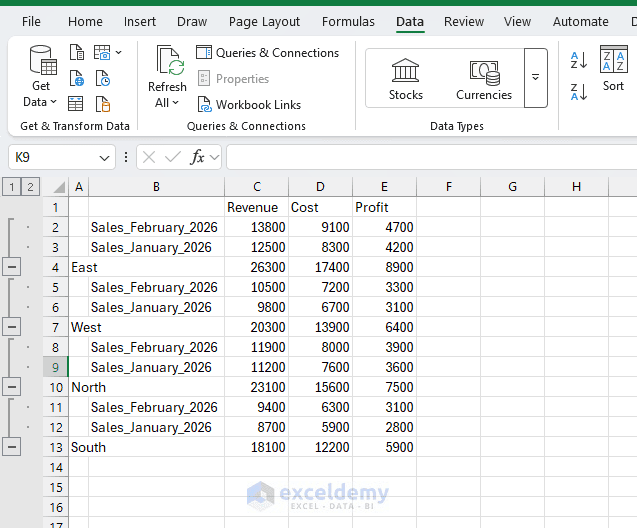
When to Use This Method: The Consolidate tool works well when you only need summarized values. It is less suitable for combining hundreds or thousands of individual transaction rows. For that scenario, Power Query is generally more practical.
5. Consolidate Multiple Workbooks with Office Scripts
Office Scripts can extract data from each workbook, while Power Automate can run the script across multiple files and send the results to a master workbook. Best for Microsoft 365 users who want to automate consolidation from files stored in OneDrive or SharePoint.
Suppose every workbook contains a worksheet named SalesData with the same column structure.
Step 1: Create the Office Script
- Open one source workbook
- Go to the Automate tab >> select New Script
Use the following script:
function main(workbook: ExcelScript.Workbook) {

    const worksheet = workbook.getWorksheet("SalesData");
    const usedRange = worksheet.getUsedRange();

    if (!usedRange) return [];

    const data = usedRange.getValues();

    // Remove the header row
    data.shift();

    return data;
}
- Save the script as Get Sales Data
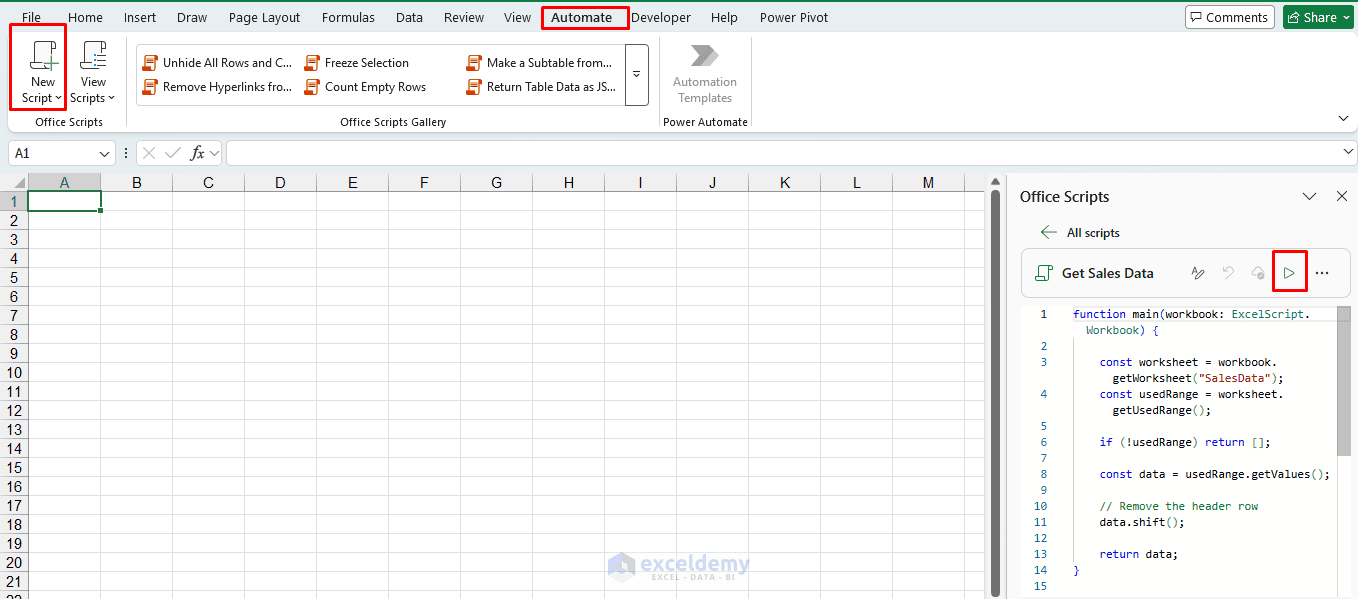
The script reads all used cells from the SalesData worksheet and returns the data without the header row.
Step 2: Run the Script Across Multiple Workbooks
In Power Automate:
- Create a new cloud flow
- Add List files in folder and select the OneDrive or SharePoint folder containing the workbooks
- Add Apply to each to process every workbook
- Inside the loop, add Excel Online (Business) >> Run script
- Select the Get Sales Data script
- Use the returned data to append rows to a master workbook
Once the flow is set up, you can run it manually or schedule it to run automatically.
Best for: Team environments where multiple people contribute files independently and you want the master file always up to date — no macros, no manual refresh. It runs in the cloud, so it works even when your machine is off.
Tip: Keep the worksheet name and column structure the same in every workbook so the script can process all files consistently.
Conclusion
Now you know 5 ways to consolidate data from multiple workbooks automatically. For most recurring data-consolidation tasks, Power Query from a Folder is the best place to start. Once the query is created, you can simply add new files to the folder and use Refresh All instead of rebuilding the report each month. Use Power Query Append when only selected files should be combined, the Consolidate tool when you only need summary values, and VBA when the workflow requires customized automation. If you have access to Power Automate, you can pair Office Scripts with Power Automate for a fully cloud-based solution. Choose any of the methods based on what best fits your consolidation needs.
Get FREE Advanced Excel Exercises with Solutions!