This is an article about using Macro Recorder in Excel. So, study this tutorial part by part at your own pace. In two ways you can create macros in Excel:
- Turn on the macro recorder and record your actions. This is the easiest way.
Below, we have attached an image based on using Record Macro in Excel.
- Another way is entering the code directly into a VBA module. This is a bit complicated but will give you extra advantages to automate Excel.
In this article, we shall cover how to create a Macro using the Macro Recorder in Excel.
How to Use Macro Recorder in Excel: Easy Steps
We’ve covered here the basic steps to record a VBA macro. In most cases, we can record our actions as a macro and then simply replay the macro; we don’t need to look at the code that’s automatically generated by Excel.
If simply recording and playing back macros can do your job, you don’t need to be concerned with the VBA language. But a basic understanding of how things work will help you of course.
Basic Recording Actions to Create VBA Code in Excel
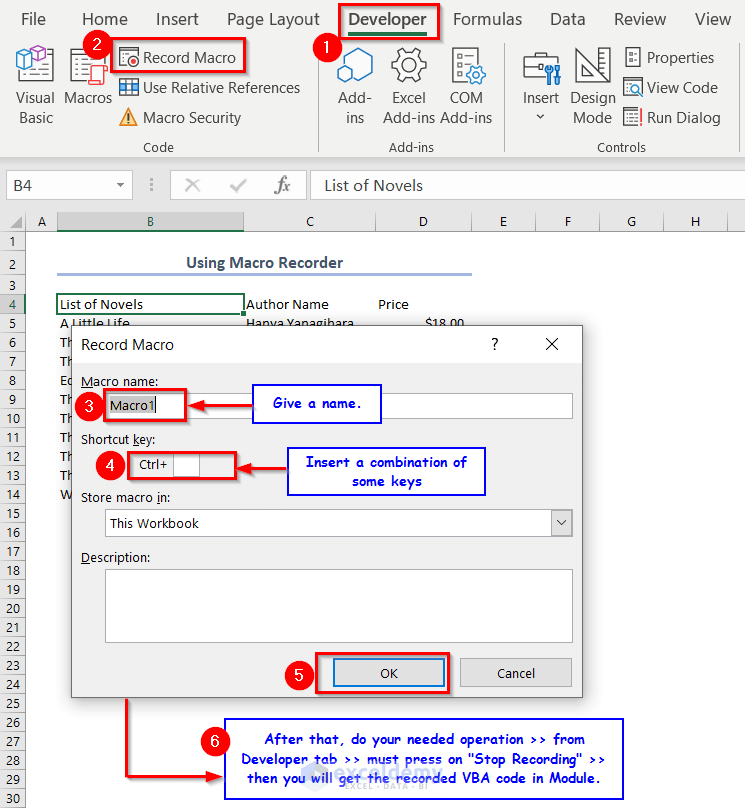
The Excel macro recorder interprets your actions into VBA code. To start the macro recorder, choose Developer >> Code >> Record Macro. Then, the Record Macro dialog box will appear.
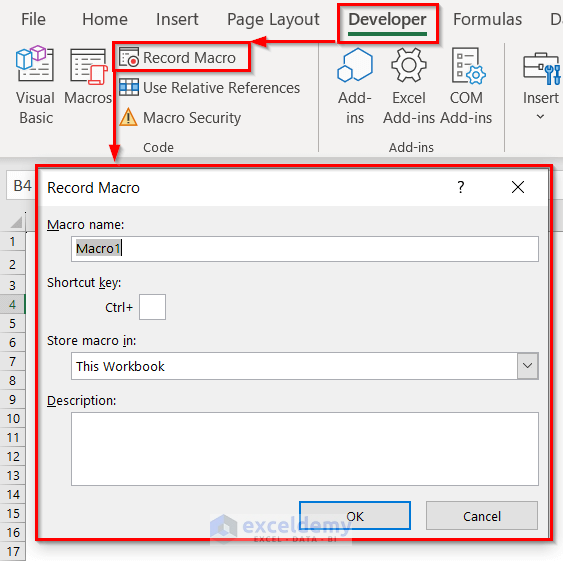
The Record Macro dialog box has several options:
Macro Name: You will enter a unique name for your macro. Excel displays generic names, such as Macro1, and Macro2.
Shortcut Key: You can mention a key combination that will execute your macro. The key combination always uses the CTRL key. You can also press the SHIFT key when you enter a letter. For example, pressing SHIFT while you enter the letter M, makes the shortcut key combination CTRL+SHIFT+M for your macro.
Store Macro in: This is the option you can select to choose a location for your macro. You have three choices: the current workbook (This workbook), your Personal Macro Workbook, or a New workbook.
Description: You can put a brief description of your macro. It is optional.
![]()
You can also click the Record Macro icon on the left side of the Status Bar to get the Record Macro.
When you begin recording your actions in Excel, click OK. When you finish recording the macro, choose Developer >> Code >> Stop Recording. Or you can click the Stop Recording button on the Status Bar. You’ll see this button in place of the Start Recording button.
Using Macro Recorder in Excel: Step-by-Step Procedures
This example explains to you how to record a simple macro that will do both formatting and calculation in the active worksheet.
For conducting the session, we’re going to use Microsoft 365 version. To create this macro, start with a new workbook and follow these steps.
STEP 1: Prepare Macro Recorder
- First, activate an empty cell.
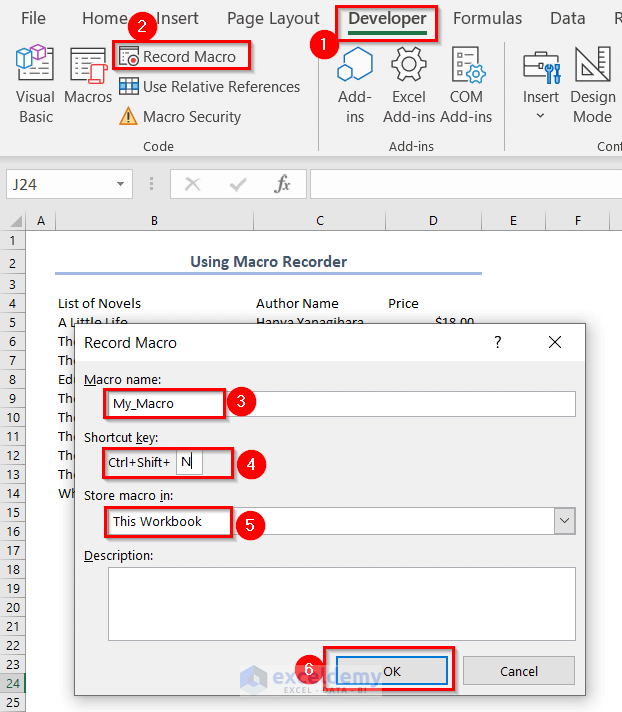
- Choose Developer >> Code >> Record Macro.
As a result, the Record Macro dialog box will appear.
- Then, enter a new name for the macro, to replace Excel’s provided default Macro1 name. For example, you can type My_Macro in the Macro name field.
- You can assign a shortcut key CTRL+SHIFT+N for your macro by entering an uppercase N in the Shortcut Key field.
- Click OK.
Clicking OK will close the Record Macro dialog box and begin recording your actions in Excel.
Here, we have attached the video of the formatting and calculation.
- First, apply Border to the dataset >> increase the Font size of the Column Headers >> apply a Fill Color >> make them Bold >> make Middle and Center Alignment >> repeat this formatting for Total Price cell >> use the SUM function to calculate the total price.
- After that, from the Developer tab >> press Stop Recording.
STEP 2: Examining Macro
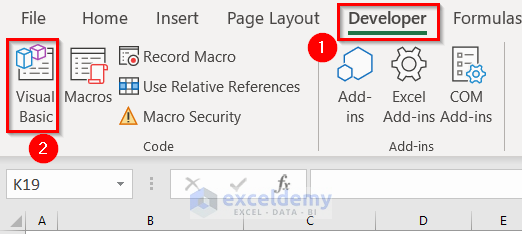
Macro My_Macro is recorded in a new module named Module1. You have to activate the VB Editor to view the code in this module. We can activate the VB Editor in either of the two ways:
- Choose from the Developer tab >> under the Code group >> select Visual Basic.
- Or you can press ALT+F11.
In the VB Editor, the Project window displays a list of all open workbooks, worksheets, and add-ins. This list is displayed as a tree diagram, which you can expand or collapse.
Here, the code of the My_Macro that you have recorded is stored in Module1 in the current workbook.
Double-click on Module1 from Modules and the code of the macro appears in the Code window.
The following figure shows the recorded macro in the Code window.
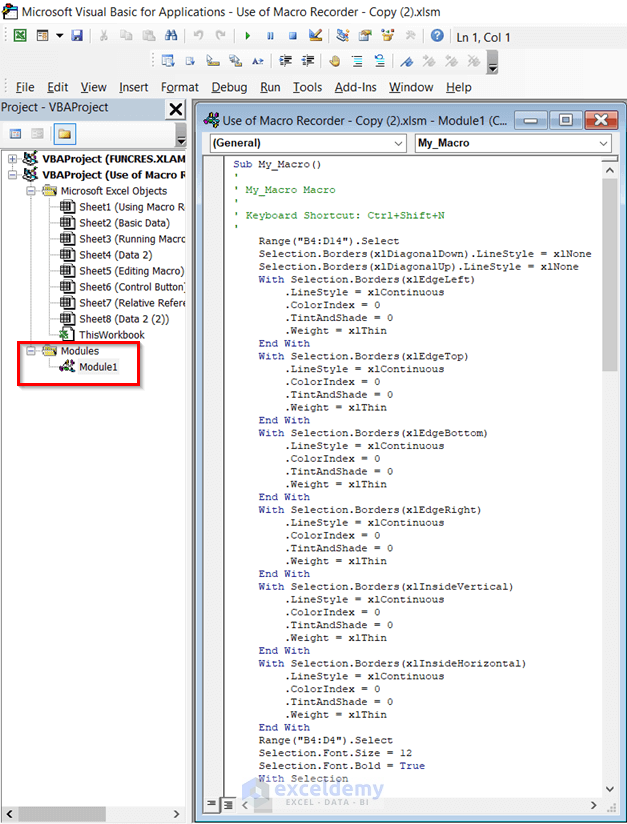
The Recorded Code
Sub My_Macro()
'
' My_Macro Macro
'
' Keyboard Shortcut: Ctrl+Shift+N
'  Range("B4:D14").Select
    Selection.Borders(xlDiagonalDown).LineStyle = xlNone
    Selection.Borders(xlDiagonalUp).LineStyle = xlNone
    With Selection.Borders(xlEdgeLeft)
        .LineStyle = xlContinuous
        .ColorIndex = 0
        .TintAndShade = 0
        .Weight = xlThin
    End With
    With Selection.Borders(xlEdgeTop)
        .LineStyle = xlContinuous
        .ColorIndex = 0
        .TintAndShade = 0
        .Weight = xlThin
    End With
    With Selection.Borders(xlEdgeBottom)
        .LineStyle = xlContinuous
        .ColorIndex = 0
        .TintAndShade = 0
        .Weight = xlThin
    End With
    With Selection.Borders(xlEdgeRight)
        .LineStyle = xlContinuous
        .ColorIndex = 0
        .TintAndShade = 0
        .Weight = xlThin
    End With
    With Selection.Borders(xlInsideVertical)
        .LineStyle = xlContinuous
        .ColorIndex = 0
        .TintAndShade = 0
        .Weight = xlThin
    End With
    With Selection.Borders(xlInsideHorizontal)
        .LineStyle = xlContinuous
        .ColorIndex = 0
        .TintAndShade = 0
        .Weight = xlThin
    End With
    Range("B4:D4").Select
    Selection.Font.Size = 12
    Selection.Font.Bold = True
    With Selection
        .HorizontalAlignment = xlGeneral
        .VerticalAlignment = xlCenter
        .WrapText = False
        .Orientation = 0
        .AddIndent = False
        .IndentLevel = 0
        .ShrinkToFit = False
        .ReadingOrder = xlContext
        .MergeCells = False
    End With
    With Selection
        .HorizontalAlignment = xlCenter
        .VerticalAlignment = xlCenter
        .WrapText = False
        .Orientation = 0
        .AddIndent = False
        .IndentLevel = 0
        .ShrinkToFit = False
        .ReadingOrder = xlContext
        .MergeCells = False
    End With
    With Selection.Interior
        .Pattern = xlSolid
        .PatternColorIndex = xlAutomatic
        .ThemeColor = xlThemeColorAccent6
        .TintAndShade = 0.799981688894314
        .PatternTintAndShade = 0
    End With
    Range("C16:D16").Select
    Selection.Borders(xlDiagonalDown).LineStyle = xlNone
    Selection.Borders(xlDiagonalUp).LineStyle = xlNone
    With Selection.Borders(xlEdgeLeft)
        .LineStyle = xlContinuous
        .ColorIndex = 0
        .TintAndShade = 0
        .Weight = xlThin
    End With
    With Selection.Borders(xlEdgeTop)
        .LineStyle = xlContinuous
        .ColorIndex = 0
        .TintAndShade = 0
        .Weight = xlThin
    End With
    With Selection.Borders(xlEdgeBottom)
        .LineStyle = xlContinuous
        .ColorIndex = 0
        .TintAndShade = 0
        .Weight = xlThin
    End With
    With Selection.Borders(xlEdgeRight)
        .LineStyle = xlContinuous
        .ColorIndex = 0
        .TintAndShade = 0
        .Weight = xlThin
    End With
    With Selection.Borders(xlInsideVertical)
        .LineStyle = xlContinuous
        .ColorIndex = 0
        .TintAndShade = 0
        .Weight = xlThin
    End With
    With Selection.Borders(xlInsideHorizontal)
        .LineStyle = xlContinuous
        .ColorIndex = 0
        .TintAndShade = 0
        .Weight = xlThin
    End With
    Range("C16").Select
    Selection.Font.Size = 12
    With Selection.Interior
        .Pattern = xlSolid
        .PatternColorIndex = xlAutomatic
        .ThemeColor = xlThemeColorAccent6
        .TintAndShade = 0.799981688894314
        .PatternTintAndShade = 0
    End With
    With Selection
        .HorizontalAlignment = xlGeneral
        .VerticalAlignment = xlCenter
        .WrapText = False
        .Orientation = 0
        .AddIndent = False
        .IndentLevel = 0
        .ShrinkToFit = False
        .ReadingOrder = xlContext
        .MergeCells = False
    End With
    With Selection
        .HorizontalAlignment = xlCenter
        .VerticalAlignment = xlCenter
        .WrapText = False
        .Orientation = 0
        .AddIndent = False
        .IndentLevel = 0
        .ShrinkToFit = False
        .ReadingOrder = xlContext
        .MergeCells = False
    End With
    Selection.Font.Bold = True
    Range("D16").Select
    ActiveCell.FormulaR1C1 = "=SUM(R[-11]C:R[-2]C)"
    Range("D17").Select
End Sub
Code Breakdown
- The macro recorded is a sub procedure and we name it as My_Macro. The statements in the macro code tell Excel what to do when this macro is executed.
- Notice that Excel inserted some comments at the top of the procedure. These comments are the information that you have provided in the Record Macro dialog box.
- The comment lines (which begin with an Apostrophe) aren’t really necessary and deleting them will not affect the performance of the macro.
- If you ignore the comments, you’ll see a long VBA code. Which is long but simple. In these statements, many basic properties have been used like Selection, Borders, LineStyle, ColorIndex, Alignment, and so on.
ActiveCell.FormulaR1C1 = “=SUM(R[-11]C:R[-2]C)”
- This single statement calculates the total price.
- The FormulaR1C1 part is a property of the Range object.
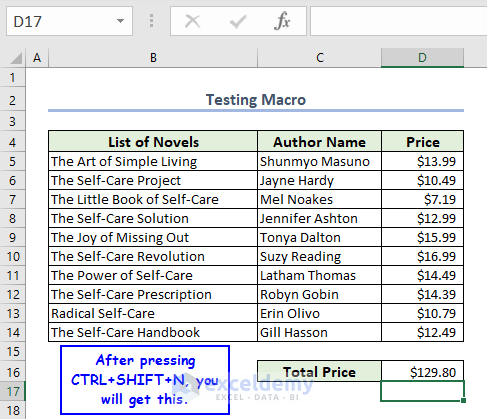
STEP 3: Testing Macro
Before we recorded the My_Macro, we assigned the macro to the CTRL+SHIFT+N shortcut keys combination. We want to test My_Macro now.
- So, go to the target worksheet >> activate a cell of that worksheet >> press CTRL+SHIFT+N >> check the output.
Here, if you open a new worksheet, the code will run. Basically, you will see formatted blank cells. And you will get 0 as the total price.
Actually, you can run this macro in any workbook that contains the VBA module. So, copy this VBA code for a new one and then run this macro.
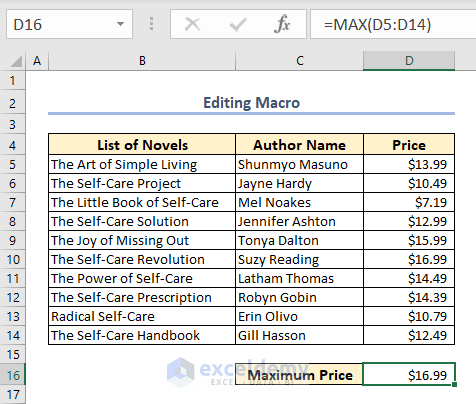
STEP 4: Editing Macro
After recording a macro, you can also make changes to it. But you have to know what you’re doing. For example, say you want to find out the highest price and change the Fill Color of column headers.
You can rerecord the macro, but this modification is simple, so editing the code is more advantageous.
- First, press ALT+F11 to activate the VB Editor window.
- Next, activate Module1 from the Project window and change the ThemeColor index for all headers. In the end, write the MAX function instead of SUM.
The edited macro will be as follows:
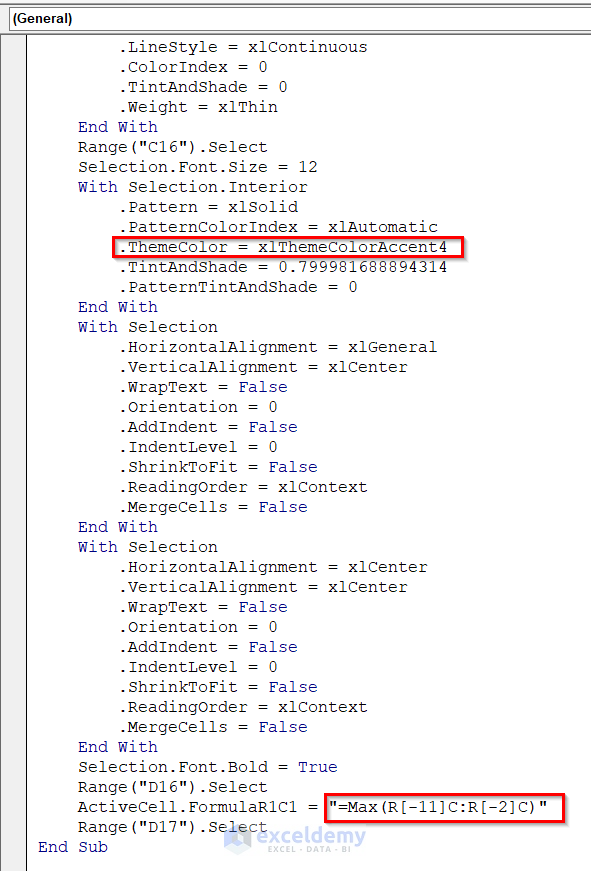
Here, for your better understanding, I have inserted a new Module, copied the code of Module1 then pasted it to Module2, and after that made the changes.
- To test this new macro, from the Developer tab >> select Macros >> so you will get the Macro dialog box >> choose Module2.My_Macro >> press Run.
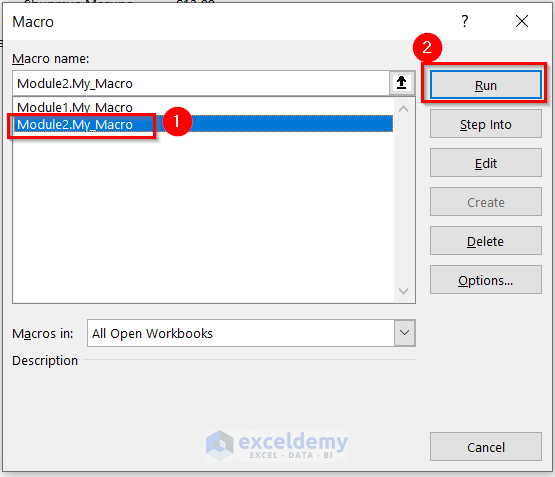
You see that it performs as it should.
Read More: How to Edit Macros in Excel
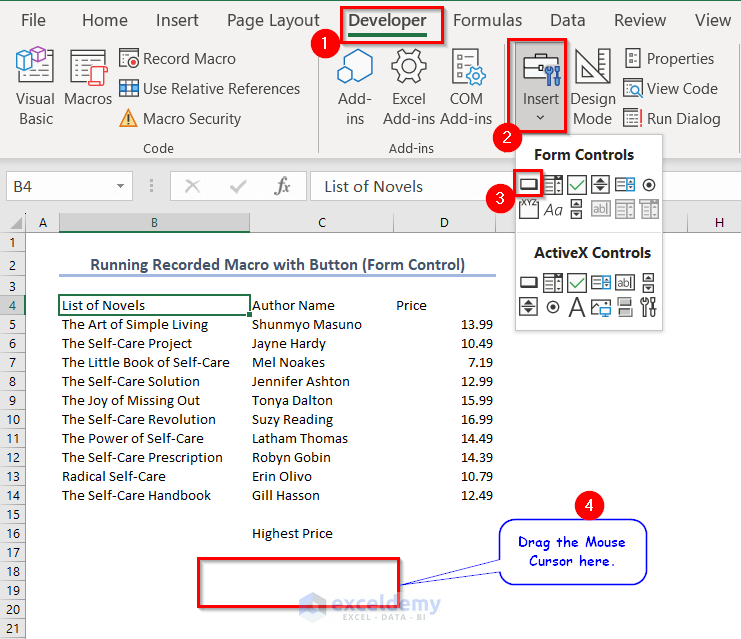
Running Recorded Macro with Control Button
There is another way to run a macro. Which is the use of the Control Button. Basically, I will insert a Button (Form Control) so with a single press of that button, you will get the output.
- For inserting the Button, from Developer tab >> go to Insert menu >> under Form Controls >> choose Button (Form Control).
- Now, drag the Mouse Cursor to a suitable place.
- After releasing the cursor, you will get a dialog box named Assign Macro.
- Choose the target macro >> press OK.
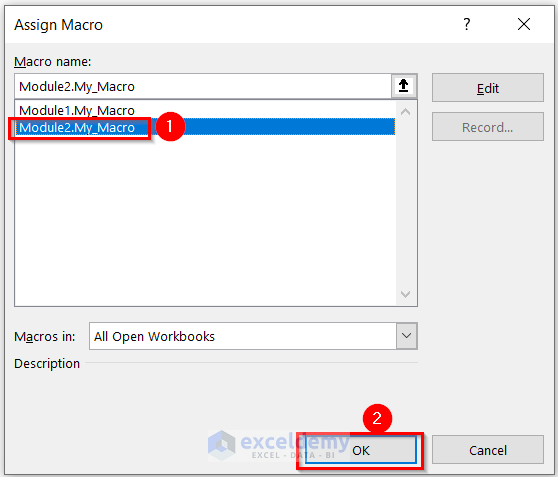
As I have assigned the macro of Module2, after pressing the button you will get the formatted data with the highest price.
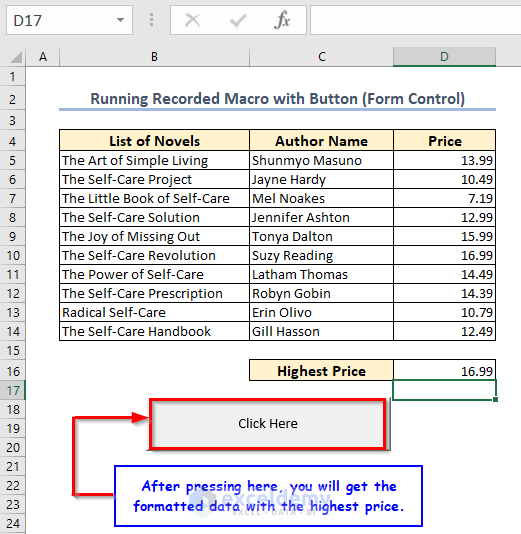
Here, I have changed the display name of the button. To do so, right-click on the button >> from the Context Menu Bar >> select Edit Text >> write your preferable name for the button.
Read More: Types of VBA Macros in Excel
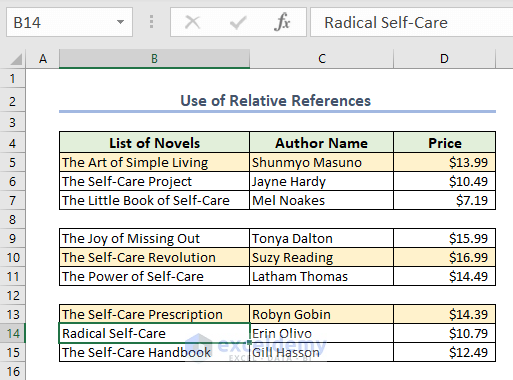
How to Use Relative References While Using Macro Recorder
While using macro, the relative reference denotes that it will work by considering the active cell as the 1st cell of a range. You can use this relative reference in the macro recorder.
- From the Developer tab >> press Use Relative References >> click on Record Macro.
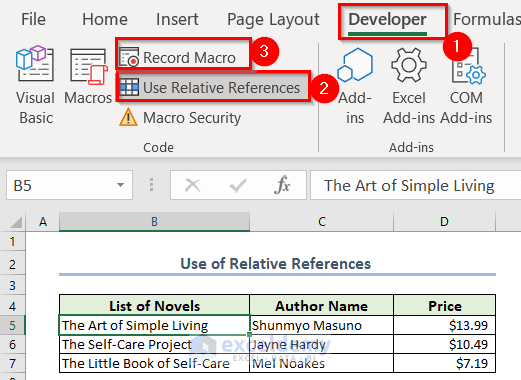
As a result, you will see the Record Macro dialog box.
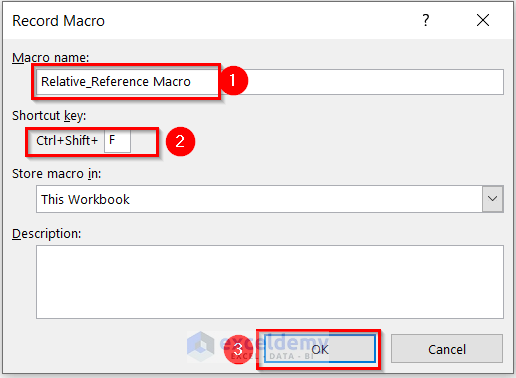
- Then, enter a new name >> assign a shortcut key (CTRL+SHIFT+F) for your macro >> click OK.
Clicking OK will close the Record Macro dialog box and begin recording your actions in Excel.
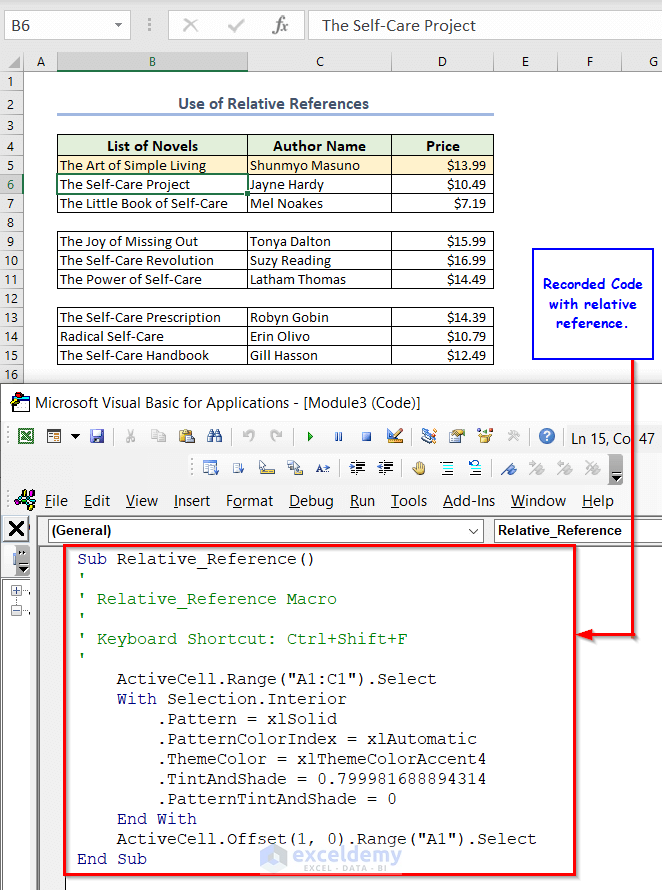
Macro Recording Brief
- I have selected B5:D5 cells >> changed the Fill Color >> then pressed the Down-Arrow.
- Now to test the macro, select any cell >> press CTRL+SHIFT+F to get output. Here, you will see that not only that particular cell but also two adjacent cells are colored, and then the macro activates the vertically following cell.
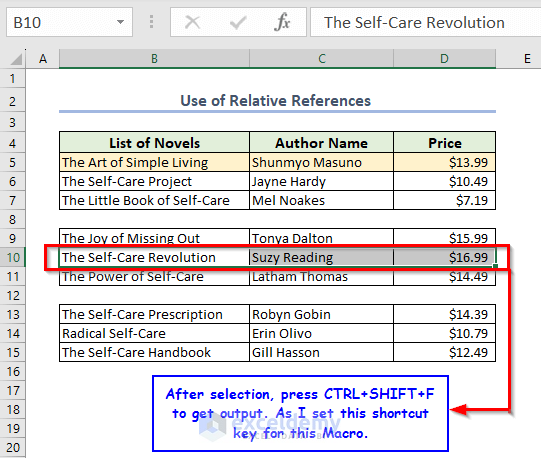
I have colored some more cells by pressing CTRL+SHIFT+F. Basically, I want to show the highest price for each segment. The cell selection is done manually, and macro colored the cells.
Limitations of Macro Recorder
- Macro recorders can’t record complex operations.
- It can’t continue any loop in VBA. It just repeats the same work for every sheet.
- Furthermore, the macro recorder can’t cooperate with the If-End If statement.
- A macro recorder is very bad for using UserForm.
- It can’t do any work for VBA InputBox or MsgBox.
- It can’t handle the error.
Actually, macro recorders use long code for simple work. Also, it makes the code complex. So, you may use a macro recorder when you need to do very simple work.
Frequently Asked Questions
1. How do I record a macro in Excel for all workbooks?
From Developer tab >> go to Code group >> select Record Macro >> in the Record Macro dialog box >> enter a new name for the macro in the Macro name field >> assign a shortcut key for your macro in the Shortcut Key field >> now you should choose Personal Macro Workbook in the Store Macro in: field >> click OK.
2. How long can you record a macro in Excel?
Macro recorder can record the operation till it crosses 9999 lines of code in VBA.
3. Can macro record formulas?
A macro recorder can record an Excel formula that you type manually.
4. What is the extension of a macro-enabled file?
The extension of a macro-enabled file is .xlsm.
Download Practice Workbook
Download the following workbook to practice by yourself.
Conclusion
Henceforth, you will be using Macro Recorder in Excel following the above-described procedures. Keep using them and let us know if you have more ways to do the task. Don’t forget to drop comments, suggestions, or queries if you have any in the comment section below.
Related Articles
- How to Save VBA Code in Excel
- Excel Macro Shortcut Key
- 25 VBA Macro Example for Enhanced Productivity
- How to Remove Macros from Excel
- How to Save Macros in Excel Permanently
- How to Use Excel VBA to Run Macro When Cell Value Changes
- Excel VBA to Pause and Resume Macro
- Excel Macro Enabled Workbook

