Introduction to InputBox() Function
Using the VBA InputBox() function, we can display an InputBox to users and request responses from them. This is useful for obtaining a single input from the user.
Objective:
This function returns an InputBox with some kind of criteria.
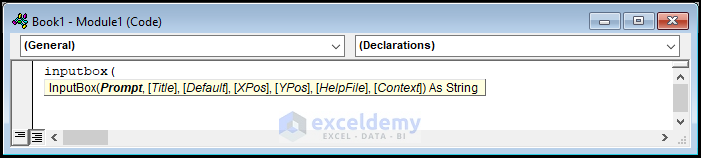
Syntax:
The syntax of this function is as follows:
InputBox(Prompt, [Title], [Default], [Xpos], [Ypos], [Helpfile], [Context] )
Parameters or Arguments:
The arguments are defined as follows.
- Prompt: This is the only required argument of this function. This text is displayed in the input box.
- Title: It is optional. This text is displayed in the input box’s title bar.
- Default: It is also optional. The default value showed in the input field.
- Xpos: It is a numeric value that indicates the prompt’s horizontal distance from the left side of the screen (X-axis position); if left empty, the input box will be horizontally centered.
- Ypos: It is an optional argument as well. It tells of the Y-axis positioning location of the InputBox.
- Helpfile: to provide a user-friendly assistance file. By pressing the help button, the person can open that file.
- Context: It indicates the HelpContextId in the ‘Helpfile’ that is being called. It’s an optional parameter. But it becomes required when the ‘helpfile’ argument is given.
How to Use InputBox() Function: 3 Examples
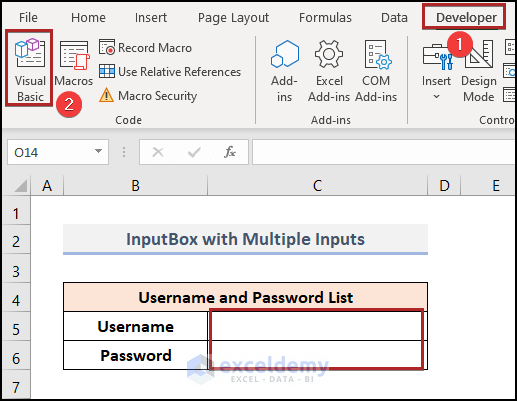
Example 1 – Excel VBA InputBox with Multiple Inputs
Steps:
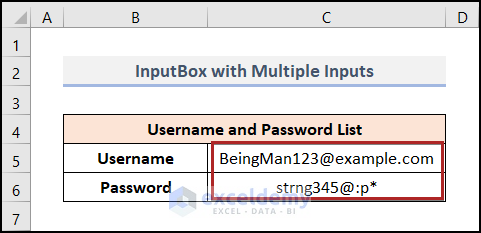
We want to get the username and password in cells C5 and C6. To do this,
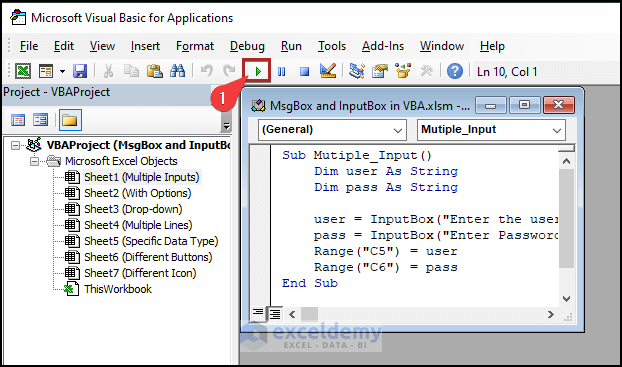
- Go to the Developer tab.
- Click on Visual Basic.
The Microsoft Visual Basic for Applications window will open.
- Double-click on Sheet1 on Project Explorer.
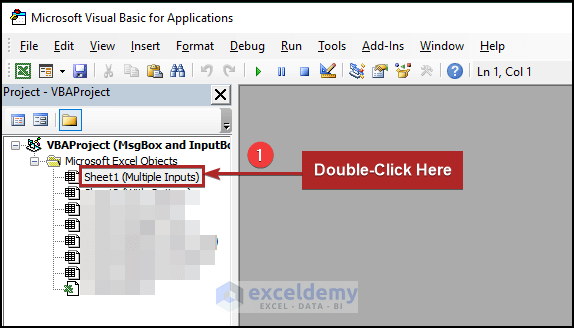
It will open the code module.
- Enter the following code into the module.
Sub Mutiple_Input()
Dim user As String
Dim pass As String
user = InputBox("Enter the username:", "Exceldemy", "Enter Here")
pass = InputBox("Enter Password:", , "Keep it Secret")
Range("C5") = user
Range("C6") = pass
End Sub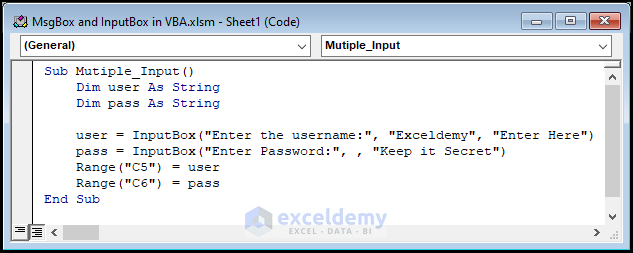
- Click the Run icon, or press F5, to run the subprocedure.
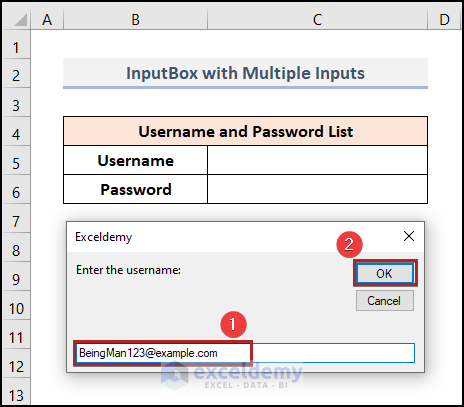
An InputBox will appear. The title of this dialog box is Exceldemy as we set it in the code.
- Enter the username in the blank box as in the following image.
- Click OK.
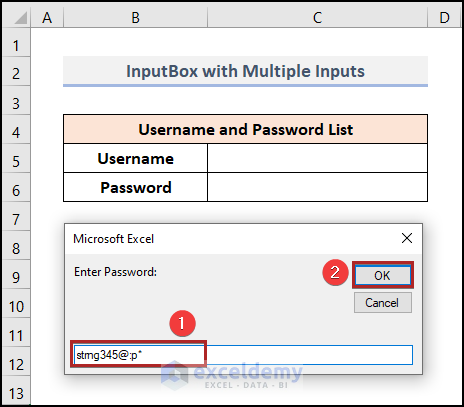
It will ask you to enter the password.
- Enter the password into the box.
- Click OK.
The inputs will display in the C5:C6 range.
Read More: VBA MsgBox Format in Excel
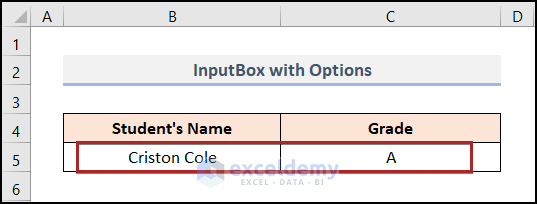
Example 2 – VBA InputBox with Options
Steps:
- Open the code module like in the previous example.
- Enter the following code into the module.
Sub InputBox_with_Options()
Dim S_name As String, Msg1 As String, Msg2 As String, Msg3 As String, Box_Title As String, Box_Default As String
Dim Grade As String
Msg1 = "Enter the Grade Here!"
Msg2 = "A+ for marks" & vbTab & "over 80%"
Msg3 = "A for marks" & vbTab & "under 80%"
Box_Title = "Exceldemy"
Box_Default = "Do It Carefully"
S_name = InputBox("Enter Name of the Student", Box_Title, Box_Default)
Grade = InputBox(Msg1 & vbCrLf & vbCrLf & Msg2 & vbCrLf & Msg3, Box_Title, Box_Default)
Range("B5").Value = S_name
Range("C5").Value = Grade
End Sub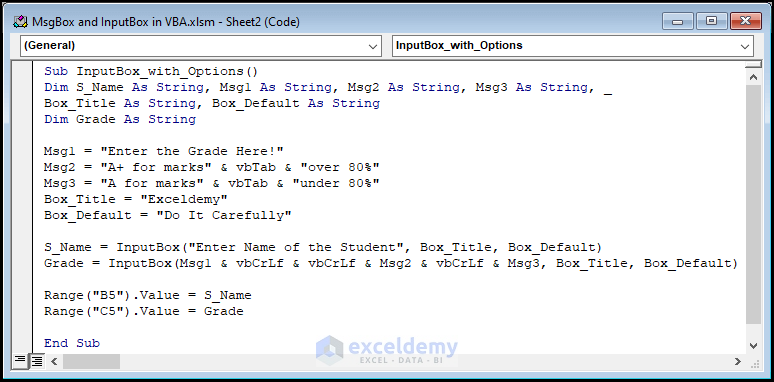
- Run the code like we did it before.
A dialog box will appear.
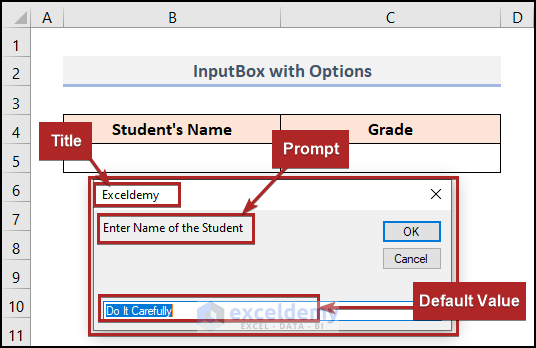
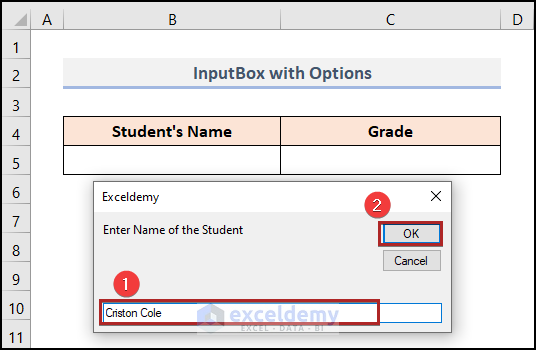
- Enter the student’s name in the box.
- Click OK.
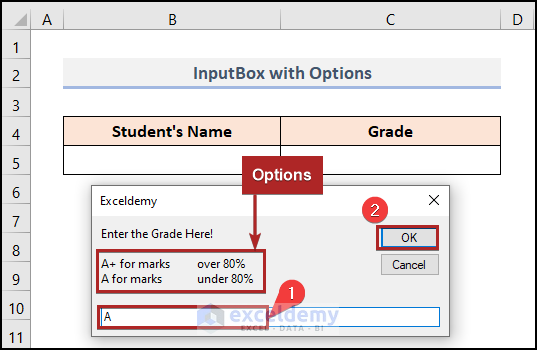
Another dialog box will open.
- In the blank box, enter the grade of the student according to the options given above.
- Click OK.
- The inputs will display in the B5:C5 range.
Example 3 – Excel VBA InputBox with Drop-Down List
Steps:
- Go to the Developer tab.
- Click on the Insert drop-down on the Controls group.
- Select Combo Box (ActiveX Controls) from the available options.
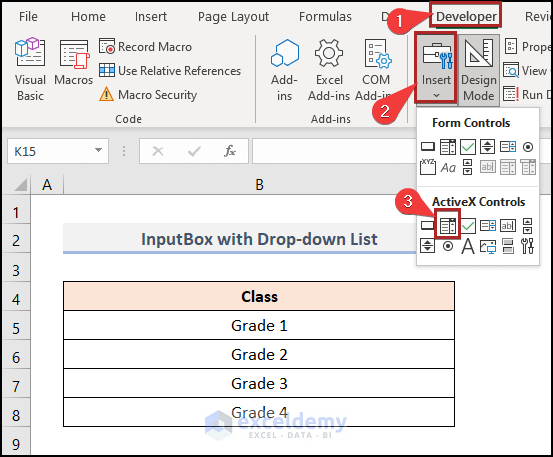
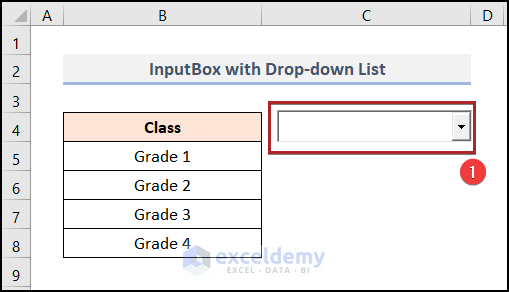
- Draw a box with the cursor as in the following image.
- Double-click on the box.
It will open the Microsoft Visual Basic for Applications window. A code module was created for this Combo Box automatically.
- In Project Explorer, double-click on ThisWorkbook to open a code module with the Workbook event.
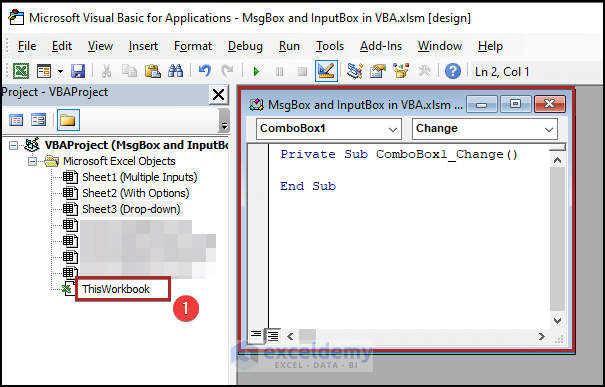
- Enter the following code into the new code module.
Private Sub Workbook_Open()
With Worksheets("Drop-down").ComboBox1
.AddItem "Grade 1"
.AddItem "Grade 2"
.AddItem "Grade 3"
.AddItem "Grade 4"
End With
End Sub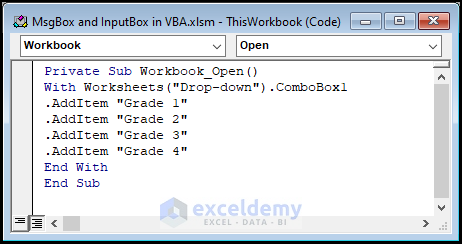
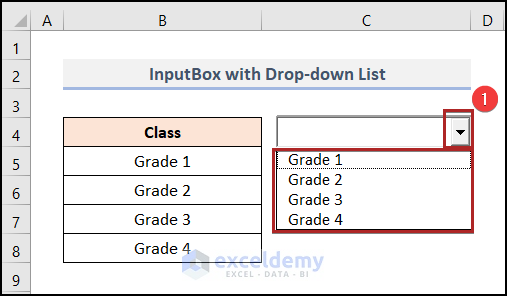
- Save the workbook.
- Close the file and open it again.
- You will see the InputBox working like the image below.
Introduction to Application.InputBox Method
You can also use the Application.InputBox method to do the same task. But it has some advantages over the InputBox function.
- You can define the resulting datatype.
- You can identify when someone clicks the Cancel button.
- You may quickly determine whether the return value is False by assigning it to a Variant datatype.

Objective:
The objective of this method is the same as the previous function. It returns an InputBox with some advanced features.
Syntax:
The syntax for this method is similar to the InputBox function.
Application.InputBox(Prompt, [Title], [Default], [Left], [Top], [Helpfile], [HelpContextID], [Type])
Parameters:
The arguments of this method are mostly similar to the arguments of the InputBox function. The only difference is an extra parameter, that is Type. It’s an optional argument. It defines the type of returned data. Without this option, the InputBox will return only text as a default. Here is the list of the value of the data types.
| Value of Data Type | Description of Input Data Type |
|---|---|
| 0 | Formula |
| 1 | Number |
| 2 | Text String |
| 4 | Boolean (True / False) |
| 8 | Range / Cell Reference |
| 16 | #N/A |
| 64 | Array |
How to Use Application.InputBox Method: 2 Examples
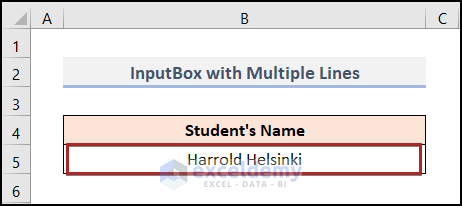
Example 1 – InputBox with Multiple Lines
Steps:
- Open the code module and enter the following code.
Sub InputBox_with_Multiple_Lines()
Dim S_name As String
S_name = Application.InputBox("Enter Name of" & vbNewLine & "the Student", "Exceldemy")
Range("B5").Value = S_name
End Sub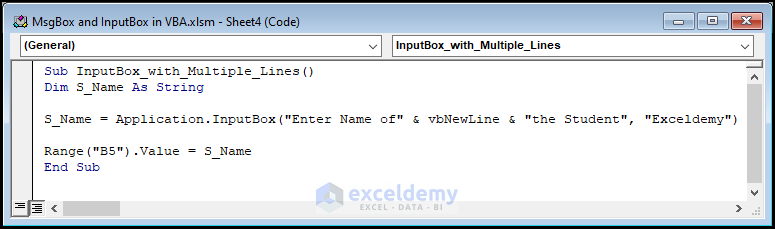
- Run the code and you’ll get an InputBox that has two lines as prompt.
- Add the entry in the blank box.
- Click OK.
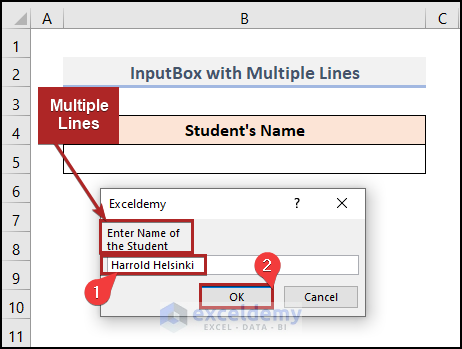
The input will be placed in cell B5.
Note: The fact to notice here is that we haven’t specified any data type in our code. So, as default, the InputBox takes the entry of a text string that we’ve addressed before.
Example 2 – InputBox with Specific Data Type
Steps:
- Enter the code below into the code module.
We’ve used data type 1 in our code. That means our InputBox will allow only numbers as input.
Sub InputBox_with_Specific_Data_Type()
Dim Score As String
Score = Application.InputBox("Enter the Score:", "Exceldemy", Type:=1)
Range("C5").Value = Score
End Sub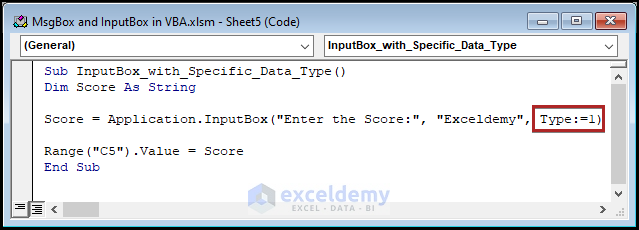
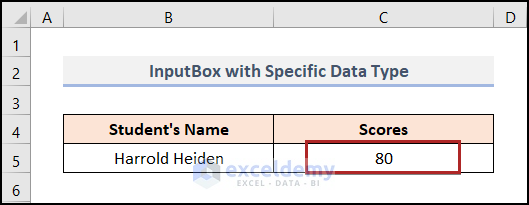
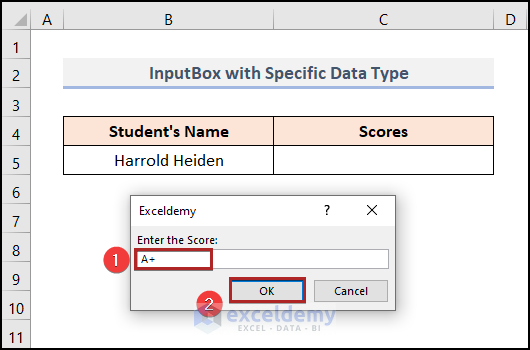
- Run the code.
- Enter the the student’s score in the InputBox.
- Click OK.
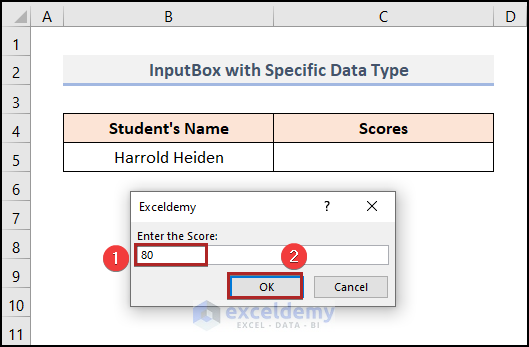
The score will be placed into cell C5.
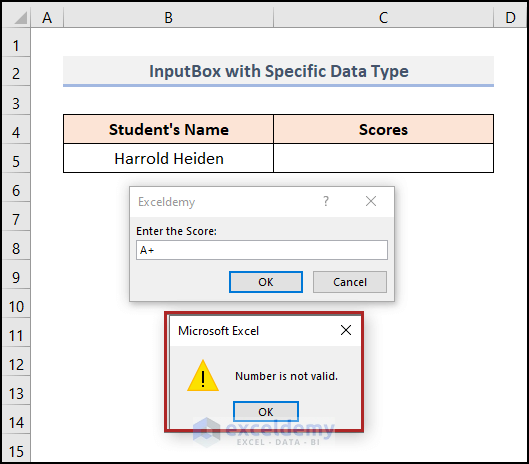
What will happen if we don’t enter a number?
- Execute the code again and enter A+ in the input box.
- Click OK.
It will show a warning box like in the following image.
Read More: Excel VBA: Work with Variable in MsgBox
Introduction to VBA MsgBox() Function
The MsgBox function is an easy way to display information and to take simple input (like Yes, No, Cancel) from the users. It appears in the display as a pop-up. For example, we can say Hello through a MsgBox to our users. For this purpose, we’ll use the MsgBox() function.

MsgBox function can be used by itself like this one: MsgBox “Click OK to continue” (parenthesis not included in this way) or it can be assigned to a variable like the above one: Ans = MsgBox(“Process the monthly report?”, vbYesNo).
Objective:
The MsgBox function shows a message in a dialog box, waits for the viewer to select a button, and then sends back an Integer number according to the clicked button.
Syntax:
A simplified version of the MsgBox syntax is as follows:
MsgBox ( Prompt, [Buttons], [Title] )
Parameters:
The arguments are defined as follows:
- Prompt: It is required. This text is displayed in the message box.
- Buttons: It is optional. Use some code such as vbYesNo, vbOKOnly in this place. According to this code, different buttons will appear in the message box.
- Title: It is optional. This text appears in the message box’s title bar.
MsgBox Table: Constants Used in the MsgBox() Function
| Constant | Value | Description |
|---|---|---|
| vbOKOnly | 0 | We can see the OK button. |
| vbOKCancel | 1 | It shows two buttons: OK and Cancel. |
| vbAbortRetryIgnore | 2 | It exhibits three buttons: Abort, Retry, and Ignore. |
| vbYesNoCancel | 3 | It shows the Yes, No, and Cancel buttons. |
| vbYesNo | 4 | We can watch two buttons: Yes and No. |
| vbRetryCancel | 5 | It pomps Retry and Cancel knobs. |
| vbCritical | 16 | It shows the Critical Message icon. |
| vbQuestion | 32 | It showcases a Query icon (a question mark). |
| VBExclamation | 48 | We can observe the Warning Message icon. |
| vbInformation | 64 | It shows the Information Message icon. |
| vbDefaultButton1 | 0 | The first button is the default. |
| vbDefaultButton2 | 256 | The second button is the default. |
| vbDefaultButton3 | 512 | The third button is the default. |
2 Examples of Using MsgBox() Function
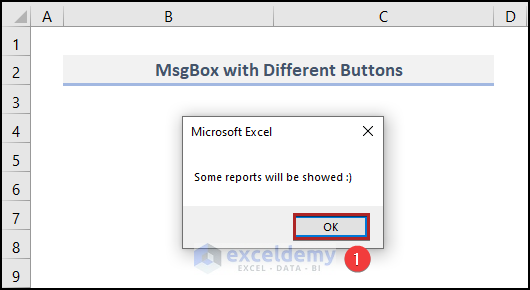
Example 1 – MsgBox with Different Buttons
Steps:
- Enter the code into the code module.
Sub Get_Answer()
Ans = MsgBox("Process the monthly report?", vbYesNo)
If Ans = vbYes Then MsgBox ("Some reports will be showed :)")
If Ans = vbNo Then Exit Sub
End Sub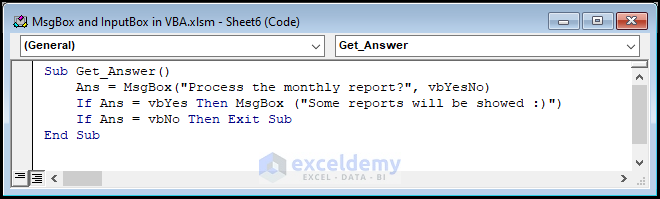
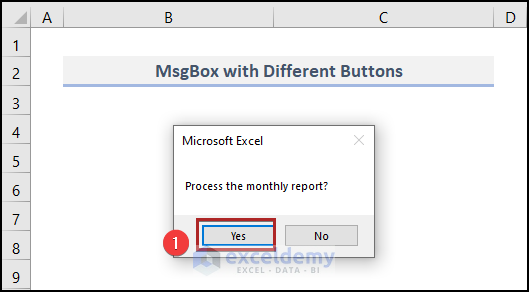
- Run the code.
A MsgBox will appear on the display.
- To bring the next box, click on the Yes button.
It will show another MsgBox with some information.
- Click OK.
Read More: Create VBA MsgBox Custom Buttons in Excel
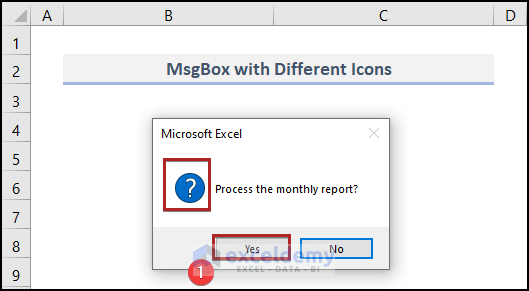
Example 2 – MsgBox with Different Icons
Steps:
- Enter the code into the module.
Sub GetAnswer()
Config = vbYesNo + vbQuestion + vbDefaultButton2
Ans = MsgBox("Process the monthly report?", Config)
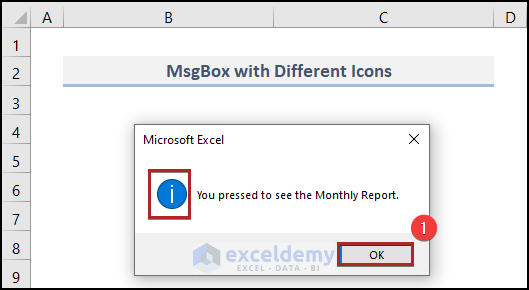
If Ans = vbYes Then MsgBox "You pressed to see the Monthly Report.", vbInformation
If Ans = vbNo Then Exit Sub
End Sub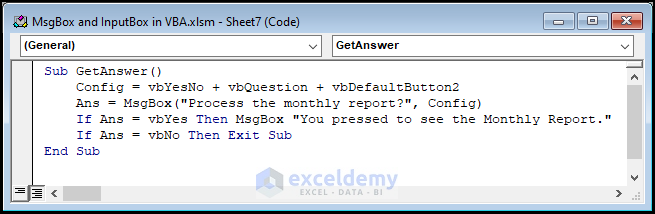
After executing the code, we can see the MsgBox with a question mark.
- Click Yes to proceed.
In the next step, we can see another Information icon on the prompt.
- Click OK to close the MsgBox.
Download Practice Workbook
Related Articles
- How to Use Excel VBA MsgBox Title
- Excel VBA: Show Multiple Values with Multiple Variables in MsgBox
- Excel VBA: Modeless MsgBox

