In general, users store Customer Info in a single column. Sometimes users need to split data in Excel into multiple columns. Excel’s multiple features, VBA Macro, Power Query, and functions split data into multiple columns.
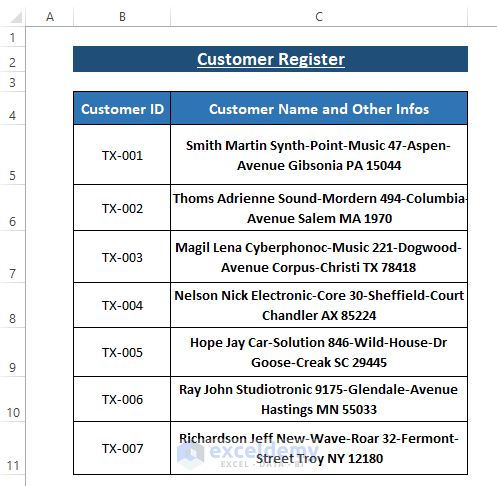
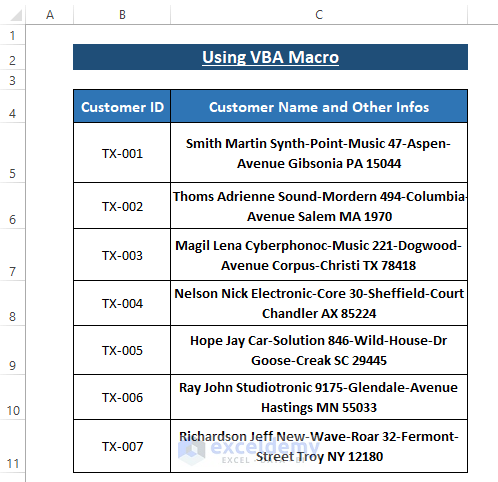
Let’s say we have Customer Name and Other Infos in a single column along with their IDs. We want the names and info to be split into multiple columns.
In this article, we use features such as Text to Columns and Flash Fill, VBA Macro, Power Query, and Functions to split data in Excel into multiple columns.
How to Split Data into Multiple Columns in Excel: 5 Methods
Method 1: Using Text to Columns Feature
Excel provides the Text to Columns feature in the Data tab. Text to Columns features allows split data into columns separated by comma, and space that are delimiters or separating indicators.
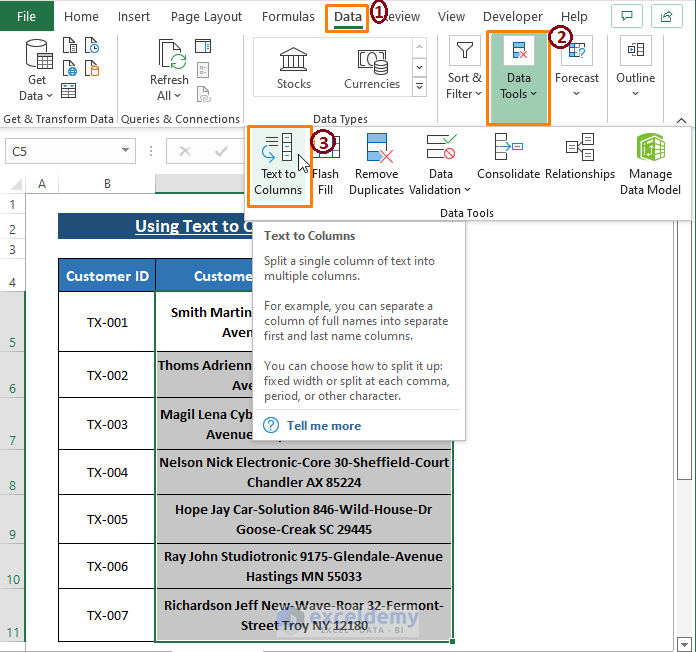
Step 1: Select the entire column you want to split the data from. Go to the Data tab > Click on Data Tools > Select Text to Columns.
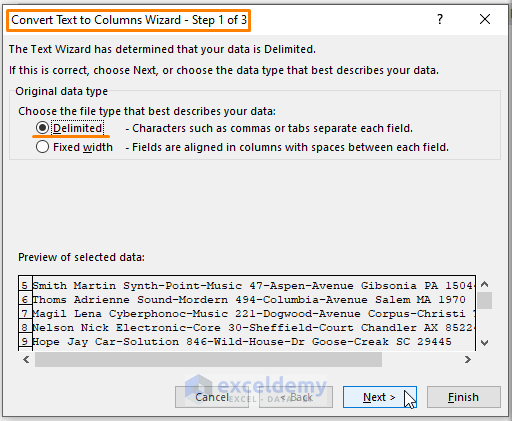
Step 2: The Convert Text to Columns Wizard appears. In the Wizard,
Mark Delimited as Choose the file type that best describes your data.
Click on Next.
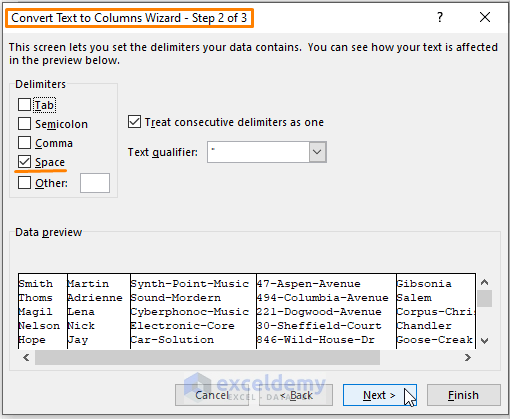
Step 3: Convert Text to Columns Wizard- Step 2 of 3 pops up. In the Wizard,
Tick Space as Delimiters. You can choose other options (i.e., Tab, Semicolon, Comma, etc,) as delimiters depending on your data type.
Click on Next.
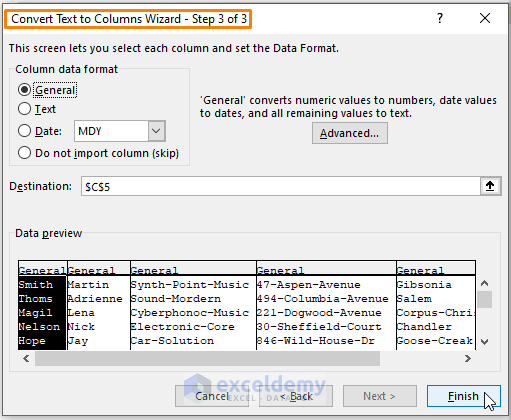
Step 4: Last Convert Text to Columns Wizard appears.
Mark the Column data format as in any preferred option (i.e., General). You can mark Text as outcome data format.
Click on Finish.
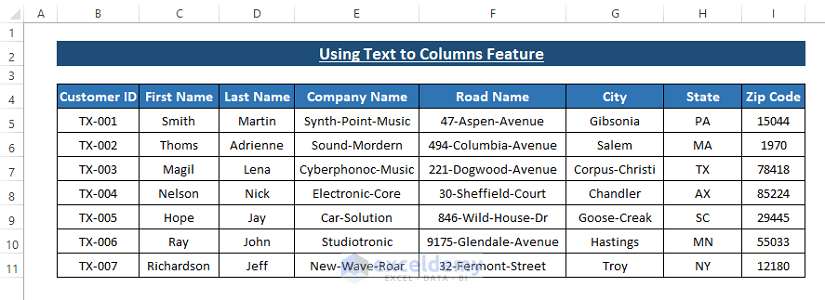
➤ Return to the Worksheet, and furnish the data as you need. At last, the outcome will be similar as depicted in the following picture.
Read More: How to Split Comma Separated Values into Rows or Columns in Excel
Method 2: Using VBA Macro to Split Data into Multiple Columns
VBA Macros are efficient in achieving objective-oriented outcomes. The VBA SPLIT function can split data from a single column into multiples. From the dataset, it’s obvious that only a single column holds all the data as shown in the below image and we want to split them.
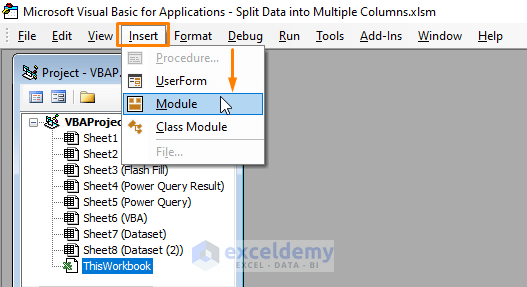
Step 1: To open Microsoft Visual Basic window, Press ALT+F11 altogether. In the window, Click on Insert (from the Toolbar) > Select Module.
Step 2: In the Module, Paste the following macro.
Sub SplitData()
For I = 5 To Cells(Rows.Count, 3).End(xlUp).Row
wrksplit = Split(Cells(I, 3).Value & " #", " ", , vbTextCompare)
Cells(I, 3).Resize(1, UBound(wrksplit)).Value = wrksplit
Next I
End Sub
The macro starts counting rows from row 5 up to the last used row. Then, wrksplit variable is assigned to the VBA SPLIT function. The SPLIT function takes the Space delimiter as a separation indicator. Afterward, the macro resizes the cells declaring array length using the VBA UBound function.
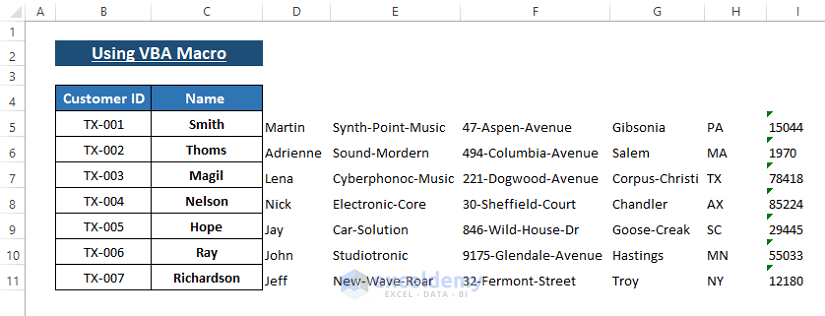
Step 3: Use the F5 key to run the macro. Now, back to the Worksheet, you see macro splits the Infos into multiple columns.
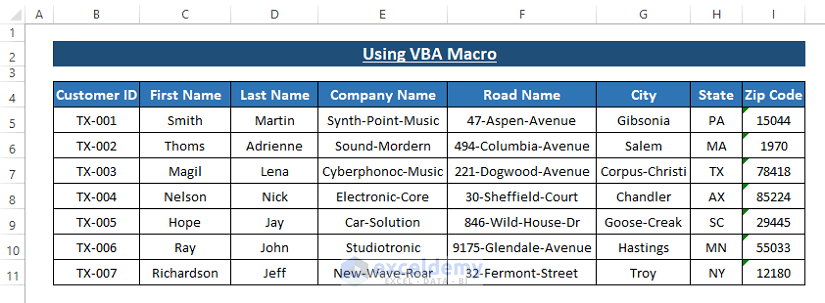
➤ Restructure the macro outcomes according to your desire. In the end, the outcome looks like the image you are seeing below.
You can split the data into as many columns as you want just you have to insert a Space in separations.
Read More: Excel Macro to Split Data into Multiple Files
Method 3: Split Data into Multiple Columns Using Power Query
Excel Power Query is a powerful tool for shaping data. Power Query Editor offers a customized option to split data into columns.
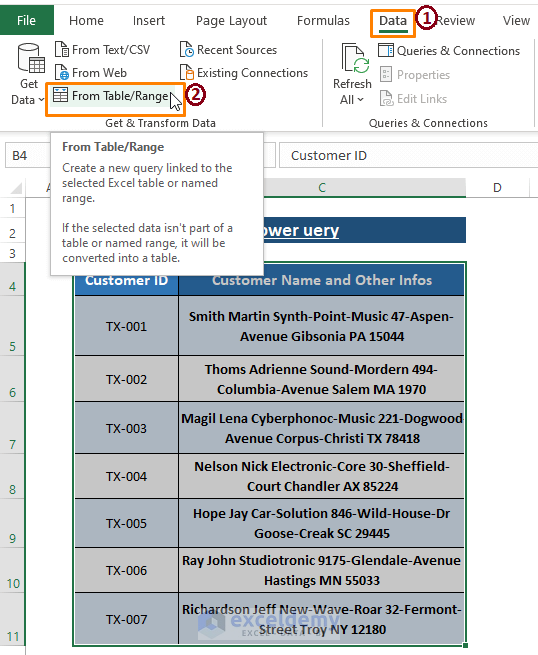
Step 1: Select the entire range. Then, Go to Data > Click on From Table/Range (within Get & Transform data section).
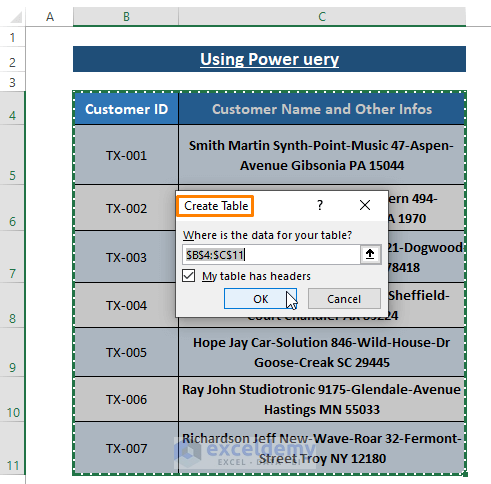
Step 2: Excel brings out the Create Table dialog box.
Tick or Untick My table has headers option depending on your data type.
Click on OK.
Step 3: The Power Query Editor appears. In the Editor,
Select the specific column that resides the data you want to split.
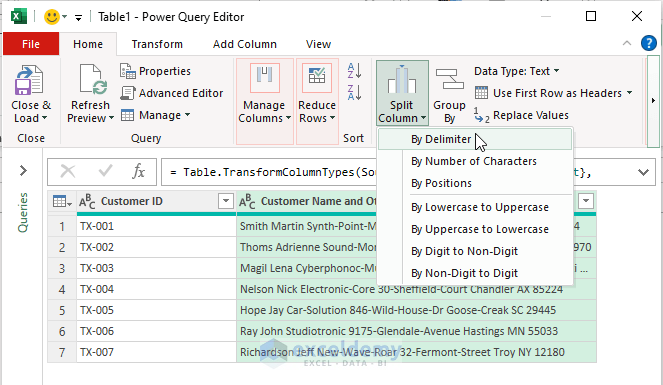
After that, Select Home > Click on Split Column (from the Transform section) > Select By Delimiter.
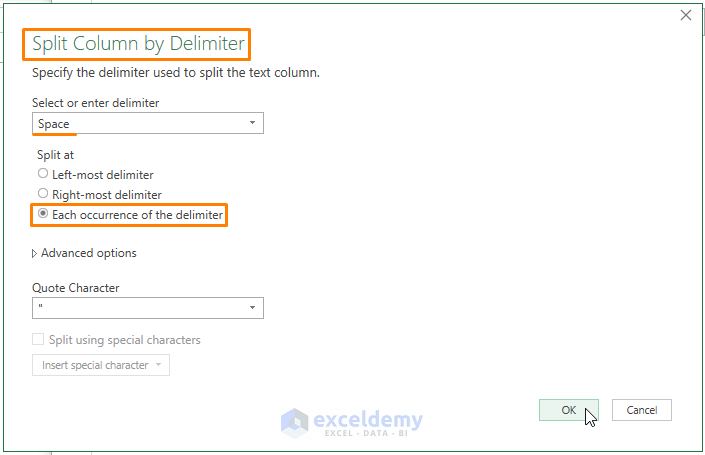
Step 4: Split Column by Delimiter dialog box opens. In the dialog box,
Choose Space as Select or enter delimiter option.
Mark Each occurrence of the delimiter as Split at options. This enables Power Query to split data as points where space exists. You can choose other delimiters such as Comma, Semicolon, etc. to split data at.
Click on OK.
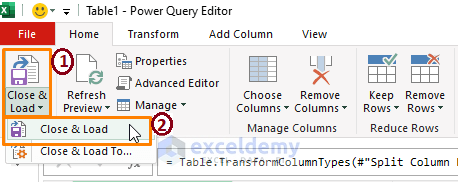
Step 5: Clicking OK in the Split Column by Delimiter dialog box takes you to the Power Query Editor window. In the Editor window,
Click on Close & Load > Select Close & Load.
➤ After that Excel closes the Power Query Editor and loads the split data in Worksheet. Arrange the data according to your taste.
Method 4: Flash Fill to Split Data into Multiple Columns
Flash Fill is a handy tool to fast-fill entries in Excel. Flash Fill mimics the previously inputted entries and fetches data from existing entries. All it needs is to provide sufficient inputs to mimic.
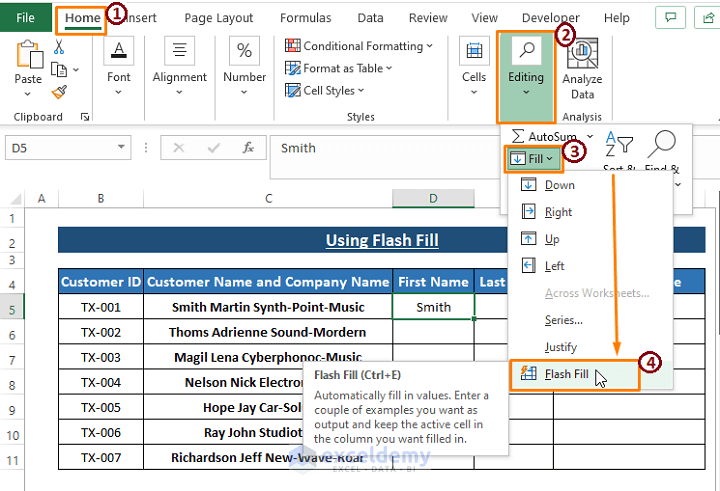
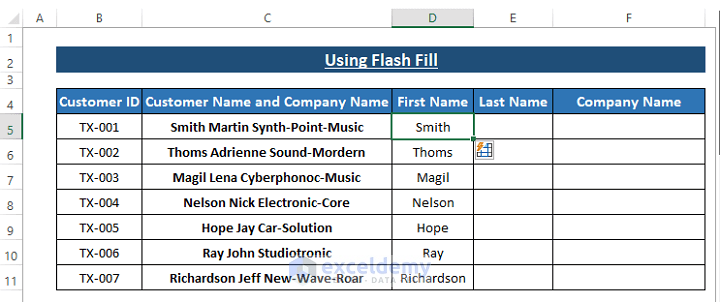
Step 1: Type the 1st entry Under the First Name header. Go to Home > Editing > Fill > Select Flash Fill.
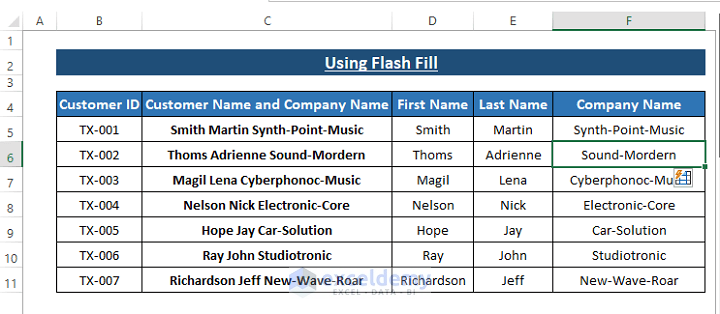
➤ Instantly, all the other entries within the First Name header get inserted with First Names. Flash Fill mimics the 1st entry and fetches all the 1st words from the adjacent column.
Step 2: Repeat Step 1 for other columns such as Last Name and Company Name. However, provide a minimum of 2 entries in the Company Name column to allow Flash Fill in other cells successfully.
Flash Fill is efficient for a limited variety of entries. In case you have a variety of entries it’s better not to use Flash Fill. Because in that case, Flash Fill will mimic the data completely wrong.
Method 5: Insert Data into Multiple Columns Using Functions
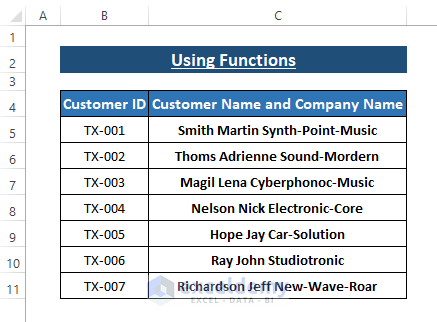
We can fetch left, right, or middle sections of an entry using LEFT, RIGHT, MID, SUBSTITUTE, and SEARCH functions. As it’s not efficient to use lengthy formulas to fetch complicated data types. We use a simple form of our dataset to be extracted by combined functions.
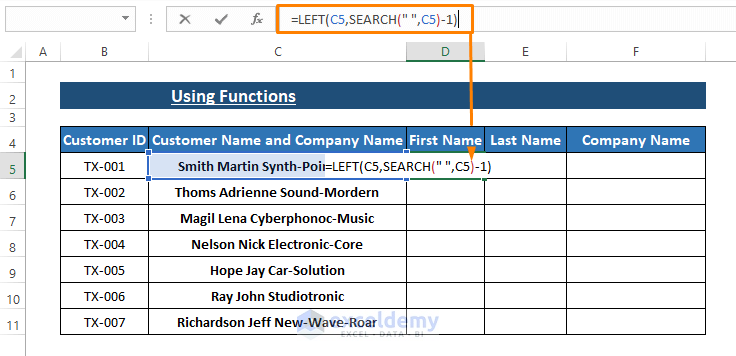
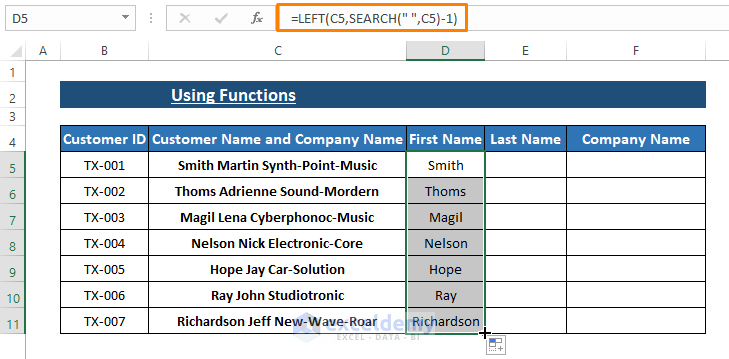
Step 1: Type the following formula in any blank cell (i.e., D5) to extract First Names.
=LEFT(C5,SEARCH(" ",C5)-1)The SEARCH function displays the character length of the 1st Space character in cell C5. By subtracting 1 from the length the LEFT function fetches the rest of the characters until the 1st Space.
Step 2: Hit ENTER to apply the formula in cell C5. Then, drag the Fill Handle to apply the formula to the other cells within the same column.
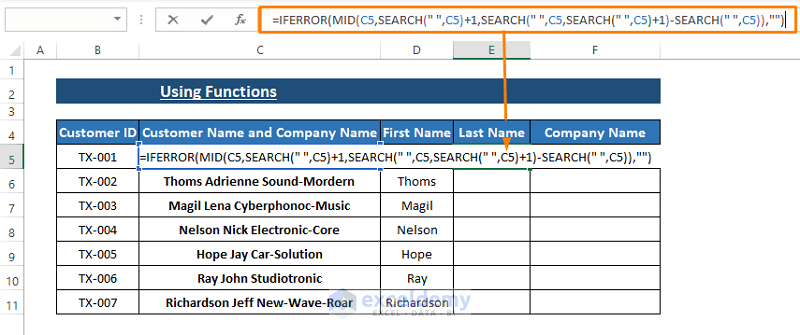
Step 3: Now, use the below formula for inserting Last Names.
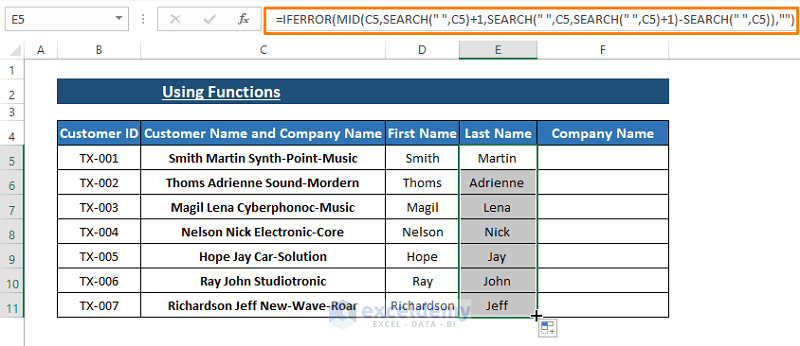
=IFERROR(MID(C5,SEARCH(" ",C5)+1,SEARCH(" ",C5,SEARCH(" ",C5)+1)-SEARCH(" ",C5)),"")In the formula SEARCH(” “,C5)+1 passes 1 plus 1st Space length as the start_num argument for the MID function. After that, the SEARCH(” “,C5,SEARCH(” “,C5)+1)-SEARCH(” “,C5) portion delivers the num_chars to display the last names in the Last Names cells. In instances of error, the IFERROR function restricts Excel from displaying any errors rather than a single Space.
Step 4: Use the ENTER key to apply the formula and drag the Fill Handle to apply the formula in other cells as depicted in the following image.
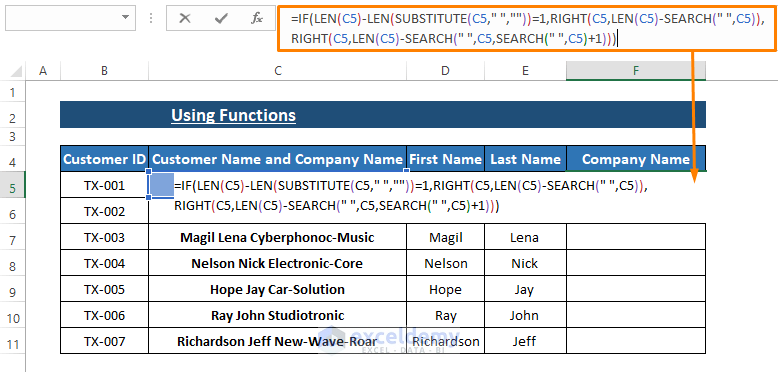
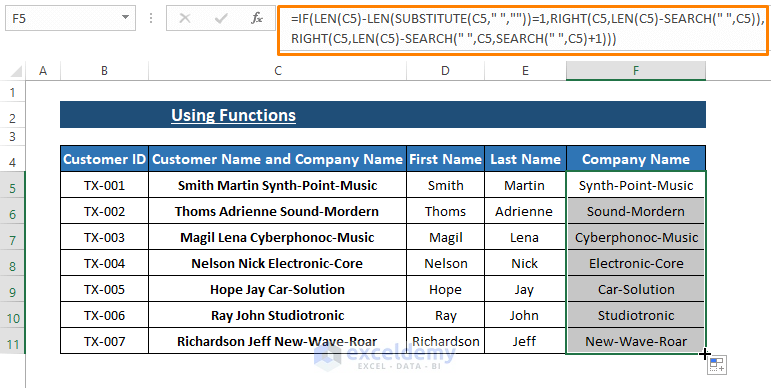
Step 5: For Company Name use the below formula in respective cells.
=IF(LEN(C5)-LEN(SUBSTITUTE(C5," ",""))=1,RIGHT(C5,LEN(C5)-SEARCH(" ",C5)),RIGHT(C5,LEN(C5)-SEARCH(" ",C5,SEARCH(" ",C5)+1)))The formula performs a logical_text (i.e., LEN(C5)-LEN(SUBSTITUTE(C5,” “,””))=1) using the IF function for each entry. If the test result TRUE, the formula inserts performs RIGHT(C5,LEN(C5)-SEARCH(” “,C5)) to fetch characters otherwise RIGHT(C5,LEN(C5)-SEARCH(” “,C5,SEARCH(” “,C5)+1)) inserts the desired characters.
However, it’s obvious from our data that entries contain more than 1 Space and the SUBSTITUTE function converts those entries with no-spaced entries. The RIGHT function results in the characters after what the LEN and SEARCH functions pass to it.
Step 6: Press ENTER and drag the Fill Handle to apply the formula in the entire Company Name column.
You can modify any of the formulas to fit them with your dataset. As we already know simpler ways to split data into multiple columns, it’s futile to use lengthy formulas to do the jobs.
Download Excel Workbook
Conclusion
In this article, we use features such as Text to Columns, Flash Fill, VBA, Power Query, and functions that split data in Excel into multiple columns. Text to Columns, VBA Macro, and Power Query split data into multiple columns with ease. However, functions and Flash Fill efficiently split less crowded data. Hope you find these above-described methods handy in your case. Comment, if you have further inquiries or have anything to add.
Related Articles
- How to Split Data into Equal Groups in Excel
- How to Split Data from One Cell into Multiple Rows in Excel
- Split Data into Multiple Worksheets in Excel
