In day-to-day use, users need to show Excel formulas when printing. Showing formulas in print may be the result of various users’ requirements. Placing Apostrophes, showing formulas, and the Find and Replace feature, Enabling Advanced Options, as well as the VBA custom function, allow Excel to show formulas.
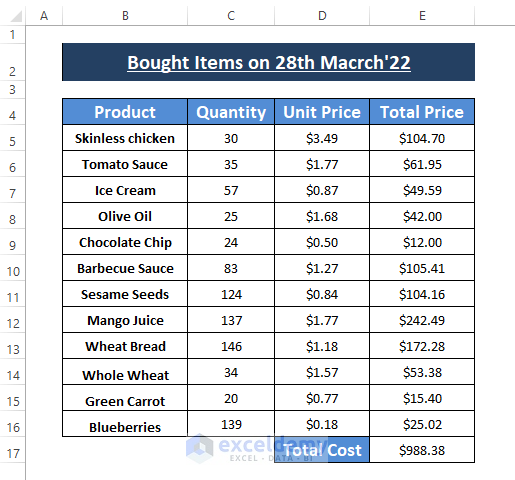
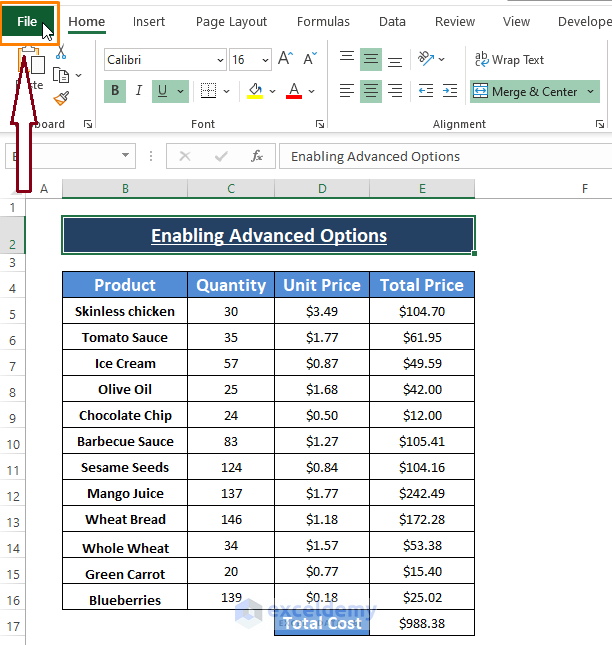
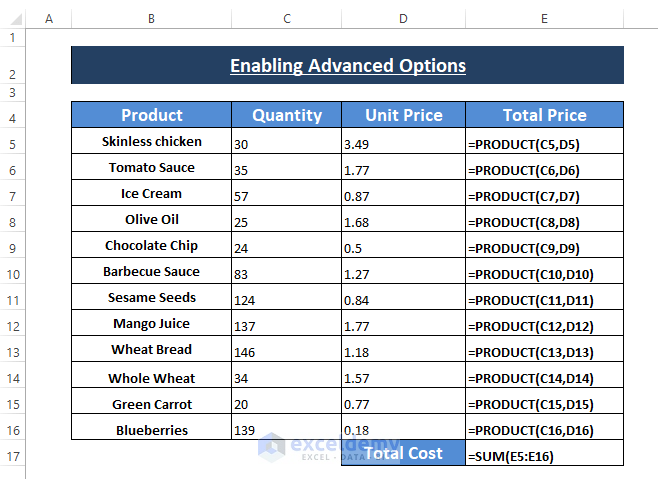
Let’s say we have a dataset that is made of our daily shopping items. We buy products on a certain date and calculate the total cost as depicted in the following image.
In this article, we describe ways to show Excel formulas when printing.
How to Print an Excel Worksheet or Workbook?
🔺 A simple keyboard command (i.e., CTRL+P) or selecting the File ribbon > Print takes you to the Excel Print Menu.
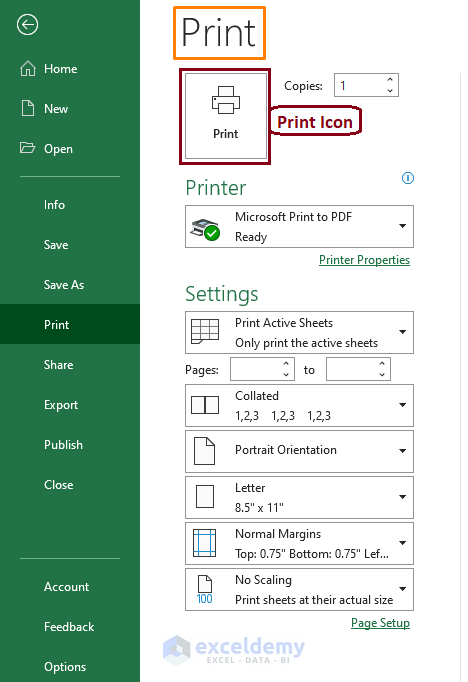
Excel offers multiple options in its Print menu. You can choose your Printer using the drop-down list under the Printer section. You can change options under the Settings section such as printing options (i.e., Print Active Sheets, Print Entire Workbook, Print Selection), number of print Pages, Page Orientations, etc.
🔺 After selecting all your necessary requirements in the options, click on the Print icon to print the worksheet, workbook, or selection.
1. Placing Apostrophe to Show Excel Formulas When Printing
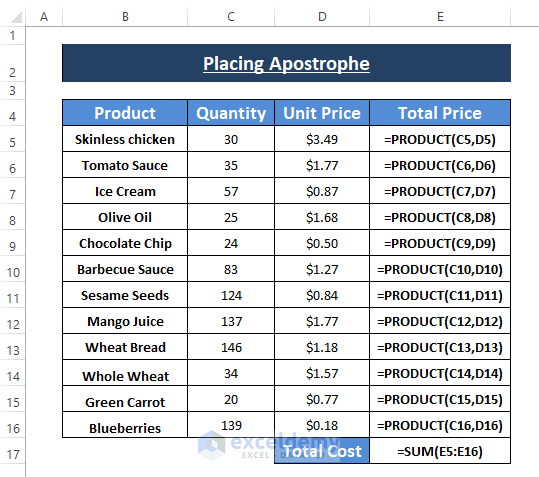
Placing an Apostrophe (i.e., ‘) in front of a formula converts the inserted formula to text. We can use an Apostrophe (i.e., ‘) to transform a formula outcome value into just a formula. However, we have to manually place Apostrophes before each formula. If we have a handful of data for converting formula outcome values into formulas, we can use this trick.
Step 1: Just insert an Apostrophe (i.e., ‘) before the formula.

Step 2: Press ENTER. You see the formula-driven value gets transformed into the formula.

➤ You can apply an Apostrophe (i.e., ‘) to transform all the values in the Total Price column into formulas as shown in the following picture.
🔺 After showing all the formulas within a worksheet or workbook, follow the printing instructions in order to print the desired Excel worksheet, workbook, or selection.
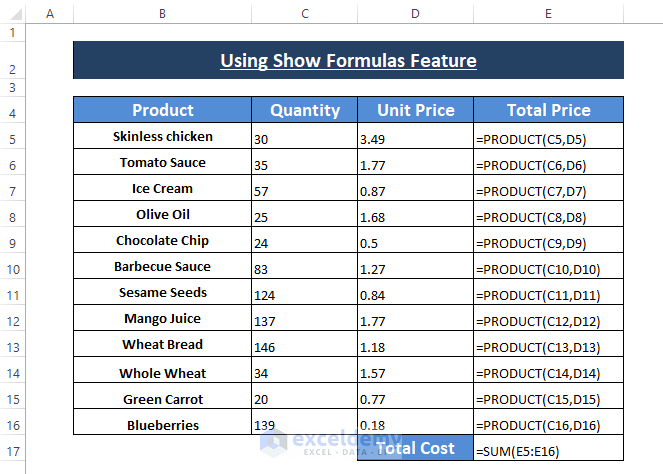
2. Using Show Formula Feature to Display Excel Formulas When Printing
Excel offers the Show Formula feature in the Formula tab. By enabling the Show Formula option, we can show formulas within a worksheet. Alternative to this feature, we can use keyboard shortcuts (CTRL+` (i.e., the Tilde key on the keyboard)).
Steps: Select the cells or a range of which you want to show the formulas. Then, go to Formulas > Select Show Formulas (from the Formula Auditing section).
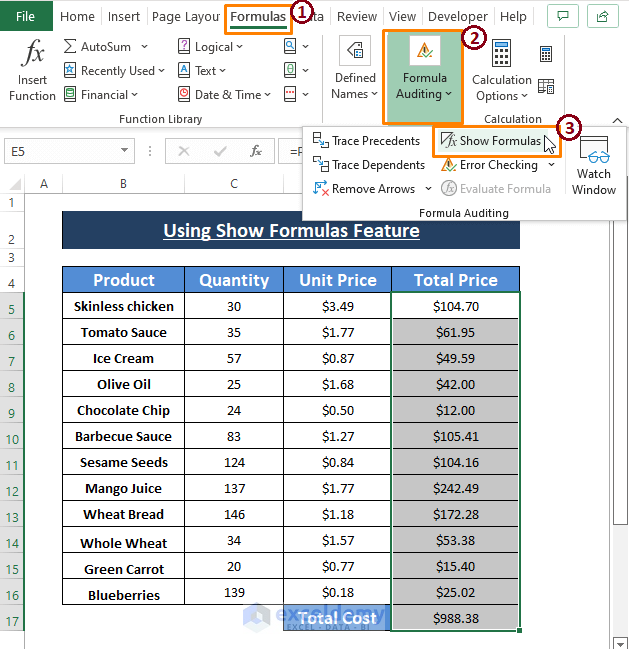
➤ In a moment, all the formula resultant values get converted into just formulas as depicted in the below picture.
🔺 Afterward use the printing instructions to print desired Excel worksheet, workbook, or selection.
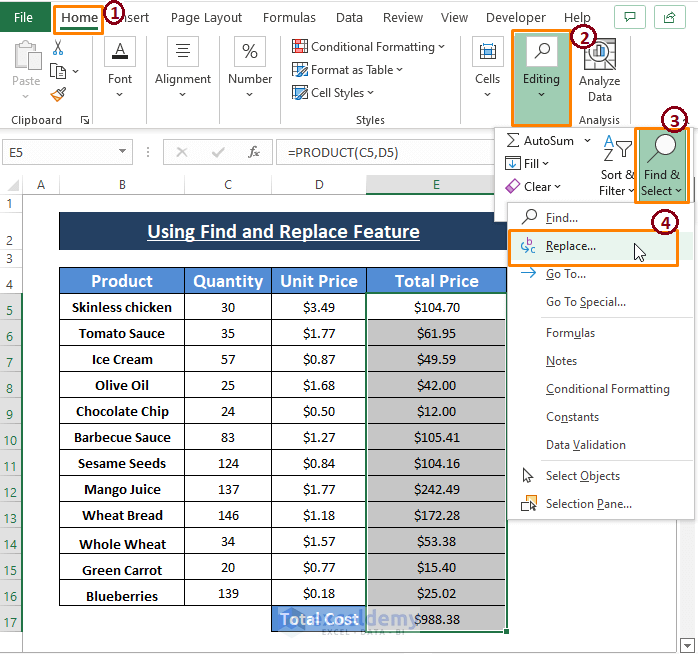
3. Showing Formulas When Printing Using Excel Find and Replace Tool
The Find and Replace feature in Excel works in a way to replace given characters with given characters. We can use the Find and Replace feature to replace the Equal sign (=) from formulas with an Apostrophe and Equal sign (‘=). The inserted apostrophes before formulas convert cells to text showing the formulas in the cells as it does in Method 1.
Step 1: Highlight the entire column of Total Price. Afterward, go to the Home tab > Select Find & Replace (from the Editing section) > Select Replace.
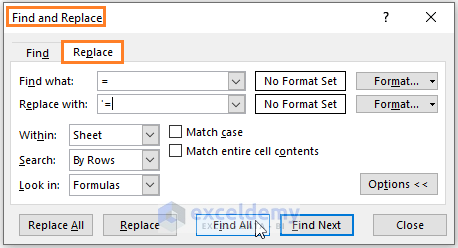
Step 2: The Find and Replace dialog box appears. In the Find and Replace dialog box,
Insert an Equal sign (=) in the Find What command box.
Type an Apostrophe and Equal sign (‘=) in the Replace with command box.
Leave the other options as they are.
Click on Find All.
Step 3: Clicking Find All stacks all the matched cells as shown in the latter picture.
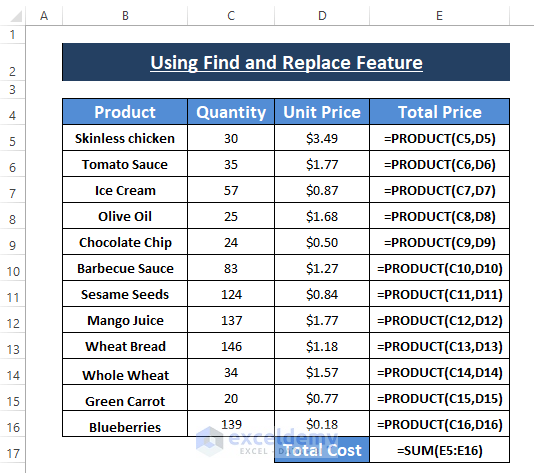
Click on Replace All.

Step 4: Excel displays a pop-up saying it has replaced all the selected cells with the provided characters. Click on OK.

➤ Excel shows all the formulas in selected cells after replacement as shown in the below screenshot.
🔺 Now, you can use the printing instructions, as you want to print the desired Excel worksheet, workbook, or selection.
4. Enabling Advanced Options to Show Formulas in Excel
Enabling Advanced Show formulas in cells instead of their calculated results option displays formulas in cells. Excel offers to enable this option for individual worksheets.
Step 1: Click on the File tab of any worksheet.
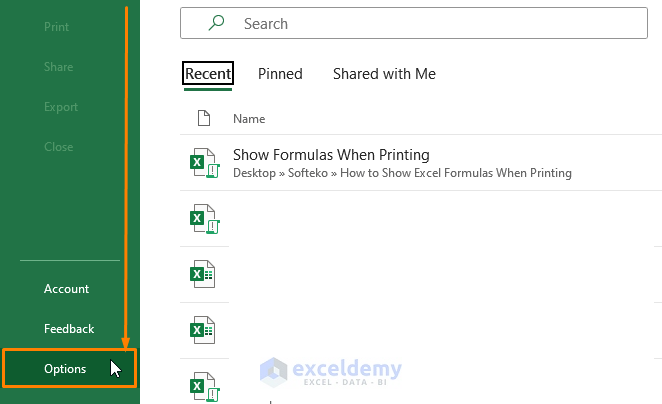
Step 2: Select Options from the right side of the window.
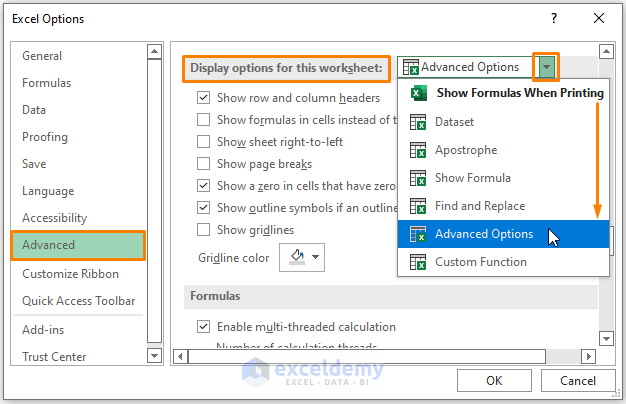
Step 3: The Excel Options window appears. In the window, Click on Advanced > Scroll up to Display options for the worksheet > Select the desired Worksheet (i.e., Advanced Options).
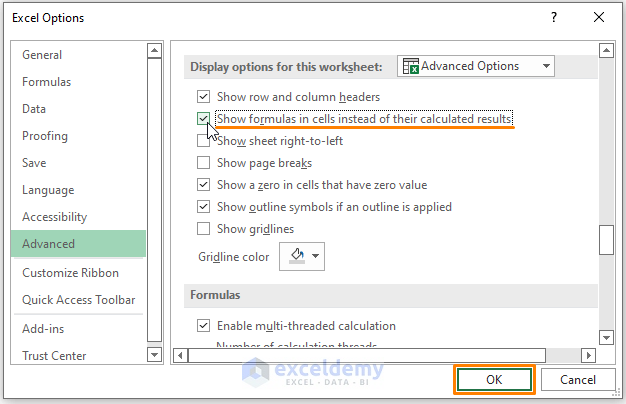
Step 4: Check the Show formulas in cells instead of their calculated results. Then, click OK.
➤ Return to the worksheet. You see clicking OK in the Excel Options Advanced window, transforming all the formulas within the worksheet into just formula text.
🔺 Since you transform all the existing formula-driven values into formula text, you can proceed to print. Follow the printing instructions in order to print the desired Excel worksheet, workbook, or selection.
5. Applying Custom VBA Function to Show Formula When Printing
Excel VBA macros are powerful tools to achieve object-oriented goals. We can use a VBA macro to generate a custom function to display formulas in worksheets.
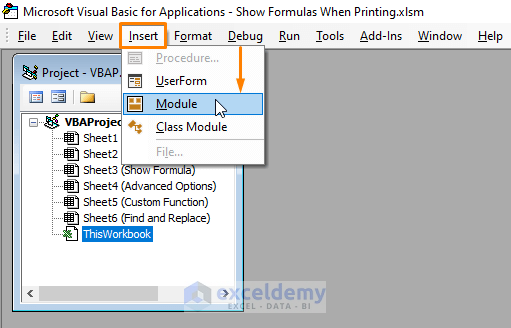
Step 1: Use the ALT+F11 keys together to open the Visual Basic window. In the Visual Basic window,
Select Insert (from the Toolbar) > Click on Module to insert a Module in the window.
Step 2: Paste the following macro in the Module.
Function ShowFormula(Cell As Range) As String
ShowFormula = Cell.Formula
End Function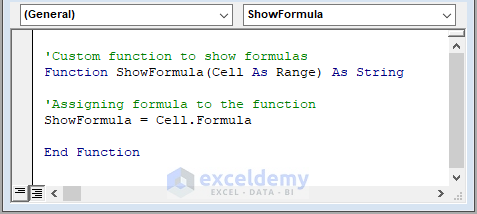
The macro constitutes a custom function named ShowFormula and Cell is its argument as Range. The Range.Formula (i.e., Cell.Formula) property returns a formula in case the reference cell has one.
Step 3: Now, back to the worksheet and try to write the custom function in any cell (i.e., G5). Excel displays the available function (i.e., ShowFormula) as depicted in the below picture.
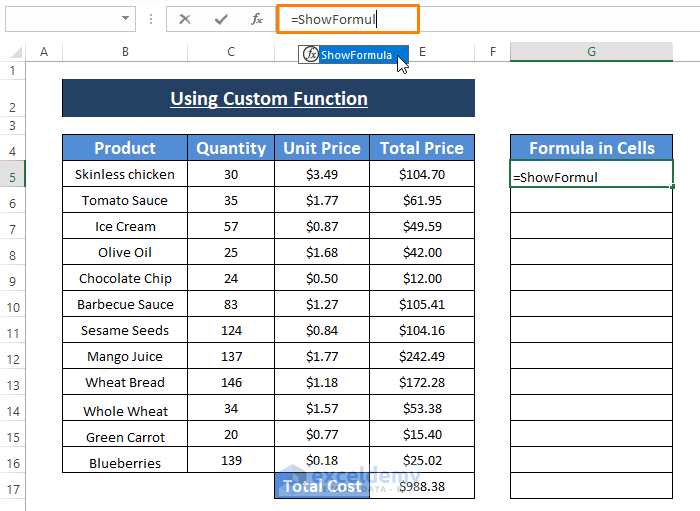
Step 4: Assign a cell reference to the custom function.

Step 5: Use the ENTER key and drag the Fill Handle to apply the formula to the rest of the cells as picturized in the latter picture.
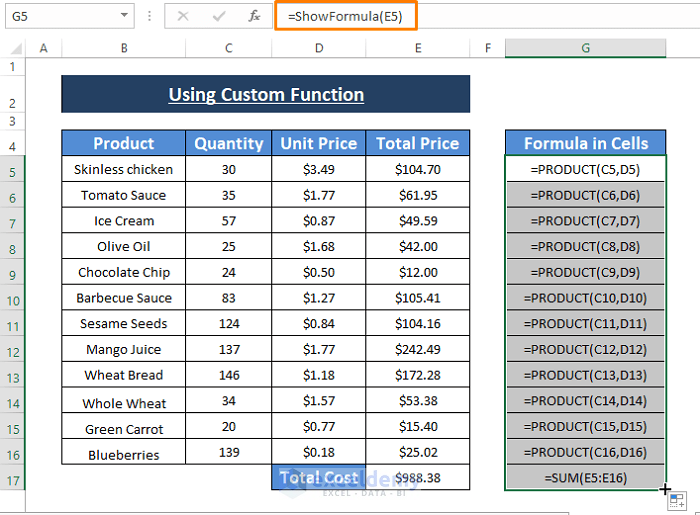
🔺 As you convert all the resultant values into formulas, you can commence printing. Use the printing instructions in order to print the desired Excel worksheet, workbook, or selection.
Download Excel Workbook
Conclusion
In this article, we use features, Advanced Options, as well as VBA custom function to show Excel formulas when printing. Hope these above-described methods withstand your requirements in converting resultant values to formulas when printing. Comment if you have further inquiries or have anything to add.
Related Articles
- How to Display Cell Formulas in Excel
- How to Show All Formulas in Excel
- Why Excel Shows Formulas Instead of Results
- How to Show Formula in Cells Instead of Value in Excel
- How to Show Value Instead of Formula in Excel
- How to Show Formula as Text in Another Cell in Excel
- [Fixed!] Formula Result Showing 0 in Excel
- How to Stop Showing Formulas in Excel
<< Go Back To Show Excel Formulas | Excel Formulas | Learn Excel
Get FREE Advanced Excel Exercises with Solutions!
