Download Practice Workbook
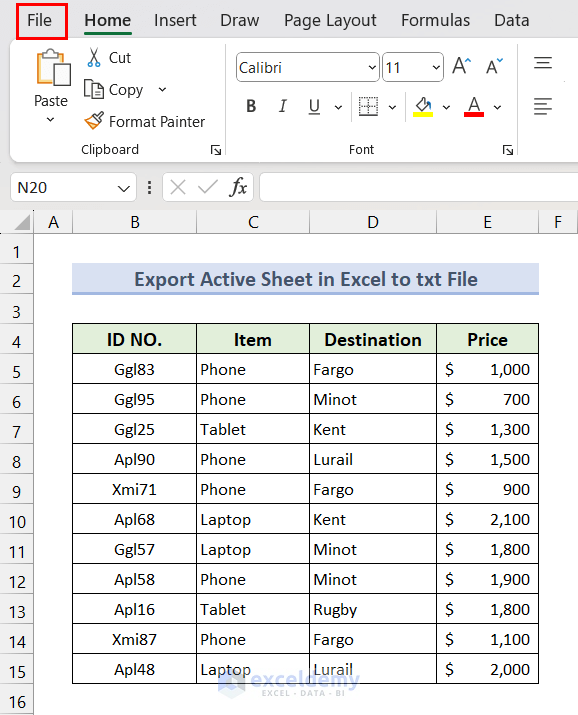
A dataset similar to the following is present in each sheet of the sample workbook.

Method 1 – Export Active Sheet in Excel to txt File
When we save a workbook as a txt (or .txt) file, only the active sheet is exported. We have two different txt file options available: Text (Tab delimited) and Unicode Text.
1.1 Export to Tab Delimited Text File
To export the active sheet to tab delimited txt file in Excel, go to the File tab.
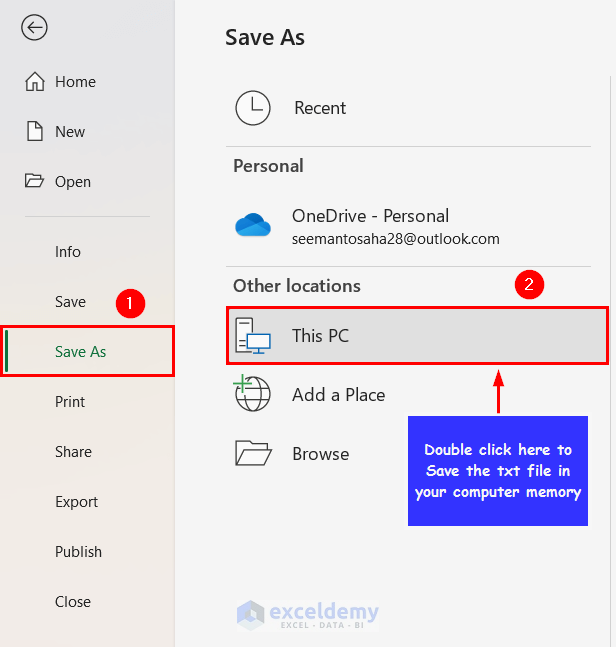
Click on the Save As option and double-click on This PC or any other memory option.
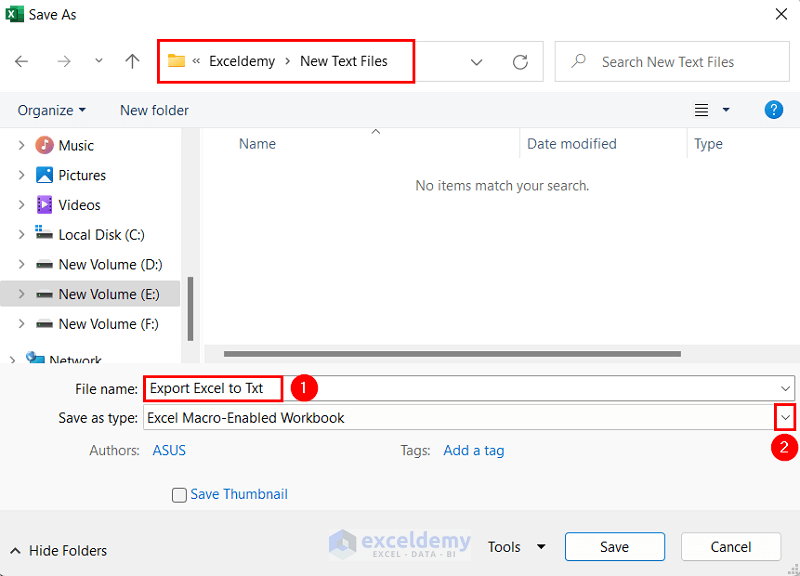
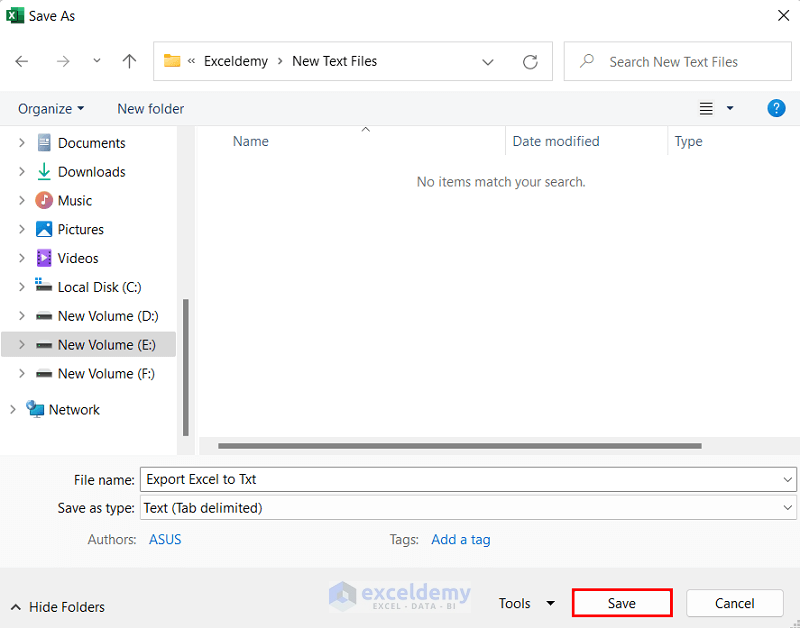
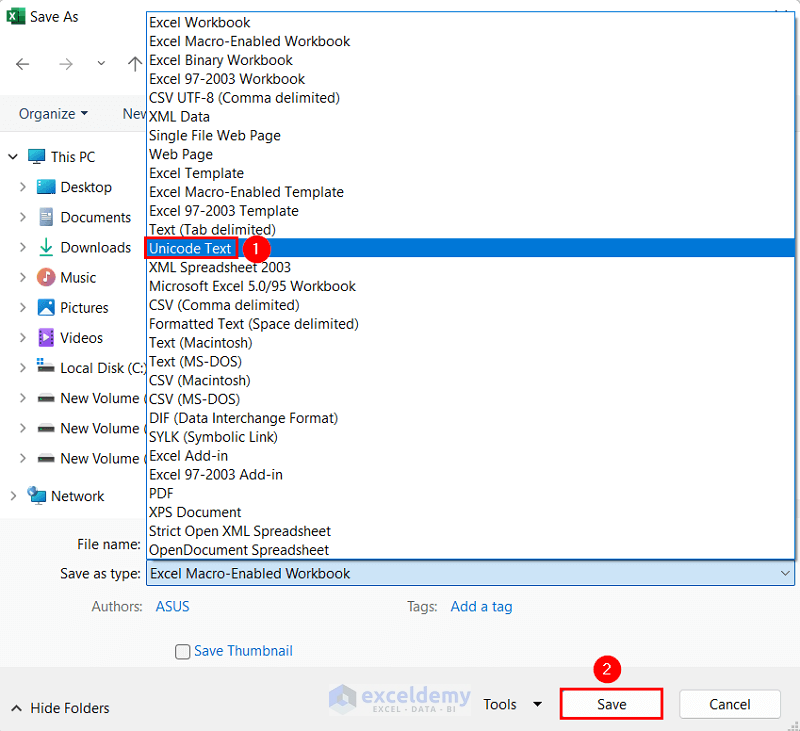
The Save As dialog box will appear. Go to the directory where you want to save your file >> input a File name (the default File name is the same as the Workbook name) >> click on the dropdown icon of the Save as type option.
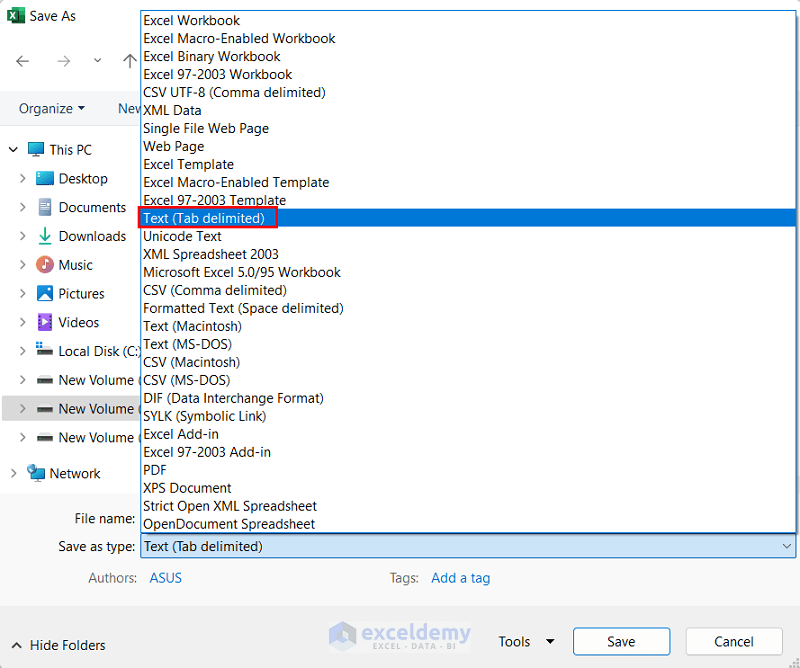
Select the Text (Tab delimited) option from the dropdown list.
Click on the Save button.
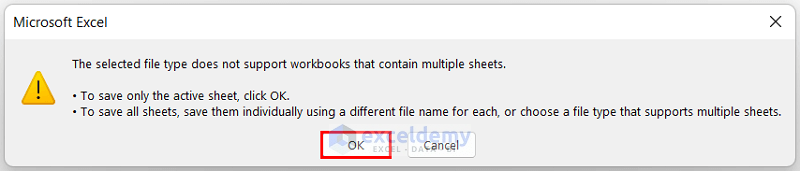
A warning message will display as txt files can contain only one sheet and our workbook contains multiple sheets. To save only the active sheet, click the OK button.
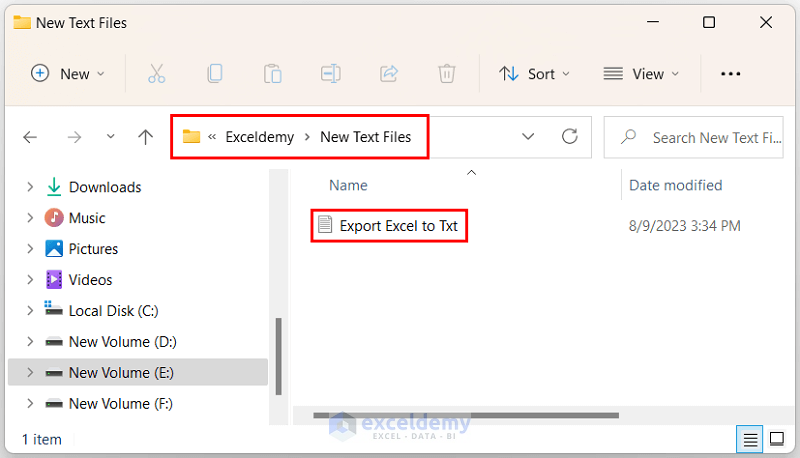
Go to the directory where you saved the file to view the txt file. Double-click on the file to open it.
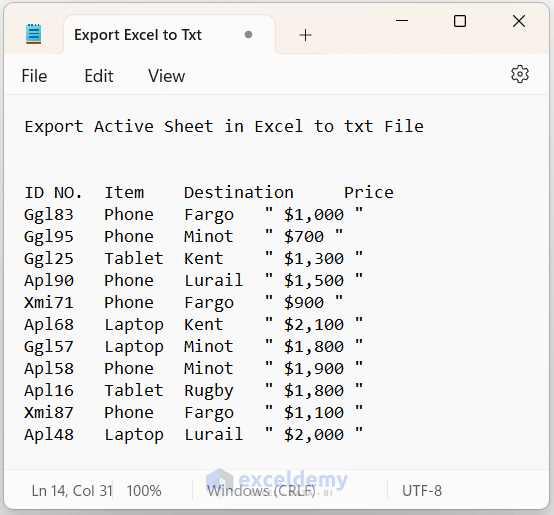
The dataset in the active sheet has been exported to the txt file.
1.2 Export to Unicode Text File
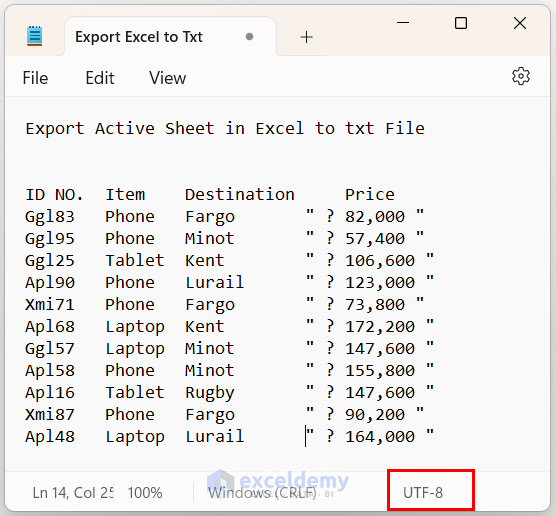
The tab delimited txt files encode data in UTF-8 format. The UTF-8 encoding format has limited support for special characters and complex formatting within cells.
The dataset below will be used for illustration.
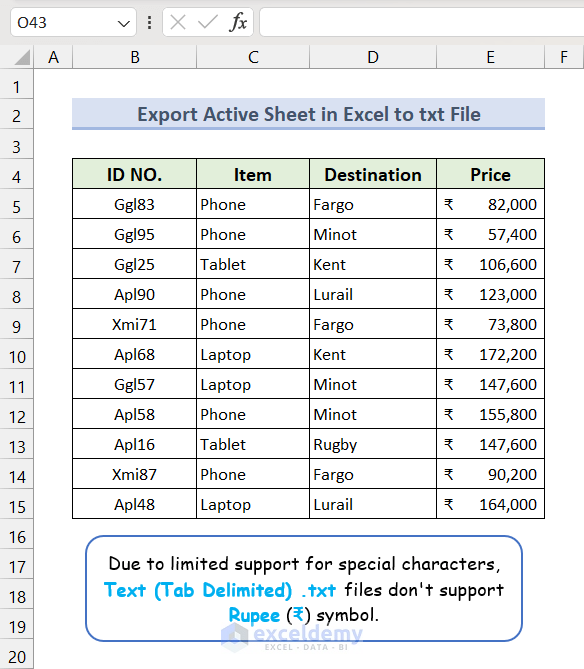
After exporting the sheet that contains this dataset to a Text (Tab delimited) file, the output will look as shown below.
The Rupee (₹) symbols are not exported properly.
The solution is to set the Save as type to Unicode Text while saving the workbook.
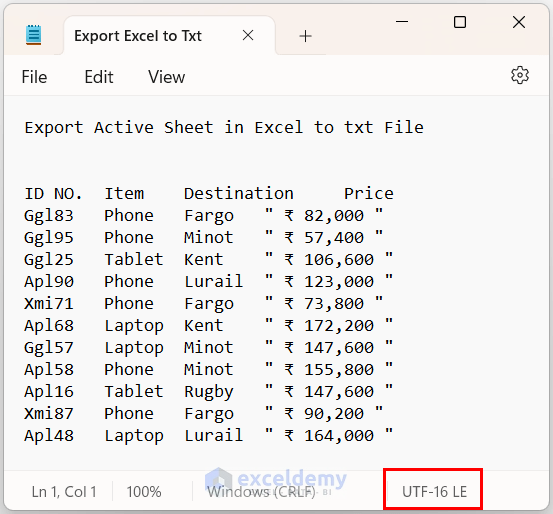
As Unicode Text files use UTF-16 encoding, it supports a wide range of characters. The data from the active sheet is exported with proper formatting as shown below.
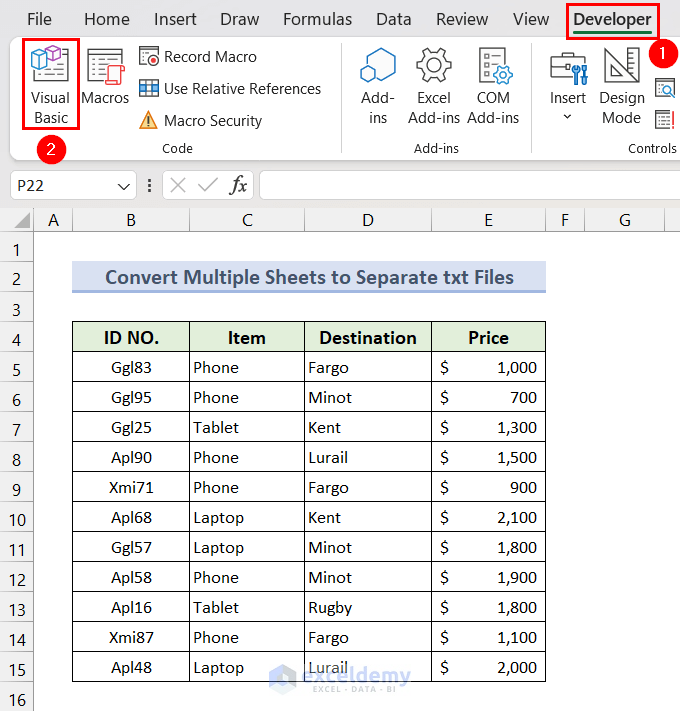
Method 2 – Convert Multiple Sheets to Separate txt Files
2.1 Convert All Sheets to Separate txt Files
To convert all sheets to separate txt files, open the Visual Basic Editor by going to the Developer tab and clicking on the Visual Basic option. An alternative method to open the Visual Basic Editor window is to use the keyboard shortcut Alt + F11.
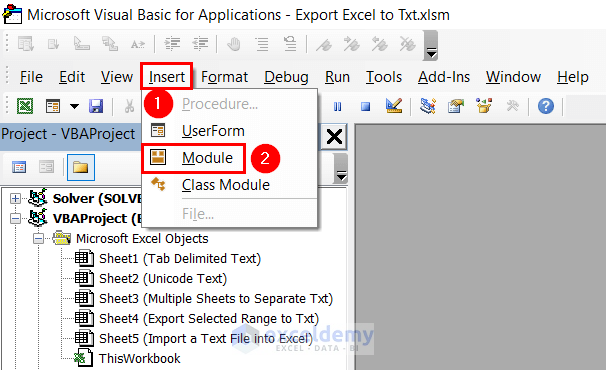
Click on the Insert tab and select the Module option.
Enter the following code in the module and change the folder path to your required directory. Save and Run the VBA code.
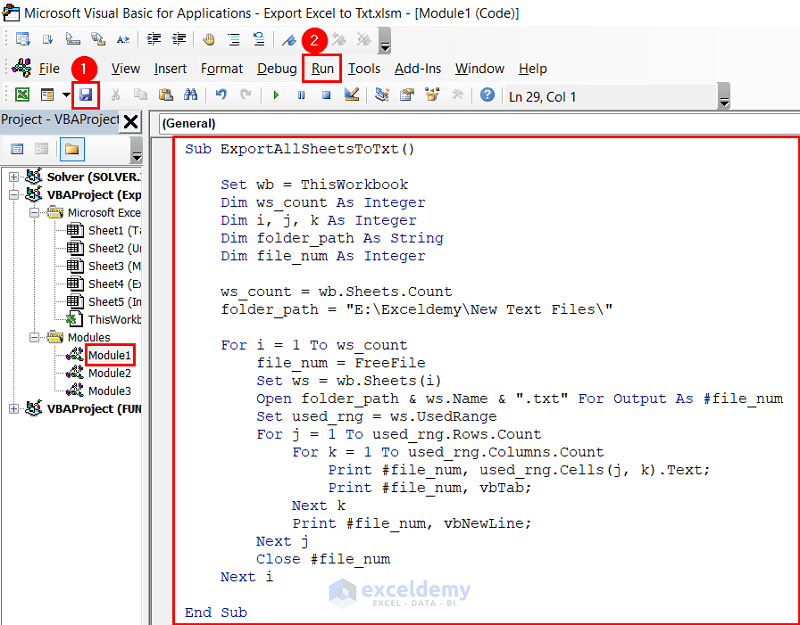
Sub ExportAllSheetsToTxt()

    Set wb = ThisWorkbook
    Dim ws_count As Integer
    Dim i, j, k As Integer
    Dim folder_path As String
    Dim file_num As Integer

    ws_count = wb.Sheets.Count
    folder_path = "E:\Exceldemy\New Text Files\"

    For i = 1 To ws_count
        file_num = FreeFile
        Set ws = wb.Sheets(i)
        Open folder_path & ws.Name & ".txt" For Output As #file_num
        Set used_rng = ws.UsedRange
        For j = 1 To used_rng.Rows.Count
            For k = 1 To used_rng.Columns.Count
                Print #file_num, used_rng.Cells(j, k).Text;
                Print #file_num, vbTab;
            Next k
            Print #file_num, vbNewLine;
        Next j
        Close #file_num
    Next i

End Sub
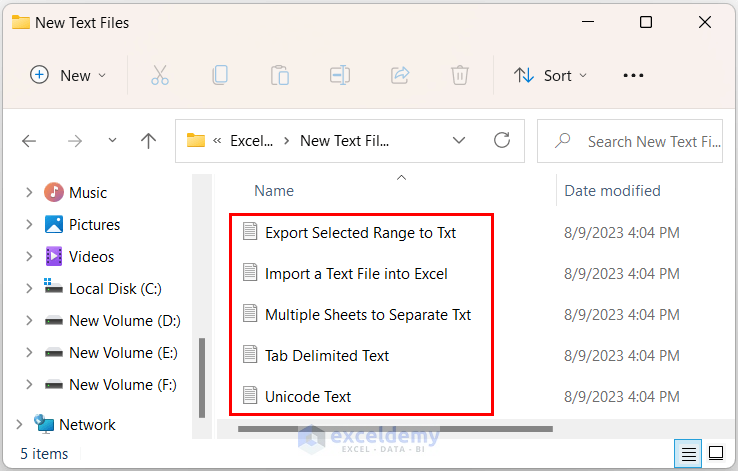
Open the specified directory. As the sample workbook contains 5 sheets, you will get 5 separate txt files.
2.2 Convert Specific Sheets to Separate txt Files
Sometimes, instead of converting all sheets in a workbook, you may require converting specific sheets. We can apply the following VBA code.
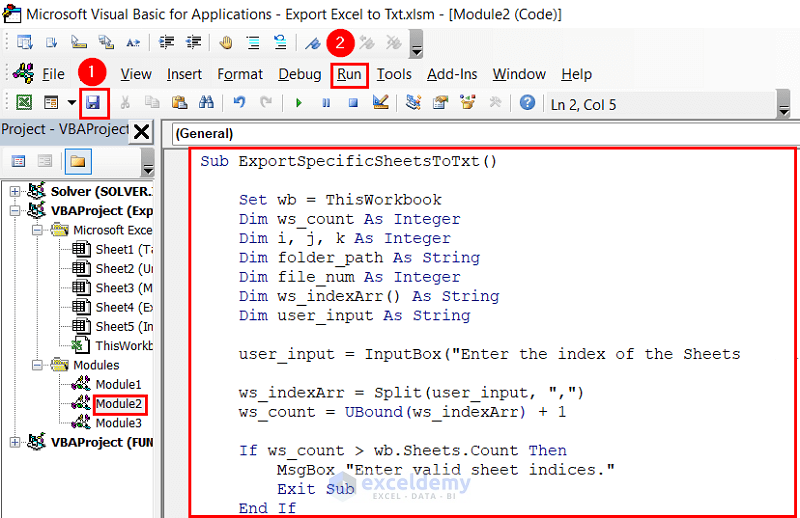
Sub ExportSpecificSheetsToTxt()

    Set wb = ThisWorkbook
    Dim ws_count As Integer
    Dim i, j, k As Integer
    Dim folder_path As String
    Dim file_num As Integer
    Dim ws_indexArr() As String
    Dim user_input As String

    user_input = InputBox("Enter the index of the Sheets (separated by commas) to be converted to txt files:")

    ws_indexArr = Split(user_input, ",")
    ws_count = UBound(ws_indexArr) + 1

    If ws_count > wb.Sheets.Count Then
        MsgBox "Enter valid sheet indices."
        Exit Sub
    End If

    For i = LBound(ws_indexArr) To UBound(ws_indexArr)
        If ws_indexArr(i) > wb.Sheets.Count Then
            MsgBox "Enter valid sheet indices"
            Exit Sub
        End If
    Next i

    folder_path = "E:\Exceldemy\New Text Files\"

    For i = LBound(ws_indexArr) To UBound(ws_indexArr)
        file_num = FreeFile
        Set ws = wb.Sheets(Int(ws_indexArr(i)))
        Open folder_path & ws.Name & ".txt" For Output As #file_num
        Set used_rng = ws.UsedRange
        For j = 1 To used_rng.Rows.Count
            For k = 1 To used_rng.Columns.Count
                Print #file_num, used_rng.Cells(j, k).Text;
                Print #file_num, vbTab;
            Next k
            Print #file_num, vbNewLine;
        Next j
        Close #file_num
    Next i

End Sub
The InputBox will open. Input the index of the sheets (separated by commas) you want to convert to separate txt files. ClickOK.
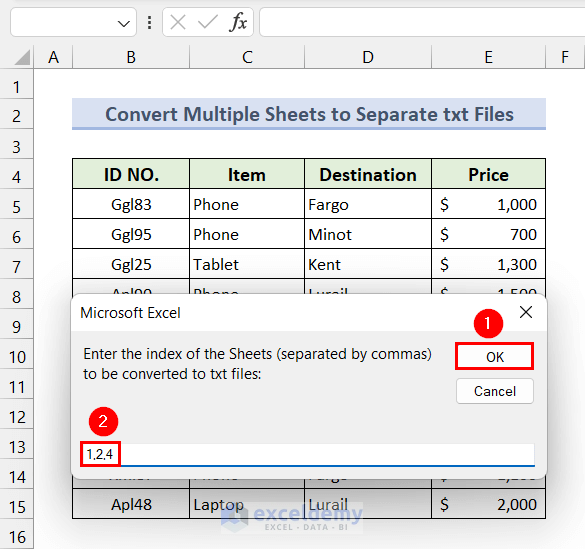
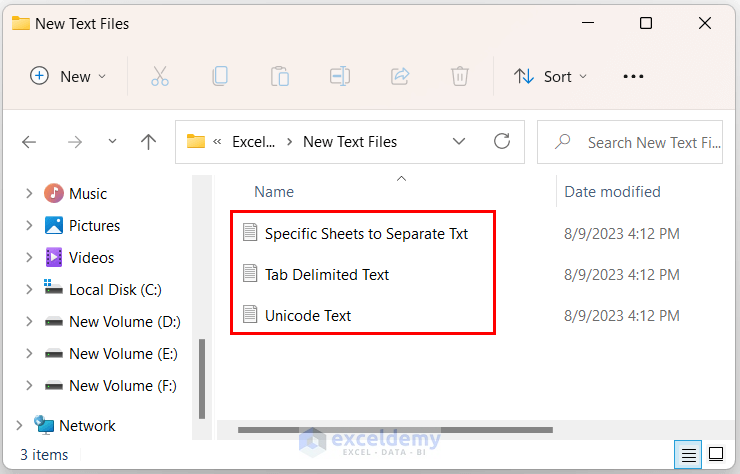
As I provided the indices of 3 sheets (1,2,4), there will be 3 txt files in the specified directory.
Method 3 – Export Selected Range in Excel to txt File
Instead of the entire sheet, we can also export any specific range in Excel to txt files. Insert the following VBA code in a module. Save and Run it.
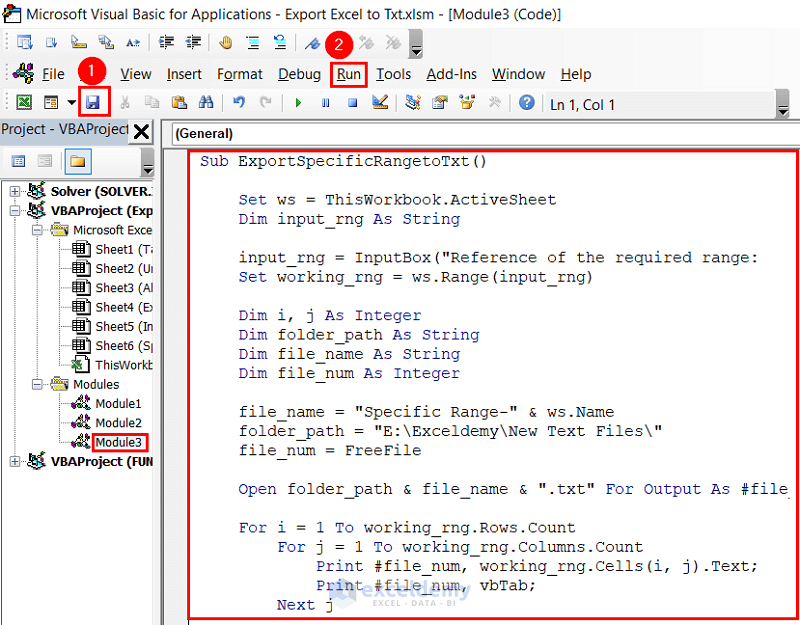
Sub ExportSpecificRangetoTxt()
Set ws = ThisWorkbook.ActiveSheet
Dim input_rng As String
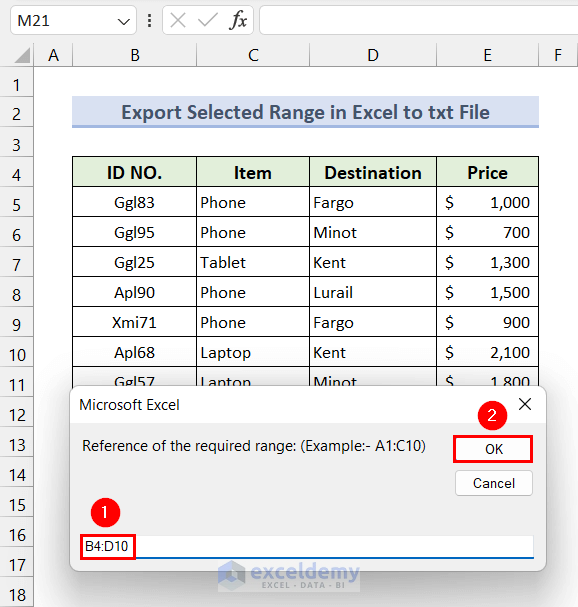
input_rng = InputBox("Reference of the required range: (Example:- A1:C10)")
Set working_rng = ws.Range(input_rng)
Dim i, j As Integer
Dim folder_path As String
Dim file_name As String
Dim file_num As Integer
file_name = "Specific Range-" & ws.Name
folder_path = "E:\Exceldemy\New Text Files\"
file_num = FreeFile
Open folder_path & file_name & ".txt" For Output As #file_num
For i = 1 To working_rng.Rows.Count
For j = 1 To working_rng.Columns.Count
Print #file_num, working_rng.Cells(i, j).Text;
Print #file_num, vbTab;
Next j
Print #file_num, vbNewLine;
Next i
Close #file_num
End Sub
The InputBox will open. Insert the reference of the range you want to export to a txt file and click the OK button.
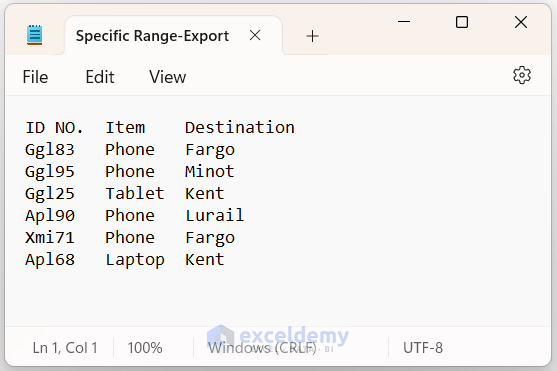
Opening the specified directory in the VBA code, you will find a txt file as shown below. Double-click on the file to open it.
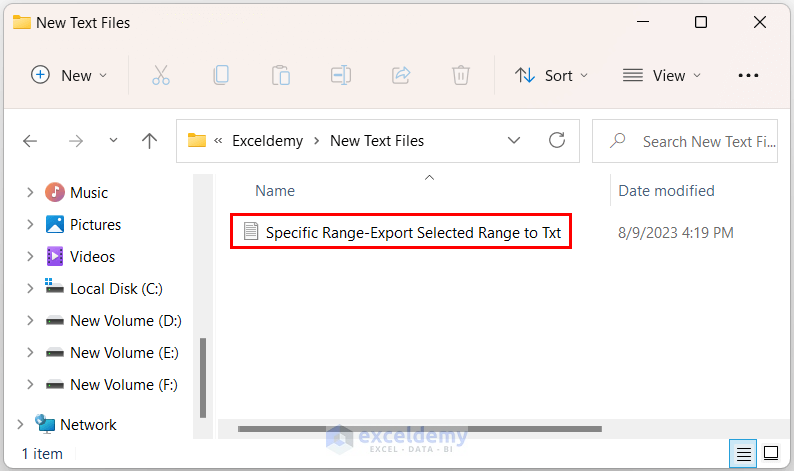
As I provided the reference of the range B4:D10, the txt file will contain only the content of these cells.
How to Import a txt File into Excel
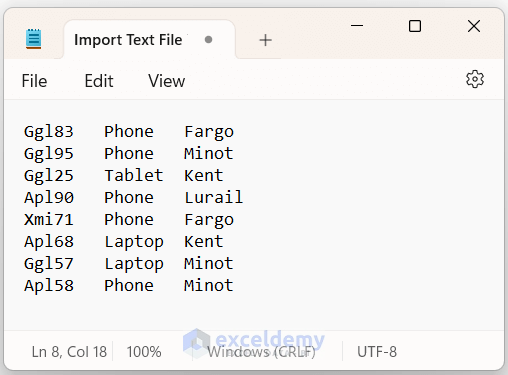
We often require importing data from a txt (or .txt) file into Excel. We can use Excel’s built-in features for this purpose. Import the following data into an Excel file from a Text (Tab delimited) file.
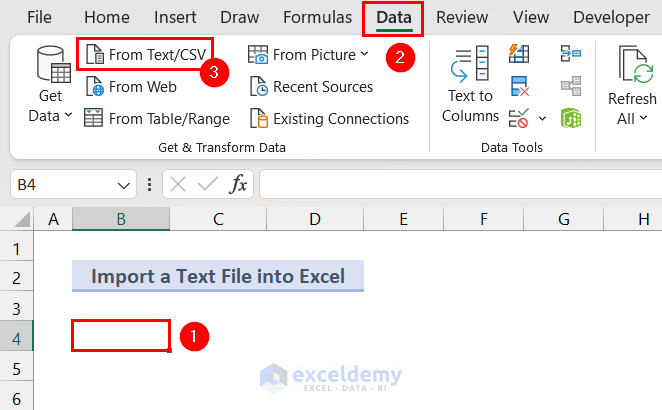
Select Cell B4 (i.e. the cell where you want to put the data from the text file) >> go to the Data tab >> click on the From Text/CSV option.
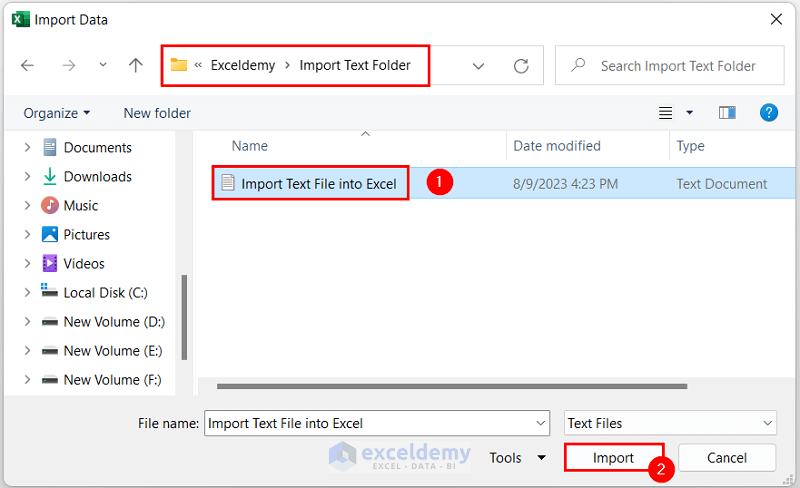
Go to the directory where the required txt file is located >> select the txt file >> click on the Import button.
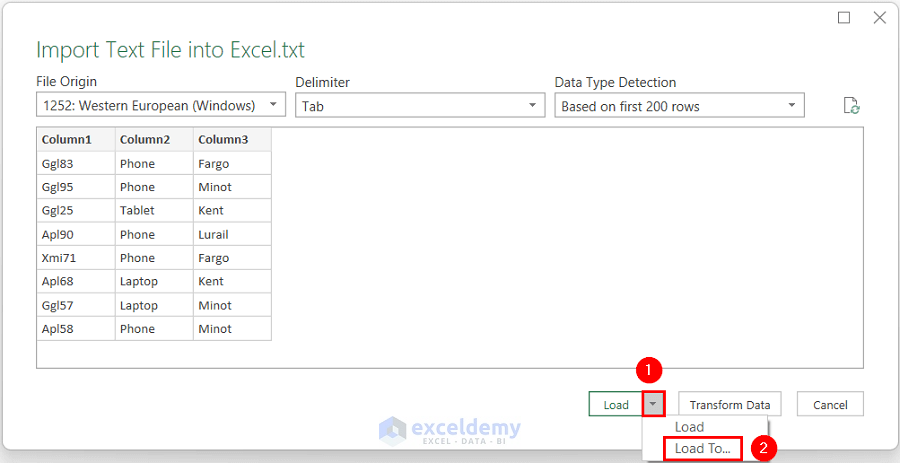
The Import Text File into Excel.txt will pop up. A preview of the imported data is available here. If any modifications are required, click on the Transform Data button. Else, click on the dropdown icon of the Load option and select the Load To option.
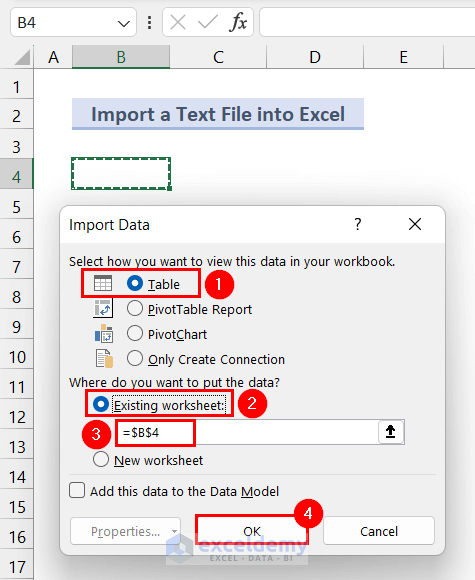
>> Seelct Load To and the Import Data dialog box will open.
>> For the Select how you want to view this data in your workbook option, the Table option will be selected by default. You can change it to other available options if required.
>> For the Where do you want to put the data? option, select the radio button of the Existing worksheet option. As we selected Cell B4 while importing the txt file, the default location is set to Cell B4. Modify if required. You can also keep the default New Worksheet option.
>> Click OK.
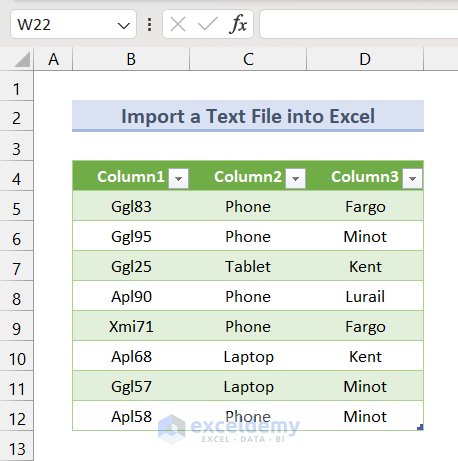
The imported data is formatted in the selected location.
Things to Consider
- When we save a workbook as a txt (or .txt) file, only the active sheet is exported.
- The Text (Tab delimited) .txt files are UTF-8 They don’t support many special characters.
- The Unicode Text .txt files are UTF-16 They support a wide range of special characters and languages.
- While exporting Excel to txt, various Excel-specific features like formulas, formatting and charts may not be preserved.
Frequently Asked Questions
- What is the difference between CSV and txt formats when exporting from Excel?
Answer: In CSV (Comma Separated Values) files, each value is separated by a comma. We can specify delimiters such as Tabs, Spaces, Pipes, etc. CSV files are commonly used for structured data, while txt files provide more flexibility in terms of delimiters.
- Can I export Excel formulas to a text file?
Answer: No, when exporting to a text file, only the cell values are exported. Formulas, formatting, and other Excel-specific features like charts or graphs are not included in the exported text file.
- How can I preserve the formatting of an Excel file when exporting it to a txt file?
Answer: Excel file’s formatting can not be exported to a txt file. If you need to preserve the formatting, you can try to export the Excel to PDF instead of txt.
Export Excel to Txt: Knowledge Hub
<< Go Back to Export Data from Excel | Learn Excel
Get FREE Advanced Excel Exercises with Solutions!
