Doing a sum now becomes easier and more convenient with the AutoSum function in Excel. This tutorial will show you all easy and quick methods on how to use AutoSum in Excel. Choose one of them and save your time for AutoSum-related calculations.
How to Use AutoSum in Excel: 4 Easy Ways
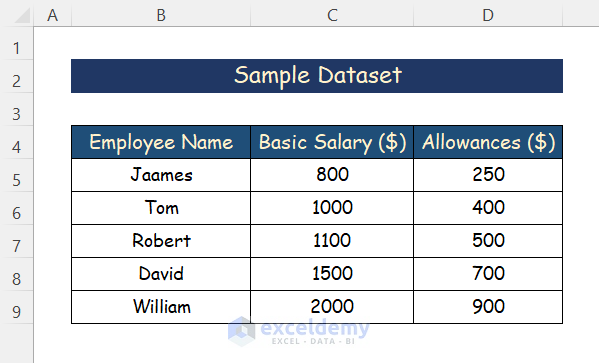
AutoSum can be used for both rows and columns. In this tutorial, we will show you 4 different ways to use AutoSum in Excel. It includes the utilization of the Editing group, Keyboard Shortcuts, Formula Tabs, and VBA code. The AutoSum option contains multiple functions like Sum, Average, Max, Min, etc. We have used the Sum function and the below dataset as a sample for the purpose of demonstration.
1. Utilizing Editing Group to Use AutoSum in Excel
You can get the sum of a particular row or column by using the AutoSum option from the Home tab. It is simple and handy to use. Anyone can apply it simply by following the steps mentioned below.
Steps:
- First, select the cell where you want to get the sum. Then go to the Home Tab.
- From the Editing section of the Home tab, click AutoSum.
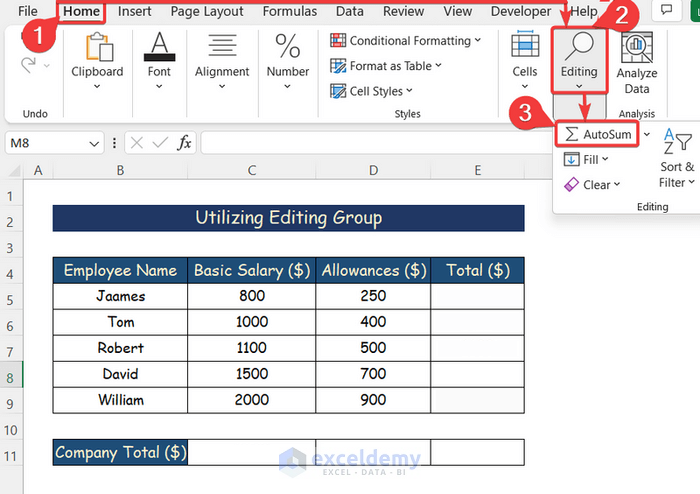
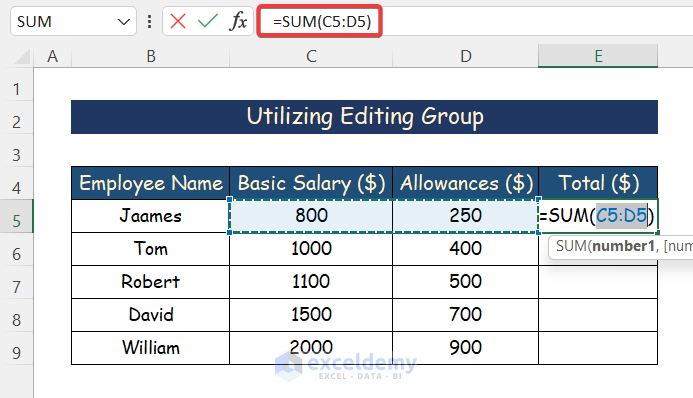
- It will highlight the particular cells which we are trying to calculate and the formula will appear automatically in the Formula Bar.
- We have selected this sum from the AutoSum option.
- Press Enter and you will find the sum of each row and column.

Read More: How to Autosum Column in Excel
2. Applying Keyboard Shortcuts to Use AutoSum
Keyboard shortcuts are the easiest method to use AutoSum. It activates the AutoSum without going to any tab in Excel. But it becomes difficult for beginners to remember numerous shortcuts.
Steps:
- Select the cell where you want to get the sum.
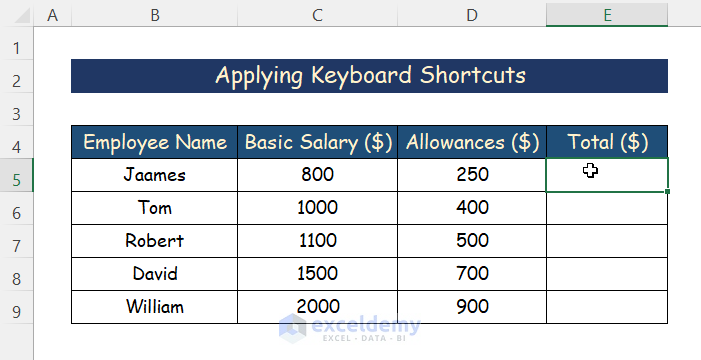
- Press Alt + = keys and it will highlight the particular cells for which we will use the AutoSum. The formula will also appear automatically on the Formula Bar.

- Now, you can use the Fill Handle to get the sum of other rows.
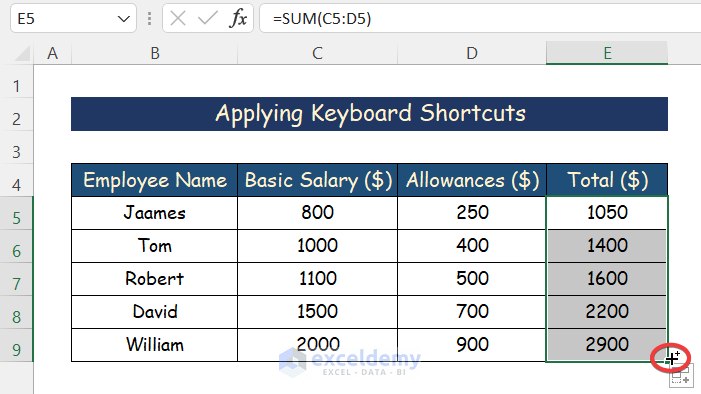
- You can follow the same steps in order to get the sum of columns.

- Finally, you will get the sum for both rows and columns.

Read More: [Fixed!] Excel AutoSum Not Working
3. Using Formulas Tab to Use AutoSum in Excel
AutoSum is actually a formula. So, you can also find AutoSum from the Formulas tab. This function can be entered automatically by selecting AutoSum from the tab. You need not enter the formula manually if you are using AutoSum.
Steps:
- Select the nearest cell where you want to get the sum of a row or column.
- Now, go to the Formulas tab and select AutoSum.

- It will highlight the particular cells which need to be calculated and the formula will appear automatically in the Formula Bar.
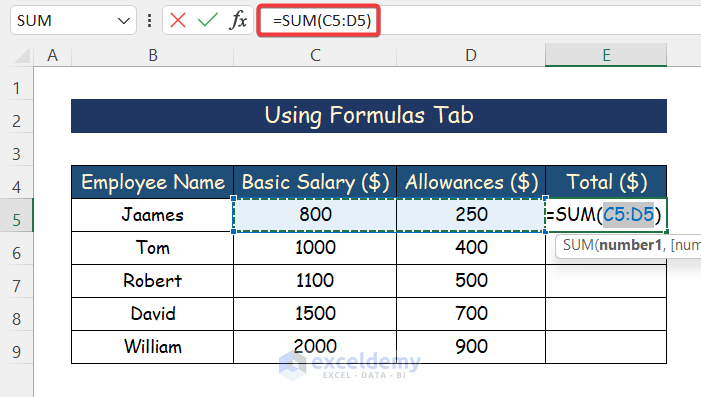
- Now, you can use the Fill Handle to get the sum of other rows.

- You can follow the same process in order to get the sum of columns.
- Finally, you will get the sum for both rows and columns.

4. Applying VBA Code to Use AutoSum
A VBA code can also help you to use AutoSum in Excel. A VBA code is necessary for this method. You can just copy the code and run it in your Excel worksheet by following the below steps.
Steps:
- Open the worksheet where you want the desired sum.

- Hold Alt+F11 keys in Excel which opens the Microsoft Visual Basic Applications window.
- Then click the Insert button.
- Click on Module from the menu to create a module.
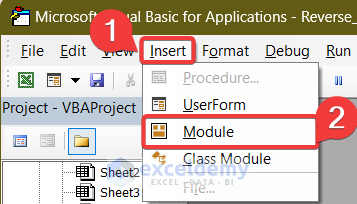
- A new window will open. Write the following VBA macro in the Module window.
Sub VBA_Auto_Sum()
'ExcelDemy Publications
Dim x, vTotal, hTotal As Range
Set x = Range("C5:E" & Range("c" & Rows.Count).End(xlUp).Row)
Set vTotal = x.Offset(, 2).Resize(x.Rows.Count, 1)
With vTotal
    .FormulaR1C1 = "=SUM(RC[-2]:RC[-1])"
    .Value = .Value
End With
Set hTotal = x.Offset(5, 0).Resize(1, x.Columns.Count)
With hTotal
    .FormulaR1C1 = "=SUM(R[-5]C:R[-1]C)"
    .Value = .Value
End With
End Sub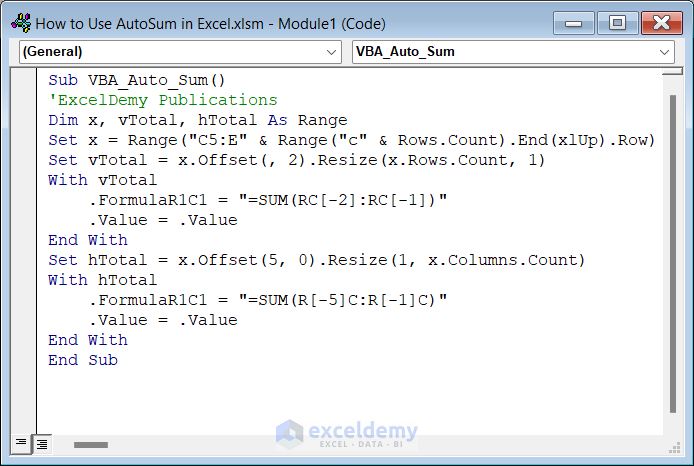
VBA Code Breakdown
- Firstly, we create a new procedure Sub in the worksheet using the below statement
Sub VBA_Auto_Sum()- Secondly, we declare variables as
Dim x, vTotal, hTotal As Range- Thirdly, we set x to a specific range and vTotal to a range.value
Set x = Range("C5:E" & Range("c" & Rows.Count).End(xlUp).Row)
Set vTotal = x.Offset(, 2).Resize(x.Rows.Count, 1)- Now, with vTotal we applied the R1C1 formula
With vTotal
    .FormulaR1C1 = "=SUM(RC[-2]:RC[-1])"
.Value = .Value- After that, we set hTotal
Set hTotal = x.Offset(5, 0).Resize(1, x.Columns.Count)- Again, with hTotal we applied the R1C1 formula
With hTotal
    .FormulaR1C1 = "=SUM(R[-5]C:R[-1]C)"
.Value = .Value- Finally, we end the Sub of the VBA macro as
End With
End Sub- Press the F5 key to run the VBA code.
- Finally, you will get the sum of all your columns and rows.

Download Practice Workbook
You can download the workbook used for the demonstration from the download link below.
Conclusion
These are all the steps you can follow in Excel to use AutoSum. Hopefully, you can now easily create the needed adjustments. I sincerely hope you learned something and enjoyed this guide. Please let us know in the comments section below if you have any queries or recommendations.
Related Articles
- How to AutoSum Horizontally in Excel
- How to Calculate Percentage Using AutoSum in Excel
- How to Autosum Time in Excel
- [Solved!] Excel AutoSum Is Not Working and Returns 0
- How to Turn Off AutoSum in Excel
<< Go Back to Autosum in Excel | Sum in Excel | Calculate in Excel | Learn Excel
Get FREE Advanced Excel Exercises with Solutions!
