Method 1 – Numbers Stored as Text in Excel
Solution 1: Use Error Warning to Convert to Number
Steps:
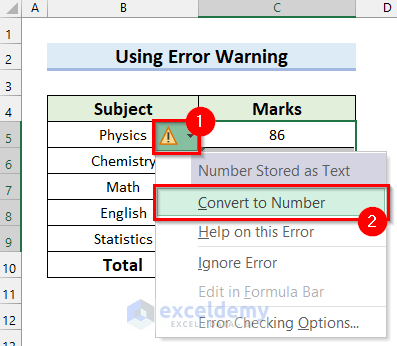
- Select the cells where the numbers are stored as text. We selected the cell range C5:C9.
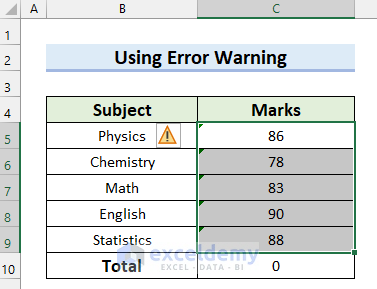
- Click the Error Warning.
- Select Convert to Number.
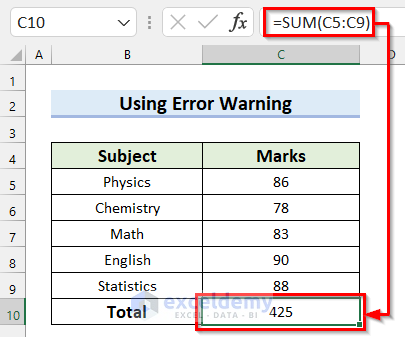
- See that the numbers are stored as numbers. The AutoSum is working correctly and returns the correct result.
Solution 2: Apply Mathematical Operations
Steps:
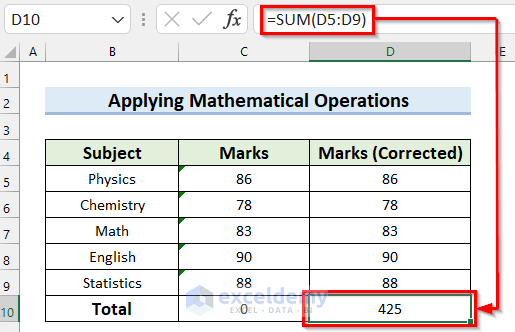
- Make a column where you will convert the numbers.
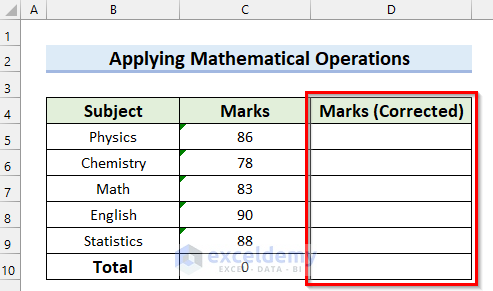
- Select the first cell of that column. We selected cell D5.
- In cell D5 write the following formula.
=C5*1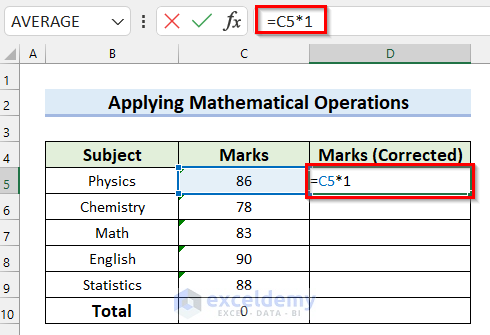
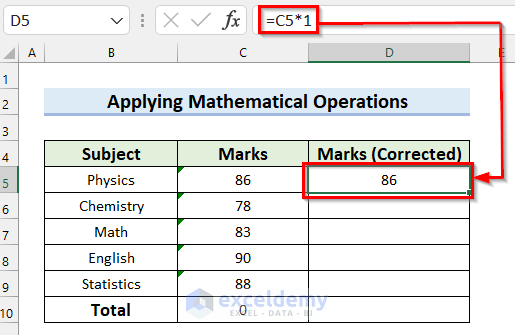
- Press Enter to convert it to a number.
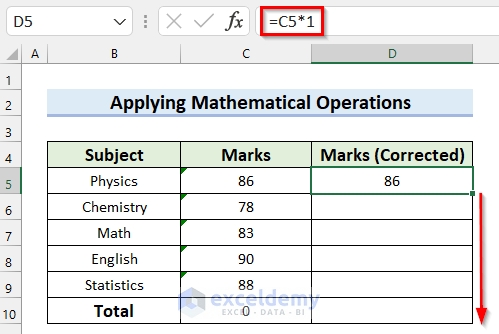
- Drag the Fill Handle down to copy the formula to the other cells.
- You will see that you have copied the formula to the other cells and got your desired output.
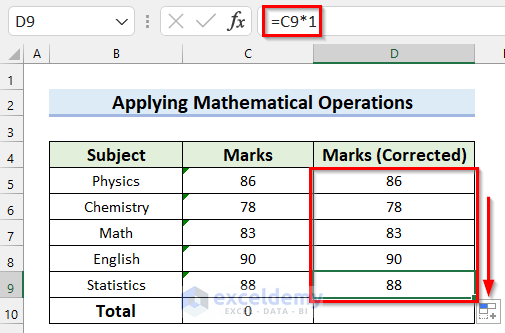
- You will see that the AutoSum is working and returns the correct result for this range.
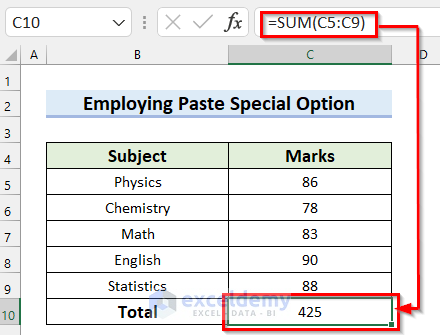
Solution 3: Employ Paste Special Option
Steps:
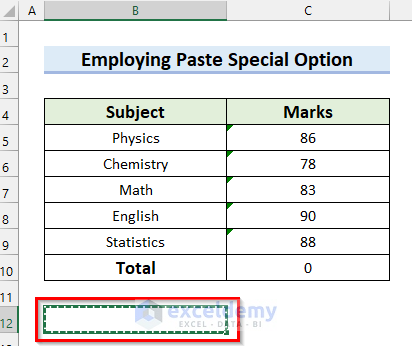
- Select a blank cell from the worksheet. We selected cell B12.
- Copy the cell by pressing Ctrl + C on your keyboard.
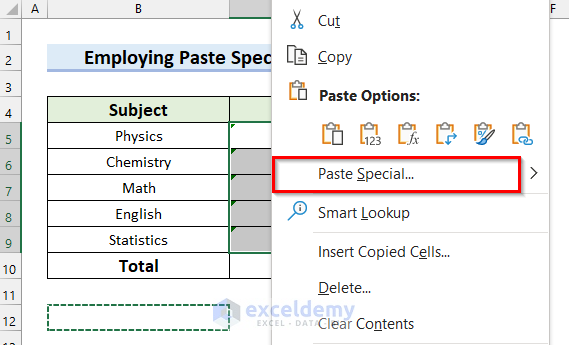
- Select the cells where you want to convert the numbers.
- Right-Click on the selected cells.
- Select Paste Special.
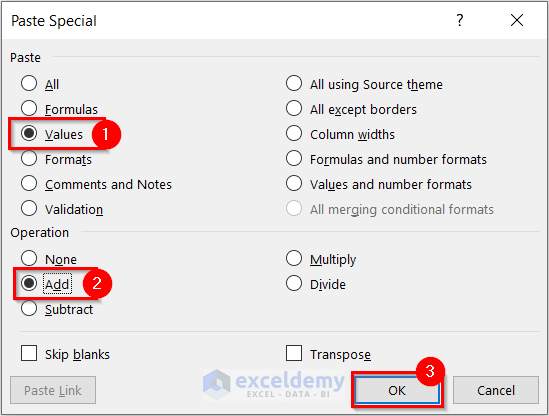
- The Paste Special dialog box will appear.
- Select Values from Paste.
- Select Add.
- Select OK.
- You will see that the numbers are converted, and the AutoSum is working.
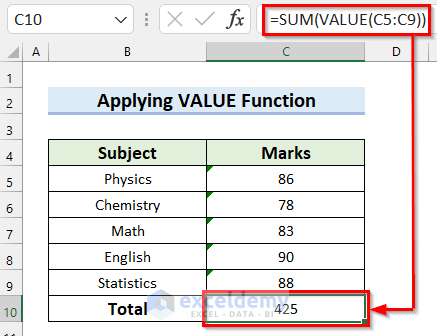
Solution 4: Apply VALUE Function
Steps:
- Select the cell where AutoSum is not working and returns 0. We selected cell C10.
- In cell C10 write the VALUE function in the AutoSum like the following formula.
=SUM(VALUE(C5:C9))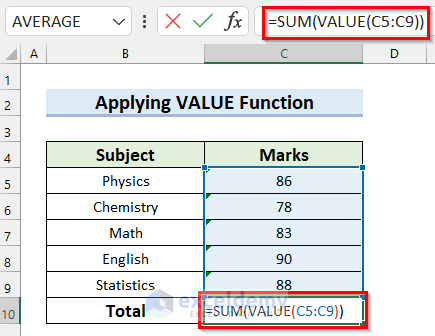
- Press Enter to see that the formula works and returns the correct result.
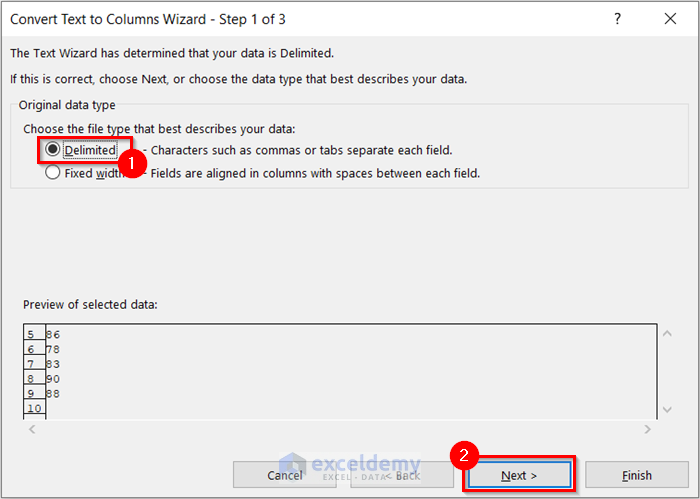
Solution 5: Use Text to Columns Wizard
Steps:
- Select the cells where the numbers are stored as text.
- Go to the Data tab.
- Select Text to Columns.
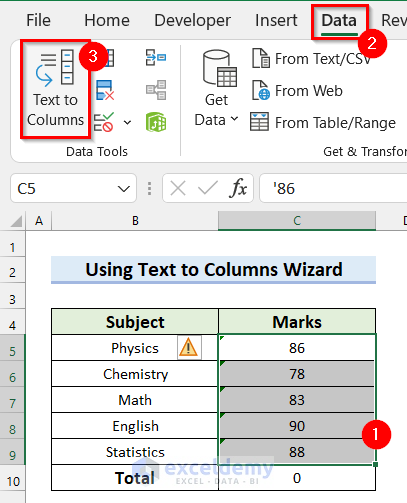
- Convert Text to Columns Wizard – Step 1 of 3 will appear.
- Make sure Delimited is selected.
- Select Next.
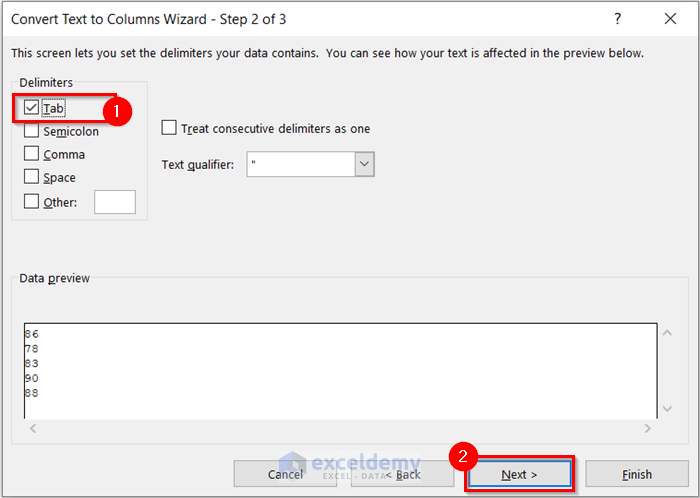
- Convert Text to Columns Wizard – Step 2 of 3 will appear.
- Check Tab from Delimiters.
- Select Next.
- The Convert Text to Columns Wizard – Step 3 of 3 will appear.
- Select General.
- Select Finish.
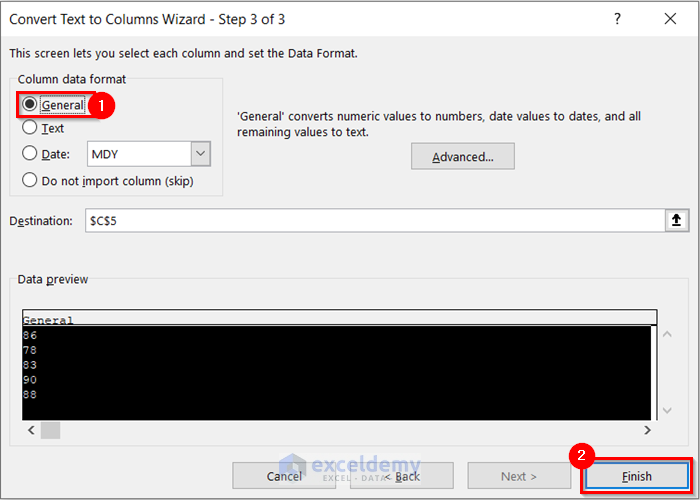
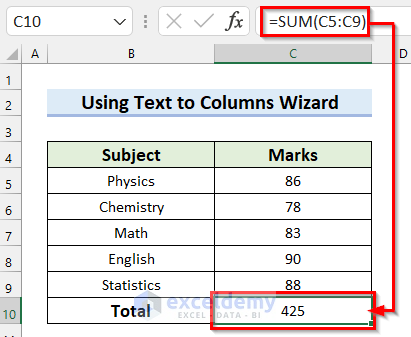
- You will see that you have converted the numbers, and the AutoSum is working and returning the correct result.
Method 2 – Non-Numeric Characters in Number
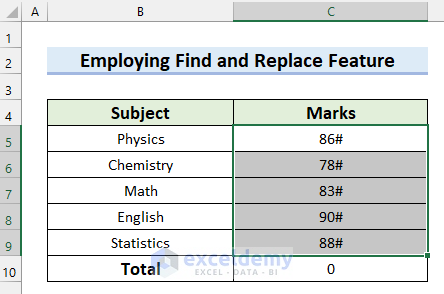
The second reason Excel AutoSum is not working and returns 0 is that it enters non-numeric characters in numbers. If you enter a non-numeric character in a number intentionally or by mistake, the number is converted to text. In the following image, you can see that I have entered the Number Sign (#) in the numbers. The AutoSum is not working here and returns 0. Now, I will show you how you can solve this problem.

Solution: Employ Find and Replace Feature
Steps:
- Select the cells where you have entered the non-numeric character with numbers.
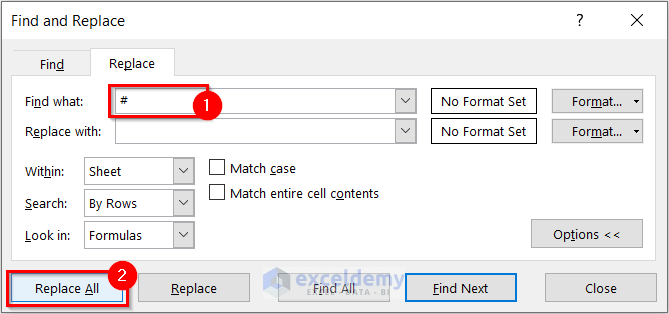
- Press Ctrl + H from your keyboard, and the Find and Replace dialog box will appear.
- Write the non-numeric character you want to remove in the Find What section. We wrote the Number Sign (#).
- Leave the Replace with section blank.
- Select Replace All.
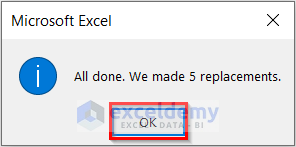
- Another dialog box will appear, showing how many replacements you have done.
- Select OK.
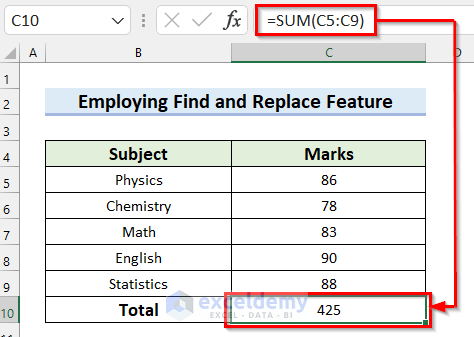
- You will see that the non-numeric characters are removed, and the AutoSum is working properly.
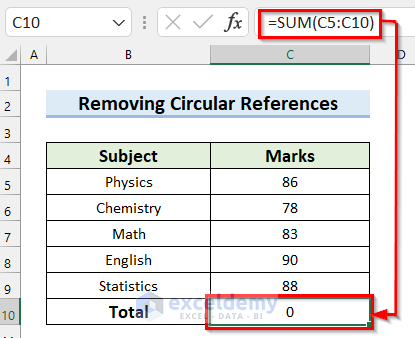
Method 3 – Circular References in AutoSum
Circular References in Excel occur when a formula refers to its own cell. Circular References is another reason Excel AutoSum is not working and returns 0. In the following picture, you can see that the numbers have no errors in them. The AutoSum is returning 0. Circular References can be the reason here.
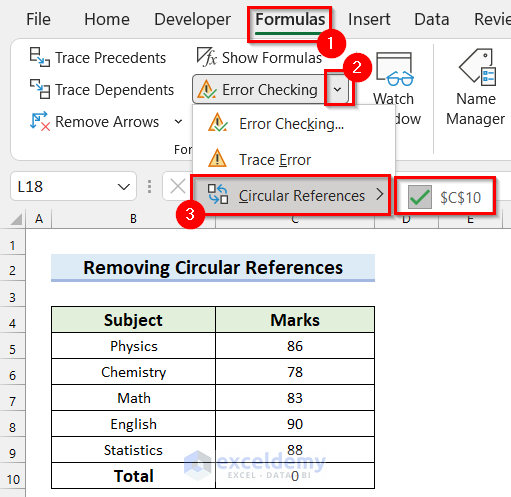
Let’s see how you can check for Circular references.
- Go to the Formulas tab.
- Select the drop-down option for Error Checking.
- Select Circular References.
- You will be able to see the cells that are causing the Circular References. Cell C10 is causing the error.
Solution: Remove Circular References
Steps:
- Select the cell where the AutoSum is not working and returns 0.
- Remove the cell that is causing the error. We removed cell C10 and got the following formula.
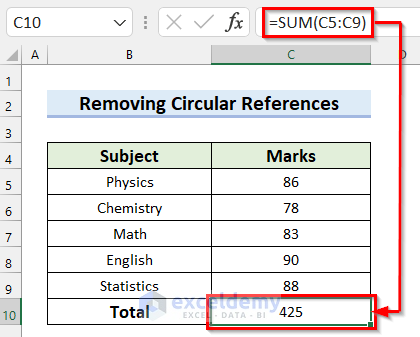
=SUM(C5:C9)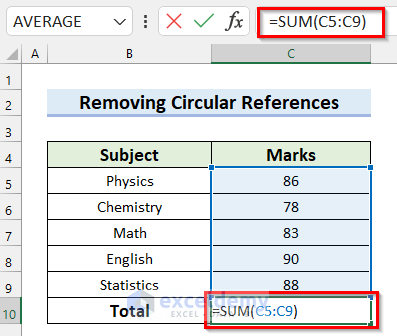
- Press Enter to see that the AutoSum works and returns the proper result.
Download Practice Workbook
You can download the practice workbook from here.
Related Articles
- How to AutoSum Horizontally in Excel
- How to Calculate Percentage Using AutoSum in Excel
- How to Autosum Time in Excel
- How to Turn Off AutoSum in Excel
<< Go Back to Autosum in Excel | Sum in Excel | Calculate in Excel | Learn Excel
Get FREE Advanced Excel Exercises with Solutions!
