Reference a Table with ListObject Property
When writing VBA code, ListObjects are essential for referring to Excel tables. These tables can be created and deleted using the VBA LISTOBJECTS functionality. However, working with Excel Tables can be challenging for beginners and even intermediate users. To effectively reference Excel tables, it’s crucial to have a solid understanding of Tables in Excel when coding in VBA.
For example, to select an entire table in an Excel worksheet, you can use the following VBA code:
ActiveSheet.ListObjects("Table_ref_1").Range.SelectIn this code snippet, “Table_ref_1” represents the name of the table in our dataset.
Before you proceed, ensure that the Developer tab is visible on your ribbon. The examples discussed here apply to Microsoft Office 365, but you can adapt them to other versions as well.
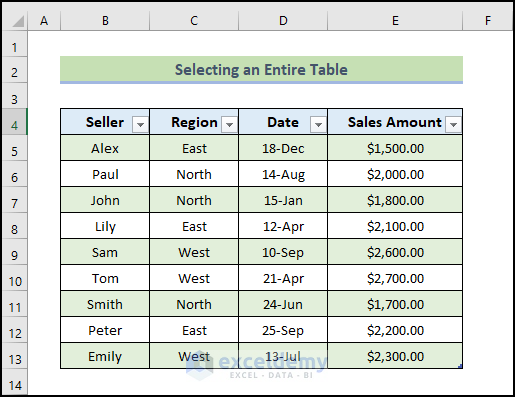
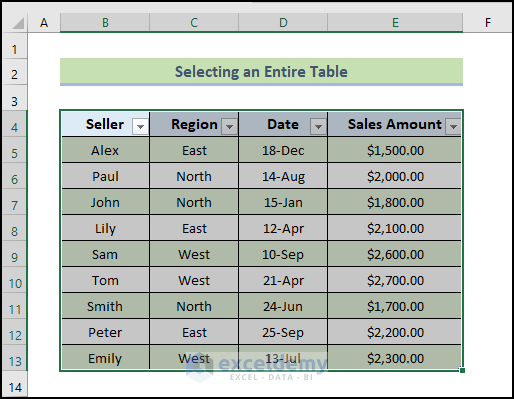
Example 1 – Select an Entire Table
For demonstration purposes, we will use the following dataset for all examples.
Steps:
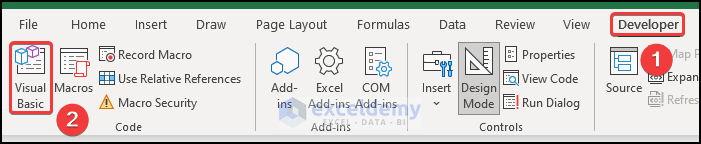
- Open the VBA window by going to the Developer tab and selecting Visual Basic from the Code group.
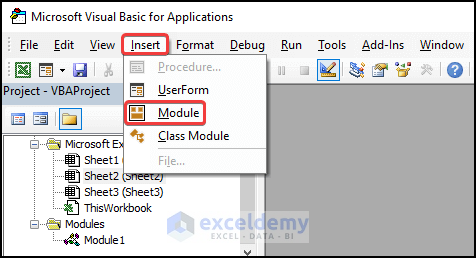
- Create a new module by clicking Insert and choosing Module from the drop-down.
- Enter the following code in the new module:
Sub Select_whole_Table()
ActiveSheet.ListObjects("Table_ref_1").Range.Select
End Sub- Save the code.
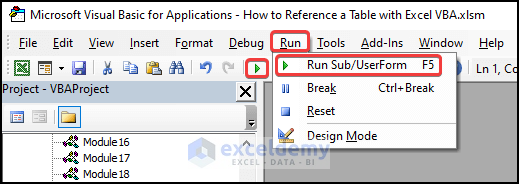
- Press F5 on your keyboard or select Run and click on Run Sub/UserForm from the menu bar. Alternatively, click the small Play icon in the sub-menu bar to run the macro.
Result: This will select the entire table as shown below.
Note: Please note that all 20 examples share the same steps. The only differences occur in the VBA code written for the new module and the resulting outcomes. For brevity, this tutorial will only highlight these variations starting from Example 2.
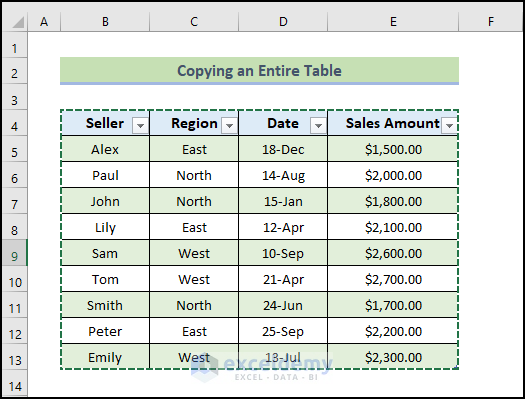
Example 2 – Copy an Entire Table
- Enter the following code in the new module:
Sub copy_whole_Table()
ActiveSheet.ListObjects("Table_ref_18").Range.Copy
End Sub
Result: This will copy the Entire table as shown below.
Example 3 – Referencing a Column of a Table
- Enter the following code in the new module:
Sub ReferenceEntireColumn()
ActiveSheet.ListObjects("Table_ref").ListColumns("Seller").Range.Select
End Sub
Result: This will select the entire column of the specified table.

Example 4 – Getting a Value from a Cell from a Table
- Enter the following code in the new module:
Sub get_Value()
Dim Table1 As ListObject
Set Table1 = ActiveSheet.ListObjects("Table_ref_2")
Set Value = Table1.DataBodyRange.Columns(1).Find("Sam", LookAt:=xlWhole)
MsgBox Value
End Sub
Result: This will display the value found in the specified cell.

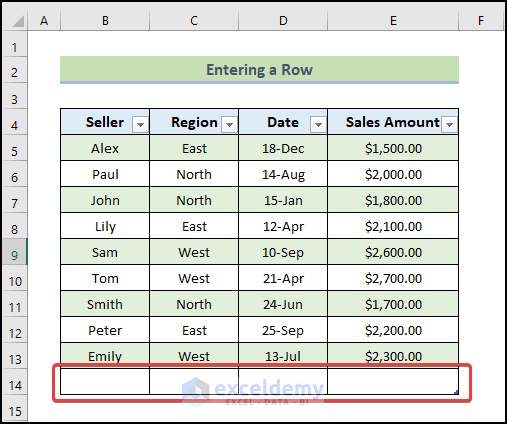
Example 5 – Entering a New Row
- Enter the following code in the new module:
Sub Entering_row()
Dim Table1 As ListObject
Set Table1 = ActiveSheet.ListObjects("Table_ref_3")
Table1.ListRows.Add
End Sub
Result: This will insert a new row into the specified table.
Read More: Excel VBA Code for Each Row in a Table
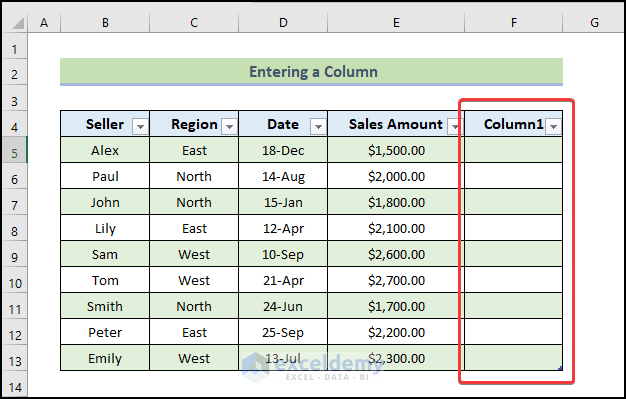
Example 6 – Adding a New Column
- Enter the following code in the new module:
Sub Entering_Column()
Dim Table1 As ListObject
Set Table1 = ActiveSheet.ListObjects("Table_ref_4")
Table1.ListColumns.Add
End Sub
Result: This will add a new column to the existing table.
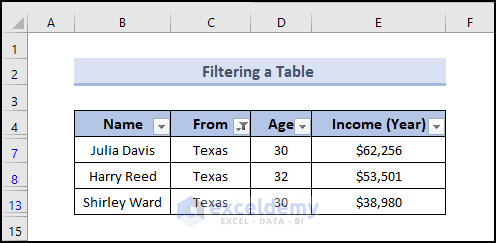
Example 7 – Filtering a Table
We’ll use the following dataset for this example:

- Enter the following code in the new module:
Sub Select_AutoFiltered_VisibleRows_NewSheet()
 ActiveSheet.ListObjects("Table_25").Range.AutoFilter _
    Field:=2, Criteria1:="=Texas"
End Sub
Result: This will filter the table based on the Texas text.
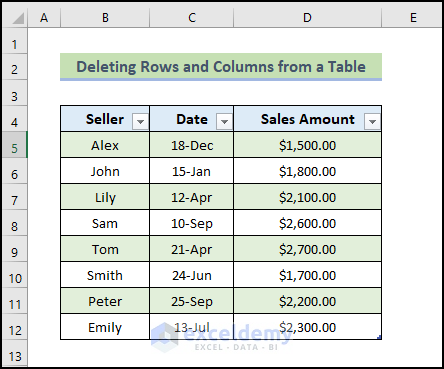
Example 8 – Deleting Rows and Columns from a Table
- Enter the following code in the new module:
Sub delete_row_column()
ActiveSheet.ListObjects("Table_ref_9").ListRows(2).Delete
ActiveSheet.ListObjects("Table_ref_9").ListColumns(2).Delete
End Sub
Result: This will delete rows and columns from the specified table.
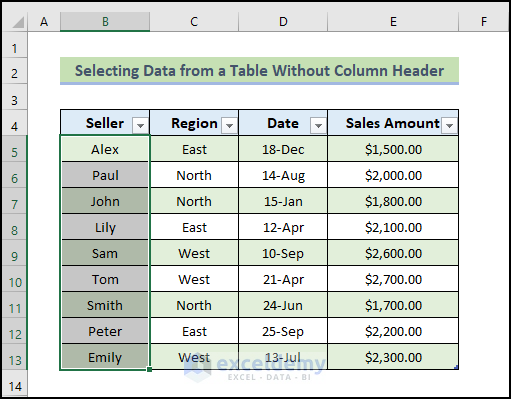
Example 9 – Selecting Data from a Table Without Column Header
- Enter the following code in the new module:
Sub ReferenceEntireColumnWithoutHeader()
ActiveSheet.ListObjects("Table_ref_6").ListColumns("Seller").DataBodyRange.Select
End Sub
Result: This will select data from a table without a column header as shown below.
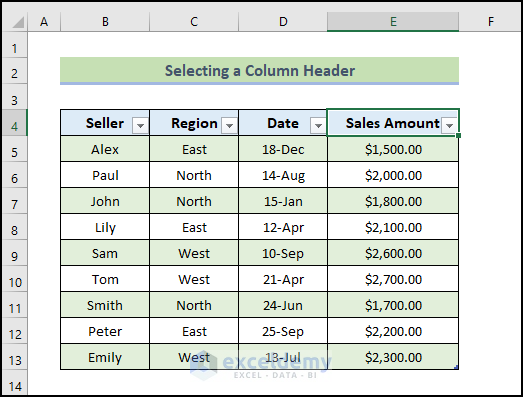
Example 10 – Selecting a Column Header
- Enter the following code in the new module:
Sub Selecting_Column_Header()
ActiveSheet.ListObjects("Table_ref_7").HeaderRowRange(4).Select
End Sub
Result: This will select a column header as shown below.
Read More: How to Create a Table with Headers Using Excel VBA
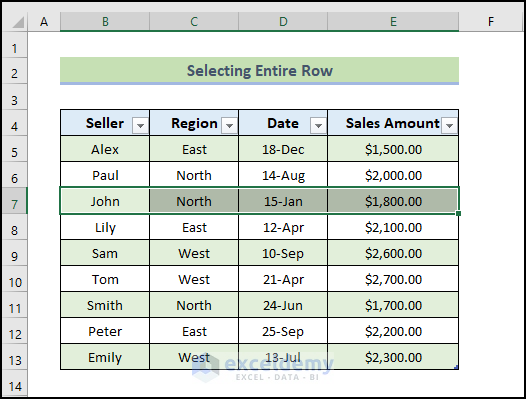
Example 11 – Select Entire Row
- Enter the following code in the new module:
Sub Selecting_row_entire()
ActiveSheet.ListObjects("Table_ref_8").ListRows(3).Range.Select
End Sub
Result: This will select an entire row as shown below.
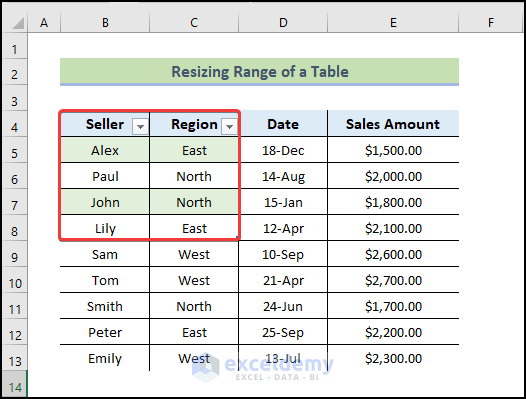
Exercise 12 – Resize Range of a Table
- Enter the following code in the new module:
Sub resize()
Dim Table1 As ListObject
Set Table1 = ActiveSheet.ListObjects("Table_ref_5")
Dim Rng As Range
Set Rng = Range("B4:C8")
Table1.Resize Rng
End Sub
Result: This will resize the range of a table as shown below.
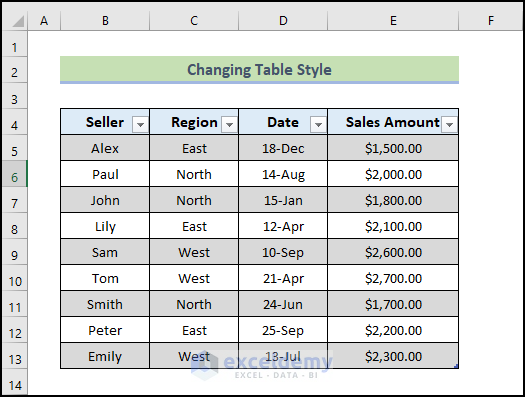
Exercise 13 – Changing Table Style
- Enter the following code in the new module:
Sub ChangingTable1_Style()
ActiveSheet.ListObjects("Table_ref_12").TableStyle = "TableStyleLight15"
End Sub
Result: This will change the table style as shown below.
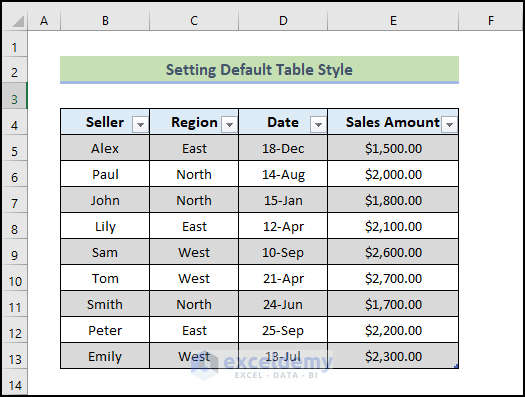
Exercise 14 – Set Default Table Style
- Enter the following code in the new module:
Sub Setting_Default_Table1_Style()
ActiveWorkbook.DefaultTableStyle = "TableStyleMedium2"
End Sub
Result: This will set the default table style as shown below.
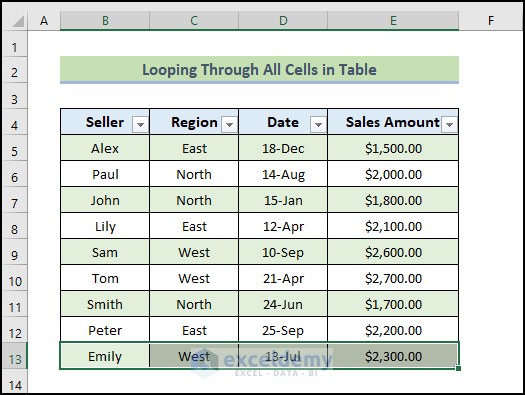
Exercise 15 – Loop Through All Cells in a Table
- Enter the following code in the new module:
Sub Loopingthrough()
Dim Table1 As ListObject
Set Table1 = ActiveSheet.ListObjects("Table_ref_14")
For i = 1 To Table1.ListRows.Count
    Table1.ListRows(i).Range.Select
Next i
End Sub
Result: This will loop through all cells in the table as shown below.
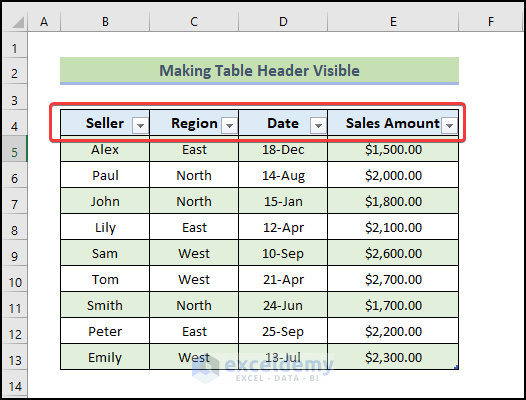
Exercise 16 – Make Table Header Visible
- Enter the following code in the new module:
Sub Table_header_visible()
ActiveSheet.ListObjects("Table_ref_15").ShowHeaders = True
End Sub
Result: This will make the table header visible as shown below.
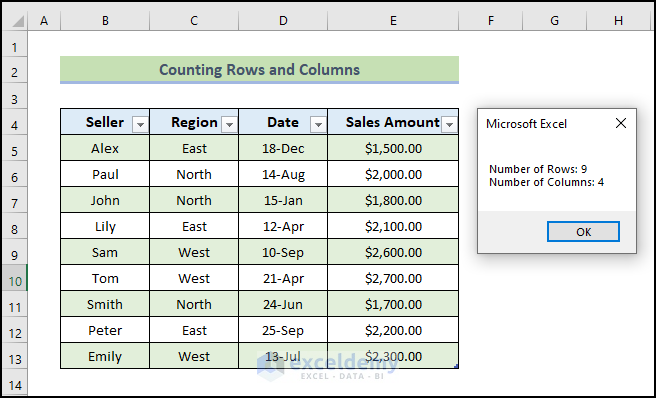
Exercise 17 – Counting Rows and Columns
- Enter the following code in the new module:
Sub counting_rows_columns()
 rowNumber = ActiveSheet.ListObjects("Table_ref_16").ListRows.Count
columnNumber = ActiveSheet.ListObjects("Table_ref_16").ListColumns.Count
MsgBox "Number of Rows: " & rowNumber & vbCrLf & _
        "Number of Columns: " & columnNumber
End Sub
Result: This will count rows from a table as shown below.
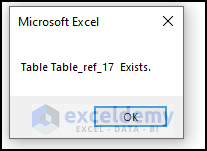
Exercise 18 – Check If There Is Any Table in the Worksheet
- Enter the following code in the new module:
Sub Checking_If1_Table1_Exists()
Dim ws1 As Worksheet
Dim tbl1 As ListObject
Dim tbl1Name As String
Dim tbl1Exists As Boolean
tbl1Name = "Table_ref_17"
For Each ws1 In ActiveWorkbook.Worksheets
    For Each tbl1 In ws1.ListObjects
        If tbl1.Name = tb1lName Then
            tb1lExists = True
        End If
    Next tbl1
Next ws1
If tbl1Exists = True Then
    MsgBox "Table " & tb1lName & " Doesn’t Exists."
Else
    MsgBox "Table " & tbl1Name & " Exists."
End If
End Sub
Result: This will check if there is any table in the worksheet as shown below.
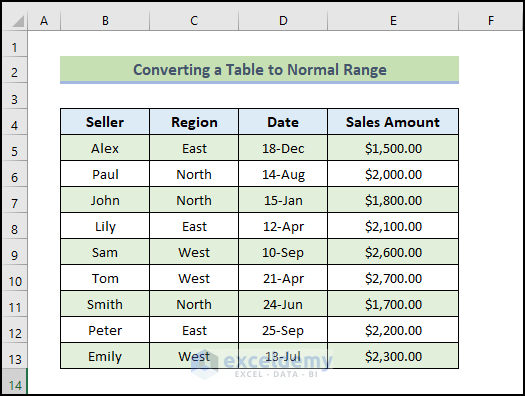
Exercise 19 – Convert a Table to Normal Range
- Enter the following code in the new module:
Sub Converting_Table1_To_NormalRange()
ActiveSheet.ListObjects("Table_ref_11").Unlist
End Sub
Result: This will convert a table to a normal range as shown below.
Read More: Excel VBA to Create Table from Range
Exercise 20 – Delete a Table
- Enter the following code in the new module:
Sub delete_table_entire()
Dim Table1 As ListObject
Set Table1 = ActiveSheet.ListObjects("Table_ref_10")
Table1.Delete
End Sub
Result: This will delete a table as shown below.
Download Practice Workbook
You can download the practice workbook from here:

