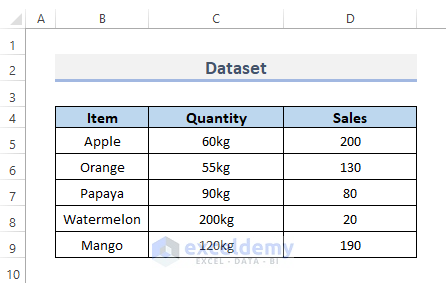
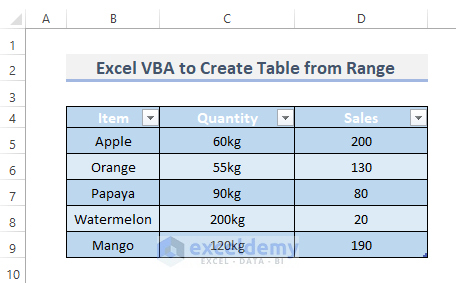
This is the sample dataset.
- Choose ListObjects.Add to turn a range into an Excel table.
The criteria for .Add are the following:
expression .Add(SourceType, Source, LinkSource, HasHeaders,Destination)
Use the SourceType xlSrcRange.
Example 1 – Create a Table from Range Using Excel VBA
STEPS:
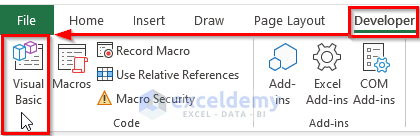
- Go to the Developer tab.
- Click Visual Basic to open Visual Basic Editor or press Alt + F11. You can also right-click the sheet and select View Code.
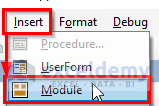
- Go to Insert and select Module. The visual basic window will open.
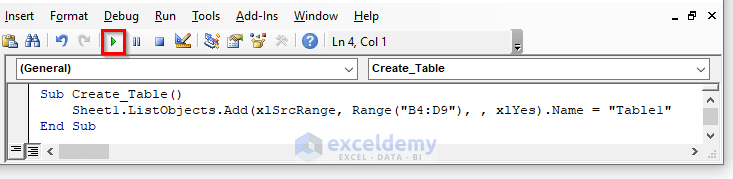
- Create a Module, copy and paste the VBA code below.
VBA Code:
Sub Create_Table()
    Sheet1.ListObjects.Add(xlSrcRange, Range("B4:D9"), , xlYes).Name = "Table1"
End Sub- Run the code by clicking on the RunSub button or pressing F5.
Don’t change the code. Change the range only.
- A table will be created from range B4:D9.
VBA Code Breakdown
Sub Create_Table()Sub names the procedure as Create_Table().
Sheet1.ListObjects.Add(xlSrcRange, Range("B4:D9"), , xlYes).Name = "Table1"This is the main code line that converts the range into a table. Use xlSrcRange as a source type. Name your table as Table1.
End SubRead More: How to Create a Table with Headers Using Excel VBA
Example 2 – Create a Table from Range Using Excel VBA
STEPS:
- Go to the Developer tab on the ribbon.
- Click on Visual Basic to open Visual Basic Editor or press Alt + F11. You can also right-click on the sheet and select View Code.
- Go to Insert and select Module. The visual basic window will open.
- Copy and paste the VBA code below.
VBA Code:
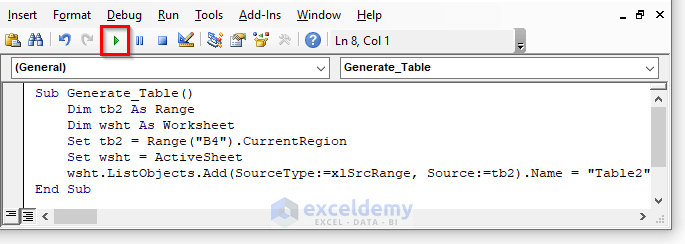
Sub Generate_Table()
    Dim tb2 As Range
    Dim wsht As Worksheet
    Set tb2 = Range("B4").CurrentRegion
    Set wsht = ActiveSheet
    ws.ListObjects.Add(SourceType:=xlSrcRange, Source:=tb2).Name = "Table2"
End Sub- Press F5 or click Run Sub to run the code.
VBA Code Breakdown
Dim tb2 As Range
Dim wsht As Worksheet
DIM in VBA refers to “declare,” and is used to declare a variable. We declare our range to tb2 and sheet to ws.
Set tb2 = Range("B4").CurrentRegion
Set wsht = ActiveSheet
VBA Set avoids having to type the range repeatedly when running the code. You set the range to your current region and your sheet to active.
wsht.ListObjects.Add(SourceType:=xlSrcRange, Source:=tb2).Name = "Table2"Use this code to create the table from range and name it Table2.
Example 3 – Create a Table from Range with VBA in Excel
STEPS:
- Select the whole range to convert into a table.
- Go to the Developer tab.
- Click Visual Basic to open the Visual Basic Editor or press Alt + F11. You can also right-click the sheet and select View Code.
- Go to Insert and select Module. The visual basic window will open.
- Copy and paste the VBA code below.
VBA Code:
Sub Create_Table3()
    Dim r As Range
    Dim wsht As Worksheet
    Dim tb3 As ListObject
    Set r = Selection.CurrentRegion
    Set wsht = ActiveSheet
    Set tb3 = wsht.ListObjects.Add(SourceType:=xlSrcRange, Source:=r, XlListObjecthasheaders:=x1Yes)
End Sub- Press F5 to run the code.
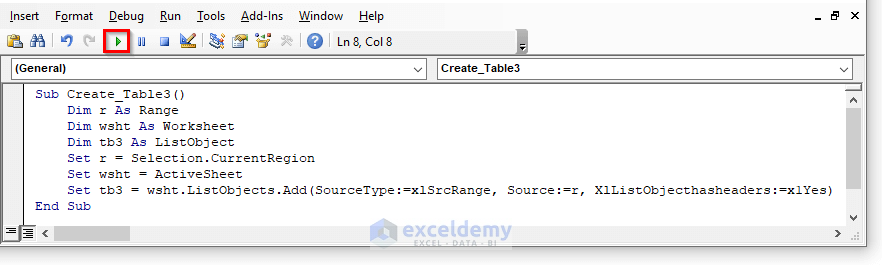
A table is created from the data range.
Example 4 – Use VBA to Create a Dynamic Table from Rangecode
STEPS:
- Go to the Developer tab.
- Click Visual Basic to open the Visual Basic Editor or press Alt + F11. You can also right-click the sheet and select View Code.
- Go to Insert and select Module. The visual basic window will open.
- Copy and paste the following VBA code.
VBA Code:
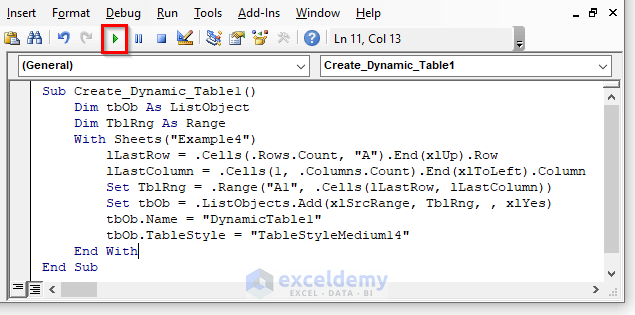
Sub Create_Dynamic_Table1()
    Dim tbOb As ListObject
    Dim TblRng As Range
    With Sheets("Example4")
        lLastRow = .Cells(.Rows.Count, "A").End(xlUp).Row
        lLastColumn = .Cells(1, .Columns.Count).End(xlToLeft).Column
        Set TblRng = .Range("A1", .Cells(lLastRow, lLastColumn))
        Set tbOb = .ListObjects.Add(xlSrcRange, TblRng, , xlYes)
        tbOb.Name = "DynamicTable1"
        tbOb.TableStyle = "TableStyleMedium14"
    End With
End Sub- Press F5 to run the code.
VBA Code Breakdown
Sub Create_Dynamic_Table1()Indicates the name of the subprocedure.
Dim tbOb As ListObject
Dim TblRng As Range
Declares variables.
With Sheets("Example4")The With statement is used to make a sequence of statements on a single object without having to rename objects. It is enclosed in the name of the sheet.
lLastRow = .Cells(.Rows.Count, "A").End(xlUp).Row
lLastColumn = .Cells(1, .Columns.Count).End(xlToLeft).Column
Identifies the last row and the last column.
Set TblRng = .Range("A1", .Cells(lLastRow, lLastColumn))Sets the range to create the table.
Set tbOb = .ListObjects.Add(xlSrcRange, TblRng, , xlYes)Creates a table in the specified range.
tbOb.Name = "DynamicTable1"Names the table
tbOb.TableStyle = "TableStyleMedium14"Specifies table style.
Example 5 – Create a Dynamic Table from Range
STEPS:
- Go to the Developer tab.
- Click Visual Basic to open the Visual Basic Editor or press Alt + F11. You can also right-click the sheet and select View Code.
- Go to Insert and select Module. The visual basic window will open.
- Copy and paste the following VBA code.
VBA Code:
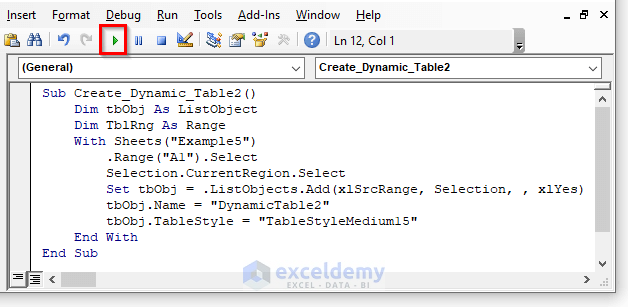
Sub Create_Dynamic_Table2()
    Dim tbObj As ListObject
    Dim TblRng As Range
    With Sheets("Example5")
        .Range("A1").Select
        Selection.CurrentRegion.Select
        Set tbObj = .ListObjects.Add(xlSrcRange, Selection, , xlYes)
        tbObj.Name = "DynamicTable2"
        tbObj.TableStyle = "TableStyleMedium15"
    End With
End Sub- Press F5 to run the code.
Example 6 – Use Excel VBA to Create a Dynamic Table from Range
STEPS:
- Go to the Developer tab.
- Click Visual Basic to open the Visual Basic Editor or press Alt + F11. You can also right-click the sheet and select View Code.
- Go to Insert and select Module. The visual basic window will open.
- Copy and paste the following VBA code.
VBA Code:
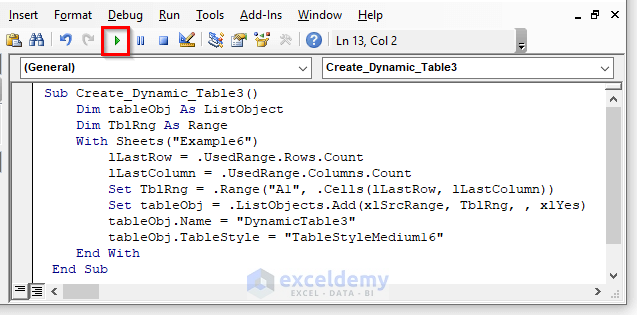
Sub Create_Dynamic_Table3()
    Dim tableObj As ListObject
    Dim TblRng As Range
    With Sheets("Example6")
        lLastRow = .UsedRange.Rows.Count
        lLastColumn = .UsedRange.Columns.Count
        Set TblRng = .Range("A1", .Cells(lLastRow, lLastColumn))
        Set tableObj = .ListObjects.Add(xlSrcRange, TblRng, , xlYes)
        tableObj.Name = "DynamicTable3"
        tableObj.TableStyle = "TableStyleMedium16"
    End With
End Sub- Press F5 to run the code.
Download Practice Workbook
Related Articles
- Excel VBA Code for Each Row in a Table
- Reference Table Column by Name with VBA in Excel
- How to Use Table Reference with Excel VBA
- Excel VBA: Insert Data into Table


What’s the difference between ‘Table’ and ‘Dynamic Table’? I thought Tables were dynamic by default?
Hello Mervyn,
Thanks for visiting our blog and sharing your questions. You wanted to clarify the difference between a Table and a Dynamic Table.
Table and Dynamic table may look similar but they are not same.
In the context of the article,
Regular Table – is created manually by the user within Excel’s interface.
Dynamic Table – is generated automatically using VBA code.
When data is turned into a table, Excel automatically adds functions like sorting, filtering, and structured referencing. These tables are dynamic and adjust automatically when the data changes.
But a Dynamic Table in the article’s context likely refers to a table created dynamically using VBA code from a range. It is able to automatically manage specific criteria or changes.
Regards
ExcelDemy