In this article, we are going to discuss the Excel COS function, its uses, how to use it with degrees, COS square, why COS 90 is not zero, and how to fix it when it returns wrong outputs.
The COS function is used to determine the cosine of angles in Excel. By default, the COS function accepts the angles in radians. However, with the help of the other functions, you can insert angles both in radians as well as degrees. After finishing this article you will know everything about the COS function.

The above screenshot is an overview of the article, representing a few applications of the COS function in Excel. You’ll learn more about the methods along with the other functions to use the COS function precisely in the following sections of this article.
Introduction to the COS Function
- Function Objective:
The COS function is used to determine the cosine of angles in Excel.
- Syntax:
COS(number)
- Arguments Explanation:
| Argument | Required/Optional | Explanation |
|---|---|---|
| number | Required | Angle in radians to calculate the cosine of the given angle. |
- Return Parameter:
Cosine value of the given angles.
How to Use the COS Function in Excel: 2 Examples
Depending on the input values, the usage of the COS function falls into two main categories. The first one is input angles in radians which is the default angle metric for the COS function. The second one is angled in degrees. In the following sections, we will discuss both of the categories one by one.
We will also discuss the COS function in Excel VBA. So, without having any further discussion, let’s jump straight into all of the examples one by one.
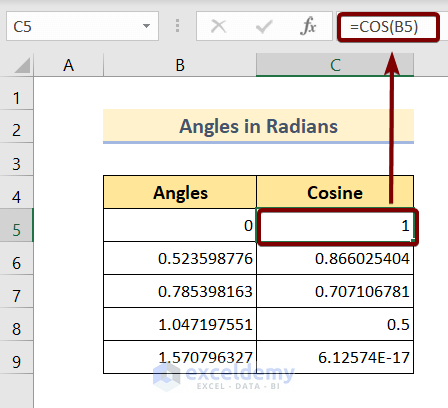
1. Use COS Function in Excel for Angles in Radians
When you want to insert angles in radians, then the usage of the COS function is super easy. Because the COS function can work with the angles in radians by default. Anyways follow the steps below to see how to use the COS function for angles in radians.
🔗 Steps:
❶ Select cell C5 ▶ to store the formula result.
❷ Then enter the formula:
=COS(B6)❸ Now press the ENTER button ▶ to execute the formula.
❹ Finally, finish the whole process the dragging the Fill Handle icon to the end of the Cosine column.
That’s all you need to do. Anyways, when you are done with all the steps mentioned above, you will see the end result as in the picture below:
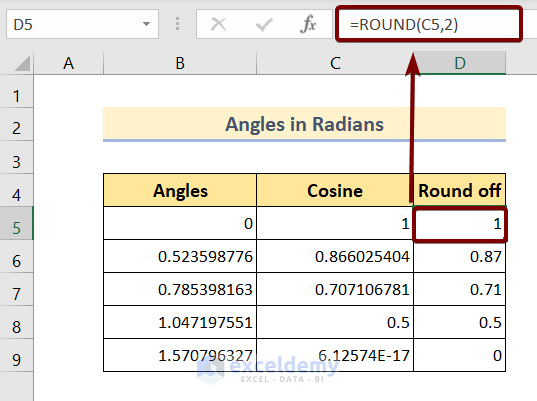
As we can see in the above picture, the cosine of the given angles is long fraction values. It’s not always convenient to use.
So, if you want you can trim those long numbers into your own convenience using the ROUND function. All you need to do is:
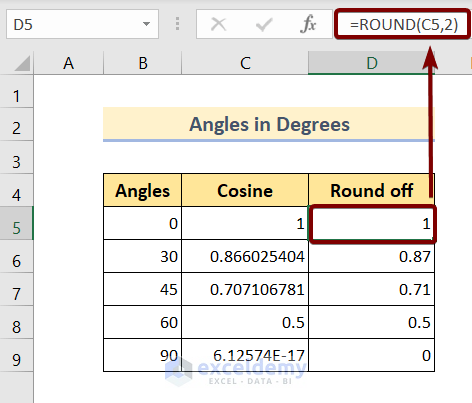
❶ Select cell D5 ▶ to store the formula result.
❷ Then enter the formula:
=ROUND(C5,2)❸ Now press the ENTER button ▶ to execute the formula.
❹ Finally, finish the whole process the dragging the Fill Handle icon to the end of the Cosine column.
That’s all you need to do. Anyways, when you are done with all the steps mentioned above, you will see the end result as in the picture below:
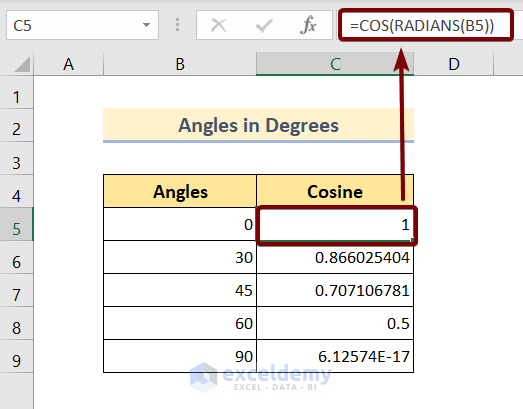
2. Use COS Function in Excel for Angles in Degrees
When you have angles in degrees, then to calculate the cosine of the angles you have to perform some extra task. That is to convert the angle from degree to radian. As COS function accepts only angles in radians.
So we can convert the angles in degrees in two different ways. The first one is using the RADIAN function. This is a built-in function inside Microsoft Excel that you can convert angles in degrees into angles in radians within a bleak of an eye.
Now the below steps will guide you to do so.
🔗 Steps:
❶ Select cell C5 ▶ to store the formula result.
❷ Then enter the formula:
=COS(RADIANS(B5))❸ Now press the ENTER button ▶ to execute the formula.
❹ Finally, finish the whole process the dragging the Fill Handle icon to the end of the Cosine column.
That’s all you need to do. Anyways, when you are done with all the steps mentioned above, you will see the end result as in the picture below:
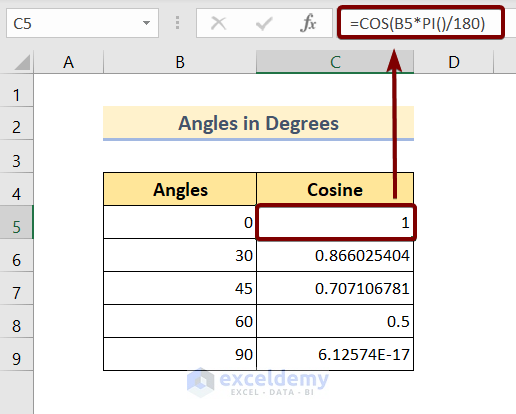
Alternative Conversion Method
There’s another way to convert the angles in degrees into angles in radians. All you need to do is multiply the angles with PI()/180. Lemme show you the whole process step by step:
🔗 Steps:
❶ Select cell C5 ▶ to store the formula result.
❷ Then enter the formula:
=COS(B5*PI()/180)❸ Now press the ENTER button ▶ to execute the formula.
❹ Finally, finish the whole process the dragging the Fill Handle icon to the end of the Cosine column.
That’s all you need to do. Anyways, when you are done with all the steps mentioned above, you will see the end result as in the picture below:
As we can see in the above picture, the cosine of the given angles is long fraction values. It’s not always convenient to use.
So, if you want you can trim those long numbers into your own convenience using the ROUND function. All you need to do is:
❶ Select cell D5 ▶ to store the formula result.
❷ Then enter the formula:
=ROUND(C5,2)❸ Now press the ENTER button ▶ to execute the formula.
❹ Finally, finish the whole process the dragging the Fill Handle icon to the end of the Cosine column.
That’s all you need to do. Anyways, when you are done with all the steps mentioned above, you will see the end result as in the picture below:
Read More: How to Use Excel COS Function with Degrees
Things to Remember
📌 The COS function expects the angles in radians.
📌 For the angles in degrees, you must convert the angles into radians either by using the RADIAN function or multiplying the angle with PI()/180.
Download the Practice Workbook
You are recommended to download the Excel file and practice along with it.
Conclusion
To sum up, we have discussed everything there is to know about the Excel COS function in this article. You are recommended to download the practice workbook attached along with this article and practice all the methods with that. And don’t hesitate to ask any questions in the comment section below. We will try to respond to all the relevant queries asap.
COS Function in Excel: Knowledge Hub
- Why Cos 90 Is Not Equal to Zero in Excel
- Cos Squared in Excel (Both Degrees and Radians)
- [Solved]: Excel COS Function Is Returning Wrong Output?
<< Go Back to Excel Functions | Learn Excel
Get FREE Advanced Excel Exercises with Solutions!
