The double-headed arrow in Excel serves two purposes: it represents resizing and adjustment of columns or rows, and it can also be used for scrolling within a sheet.
You can use this arrow as a symbol or shape to illustrate relationships between two or more objects.
![]()
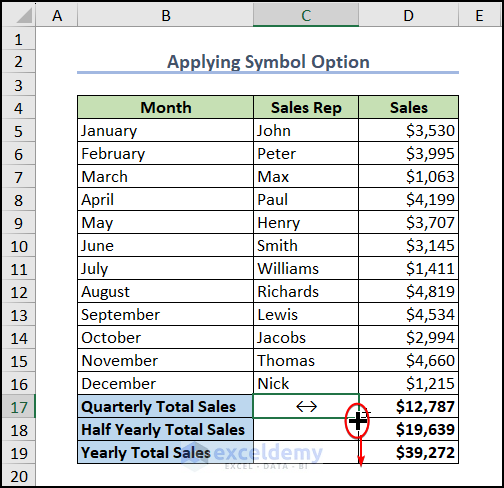
Method 1 – Using the Symbol Option from Insert Tab
- Choose the cell where you want to insert the arrow.
- Go to the Insert tab in the Excel ribbon.
- Look for the Symbols option and click on it.

- In the Symbol window, select the Arrows subset. Pick the double-headed arrow that suits your needs.
- Click the Insert button.
![]()
- The arrow will now appear in your selected cell, indicating the relationship between two cells.
- You can also drag the Fill Handle tool to apply the arrow to other cells.
![]()
Read More: How to Add Up and Down Arrows in Excel
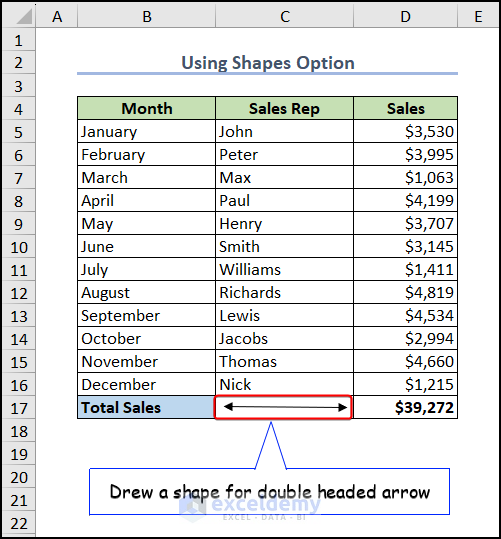
Method 2 – Using the Shapes Feature
- Choose the cell where you want to place the arrow.
- Navigate to the Insert tab.
- Look for the Shapes option in the Illustrations group.
- From the Lines section, select the double-headed arrow shape.
![]()
- Use the Format Shapes options to adjust the arrow’s size, color, shape, and font. This method allows greater flexibility in modifying the arrow’s appearance.
Read More: How to Insert Trend Arrows Based on Another Cell in Excel
Method 3 – Using a Special Font
- Go to the Home tab in the Excel ribbon.
- Look for the Windings 3 font in the Font group.
- Set the font size to 14.
- Simply type the letter n on your keyboard. Excel will automatically insert a double-headed arrow using the chosen font.
![]()
Remember that while the first two methods provide built-in shapes and customization options, the third method relies on font characters for the arrow. Choose the method that best suits your needs!
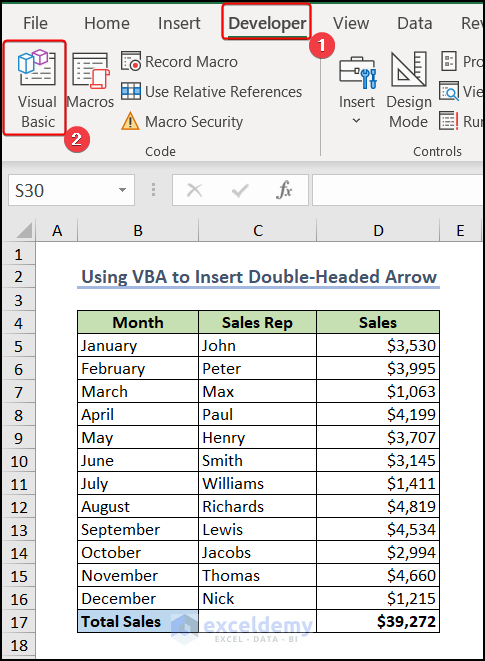
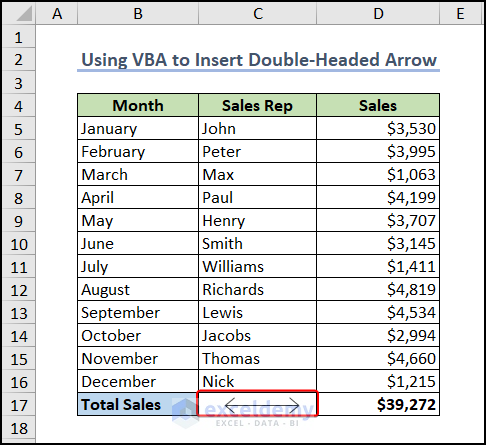
Method 4 – Using VBA Code to Insert a Double-Headed Arrow
VBA (Visual Basic for Applications) code can simplify your work and automate processes. To use VBA macros for inserting a double-headed arrow, follow these steps:
- Hover over the Developer tab in Excel.
- Choose Visual Basic to open the Visual Basic Editor window.
- In the Visual Basic Editor, go to the Insert tab.
- Select Module to create a new module (e.g., Module1).
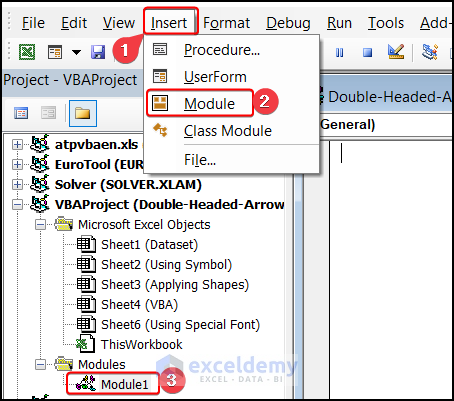
- Enter the following code in the Module:
![]()
Sub AddDoubleHeadedArrowToCell()
    Dim ws As Worksheet
    Set ws = ActiveSheet
    Dim cell As Range
    Set cell = ws.Range("C17")
    Dim cellCenterX As Double
    cellCenterX = cell.Left + (cell.Width / 2)
    Dim cellCenterY As Double
    cellCenterY = cell.Top + (cell.Height / 2)
    Dim shape As shape
    Set shape = ws.Shapes.AddLine(cellCenterX, cellCenterY, cellCenterX + 50, cellCenterY)
    shape.Line.ForeColor.RGB = RGB(0, 0, 0)
    shape.Line.EndArrowheadStyle = msoArrowheadOpen
    shape.Line.EndArrowheadLength = msoArrowheadLengthMedium
    shape.Line.EndArrowheadWidth = msoArrowheadWide
    shape.Line.BeginArrowheadStyle = msoArrowheadOpen
    shape.Line.BeginArrowheadLength = msoArrowheadLengthMedium
    shape.Line.BeginArrowheadWidth = msoArrowheadWide
End Sub
Code Breakdown
-
- This VBA sub-procedure adds a double-headed arrow to a specific cell (e.g., C17) in the Excel sheet.
- It calculates the center of the cell where the arrow starts and extends it 50 units horizontally.
- The arrow is black, with medium-length and wide arrowheads.
- Press F5 to execute the VBA code.
- The double-headed arrow will appear in the selected cell.
Read More: How to Add Trend Arrows in Excel
Where Do You Find Double Headed Arrows in Excel? (2 Examples)
1. Increase/Decrease Column Width
- Hover over the edge of a column.
- When you see the double-headed arrow cursor, drag it rightward to increase column width or leftward to decrease it.
![]()
2. Scroll Your Cursor
- Excel has both vertical and horizontal scrollbars.
- Use the vertical scrollbar to move the page up or down and the horizontal scrollbar to move left or right within a worksheet.
![]()
The above image shows the default scrollbars in the Excel window for moving your cursor vertically or horizontally within a worksheet. However, if your dataset is large, you can create a customized vertical or horizontal scrollbar in Excel.
Read More: How to Insert Curved Arrow in Excel
Frequently Asked Questions
- I cannot find the double-headed arrow to resize the column/row. What could be the reason?
- If the spreadsheet is protected, the double-headed arrow may not appear, and you won’t be able to adjust column or row sizes. In this case, unprotect the sheet.
- Over zooming your spreadsheet might hide the double-headed arrow. Try expanding the view to see if it becomes visible.
- Some older Excel versions may lack the double-headed arrow feature. Consider using the latest Microsoft 365 version.
- What is the function of the two-headed arrow cursor in Excel?
- The double-headed arrow serves multiple purposes:
- It allows you to modify column width.
- You can scroll using the cursor.
- It can also be used to create symbols or shapes that represent relationships between different elements.
- The double-headed arrow serves multiple purposes:
- What is a double-headed arrow called?
- The double-headed arrow is commonly referred to as the “resonance arrow.” It signifies two or more arrows resonating with each other.
- Can we hide the double-headed arrow in Excel?
- The double-headed arrow is a built-in feature for resizing cells and cell groups. Unfortunately, you cannot hide it.
- However, if you don’t want to see individual column boundaries, you can disable gridlines display in Excel.
- Can we use the double-headed arrow to resize multiple rows or columns simultaneously?
- Yes! You can resize multiple rows or columns at once using the double-headed arrow:
- Select the rows or columns you want to adjust.
- Hover your mouse over the boundary until the double-headed arrow appears.
- Click and drag the border to resize all the selected rows or columns together.
- Yes! You can resize multiple rows or columns at once using the double-headed arrow:
Things to Remember
- When choosing a shape or symbol, consider its alignment with the chart’s purpose. For instance, if you’re comparing two data sets, select a shape that clearly represents the difference between them.
- Keep the double-headed arrow simple and easy to understand at a glance. Avoid overly complex shapes that might confuse readers.
Download Practice Workbook
You can download the practice workbook from here:
Related Articles
- How to Use Blue Line with Arrows in Excel
- Up and Down Arrows in Excel Using Conditional Formatting
- How to Show Tracer Arrows in Excel
- How to Remove Tracer Arrows in Excel
<< Go Back to Arrows in Excel | Excel Symbols | Learn Excel
Get FREE Advanced Excel Exercises with Solutions!
