
Image by Editor | Midjourney
Product listing is essential to manage a business. An interactive product catalog allows users to dynamically search, filter, and browse products. Excel is a great tool for cataloging, as it uses dynamic formulas, drop-downs, filters, slicers, etc. In this tutorial, we will create interactive product catalogs in Excel.
Consider a small e-commerce business selling electronic accessories that requires interactive product catalogs in Excel to search products, filter by category, check stock status, and so on.
Step 1: Set Up the Product Database
1.1. Create a Product List Table
- Create a new worksheet in Excel.
- Insert your business-relevant product columns with relevant details such as:
- Product ID
- Product Name
- Category
- Price
- Stock Status
- Image (optional)
- Description
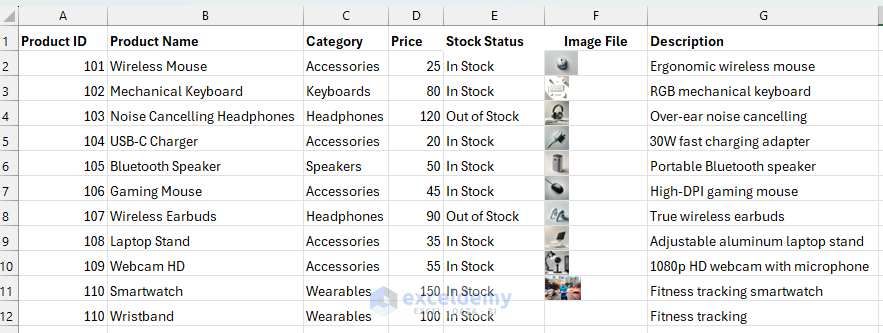
1.2. Convert Data into a Table
Convert your data into a table. It is easier to filter, sort, and apply conditional formatting in a table.
- Select the entire dataset (including headers).
- Go to the Insert tab >> select Table.
- Check “My table has headers” and click OK.

Output:

Step 2: Create a Search Function
To allow users to search by product name:
- Create a new sheet and name it Category.
- Select a cell and label it “Search Product:”.
- In cell B1, users can enter a search term.
- Select cell A3 and insert the following formula.
Formula:
=FILTER(ProductTable[[Product Name]:[Stock Status]], ISNUMBER(SEARCH(B1, ProductTable[Product Name])), "No Match Found")
This formula filters only products that contain the search term of B1 cell then it will return the product information. You will get details of the Product Name, Category, Price, and Stock Status of that search value.

Step 3: Add Drop-Down List
3.1. Add Drop-Down for Category
To filter products by category you can add a drop-down list.
- Select a cell and label it “Select Category:”.
- Click on F2 >> go to the Data tab >> select Data Validation.
- In Validation Criteria,
- In Allow filed >> choose List
- In the Source field >> insert the following formula to generate a unique list of categories.
=OFFSET(Products!$C$2, 0, 0, COUNTA(Products!$C$2:$C$11), 1)
This drop-down list will show the unique category list to select.

3.2. Add Drop-Down for Stock Status
- Click on F4 >> go to the Data tab >> select Data Validation.
- In Validation Criteria,
- In Allow filed >> choose List
- In the Source field >> insert the following formula to generate a unique list of stock status from another sheet:
=OFFSET(Products!$E$2, 0, 0, COUNTA(Products!$E$2:$E$11), 1)
This drop-down list will show the unique stock status list to select.

Step 4: Display Filtered Products Dynamically
You can select a value from the drop-down list to display the particular products.
- Select a section in the Catalog Sheet where filtered results will be displayed.
- Label column headers.
- You can use dynamic formulas to filter product lists based on drop-down values.
4.1. Use the FILTER Function to Dynamically Filter Data
- Select cell H2 and insert the following formula.
Formula:
=FILTER(ProductTable, (ProductTable[Category] = F2) * (ProductTable[Stock Status] = F4), "No products found")
This formula will display only the products that match the both category and stock status.
- F2 is the selected category and F4 is the selected stock status from the drop-down
- If both conditions don’t match, it displays “No products found”.
Now, selecting a category and status dynamically filters relevant products.

4.2. Apply Conditional Formatting for Stock Status
Highlight out-of-stock items for better visibility.
- Select the Stock Status column.
- Go to the Home tab >> from Conditional Formatting >> select New Rule.
- Choose “Use a formula to determine which cells to format”.
- Enter the formula:
=$L4="Out of Stock"
- Click Format >> select a Fill Color >> select OK.

Final Output:
Now, “Out of Stock” products will appear highlighted in peach color.

Step 5: Insert Slicers for Interactivity
- Go to the Product table >> click inside the product table.
- Go to the Insert tab >> select Slicer.
- Select Category and Stock Status >> click OK.
- Arrange the slicers in the Product sheet for easy filtering.
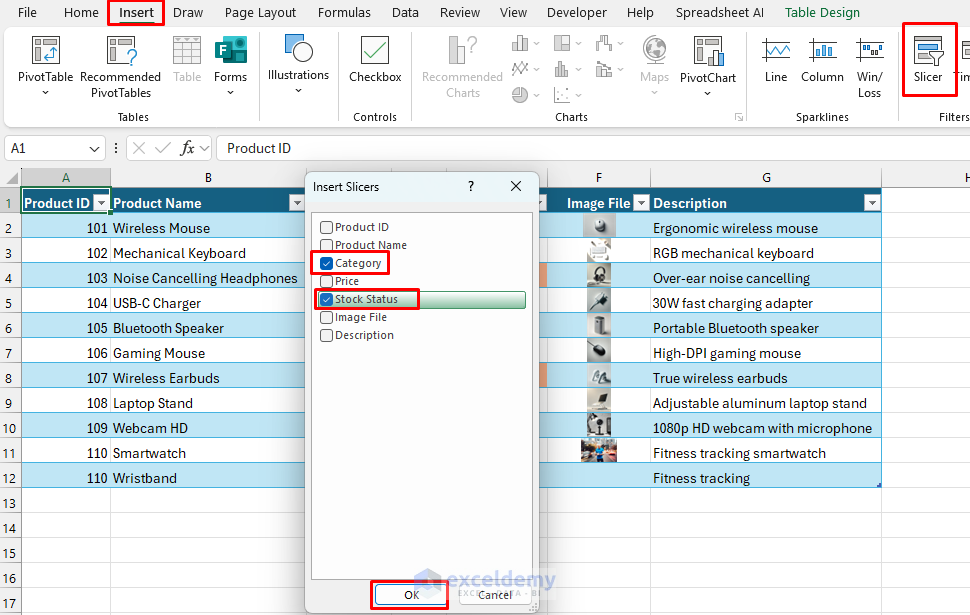
Slicers allow users to click buttons instead of using drop-downs.

- Select a Category and In Stock from the slicer to filter the product table.

Conclusion
By following the above steps, you can create interactive product catalogs in Excel. This product catalog supports dynamic filtering, searching, live product display, etc. Based on your requirements you can customize this product catalog. This solution is perfect for small businesses, e-commerce stores, or inventory tracking. You can manage your inventory without any paid software.
Get FREE Advanced Excel Exercises with Solutions!
