
Google Sheets API is a powerful tool to build web apps. You can use a simple frontend that interacts with Google Sheets using the Google Sheets API by using HTML, and JavaScript. In this article will show how to build a web app with a simple frontend using Google Sheets API.
Step 1: Enable Google Sheets API
Sign in to Google Cloud Console
- Go to Google Cloud Console.
- Log in with your Google account.
Create a New Project
- From the Project Dropdown at the top left (next to “Google Cloud”) >> select New Project.
- Enter a Project Name.
- Click Create.

To Open API Library:
- In the Cloud Console, go to APIs & Services >> select Library.
Search for Google Sheets API:
- Type Google Sheets API in the search bar.
- Click on it and then click Enable.

Set Up API Credentials:
- Go to the APIs & Services >> select Credentials.
- Click on Create Credentials >> select API key from the dropdown.

- Copy the API key to use it in the script.

Step 2: Prepare Your Google Sheet
- Open your Google Sheets.
- Create a new sheet and add some sample data. We are using a task list with columns.
- Task ID
- Title
- Description
- Status
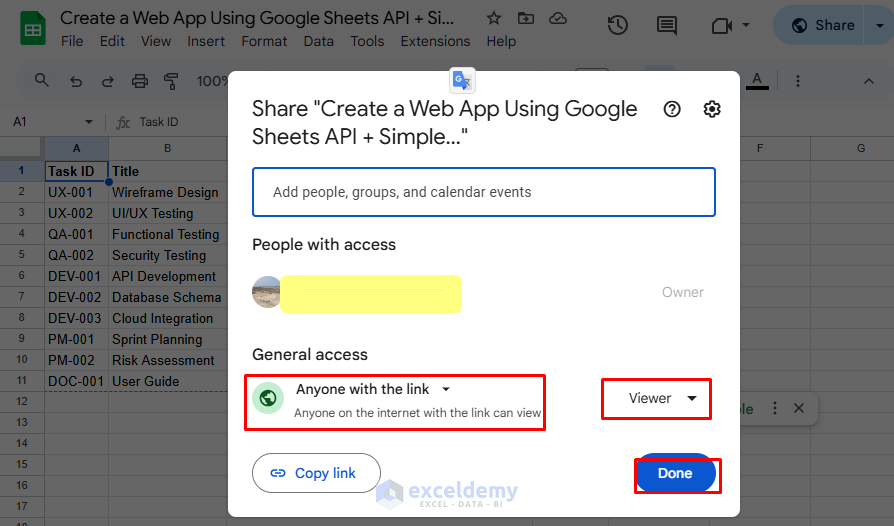
- Click on Share >> from General access;
- Set permissions to Anyone with the link.
- Set Role to Viewer.
- Click on Done.
- Copy the Spreadsheet ID from the URL (it’s the long string between /d/ and /edit).
https://docs.google.com/spreadsheets/d/your-spreadsheet-id/edit
Step 3: Setup the Simple Frontend
You can use any platform. Here we will use the vs code.
- Create an index.html file for the web app.
- Insert the following code in the editor.
index.html
<!DOCTYPE html>
<html lang="en">
<head>
    <meta charset="UTF-8">
    <meta name="viewport" content="width=device-width, initial-scale=1.0">
    <title>Google Sheets Web App</title>
    <style>
        body {
            font-family: Arial, sans-serif;
            margin: 20px;
            text-align: center;
        }
        h1 {
            color: #333;
        }
        button {
            background-color: #4CAF50;
            color: white;
            border: none;
            padding: 10px 15px;
            margin: 10px;
            cursor: pointer;
            font-size: 16px;
        }
        button:hover {
            background-color: #45a049;
        }
        table {
            width: 60%;
            margin: 20px auto;
            border-collapse: collapse;
            box-shadow: 0px 0px 10px rgba(0, 0, 0, 0.1);
        }
        th, td {
            border: 1px solid #ddd;
            padding: 12px;
            text-align: left;
        }
        th {
            background-color: #f4f4f4;
            color: #333;
        }
        tr:nth-child(even) {
            background-color: #fafafa;
        }
    </style>
</head>
<body>
    <h1>Task List</h1>
    <button onclick="fetchData()">Load Tasks</button>
    <table id="taskTable">
        <thead>
            <tr>
                <th>Task ID</th>
                <th>Title</th>
                <th>Description</th>
                <th>Status</th>
            </tr>
        </thead>
        <tbody id="taskList">
            <!-- Task rows will be populated here -->
        </tbody>
    </table>
    <script src="script.js"></script>
</body>
</html>
HTML Code Explanation:
- Defines a simple HTML page with a task list interface.
- Styling (<style> section):
- You can use different font types for better readability.
- Format the margins and alignment.
- Style the button for an intuitive UI.
- Style the table to display tasks with proper spacing and alternating row colors.
- Table (<table> tag):
- Include your Google Sheets headers: Task ID, Title, Description, Status.
- The <tbody> section (id=”taskList”) is where tasks fetched from Google Sheets are displayed dynamically.
- JavaScript File Inclusion (<script src=”script.js”>): This links an external script.js file that contains the logic to fetch and display tasks from Google Sheets.

JavaScript (script.js)
const API_KEY = "your-google-api-key";
const SHEET_ID = "your-spreadsheet-id";
const RANGE = "Sheet1!A:D";  // Adjust based on your sheet structure

async function fetchData() {
    const url = `https://sheets.googleapis.com/v4/spreadsheets/${SHEET_ID}/values/${RANGE}?key=${API_KEY}`;
    try {
        const response = await fetch(url);
        const data = await response.json();
        displayData(data.values);
    } catch (error) {
        console.error("Error fetching data: ", error);
    }
}

function displayData(rows) {
    const taskList = document.getElementById("taskList");
    taskList.innerHTML = "";
    rows.slice(1).forEach(row => {
        const tr = document.createElement("tr");
        row.forEach(cell => {
            const td = document.createElement("td");
            td.textContent = cell || "-";
            tr.appendChild(td);
        });
        taskList.appendChild(tr);
    });
}
JavaScript Code Explanation:
- API Configuration: Use your own Google Sheets API_KEY, SHEET_ID, and RANGE for accessing Google Sheets.
- fetchData() Function:
- Sends an HTTP GET request to Google Sheets API to retrieve task data.
- Calls displayData() to process and show the retrieved data.
- displayData(rows) Function:
- It clears existing table rows.
- Iterates over to fetched Google Sheets data and creates a table row (<tr>) for each task.
- Adds empty cell handling (if a value is missing, it replaces it with “-“).
- Real-time Updates: The script refreshes the task list dynamically every time fetchData() runs.

Step 4: Host the Web App Locally Using VS Code Live Server
As we are developing and testing our web app in VS Code, we will use the Live Server extension to run our project.
- Install Live Server Extension in VS Code (if not installed).
- Open index.html in the editor.
- Select the Go Live option from the bottom.

- Your web app will open in the browser at http://127.0.0.1:5500/ or a similar local URL.
- Select Load Tasks to load all the tasks from the Google Sheets.

Output:

Step 5: Deploy the Web App
You can use GitHub Pages, Netlify, or Vercel to host your app.
Using GitHub Pages:
- Create a GitHub repository and push your index.html and script.js files.
- Go to Settings >> select Pages in the repository.
- Set the source to main and save.
- Access your app via the provided GitHub Pages link.
Adding New Tasks to Google Sheets
To add a new task to the Google Sheets you will need to write permission for that you will need to use OAuth 2.0 Client ID.
Enable Write Permissions:
- Go to Google Cloud Console >> from APIs & Services >> select Credentials.
- Click Create Credentials >> select OAuth Client ID and follow the prompts to create a client ID (needed for write access).
- Update the OAuth consent screen to allow necessary permissions for Google Sheets.
Adjust Google Sheet Sharing Settings:
- Open your Google Sheet >> Click Share.
- Set permissions to Anyone with the link >> role Editor for app modifications.
Update the HTML and JavaScript:
- Add an input field for entering a new task.
- Add an “Add Task” button that triggers the script to send data to Google Sheets.
- To send data to Google Sheets API, use a POST request with valueInputOption=USER_ENTERED to append new tasks.
Advantages and Limitations of Google Sheets API
Advantages:
- Easy Integration: Google Sheets API offers easy ways to use spreadsheets as a database.
- No Hosting Required: As Google Sheets is cloud-based you won’t need a separate database server.
- Real-Time Updates: Offers auto update, if changes made in Google Sheets reflect instantly in the web app.
- Free for Small Projects: The API allows a reasonable number of requests without incurring costs.
- Accessible Anywhere: Data can be retrieved from any internet-connected device.
Limitations:
- Rate Limits: Google applies API charges, restricting the number of requests per minute.
- Security Concerns: If the sheet is publicly editable it increases the risk of unauthorized modifications.
- Scalability Issues: Not suitable for large-scale applications that require heavy database transactions.
- Dependency on Google Services: If Google Sheets or its API experiences downtime, the application will become unusable.
Conclusion
Following the above steps, you can create a web app with a simple frontend using Google Sheets API. This web app can interact with Google Sheets using the Google Sheets API. This app allows users to fetch tasks dynamically. Based on your requirement you can extend it further by adding features such as adding new tasks, deleting and updating tasks, authentication, or integrating it with other Google services.
Get FREE Advanced Excel Exercises with Solutions!
