In this article, we will demonstrate anchoring the comment boxes in Excel. Anchoring comment boxes in a specific location is a tricky task. In Excel 365, comments are replaced by Notes, and comments are shown in a thread. But in the earlier versions of Excel, this feature is known as Comment. Today, we will demonstrate 3 easy ways. Using these methods, you can anchor comment boxes in Excel.
Anchoring Comment Boxes in Excel: 3 Easy Ways
To explain the methods, we will use a dataset that contains comments about some employees of a company. We will try anchoring the comment boxes. You can see cells B10, D5, and D9 contain comments.

1. Anchoring Comment Boxes Using Excel Options
In the first method, we will anchor comment boxes using the Excel options. Generally, Excel doesn’t show the comments until you place the cursor on the small red flag in the cell. So, we need to display the comments first. The steps of this method are easy to implement. So, let’s follow the steps below to learn the method.
STEPS:
- In the first place, click on the File tab.
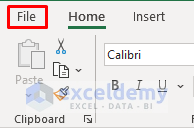
- Secondly, select Options from the bottom left corner of the screen. It will open the Excel Options window.

- In the Excel Options window, select Advanced.
- Then, go to the Display section and select the “Indicators and notes, and comments on hover” option.
- Click OK to proceed.

- As a result, you will see the comments on the worksheet.
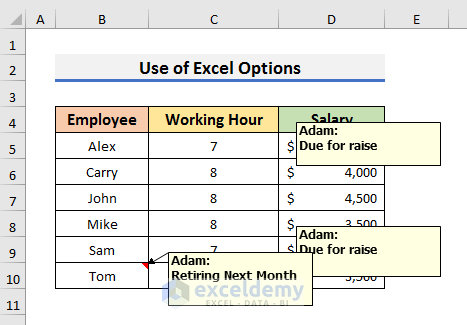
- At this moment, put the cursor on the top side of the comment box of Cell B10 and it will change into a four-headed arrow symbol with the cursor.
- Now, select the comment box and hold the Left Button of the mouse.

- After that, drag the comment box to the desired position and let go of the mouse button to anchor it.

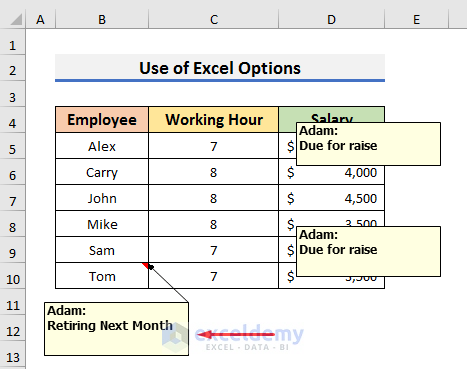
- As a result, you will see the comment box of cell B10 like in the picture below.
- Finally, you need to do the above steps for each comment box for anchoring.

2. Use Review Tab for Anchoring Comment Boxes in Excel
The second method is similar to the previous one. But here we will use the Review tab to display the comments. Here, we will use the same dataset. Let’s follow the steps below to figure out the method.
STEPS:
- Firstly, go to the Review tab and select Notes. A drop-down menu will appear.
- Select Show All Notes from there.
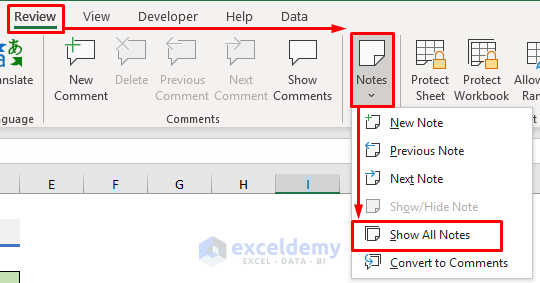
Note: In the earlier versions of Excel, you need to select the Show All Comments option from the Comments section in the Review tab.
- As a result, you will find the comments on the sheet.

- Now, follow the steps of Method 1 and anchor the comment boxes one by one.

3. Apply VBA for Anchoring All Comment Boxes in Excel
In the previous two methods, we anchored the comment boxes one after another. But, using VBA, we can anchor all the comment boxes at once. Again, we will use the same dataset. But, this time comments are already displayed. You can use Method 2 to display the comments.

Let’s follow the steps below to find out the results.
STEPS:
- First of all, go to the Developer tab and select Visual Basic. It will open the Visual Basic window.
- Alternatively, you can press Alt + F11 to open it.

- Secondly, select Insert >> Module in the Visual Basic window to open the Module box.

- Now, copy the code below and paste it into the Module box:
Sub Anchor_Comments()
Dim iComment As Comment
For Each iComment In Application.ActiveSheet.Comments
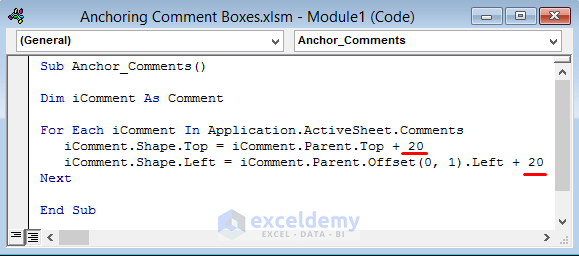
iComment.Shape.Top = iComment.Parent.Top + 20
iComment.Shape.Left = iComment.Parent.Offset(0, 1).Left + 20
Next
End Sub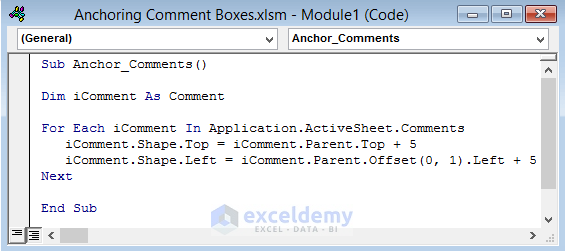
- Press Ctrl + S to save it.
- After that, go to the Developer tab and select Macros.

- Then, select the desired code in the Macro box and Run it.

- As a result, you will see the comment boxes at specific points from the cells.

- Now, if you want to change the position of the comment boxes, change the underlined numbers in the Module box.
- Here, we set a distance of 20 units from the top and left sides of the cells.
- Finally, after running the above code, you will see results like those in the picture below.

How to Change Size of Comment Boxes in Excel
In the last section, we will learn to change the size of comment boxes in Excel. Sometimes, we need to change the size of a comment box for bigger comments. We will describe the technique in the steps below.
STEPS:
- In the first place, put the cursor on the top side of the comment box and it will change into a four-headed arrow symbol with the cursor.
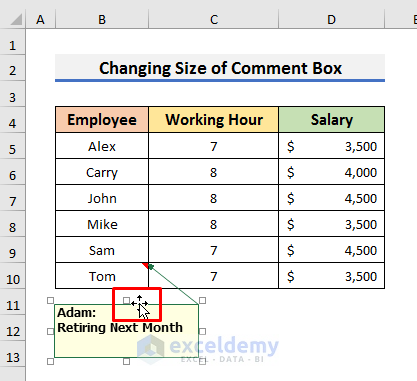
- Secondly, right-click to open the menu.
- Select Format Comment from there.

- In the Format Comment box, select Size and change the Height and Width according to your preferences.
- After that, click OK.

- Finally, you will be able to change the size of the comment box.

Read More: How to Format Comments in Excel
Download Practice Workbook
You can download the practice workbook from here.
Conclusion
In this article, we have demonstrated 3 ways of Anchoring Comment Boxes in Excel. I hope this article will help you to perform your tasks efficiently. Furthermore, we have also added the practice book at the beginning of the article. To test your skills, you can download it to exercise. If you have any suggestions or queries, feel free to ask in the comment section below.
Related Articles
- How to Copy Comments in Excel
- Vlookup to Copy Comments in Excel
- How to Make Flashcards in Excel
- How to Filter Cells with Comments in Excel
- How to Reply to a Comment in Excel
- How to Find Comments in Excel
- How to Read Full Comment in Excel
<< Go Back to Comments in Excel | Learn Excel
Get FREE Advanced Excel Exercises with Solutions!

thank you for the article
Dear Zidane,
Thanks for your appreciation.
Shamima | Project Manager | ExcelDemy