If you are looking for some special tricks to learn how to manage relationships in Excel, you’ve come to the right place. This article will discuss every step of managing relationships in Excel. Let’s follow the complete guide to learn all of this.
What Is Relationship in Excel?
When two separate tables are combined, a relationship is created:
You have to locate a column that is shared by both tables. The columns don’t have to share the same name, though. The new column must only include unique entries. Relational databases have several tables that form these kinds of connections. Using Excel’s Data Model option, you may create a basic relational structure. For Example, let’s say that the Date column is shared by both a Product Order data table and a Product Sales data database. You are not permitted to add that column to the new table since both tables have identical data in those columns. The Date column must be ignored.
Why Is It Important to Create Relationships in Excel?
Knowing something’s significance aids in understanding why you should use it. The data required to create a report cannot be contained in a single data table. It frequently occurs in numerous situations, which is why Excel relationship tables are necessary.
Using the aforementioned scenario, it is unlikely that a report about the individual who marked the Product order will be added to the Product Sales data database. To create a relationship between the tables Product Order and Product Sales, all that is required is the Product Order ID in order to extract the table’s name for use in the Product Sales report.
In the following section, we will use one effective and tricky method to manage relationships in Excel. Creating relationships in Excel is the first step, and then you’ll learn how to manage them, including editing auto-correct and adding and deleting relationships. This section provides extensive details on this method. You should learn and apply these to improve your thinking capability and Excel knowledge. We use the Microsoft Office 365 version here, but you can utilize any other version according to your preference.
Step 1: Prepare Dataset for Managing Relationships in Excel
Here, we will demonstrate how to manage relationships in Excel. The first step is to create relationships in Excel, and then we will show you how to manage them, which includes editing auto-correct and adding or deleting relationships. To create relationships in Excel, we have to follow some specified rules. At first, we want to make a dataset. To do this we have to follow the following rules.
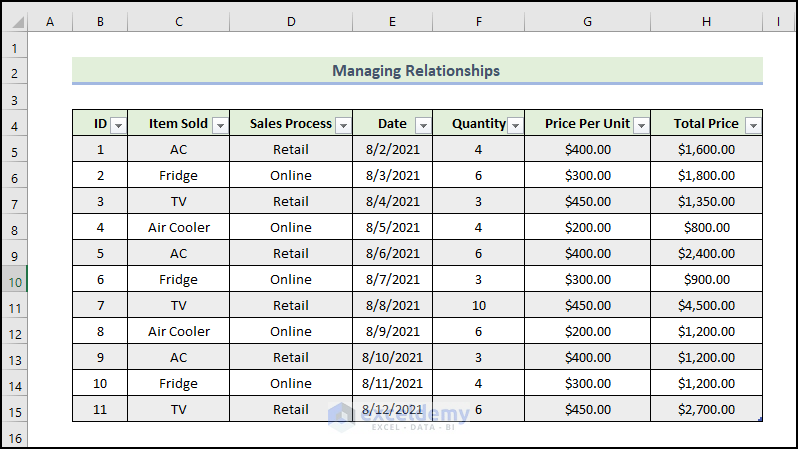
- Firstly, write ‘Managing Relationships’ in some merged cells at a larger font size, That will make the heading more attractive. Then, type your required Headline fields for your data. Click here to see a screenshot that illustrates what the fields look like.
- Now, after completing the heading part, you have to enter the customer ID, Item Sold, Sales Process, Date, Quantity, Per Unit Price, and Total Price columns.
- In the ID column, we will enter the customer ID number.
- Then, in the Item sold column we will enter the name of the items, and in the Sales Process column, we will describe how we sell the product.
- By multiplying the per unit price by the quantity number, we will get the Total Price column.
- Therefore, the first table will look like this.
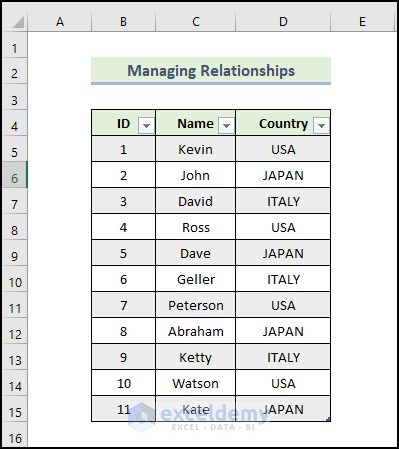
- We will then complete the second table with the customer ID, name, and country.
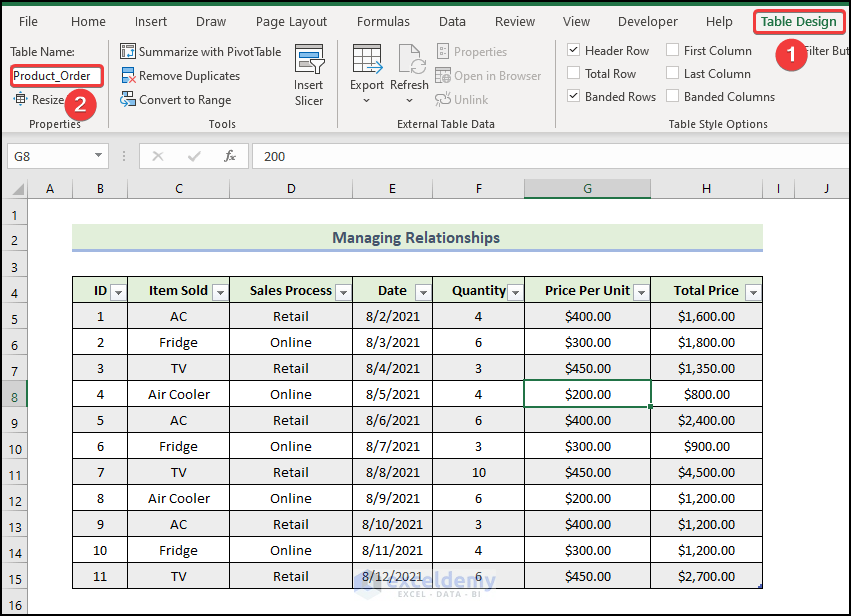
- Next, we are going to rename the table.
- Select any cell randomly from the table range.
- In addition, go to the Table Design tab and type a name in the Product_Order field. We named the table Product_Order. You can select any name based on your data. We will use this table name as a reference while creating relationships.
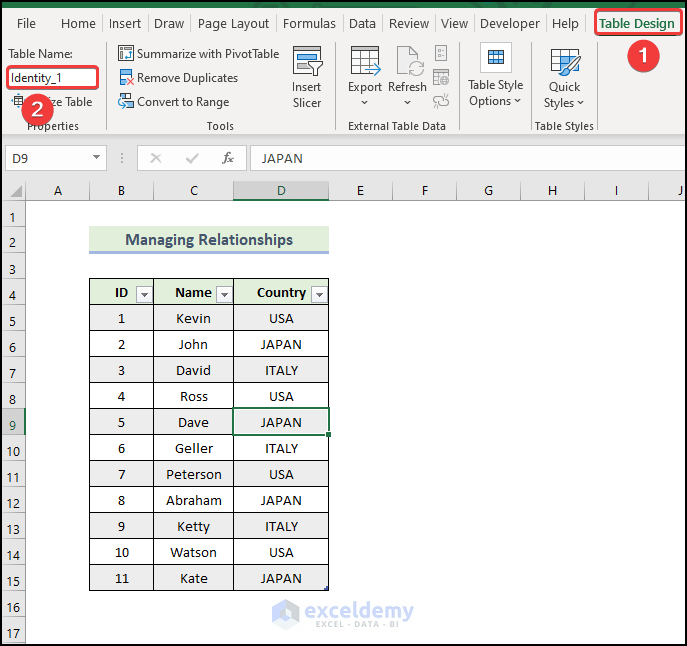
- Next, we are going to rename the second table.
- Select any cell randomly from the table range.
- In addition, go to the Table Design tab and type a name in the Identity_1 field. We named the table Identity_1. You can select any name based on your data. We will use this table name as a reference while creating relationships.
Read More: How to Create Relationship in Excel with Duplicate Values
Step 2: Using Excel Pivot Table to Create Relationships
In this step, we will illustrate how to create relationships in Excel. To do this, you have to follow the following process.
- First of all, you have to go to the Insert tab, select Pivot Table, and finally, select From Table/Range.
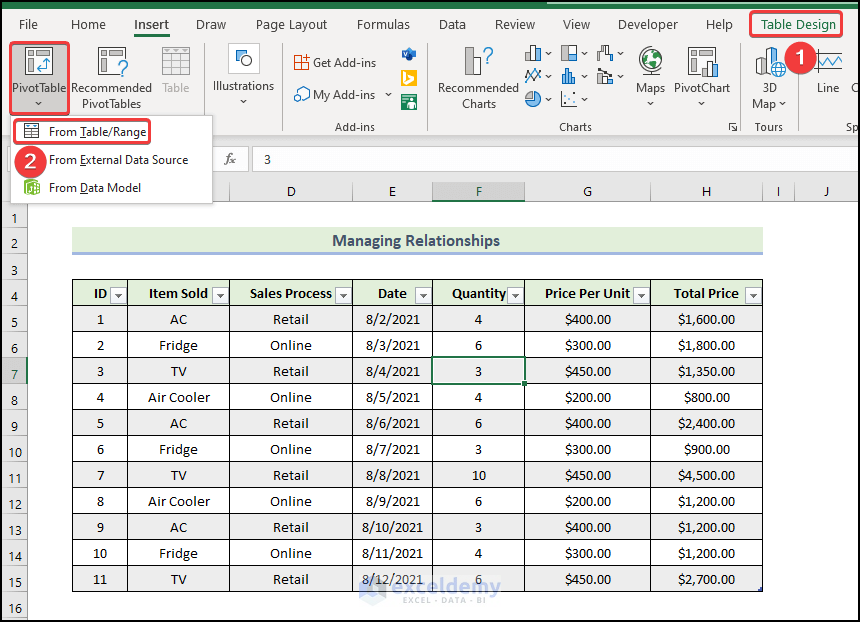
- Therefore, PivotTable form table or range window will appear.
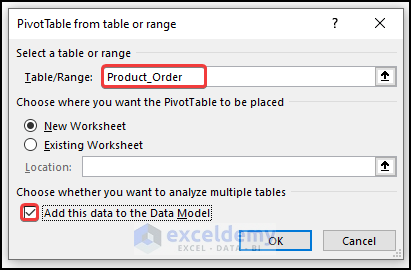
- Then, you have to enter the Product_Order table in the Table/Range box.
- Next, select New worksheet in the Choose where you want the PivotTable to be placed option
- Afterward, check the Add this data to the Data Model option.
- Finally, click on OK.
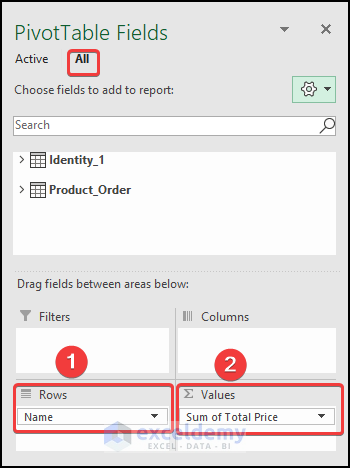
- Therefore, PivotTable Fields will appear in the new worksheet.
- Next, we will create a Pivot table.
- Then, you have to select the Name field from the Product_Order table and then, drag it to the Rows field. By clicking the arrow next to the table name, you can expand the table to see the fields.
- Next, you have to select Total Price from the Identity_1 table and drag it to the Values filed.
- The field list will be accompanied by a notice saying relationships may be needed between tables. Here, if we choose Auto-Detect, Excel will create a relationship and if we choose to Create option, we will be able to create a table based on our preference.
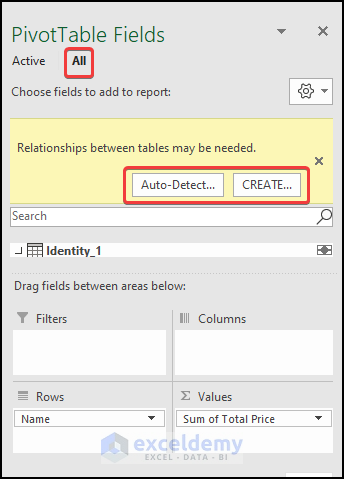
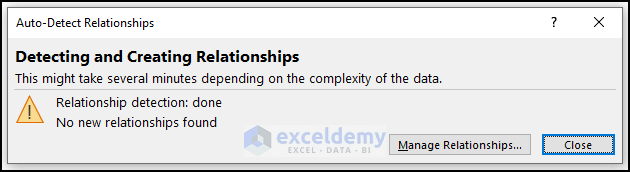
- For instance, if we select Auto-detect, the Auto-Detect Relationships window will appears shown below.
- Next, click on Close.
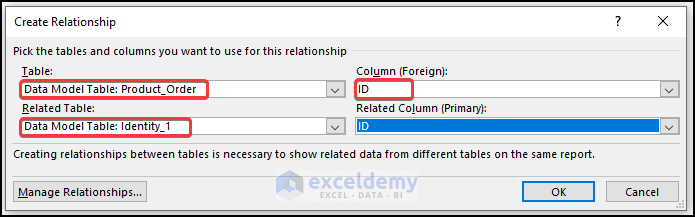
- If we select Create in the PivotTable Fileds, therefore, we will get the following window.
- Here, we can create relationships based on our preferences.
- Now, we have to select the Product_Order table in the Table option.
- Then, select the Identity_1 table in the Related Table option.
- Next, select ID in the Column (Foreign) option
- Choose ID in the Related Column (Primary) option.
- Finally, click on OK.
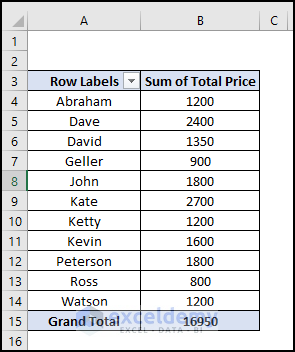
- As a consequence, you will get the following Pivot Table.
Read More: How to Create Data Model Relationships in Excel
Step 3: Applying Relationships Option to Manage Relationships in Excel
In this step, we are going to show how to manage relationships in Excel. To do this, you have to follow the following process.
- First of all, select any cell randomly from the table range.
- Then, go to the Data tab and select the Relationships option from the Data Tools.
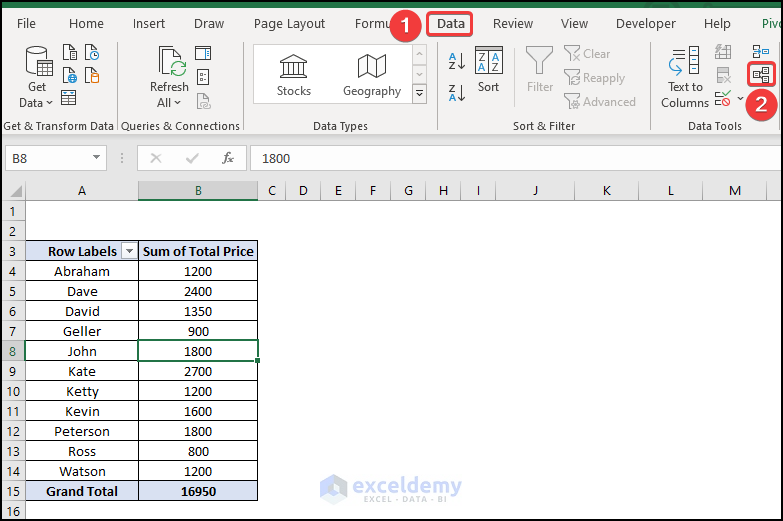
- Consequently, the Manage Relationships window will appear.
- Here, you can customize the relationships table based on your preferences.
- You can also create new relationships from the previously mentioned Product_Order and Identity_1 table by clicking on the New option.
- Then, you can choose the Edit option to modify the table of your current relationship.
- You can also select the Delete option to delta the table of your current relationship.
- Next, you can also the Deactivate option for your customization purpose.
- After completing the customization process, you have to click on Close.
- This is how you will be able to manage relationships in Excel.

Read More: How to Create Many to Many Relationship in Excel
Download Practice Workbook
Download this practice workbook to exercise while you are reading this article. It contains all the datasets in different spreadsheets for a clear understanding. Try yourself while you go through the step-by-step process.
Conclusion
That’s the end of today’s session. I strongly believe that from now you may be able to manage relationships in Excel. If you have any queries or recommendations, please share them in the comments section below. Keep learning new methods and keep growing!
Related Articles
- Create Entity Relationship Diagram from Excel
- How to Make One to Many Relationship in Excel
- How to Create Table from Data Model in Excel
- [Fixed!] Excel Data Model Relationships Not Working
<< Go Back to Create Relationships in Excel | Data Model in Excel | Learn Excel

