In this article, we will explore the step-by-step process of using VBA to create a Pivot Table from named range using Excel VBA. Excel Pivot Tables are powerful tools for summarizing and analyzing data. They allow you to transform raw data into meaningful insights and provide a dynamic way to view and manipulate data. In Excel VBA, you can automate the process of creating Pivot Tables from a named range, which provides a convenient way to refer to a specific range of data with a meaningful name.
One common scenario is creating a Pivot Table from a named range in Excel VBA. By defining a named range that encompasses the data you want to analyze, you can dynamically generate Pivot Tables based on changing datasets.
Excel VBA to Create Pivot Table from Named Range: 2 Easy Ways
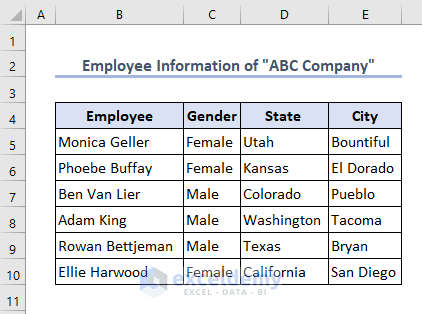
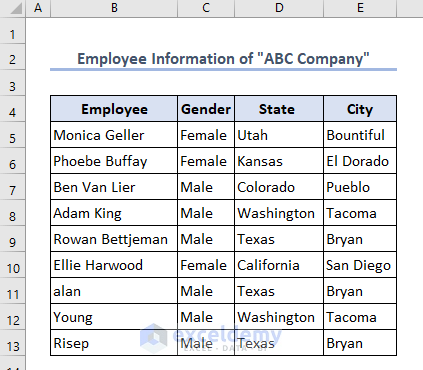
We will create a pivot table from the data of “ABC Company”.
It consists of the employer’s general information about their Name, Gender, State, and City.
Here we won’t need to make any Named Range manually. The VBA code will generate the Named Range.
1. Creating a Static Pivot Table from Named Range
A static Pivot Table refers to a Pivot Table that doesn’t update automatically when the underlying data changes or adds rows. It remains fixed in its structure and values, reflecting the data that was present at the time of its creation.
Now to create a pivot table by using VBA:
- First, Launch the VBA editor. Click here to see how to launch VBA and insert a Module in Microsoft Excel.
- Then paste the following code:
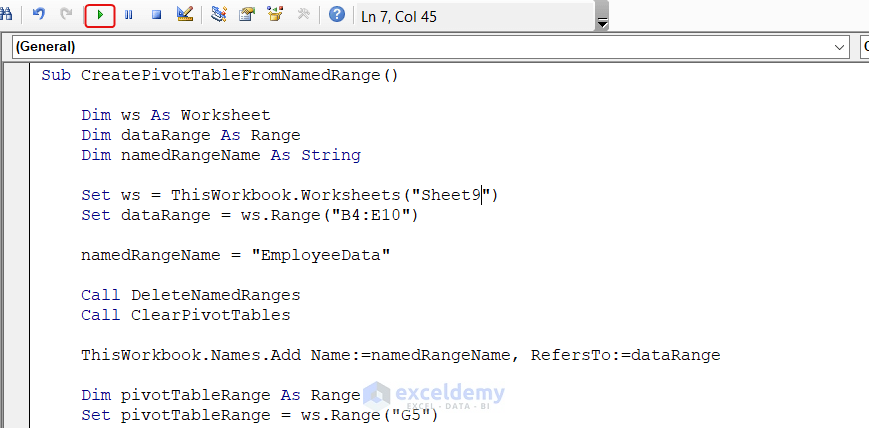
Sub CreatePivotTableFromNamedRange()
    Dim ws As Worksheet
    Dim dataRange As Range
    Dim namedRangeName As String
    Set ws = ThisWorkbook.Worksheets("Sheet1")
    Set dataRange = ws.Range("B4:E10")
    namedRangeName = "EmployeeData"
    Call DeleteNamedRanges
    Call ClearPivotTables
    ThisWorkbook.Names.Add Name:=namedRangeName, RefersTo:=dataRange
    Dim pivotTableRange As Range
    Set pivotTableRange = ws.Range("G5")
    Dim pt As PivotTable
    Set pt = ws.PivotTables.Add(PivotCache:=ThisWorkbook.PivotCaches.Create(SourceType:=xlDatabase, SourceData:=namedRangeName), TableDestination:=pivotTableRange, TableName:="EmployeePivotTable")
    With pt
        .PivotFields("Gender").Orientation = xlRowField
        .AddDataField .PivotFields("Employee"), "Count of Employee", xlCount
    End With
End Sub
Sub DeleteNamedRanges()
    Dim wb As Workbook
    Dim nm As Name
    Dim nameToDelete As String
    nameToDelete = "EmployeeData"
    Set wb = ThisWorkbook
    For Each nm In wb.Names
        If nm.Name = nameToDelete Then
            nm.Delete
        End If
    Next nm
End Sub
Sub ClearPivotTables()
    Dim wb As Workbook
    Dim ws As Worksheet
    Dim pt As PivotTable
    Set wb = ThisWorkbook
    For Each ws In wb.Worksheets
        For Each pt In ws.PivotTables
            pt.TableRange2.Clear
        Next pt
    Next ws
End Sub- Then run the code by clicking the Run icon or pressing the F5 key.
- You can able to see the output(pivot table) in the image below.
- It also counts the total number of male and female employees in the company.
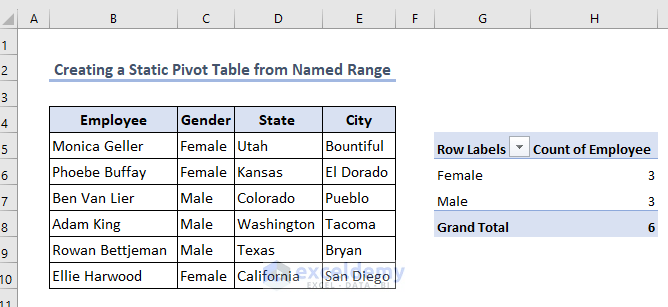
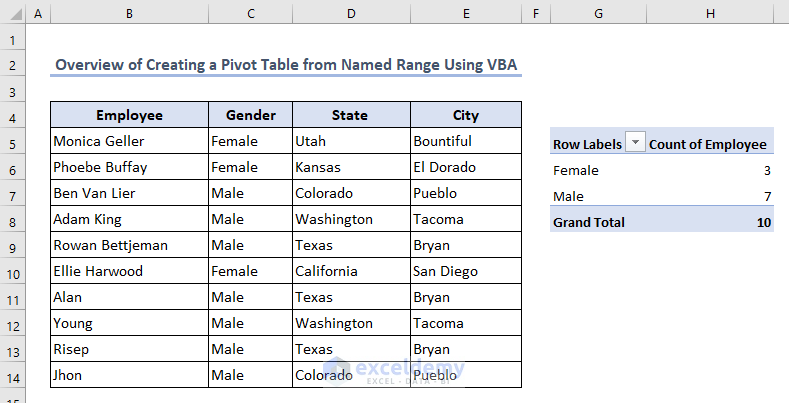
- If you notice the dataset in the image below, you can see that we have added a row in the dataset but the pivot table remains the same.

Read More: How to Insert A Pivot Table in Excel
2. Creating a Dynamic Pivot Table from Named Range
We have changed the dataset. Now, we will add three more rows to the dataset. We want to show you how to create a pivot table with dynamic range that will update automatically if we make any changes in the dataset. See the image of the updated dataset below.
We won’t insert the module separately because it will be a dynamic pivot table. We’ll take a different approach here. We will apply the code on the sheet here. If you use the code in the module then it won’t work properly. Please follow the instructions below:
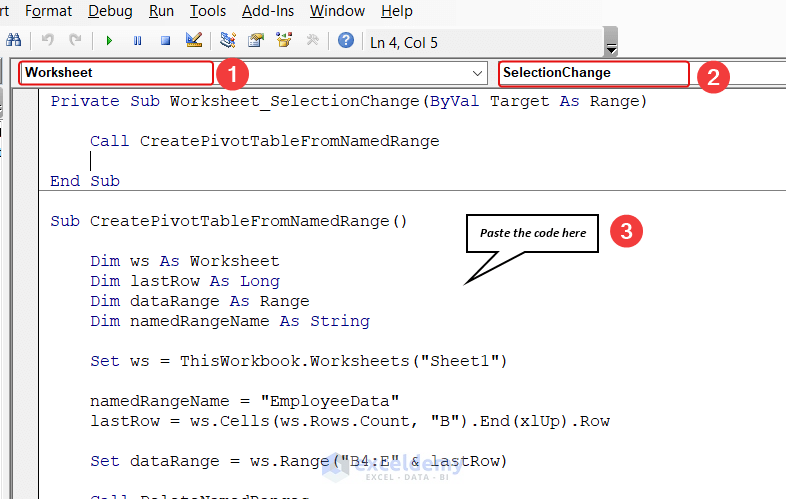
- Now go to the Sheet Name option.
- Press Right-click on the sheet name
- Then select the View Code option.

- After selecting View Code a VBA window will open.
- In the module, Select Worksheet from the Object option.
- Then select SelectionChange from the Procedure option like the image below.
- After that, paste the following code into the sheet:
Private Sub Worksheet_SelectionChange(ByVal Target As Range)
    Call CreatePivotTableFromNamedRange
End Sub
Sub CreatePivotTableFromNamedRange()
    Dim ws As Worksheet
    Dim lastRow As Long
    Dim dataRange As Range
    Dim namedRangeName As String
    Set ws = ThisWorkbook.Worksheets("Sheet1")
    namedRangeName = "EmployeeData"
    lastRow = ws.Cells(ws.Rows.Count, "B").End(xlUp).Row
    Set dataRange = ws.Range("B4:E" & lastRow)
    Call DeleteNamedRanges
    Call ClearPivotTables
    ThisWorkbook.Names.Add Name:=namedRangeName, RefersTo:=dataRange
    Dim pivotTableRange As Range
    Set pivotTableRange = ws.Range("G5")
    Dim pt As PivotTable
    Set pt = ws.PivotTables.Add(PivotCache:=ThisWorkbook.PivotCaches.Create(SourceType:=xlDatabase, SourceData:=namedRangeName), TableDestination:=pivotTableRange, TableName:="EmployeePivotTable")
    With pt
        .PivotFields("Gender").Orientation = xlRowField
        .AddDataField .PivotFields("Employee"), "Count of Employee", xlCount
    End With
End Sub
Sub DeleteNamedRanges()
    Dim wb As Workbook
    Dim nm As Name
    Dim nameToDelete As String
    nameToDelete = "EmployeeData"
    Set wb = ThisWorkbook
    For Each nm In wb.Names
        If nm.Name = nameToDelete Then
            nm.Delete
        End If
    Next nm
End Sub
Sub ClearPivotTables()
    Dim wb As Workbook
    Dim ws As Worksheet
    Dim pt As PivotTable
    Set wb = ThisWorkbook
    For Each ws In wb.Worksheets
        For Each pt In ws.PivotTables
            pt.TableRange2.Clear
        Next pt
    Next ws
End Sub- To see the output, run the code by using the F5 key or clicking on the play button.
- You can see the output(Pivot Table) is updated. Now the total number of employees is 9.
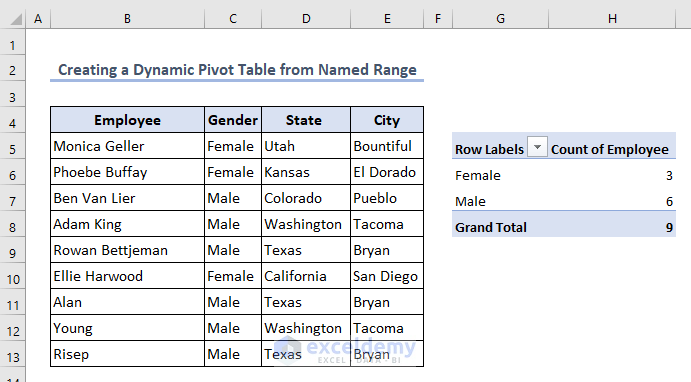
- We also added another row to the dataset. This time the Pivot Table updated automatically. We didn’t have to run the code again.
- So, the outcome is 10 now.

Frequently Asked Questions
1. Can I automate a Pivot Table?
Yes, it is possible to automate a Pivot Table using various programming languages and tools. Here are a few options:
Excel provides a powerful programming language called Visual Basic for Applications (VBA) that allows you to automate tasks within Excel, including creating and manipulating Pivot Tables. You can use VBA to write macros that perform specific actions on Pivot Tables, such as refreshing data sources, changing filters, or updating the structure of the Pivot Table.
2. Can I create a pivot table with data from another workbook?
Yes, you can create a Pivot Table with data from another workbook using various methods. Here is an approach:
If you are using VBA in Excel, you can use the “PivotCache” object to create a Pivot Table from an external data source. You would first need to establish a connection to the external workbook using the “Workbook.open” method or other suitable methods. Once you have the connection, you can create a “PivotCache” object using the data range from the external workbook and then create the Pivot Table based on that “PivotCache” object.
3. What is the best alternative for pivot?
If you’re looking for alternatives to Pivot Tables, there are several options depending on your specific needs and the tools you have available. Here are a few alternatives to consider:
- Pandas Crosstab
- GroupBy and Aggregation
- SQL Pivot
- Tableau or Power BI
Things to Remember
- Before creating a Pivot Table, make sure you have defined a named range that encompasses the data you want to include in the Pivot Table.
- Specify the location where you want the Pivot Table to be placed on the worksheet
- Make sure your workbook is open while applying the code
- For the dynamic pivot table, you don’t need to run the code again. The table will update automatically if you make any changes to the dataset.
Download Practice Workbook
Conclusion
In this article, we explored the process of creating a Pivot Table from a named range using Excel VBA. By following a few key steps, we can effectively automate the creation and manipulation of Pivot Tables, allowing for dynamic data analysis and summarization. Users can harness the power of Excel VBA to automate the creation of Pivot Tables from named ranges. This enables efficient data analysis, providing meaningful insights and supporting informed decision-making within the Excel environment.
<< Go Back to How to Create Pivot Table in Excel | Pivot Table in Excel | Learn Excel
Get FREE Advanced Excel Exercises with Solutions!
