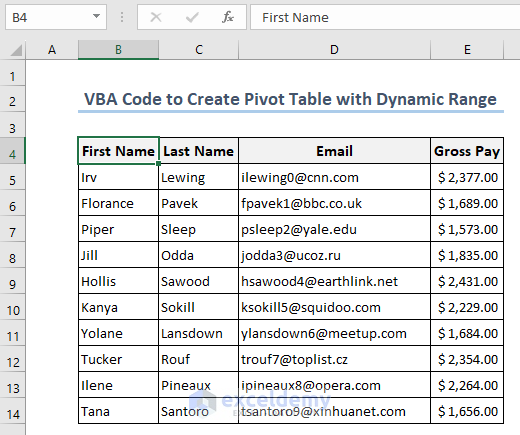
We will use a sample dataset containing First Name, Last Name, Email, and Gross Pay to demonstrate creating a pivot table with a dynamic range.
Step 1 – Creating a Pivot Table with VBA Macro
To insert a pivot table manually:
- Select the data range.
- Go to the Insert tab.
- Select PivotTable.
- Choose From Table/Range.
You can also dynamically create pivot tables by using VBA code based on your data, making analysis and visualization simple.
- Create a sample data sheet named “Data” and your pivot table will be created in the sheet “Pivot” after running the following VBA code in the module of a VBA.
- Modify your code as the following VBA code presumes that the data in the “Data” sheet starts from B4.
- The pivot table will be created in the sheet named “Pivot” where the table will start from A1.
Sub CreatePivotTable()
Dim pivotSheet As Worksheet, dataSheet As Worksheet
Dim pivotCache As PivotCache
Dim pivotTable As PivotTable
Dim dataRange As Range
Dim lastRow As Long, lastCol As Long
Dim sheet As Variant
On Error Resume Next
With Application
.DisplayAlerts = False
.ScreenUpdating = False
End With
For Each sheet In ActiveWorkbook.Worksheets
If sheet.Name = "Pivot" Then
sheet.Delete
End If
Next sheet
Worksheets.Add.Name = "Pivot"
Set pivotSheet = Worksheets("Pivot")
Set dataSheet = Worksheets("Data")
lastRow = dataSheet.Cells(dataSheet.Rows.Count, 2).End(xlUp).Row
lastCol = dataSheet.Cells(4, dataSheet.Columns.Count).End(xlToLeft).Column
Set dataRange = dataSheet.Range("B4").Resize(lastRow - 3, lastCol - 1)
Set pivotCache = ActiveWorkbook.PivotCaches.Create(SourceType:=xlDatabase, SourceData:=dataRange).CreatePivotTable(TableDestination:=pivotSheet.Range("A1"), TableName:="SalesPivotTable")
Set pivotTable = pivotCache.CreatePivotTable(TableDestination:=pivotSheet.Range("B4"), TableName:="SalesPivotTable")
With pivotSheet.PivotTables("SalesPivotTable").PivotFields("Region")
.Orientation = xlPageField
End With
With pivotSheet.PivotTables("SalesPivotTable").PivotFields("Sub-Category")
.Orientation = xlRowField
End With
With pivotSheet.PivotTables("SalesPivotTable").PivotFields("State")
.Orientation = xlColumnField
End With
With pivotSheet.PivotTables("SalesPivotTable").PivotFields("Sales")
.Orientation = xlDataField
.Function = xlSum
End With
End Sub
- Insert the code in the VBA module and run it.
Read More: How to Use VBA to Create Pivot Table from Named Range in Excel
Step 2 – Using VBA to Create a Pivot Table with a Dynamic Range
- Launch the VBA editor.
- Insert a module.
- Copy the code below and paste it into the code window.
VBA Code:
Sub RefreshExistingPivotTable()
Dim ws As Worksheet
Dim pt As PivotTable
Dim pc As PivotCache
Set ws = ThisWorkbook.Worksheets("Sheet5") ' Replace "Sheet5" with the name of the sheet containing the pivot table
' Check if a pivot table already exists in the worksheet
If ws.PivotTables.Count > 0 Then
' Assuming only one pivot table exists, you can use the first item in the PivotTables collection
Set pt = ws.PivotTables(1)
' Get the existing pivot table's PivotCache
Set pc = pt.PivotCache
' Modify the source data range of the existing pivot table's PivotCache
pc.SourceData = ThisWorkbook.Worksheets("Sample Data").Range("B4:E14").CurrentRegion.Address(True, True, xlR1C1, True)
' Refresh the pivot table
pt.RefreshTable
Else
MsgBox "No existing pivot table found.", vbCritical
End If
End Sub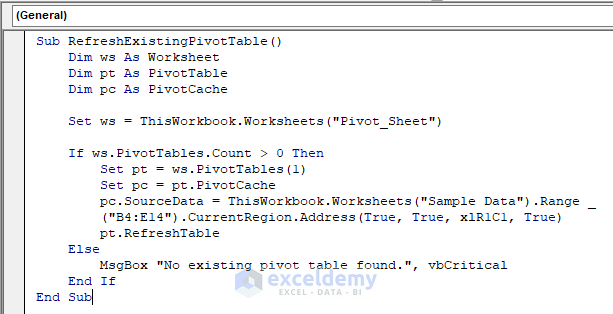
VBA Explanation:
Sub RefreshExistingPivotTable()- It declares a subroutine named RefreshExistingPivotTable.
Dim ws As Worksheet
    Dim pt As PivotTable
Dim pc As PivotCache- The above three lines with Dim declare three variables. ws is used for storing a Worksheet object, pt for storing a pivot table object, and pc for storing a Pivot Cache object.
Set ws = ThisWorkbook.Worksheets("Sheet5") ' Replace "Sheet5" with the name of the sheet containing the pivot table- While demonstrating the problem, we used a pivot table in Sheet5. Now this line of VBA code sets the ws variable for the reference to the worksheet named Sheet5.
If ws.PivotTables.Count > 0 Then- This line determines whether any pivot tables are present in the worksheet that the “ws” variable refers to.
Set pt = ws.PivotTables(1)- This line sets the “pt” variable to refer to the first pivot table in the worksheet’s PivotTables collection if there are at least one or more pivot tables.
Set pc = pt.PivotCache- Next, this line configures the “pc” variable to refer to the PivotCache associated with the pivot table.
pc.SourceData = ThisWorkbook.Worksheets("Sample Data").Range("B4:E14").CurrentRegion.Address(True, True, xlR1C1, True)- Then, this line modifies the PivotCache of the existing pivot table. It changes the range “B4:E14” in the worksheet titled “Sample Data” of the workbook where the VBA code is being executed as the SourceData property of the “pc” PivotCache object. You can change “Sample Data” to the actual name of the worksheet that houses the pivot table’s new data range.
pt.RefreshTable- This line calls the RefreshTable method on the “pt” PivotTable object to update the pivot table.
Else
MsgBox "No existing pivot table found.", vbCritical
End If- This block shows a message box with the text “No existing pivot table found.” and a warning icon if the worksheet has no pivot tables.
End Sub- The subroutine ends with this line.
- Run the code.
Read More: How to Insert A Pivot Table in Excel
Things to Remember
- Replace the name of your sheet in the VBA code. In the sample code, “Data” is the name of the sheet. From that sheet, the VBA code takes the range to make a pivot table.
- Remember that the pivot will be placed on the “Pivot” sheet. Here, we have used two VBA codes, one for creating a pivot table and another for filtering that table.
FAQs
Can I modify the code to use a different range for my pivot table?
Yes, you can change the worksheet name and range references to reflect the desired range.
What are the benefits of using a dynamic range for pivot tables?
By using a dynamic range, you can avoid manually updating the source range. Also, it will make your pivot table adapt as your data changes.
When using dynamic ranges with VBA code, are there any restrictions or things to keep in mind?
The dynamic range formula must be precise, large datasets must be handled effectively. Additionally, you must check the performance impact of frequent updates to the dynamic range.
Download the Practice Workbook
<< Go Back to How to Create Pivot Table in Excel | Pivot Table in Excel | Learn Excel
Get FREE Advanced Excel Exercises with Solutions!
