

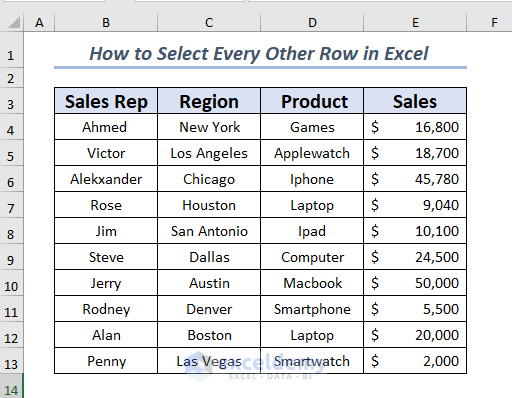
The following dataset is about the sales information of a certain tech shop. It has four columns: Sales Rep, Region, Product, and Sales. These columns show the total sales information for a particular product by a sales representative.
Method 1 – Using Conditional Formatting to Mark Selectable Cells
Steps:
- Choose the B4:E13 cell range.
- Open the Home tab.
- Go to Conditional Formatting and select New Rule.
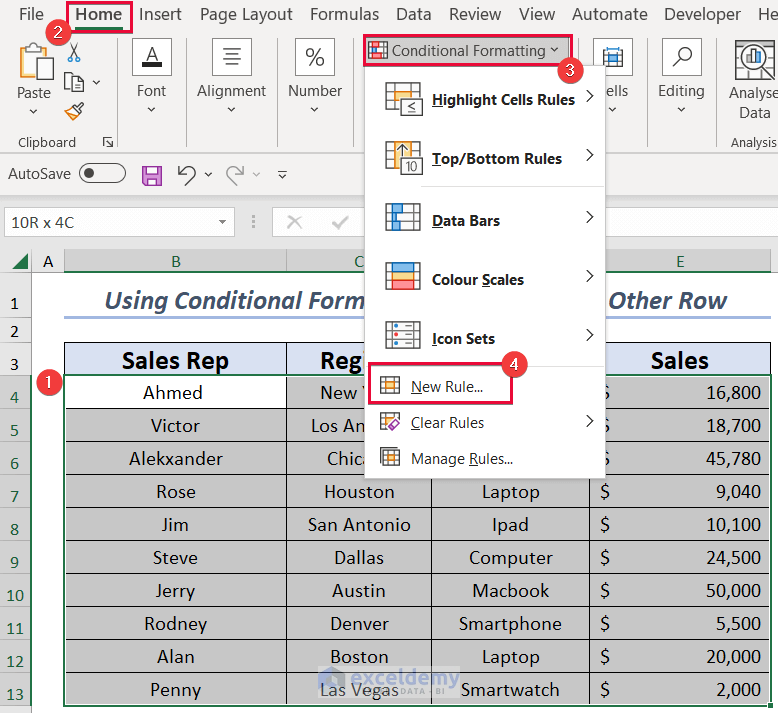
- A dialog box will pop up.
- Select Use a formula to determine which cells to format.
- Use the following formula in the Format values where this formula is true box:
Type the formula
=MOD(ROW(B4),2)=0- Select the format of your choice.
- Click OK.
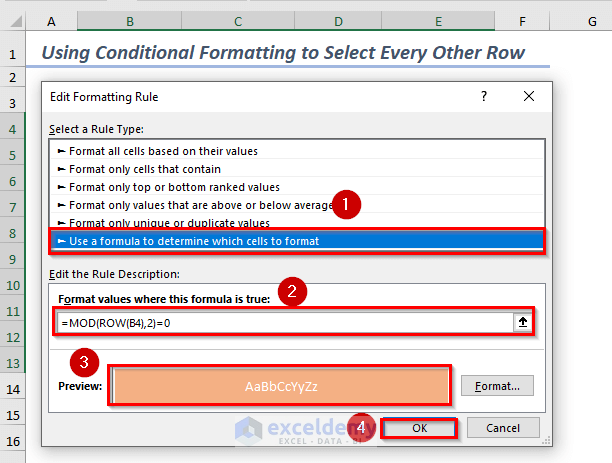
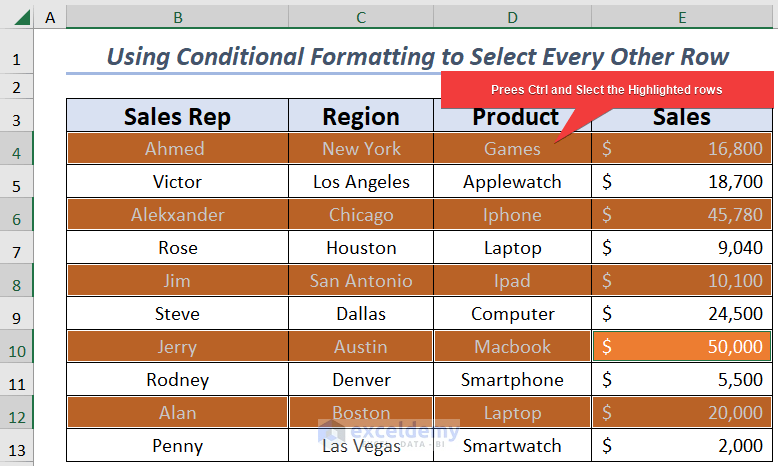
- The MOD(ROW(),2)=0 function will highlight every 2nd row starting from the first.
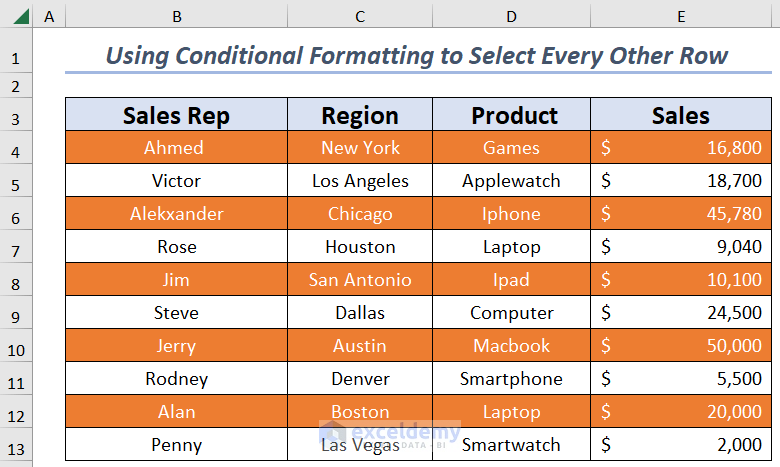
- Select the first highlighted row then hold the CTRL key and select the other highlighted rows.
Method 2 – Using the Highlight Feature
Case 1 – EVEN Rows
Steps:
- Select the cell range.
- Open the Home tab.
- Go to Conditional Formatting and select New Rule
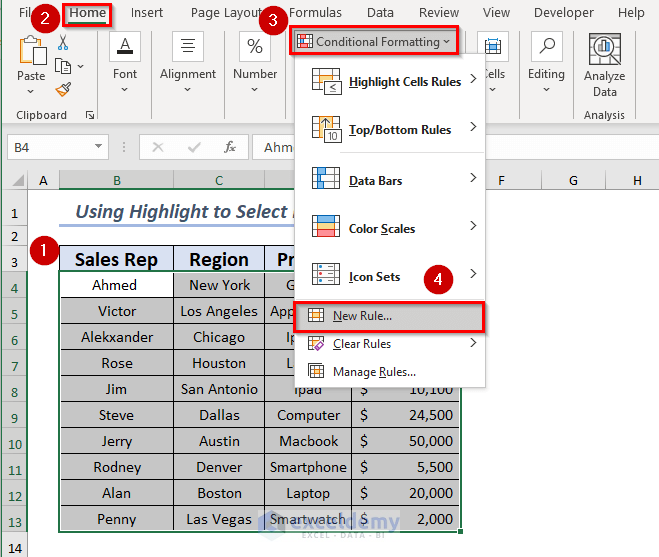
- A dialog box will be on the screen.
- Select Use a formula to determine which cells to format.
- Use the ISODD function:
=ISODD(ROW())- You can select the Format of your choice.
- Click OK.
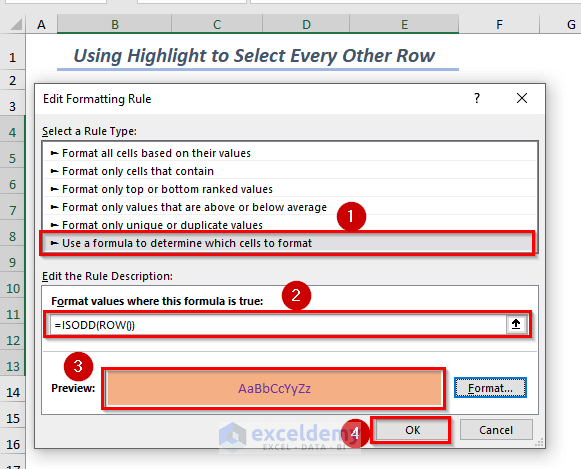
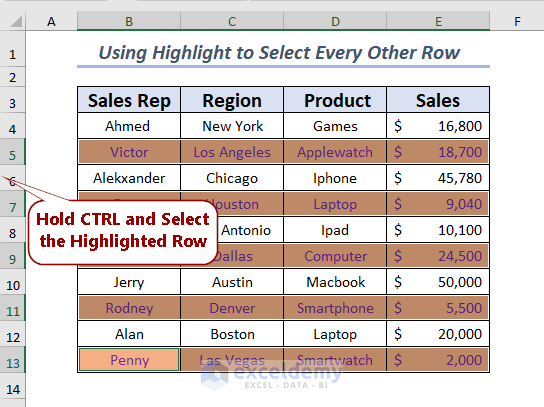
- It will highlight odd rows.
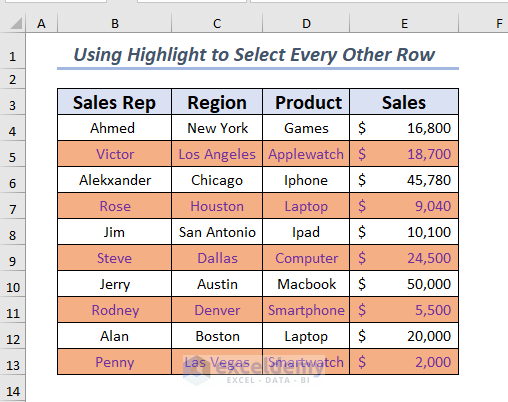
- Hold the CTRL key and select the highlighted rows.
Case 2 – EVEN Rows
Steps:
- Select the cell range that you want to highlight.
- Open the Home tab.
- Go to Conditional Formatting and select New Rule.
- A dialog box will pop up.
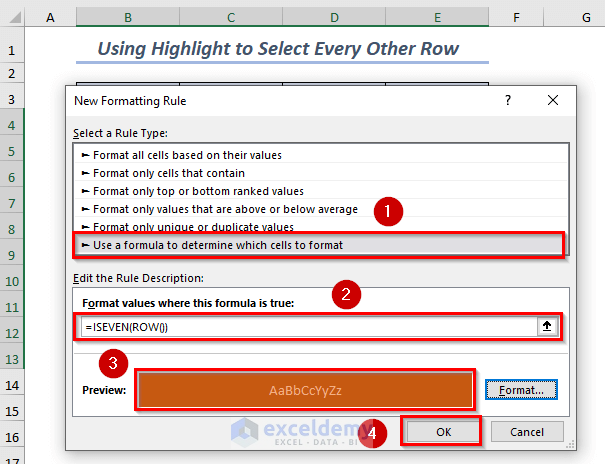
- Choose Use a formula to determine which cells to format.
- Insert the following formula in the box.
=ISEVEN(ROW())- Choose the Format of your choice.
- Click OK.
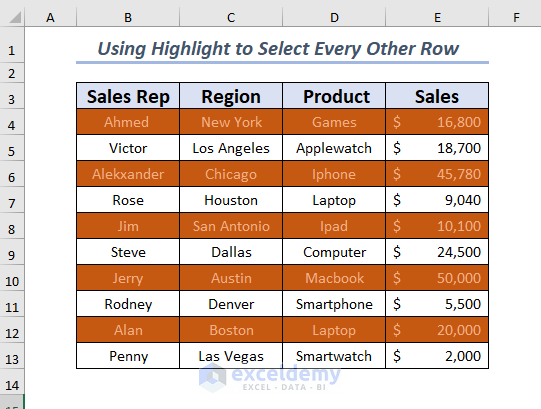
 The EVEN rows will be highlighted.
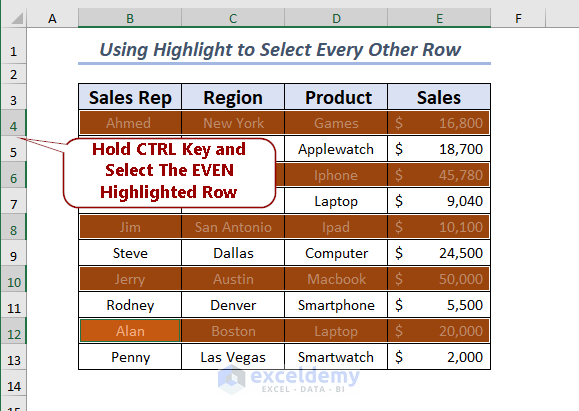
- Hold the CTRL key and select the highlighted rows.
Method 3 – Manually Selecting Rows
Steps:
- Select the row number.
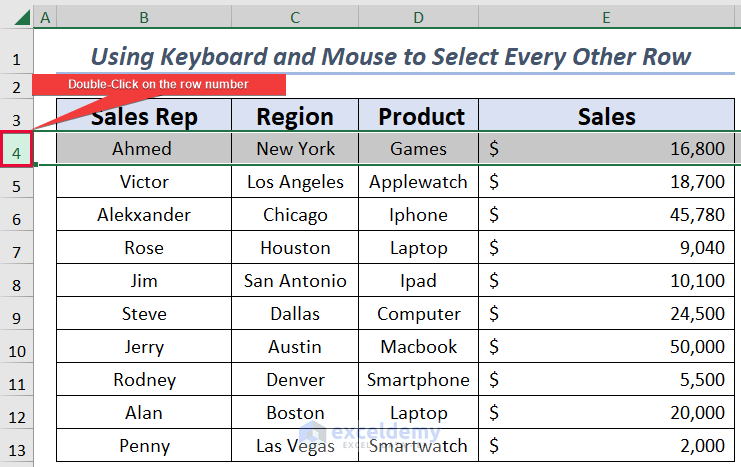
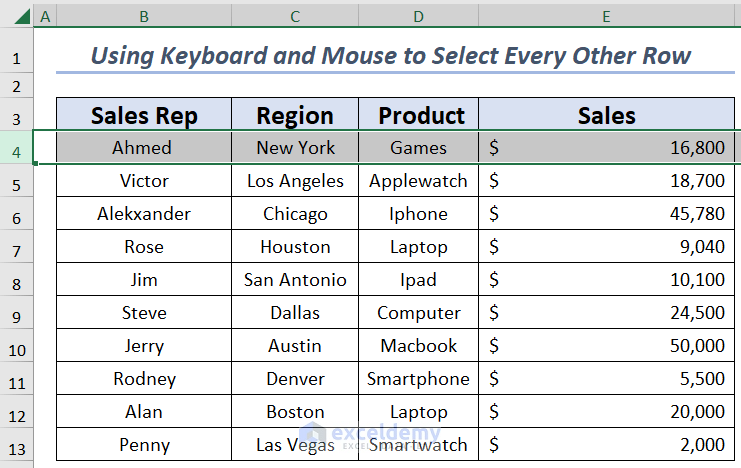
- It will select the Entire Row.
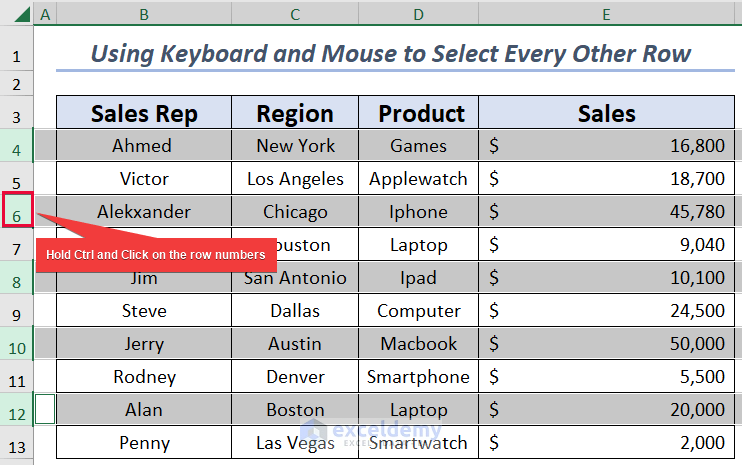
- Hold the CTRL key and select the rest of the rows of your choice.
Method 4 – Utilizing the Table Format
Steps:
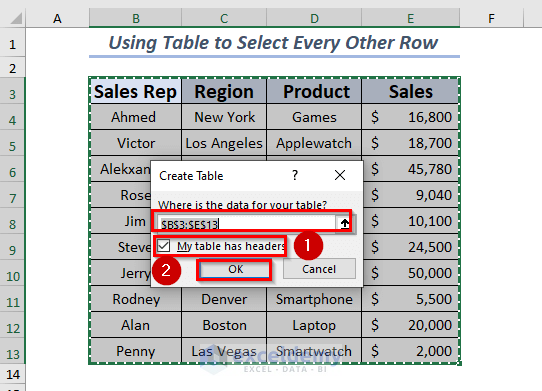
- Select a range of rows to insert a Table.
- Open the Insert tab and select Table.
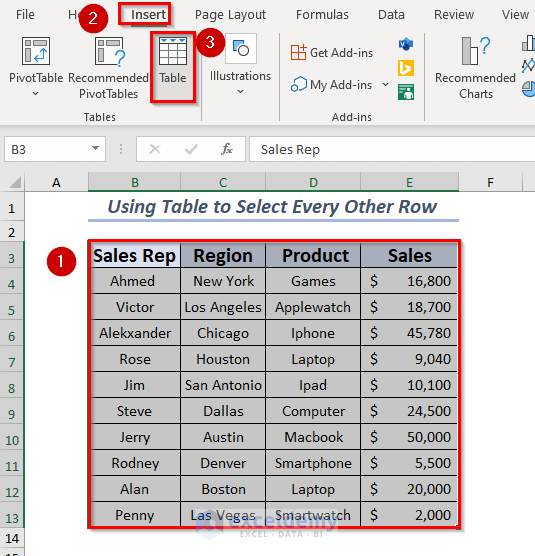
- A dialog box showing the selected range will pop up.
- Select My table has headers.
- Click OK.
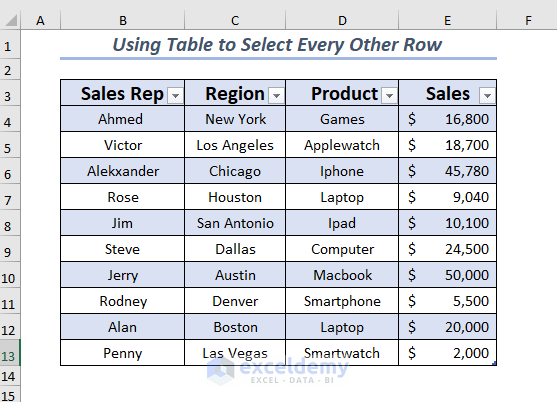
- The selected ranges will be converted into a Table.
- Every other row has a different fill color to highlight every other row.
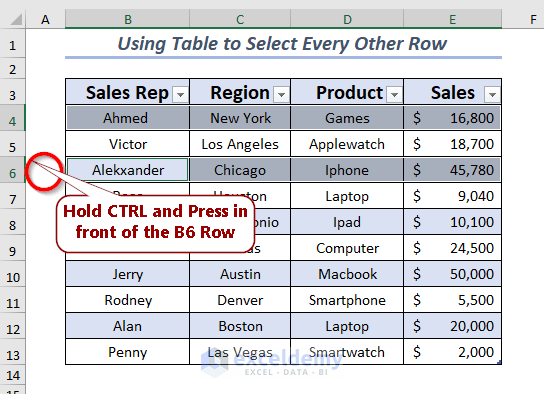
- Manually select the rows while holding Ctrl.
Method 5 – Using a Filter with Go To Special
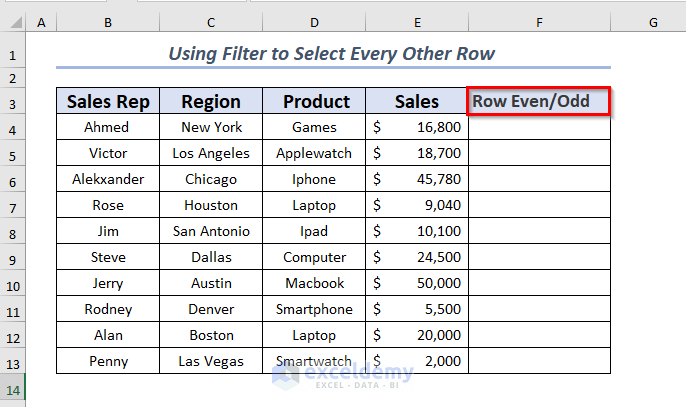
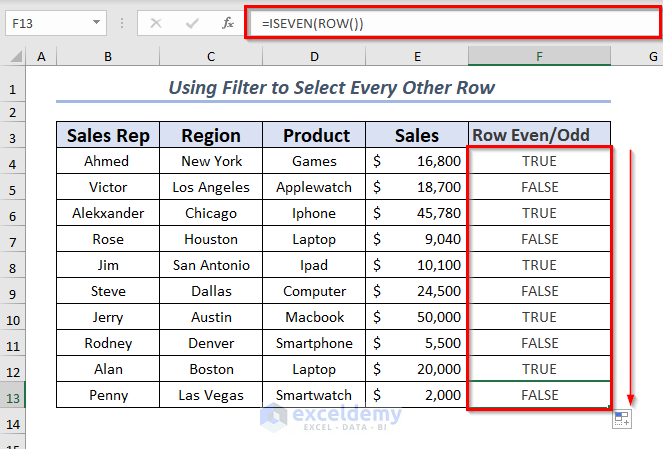
We added a new column in the dataset name Row Even/Odd. This column will show TRUE for even rows and FALSE for odd rows.
Steps:
- Select the F4 cell and insert the following formula:
=ISEVEN(ROW())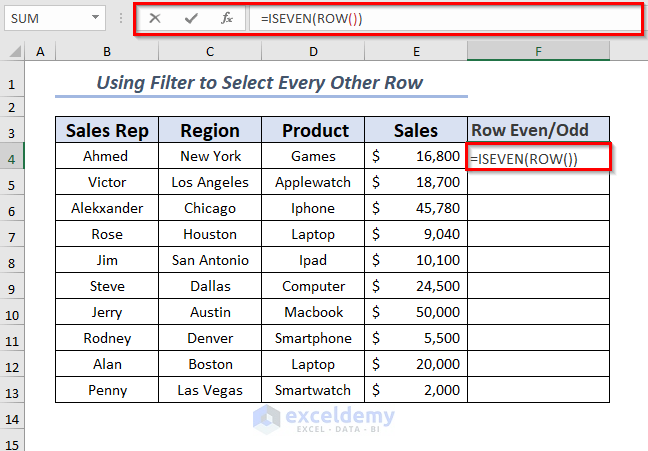
- Press Enter.
- This will show TRUE for row number 4 as it is an even number.
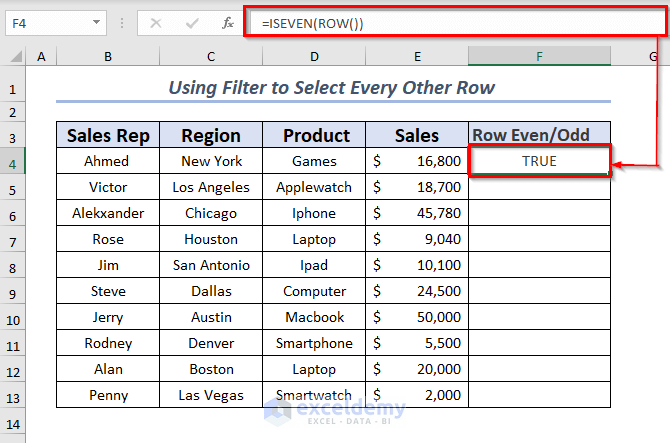
- Use the Fill Handle to AutoFill formula for the rest of the cells.
- Select the range where you want to apply the Filter.
- Select all the columns.
- Open the Data tab and select Filter.
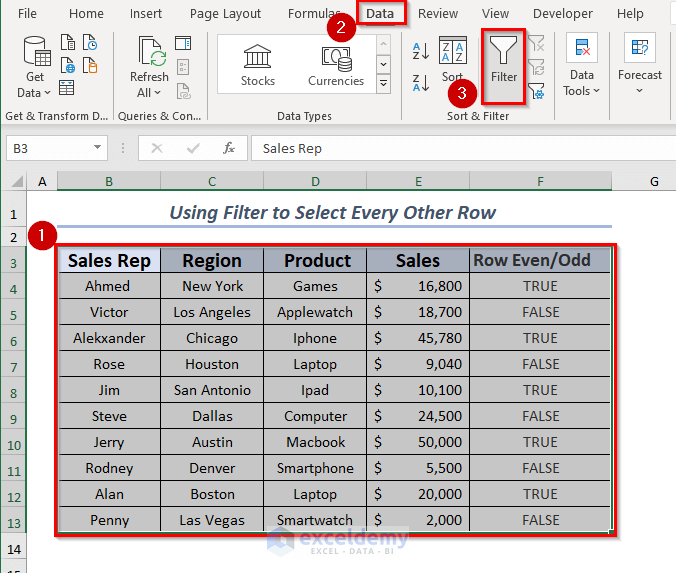
You also can use the CTRL+SHIFT+L keyboard shortcut.
- The Filter will be applied to all columns.
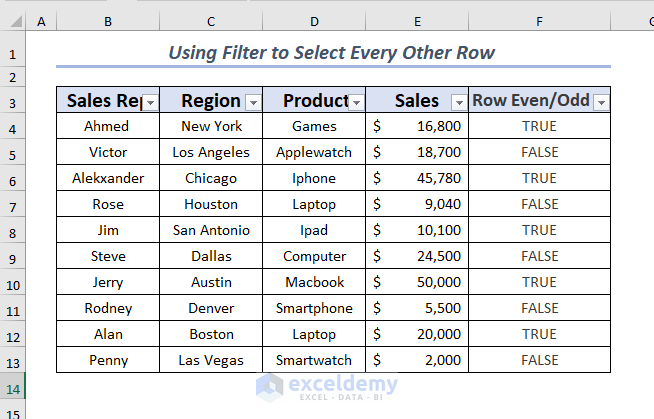
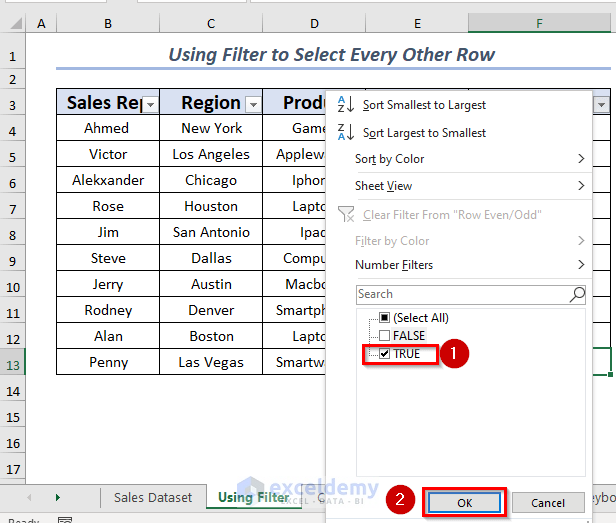
- Select the drop-down for the helper column header.
- Select the TRUE value to Filter.
- Click OK.
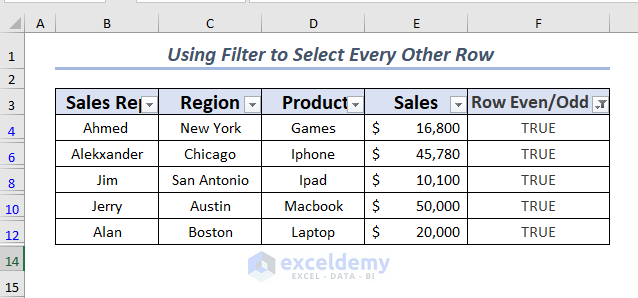
- All the column values will be Filtered where the value is TRUE.
- Select the range where you want to apply Go To Special.
- Open the Home tab and go to Find & Select, then select Go To Special
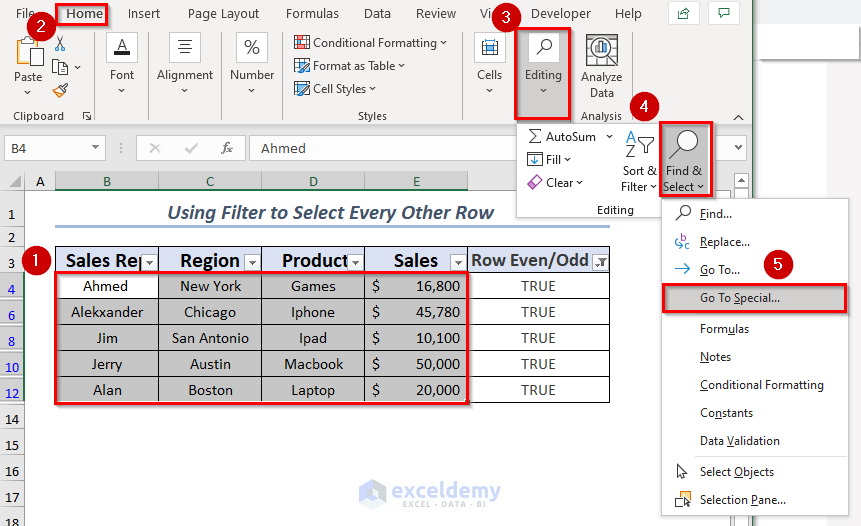
- A dialog box will be on the screen.
- Select the Visible cells only.
- Press OK.
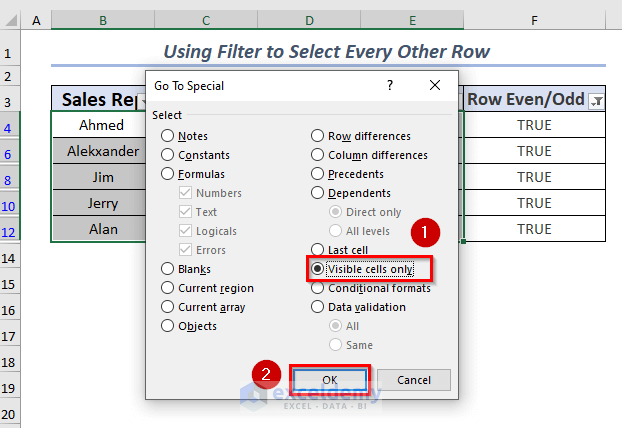
- The visible cells are selected.
- Open the Data tab and select Filter.
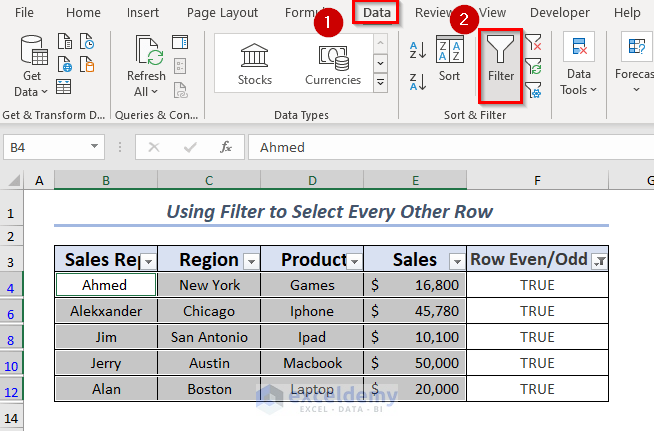
- It will show the selected values along with all values by removing Filter.
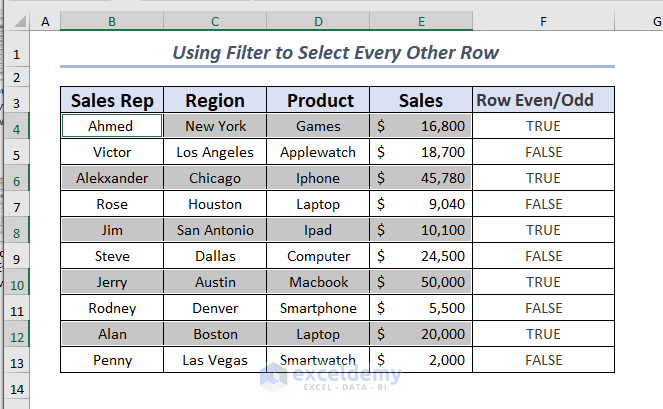
Method 6 – Applying VBA
Steps:
- Open the Developer tab and select Visual Basic.
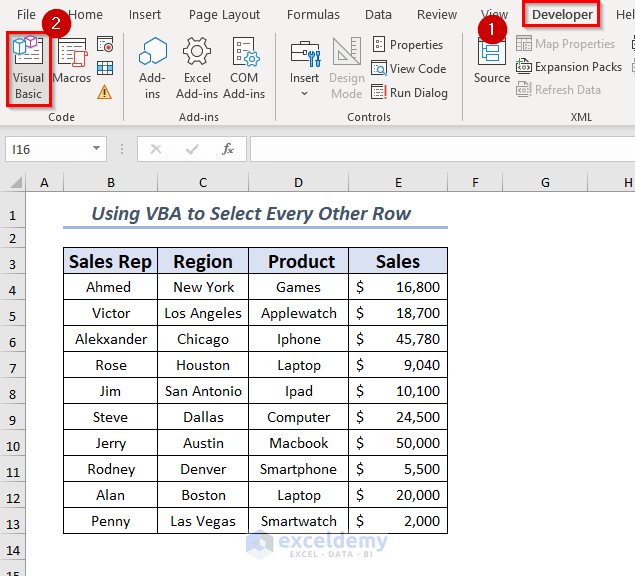
- A window for Microsoft Visual Basic for Applications will pop up.
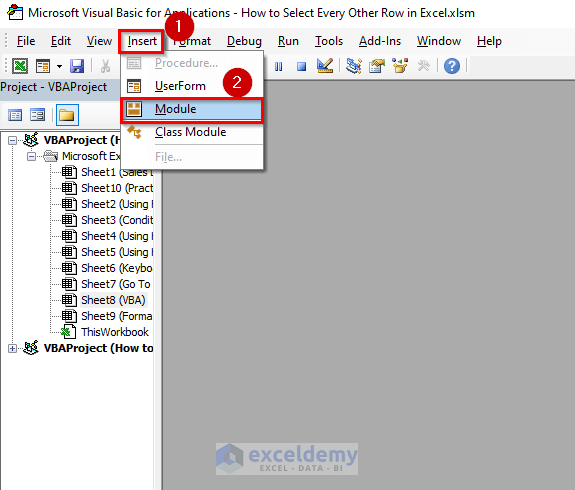
- Click on Insert and select Module.
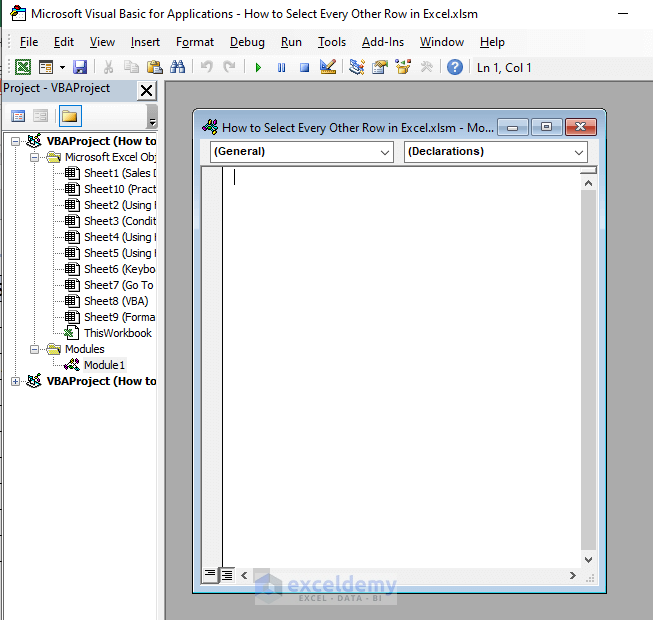
- A new Module will be opened.
- Insert this code to select every other row in the Module.
Sub SelectEveryOtherRow()
Dim userRange As Range
Dim OtherRowRange As Range
Dim rowCount, i As Long
Set userRange = Selection
rowCount = userRange.Rows.Count
With userRange
Set OtherRowRange = .Rows(1)
For i = 3 To rowCount Step 2
Set OtherRowRange = Union(OtherRowRange, .Rows(i))
Next i
End With
OtherRowRange.Select
End Sub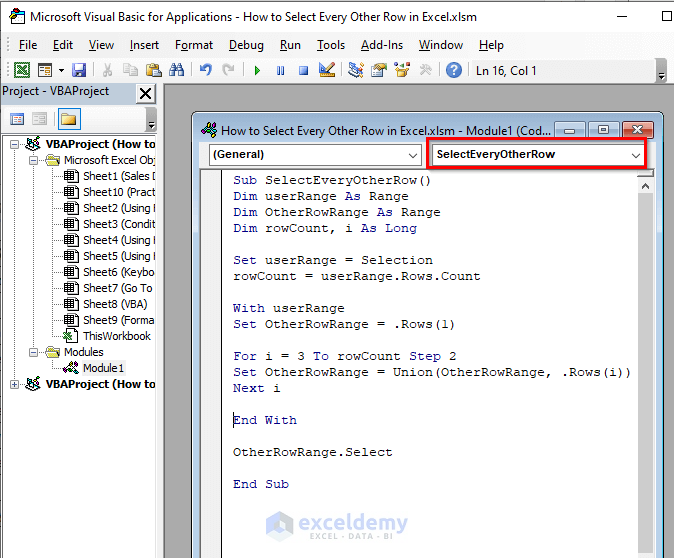
- Save the code and go back to the worksheet.
- Select the range where you want to apply the VBA.
- Open the View tab and select View Macros.
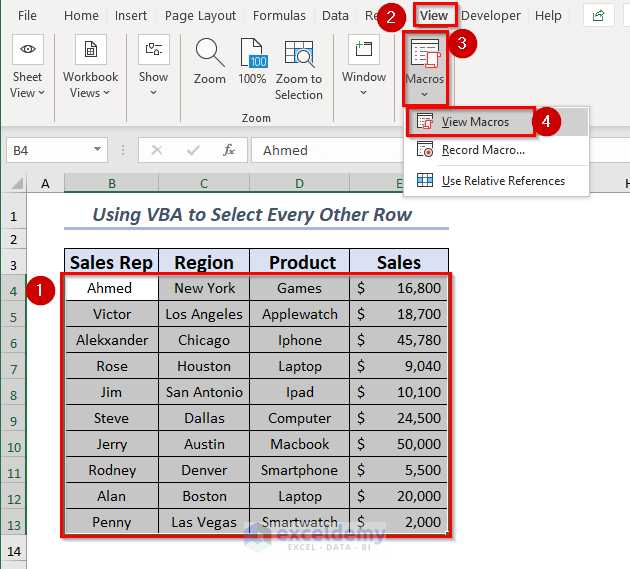
- A dialog box will pop up.
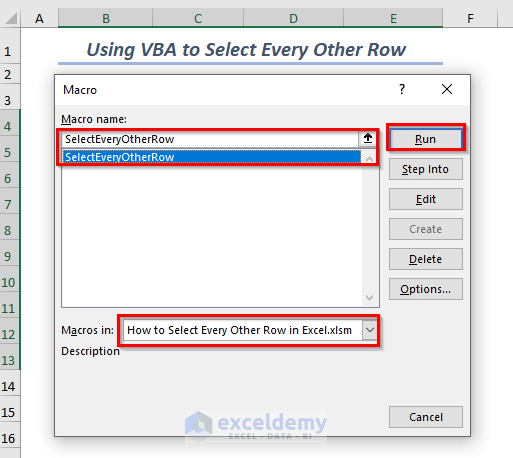
- Select the Macro name SelectEveryOtherRow.
- Click Run.
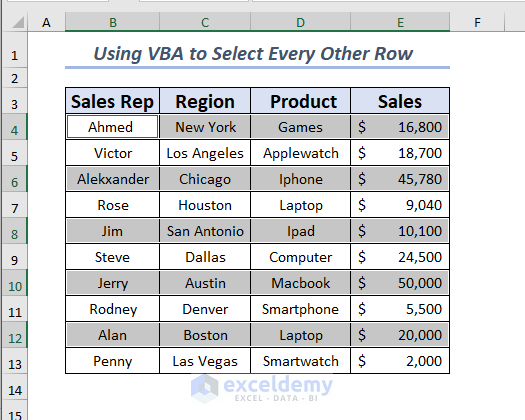
- Every other row will be selected from the first row.
Copy Every Other Row
After identifying alternate rows with the formula, you can also copy them easily.
- Filter the helper column to display only the desired rows (such as even or odd rows)
- Select the visible rows
- Press Ctrl + C to copy them
- Press Ctrl + V to paste the copied rows into the preferred location
This method helps you not only identify but also select and copy every other row in Excel.
Download the Practice Workbook
Related Articles
- How to Select All Rows in Excel
- How Do I Quickly Select Thousands of Rows in Excel
- How To Select All Rows to Below in Excel
<< Go Back to Select Row | Rows in Excel | Learn Excel
Get FREE Advanced Excel Exercises with Solutions!


This title is deceptive. I need to SELECT and then COPY every other cell. This is just about formatting.
Hello Ken,
Thanks for pointing this out. We’ve updated the article and added instructions on how to actually select and copy every other row using the formula/helper-column method. Actually, we focused on highlighting, as copying is easier when you can easily identify the rows. Now you can apply filter based on formula or color.
We appreciate your feedback!
Reagrds,
ExcelDemy