Here’s an overview of inserting a timestamp into an Excel table via VBA. Read on for the full discussion.
Download the Practice Workbook
Download the Excel file and practice along the instructions.
Insert a Timestamp in Excel: 6 Easy Ways
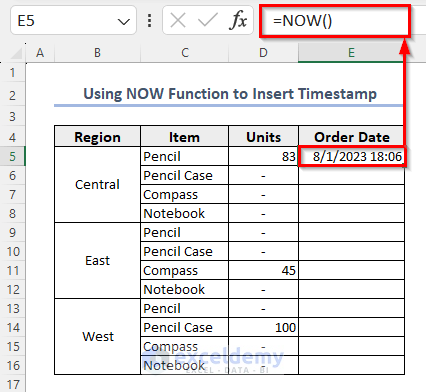
Method 1 – Using the NOW Function to Insert a Timestamp
The NOW function returns date and time with format MM/DD/YYYY hh:mm.
- Go to the cell (E5) where you want to insert a timestamp.
- Use the following function:
=NOW()- Press Enter.
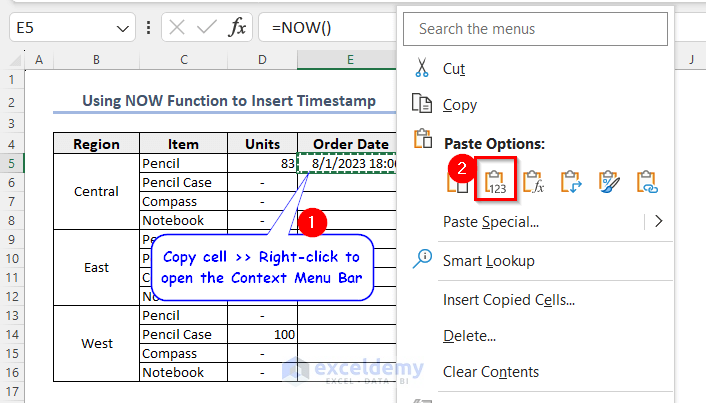
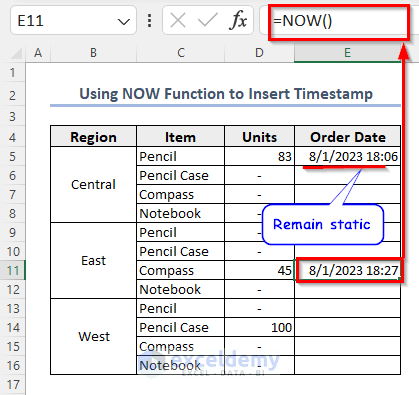
NOW is a volatile function which means it’ll update every time you input or change any data in your Excel spreadsheet. To keep the time static found by the NOW function, you have to copy the time from the cell and then paste it with the Values (V) option.
- Press Ctrl + C to copy the cell.
- Right-click on the cell where you want to put the value (or in this case, the same cell).
- From the Context Menu Bar, go to Paste Options and select Values (V).
- The E5 cell now doesn’t update after entering another timestamp in E11 cell.
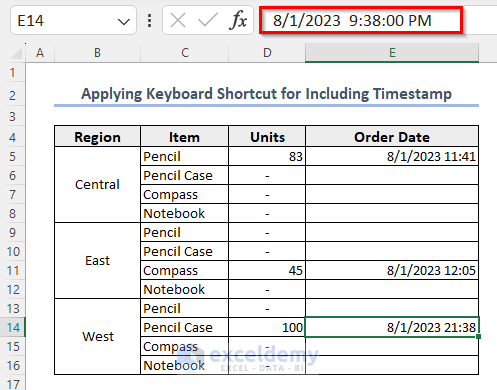
Method 2 – Applying a Keyboard Shortcut for Including a Static Timestamp
Suppose you want to preserve some data with the date and exact time of every entry in that dataset. In this case, you can use this method.
- Go to the E5 cell.
- Press Ctrl + ; (semicolon).
- Press Space then Ctrl + Shift + ; (semicolon).
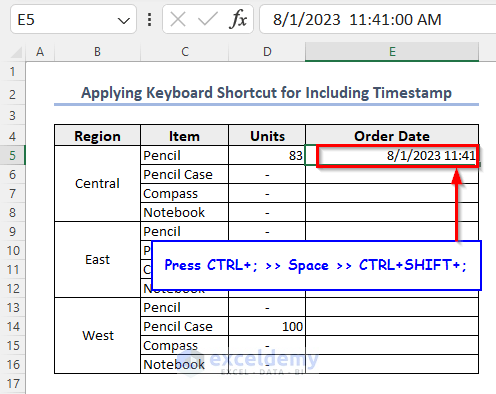
- You will get the time in a 24-hour format without seconds.
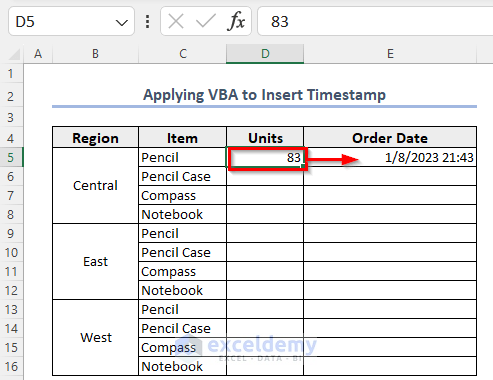
Method 3 – Applying VBA to Insert a Timestamp with Second in the Next Cell
Say you update a value and you want to store that exact time of editing.
- Right-click on the sheet name.
- From the Context Menu Bar, select View Code.
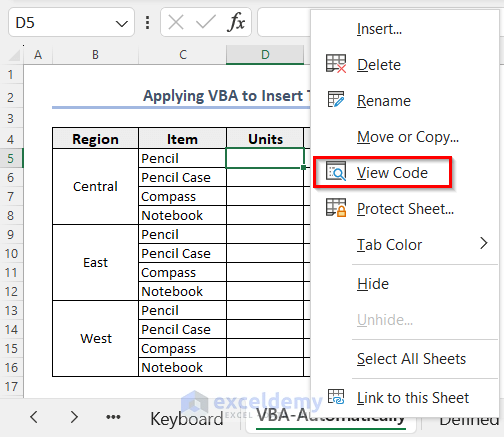
- Use the following code in the sheet.
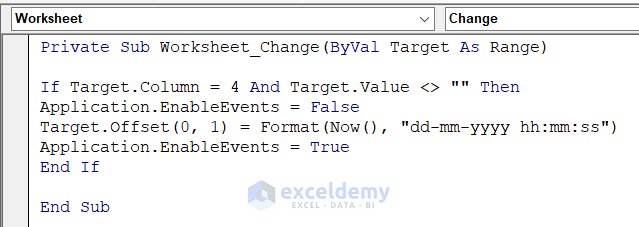
Private Sub Worksheet_Change(ByVal Target As Range)
If Target.Column = 4 And Target.Value <> "" Then
Application.EnableEvents = False
Target.Offset(0, 1) = Format(Now(), "dd-mm-yyyy hh:mm:ss")
Application.EnableEvents = True
End If
End Sub
Code Breakdown
- In this code, Target.Column = 4 denotes while you are changing any values of the D (4 number) column in Excel. So, you have to change the column number based on where you keep the data.
- Target.Offset(0,1) denotes the output (timestamp) that will store in the E column (next to the cell of the D column). So, you may change it to your preferred one.
- Save the code and go back to the worksheet .
- Enter or modify a value in the D column.
- You’ll get the instant time of update in the E column.
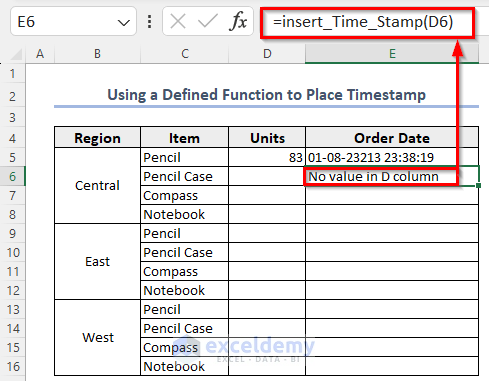
Method 4 – Using a Defined Function to Place a Timestamp with Seconds
- From the Developer tab, go to Visual Basic to get the VB Editor window.
- From the Insert tab, click on Module.
- In the Module, insert the following code and press on the Save button.
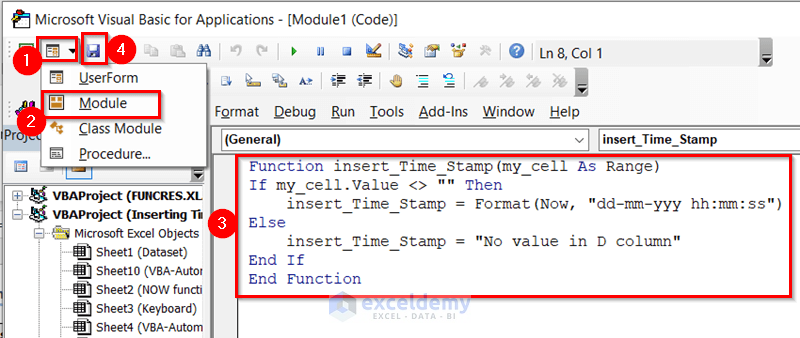
Function insert_Time_Stamp(my_cell As Range)
If my_cell.Value <> "" Then
    insert_Time_Stamp = Format(Now, "dd-mm-yyy hh:mm:ss")
Else
    insert_Time_Stamp = "No value in D column"
End If
End Function
Code Breakdown
- This code will create a function named insert_Time_Stamp.
- In this function, there will be one argument which should be a cell.
- This insert_Time_Stamp function will return the current date and time if the given cell contains any value otherwise it will return “No value in D column”.
- Use the equal sign (=) then write insert.
- You will get some suggestions from Excel. Choose insert_Time_Stamp and provide a cell reference.
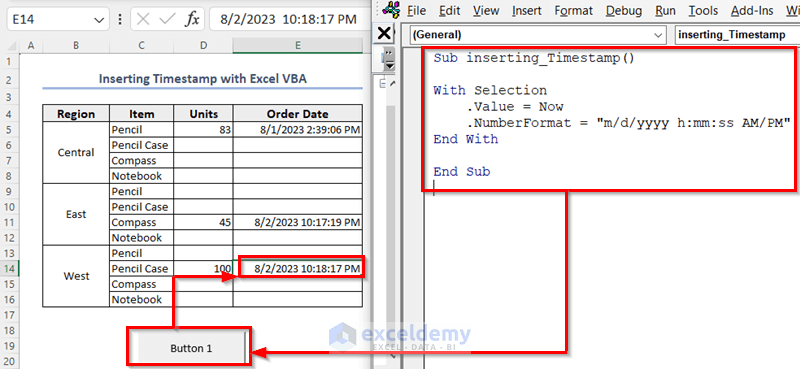
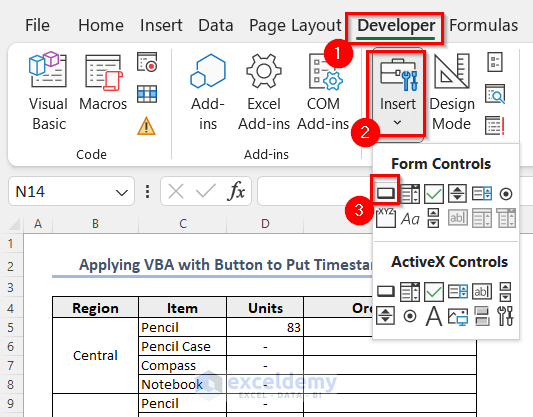
Method 5 – Applying VBA with a Button to Put a Timestamp in Excel
- From the Developer tab, go to Visual Basic to get to the VB Editor window.
- From the Insert tab, click on Module.
- In the Module, paste the following code and press on the Save button.
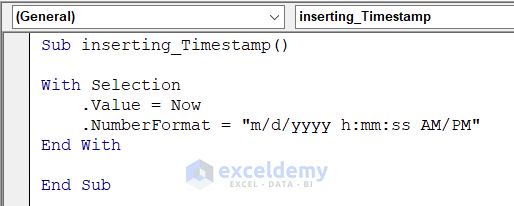
Sub inserting_Timestamp()
With Selection
    .Value = Now
    .NumberFormat = "m/d/yyyy h:mm:ss AM/PM"
End With
End Sub- Go back to the worksheet and from the Developer tab, go to Insert then select Button (Form Control).
- Drag the Button to a suitable place.
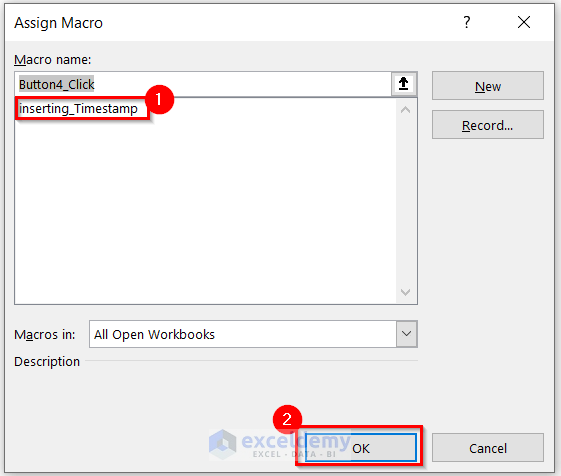
- You will get the Assign Macro dialog box.
- Select the sub-procedure (inserting_Timestamp) and press OK.
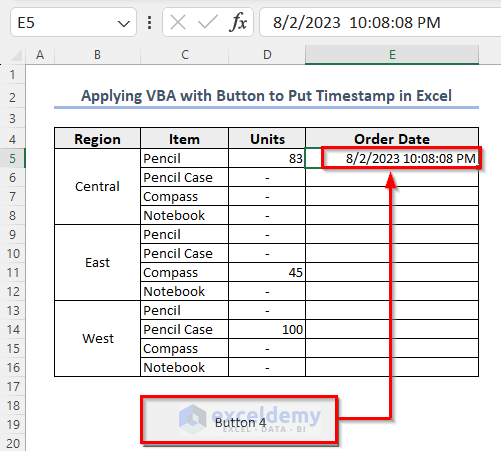
- Select the target cell and click on the button to get the timestamp.
Method 6 – Combining IF and NOW Functions with a Circular Reference for a Timestamp
- Go to the File tab and click Options.
- You will get the Excel Options dialog box.
- Go to Formulas, check Enable iterative calculation, and press OK.

- Enter the following formula in the E5 cell.
=IF(D5<>"",IF(E5<>"",E5,NOW()),"")- Press Enter and drag the Fill Handle icon to paste the formula to the other cells of the column.
- The timestamps are inserted only for the valid cells of the D column.
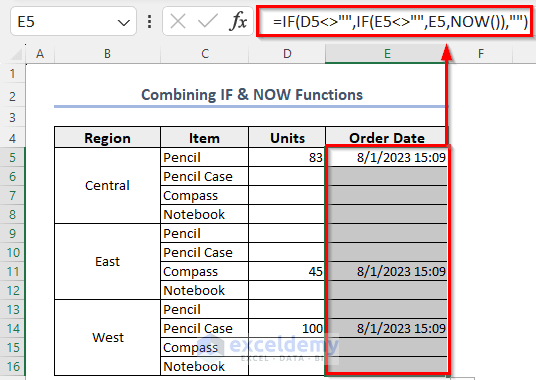
Formula Breakdown
- The first IF function says whether the D5 cell is valued or blank. If the cell contains any value, then the 2nd IF function will work.
- The second IF function will check whether the E5 cell is filled or not. If the cell is filled, then the IF function will return the cell value of E5.
- Otherwise, it will use the NOW function, which gives the current time and date.
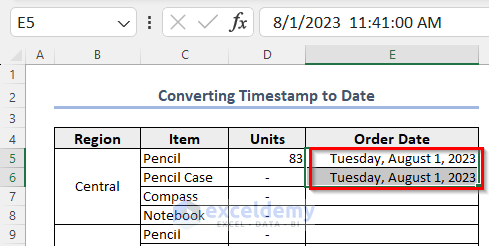
How to Convert an Excel Timestamp to a Date
- Select the timestamp and press Ctrl + 1 to open the Format Cells dialog box.
- From the Number tab, go to the Date category.
- Select a format on the right and press OK.
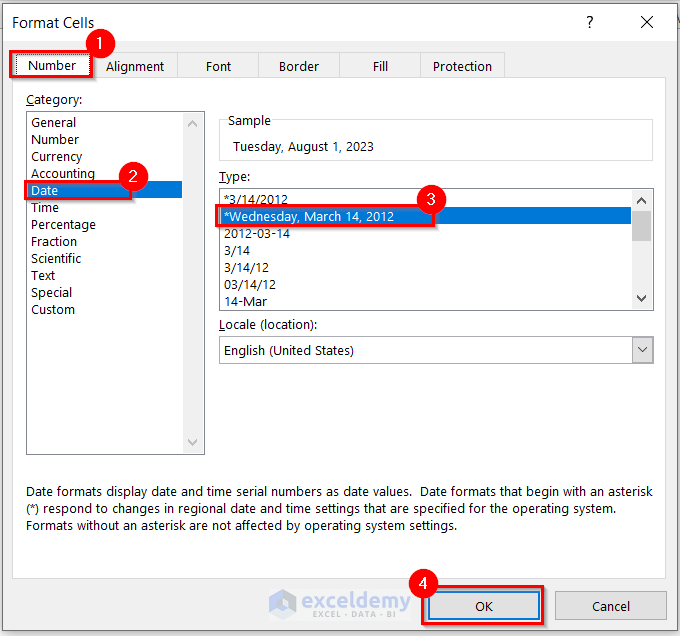
- This will convert the time to date.
Frequently Asked Questions
How to Get Current Time from Timestamp?
You should press Ctrl + ;(semicolon) to get the current time instead of the timestamp.
What is the format of a timestamp?
YYYY-MM-DD hh:mm:ss → Year-Month_Day + Hour-Minute-Second.
Can I filter data by timestamp?
Select any cell of dataset and press Ctrl + Shift + L. You will get the drop-down arrow beside column headers. Click on the drop-down arrow beside the column having timestamp, then you will get the option to filter data based on year/month/time.
Get FREE Advanced Excel Exercises with Solutions!

Thank you very much. Really detail and precise.
All the best
Rob
Dear Roberto,
You are most welcome.
Regards
ExcelDemy
This was an excel-lent instructions, thank you very much
Hello Lee G,
You are most welcome.
Regards
ExcelDemy
But how can I make it so that each row will have its own time that the record in that row was entered or updated for that matter? I may want to have a “date entered” column and another column for “date modified”.
Hello Marvin
Thanks for visiting our blog and sharing your questions so clearly. Basically, you want to have a timestamp for each row and store it in two different columns: one for the Date Entered and the other for the Date Modified.
SOLUTION Overview:
I have developed an Excel VBA Event Procedure regarding your problem:
Hopefully, you have found the idea. I have attached the solution workbook for better understanding; good luck.
DOWNLOAD SOLUTION WORKBOOK
Regards
Lutfor Rahman Shimanto
Excel & VBA Developer
ExcelDemy