Data sorting is a common activity when working with Microsoft Excel. I am pretty sure that in some cases, you’ll have to sort your cell data alphabetically. You can easily sort data alphabetically using Excel in-built features, but sometimes you might want to use VBA (Visual Basic for Applications) to make it easier and faster. In this article, I am going to show you some scenarios of sorting data alphabetically using Excel VBA. Let’s get started!

How to Launch VBA Editor in Excel
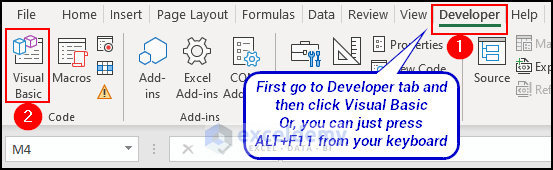
Before going to methods, in this part, we will show you how to open the Visual Basic Tab. This is the environment where we write our code. To open Visual Basic Tab, follow the below steps.
📌 Steps:
- Go to the Developer tab in the ribbon and click on Visual Basic or, you can just press ALT+F11 from your keyboard to open Visual Basic.
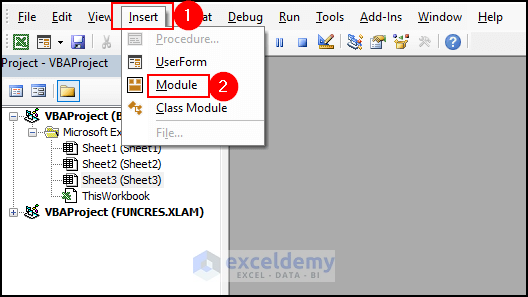
Then, the Visual Basic Editor will open up.
- Click on the Insert tab and select the Module option.
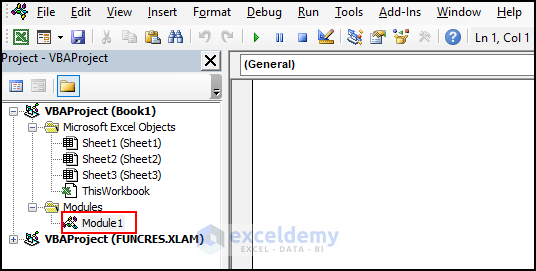
As a result, a coding module will appear.
Note:
If you can’t find the Developer tab in the Excel ribbon or if you are working for the very first time with VBA macros, don’t panic, you can get the Developer tab easily in your ribbon. It is not displayed in the ribbon by default.
Excel VBA to Sort Alphabetically: 6 Different Examples
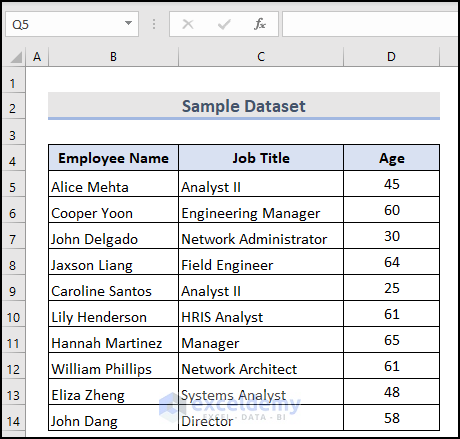
In order to demonstrate the different ways of sorting data alphabetically using VBA in Excel, I have taken a dataset that consists of 11 rows and 3 columns, Employee Name, Job Title, and Age. In this article, we are going to use Excel 365 version. You can use any other version according to your convenience.
1. Sort Data Alphabetically (A-Z) in a Column Using VBA in Excel
In this part, I have 2 different sub procedures to sort data alphabetically in a single column using VBA in Excel. You can use any of them as per your dataset.
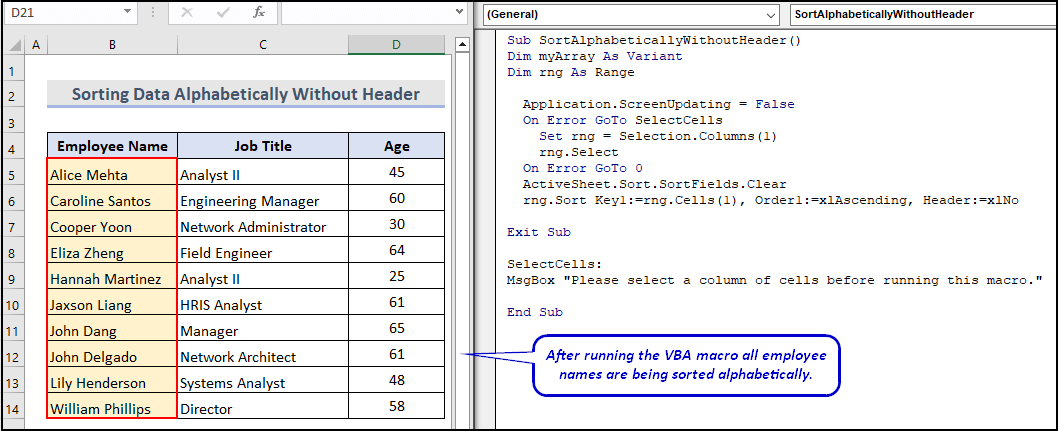
1.1. Sort Column Without Header
Let’s say, you want to sort a single column of your dataset without a column header. To demonstrate the steps, I have taken the Employee Name column data. Here is a video demonstration to help you better understand.
You can do this task easily using the VBA macro. To do so follow the below steps accordingly.
📌 Steps:
- Insert the following code in a new module and press F5 to run the entire code
Sub SortAlphabeticallyWithoutHeader()
Dim myArray As Variant
Dim rng As Range
  Application.ScreenUpdating = False
  On Error GoTo SelectCells
    Set rng = Selection.Columns(1)
    rng.Select
  On Error GoTo 0
  ActiveSheet.Sort.SortFields.Clear
  rng.Sort Key1:=rng.Cells(1), Order1:=xlAscending, Header:=xlNo
Exit Sub
SelectCells:
MsgBox "Please select a column of cells before running this macro."
End Sub🔎Code Breakdown:
Dim myArray As Variant
Dim rng As Range
These lines declare two variables: myArray as Variant data type and rng as a Range data type.
Application.ScreenUpdating = FalseTurns off screen updating to prevent flicker.
On Error GoTo SelectCells
    Set rng = Selection.Columns(1)
    rng.Select
  On Error GoTo 0
Here, handle error is used if the user does not select cells before running macro.
Set rng = Selection.Columns(1)Sets the range to the first column of the selected cells.
rng.SelectSelects the range
ActiveSheet.Sort.SortFields.ClearClears any existing sort fields in the dataset.
rng.Sort Key1:=rng.Cells(1), Order1:=xlAscending, Header:=xlNoSorts the range in ascending order, without headers. That’s why we set Header:=xlNo.
MsgBox "Please select a column of cells before running this macro."If the user did not select cells, displaying an error message to select a column.
Here is the final output after running the VBA macro.
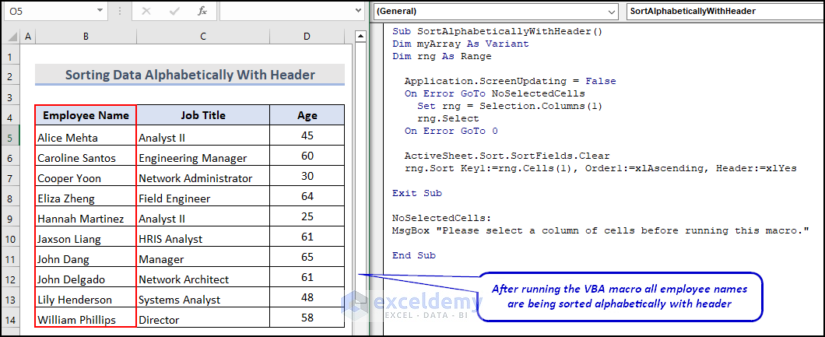
1.2. Sort Column With Header
Now, suppose you want to sort the same Employee Name column with header. Here is a demonstrative video of that.
Now, let’s insert a new module and copy paste the following code.
Sub SortAlphabeticallyWithHeader()
Dim myArray As Variant
Dim rng As Range
  Application.ScreenUpdating = False
  On Error GoTo NoSelectedCells
    Set rng = Selection.Columns(1)
    rng.Select
  On Error GoTo 0
  ActiveSheet.Sort.SortFields.Clear
  rng.Sort Key1:=rng.Cells(1), Order1:=xlAscending, Header:=xlYes
Exit Sub
NoSelectedCells:
MsgBox "Please select a column of cells before running this macro."
End Sub🔎Code Breakdown:
Dim myArray As Variant
Dim rng As Range
These lines declare two variables: myArray as Variant data type and rng as a Range data type.
Application.ScreenUpdating = FalseTurns off screen updating to prevent flicker.
On Error GoTo SelectCellsHere, handle error is used if the user does not select cells before running macro.
Set rng = Selection.Columns(1)Sets the range to the first column of the selected cells.
rng.SelectSelects the range
ActiveSheet.Sort.SortFields.ClearClears any existing sort fields in the dataset.
rng.Sort Key1:=rng.Cells(1), Order1:=xlAscending, Header:=xlYesSorts the range in ascending order, with headers. That’s why we set Header:=xlYes.
MsgBox "Please select a column of cells before running this macro."If the user did not select cells, displaying an error message to select a column.
Here is the final output after running the VBA macro successfully.
Read More: Excel VBA to Sort a ComboBox List Alphabetically
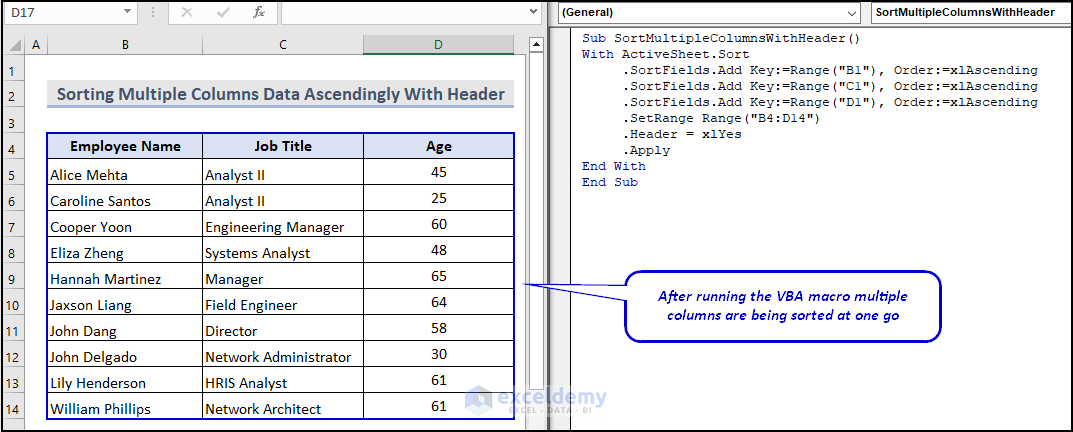
2. Sorting Multiple Columns in Ascending Order With Header Using Excel VBA
We have seen how to sort a single column with and without a header in this article. Let’s say you want to sort multiple columns with headers in ascending order using Excel VBA. Here’s how you can do that quickly. For your clear understanding, I have attached a video.
Now, insert a new module and put the following code in that module. Select the Macro name SortMultipleColumnsWithHeader and press Run.
Sub SortMultipleColumnsWithHeader()
With ActiveSheet.Sort
     .SortFields.Add Key:=Range("B1"), Order:=xlAscending
     .SortFields.Add Key:=Range("C1"), Order:=xlAscending
     .SortFields.Add Key:=Range("D1"), Order:=xlAscending
     .SetRange Range("B4:D14")
     .Header = xlYes
     .Apply
End With
End Sub
🔎 Code Breakdown:
With ActiveSheet.Sort
     .SortFields.Add Key:=Range("B1"), Order:=xlAscending
     .SortFields.Add Key:=Range("C1"), Order:=xlAscending
     .SortFields.Add Key:=Range("D1"), Order:=xlAscending
The With statement is used to refer to the ActiveSheet.Sort object. We have added sort fields for each column to be sorted in ascending order. We have 3 columns in our dataset.
.SetRange Range("B4:D14")Sets the range of cells to be sorted. Our dataset range is B4:D14.
.Header = xlYesSpecifies that the range includes a header row.
.ApplyApply the sort.
Here is the final output.
3. Sorting Data with Just Double Clicking on Header Using Excel VBA
Suppose you want to sort data by just double clicking on the column header. By writing a VBA code, you can sort the data when you double click on the headers. I have attached a demonstrative video for your better understanding.
Now, click right of the mouse on the worksheet name and go to the View Code option. After that put the below code there and press Run.
Private Sub Worksheet_BeforeDoubleClick(ByVal Target As Range, Cancel As Boolean)
Dim my_Rng As Range
Dim my_Column As Integer
my_Column = Range("B4:D14").Columns.Count
Cancel = False
If Target.Row = 4 And Target.Column <= my_Column + 1 Then
    Cancel = True
    Set my_Rng = Range(Target.Address)
    Range("B4:D14").Sort Key1:=my_Rng, Header:=xlYes
End If
End Sub🔎Code Breakdown:
Dim my_Rng As Range
Dim my_Column As Integer
These lines declare two variables: my_Rng as Range and my_Column as Integer
my_Column = Range("B4:D14").Columns.CountGets the number of columns in the range B4:D14.
Cancel = FalseSets Cancel to False by default.
If Target.Row = 4 And Target.Column <= my_Column + 1 Then
    Cancel = True
    Set my_Rng = Range(Target.Address)
    Range("B4:D14").Sort Key1:=my_Rng, Header:=xlYes
End If
This If statement checks if the double-clicked cell is in row 4 and within the range B4:D14 plus one column to the right. Then sets Cancel to True to cancel the default behavior of the double-click. After that, it sets my_Rng to the address of the double-clicked cell and sorts the range B4:D14 based on the value in the double-clicked cell.
Here is the final output image.

Read More: VBA to Sort Table in Excel
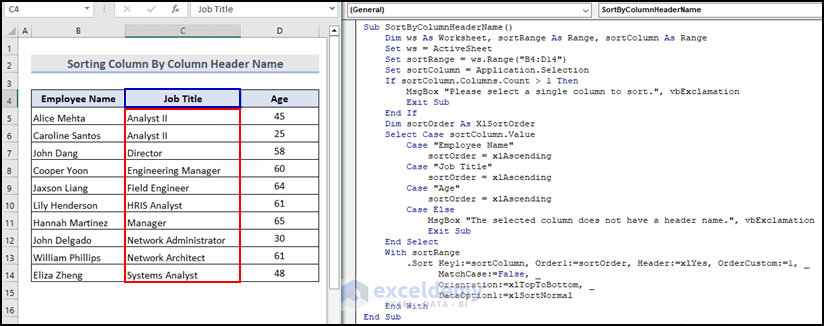
4. VBA Code to Sort Column By Column Header Name
As you already know, our dataset has three columns. Suppose you want to sort the Job Title column by selecting only the column header name. Check out the following steps to learn how to do that quickly. A demonstrative video is attached for your clear understanding.
Now let’s insert a new module and copy paste the following code. Select the Macro name SortByColumnHeaderName and click Run.
Sub SortByColumnHeaderName()
    Dim ws As Worksheet, sortRange As Range, sortColumn As Range
    Set ws = ActiveSheet
    Set sortRange = ws.Range("B4:D14")
    Set sortColumn = Application.Selection
    If sortColumn.Columns.Count > 1 Then
        MsgBox "Please select a single column to sort.", _
        vbExclamation
        Exit Sub
    End If
    Dim sortOrder As XlSortOrder
    Select Case sortColumn.Value
        Case "Employee Name"
            sortOrder = xlAscending
        Case "Job Title"
            sortOrder = xlAscending
        Case "Age"
            sortOrder = xlAscending
        Case Else
            MsgBox "The selected column does not have a header name.", _
            vbExclamation
            Exit Sub
    End Select
    With sortRange
        .Sort Key1:=sortColumn, _
              Order1:=sortOrder, _
              Header:=xlYes, _
              OrderCustom:=1, _
              MatchCase:=False, _
              Orientation:=xlTopToBottom, _
              DataOption1:=xlSortNormal
    End With
End Sub
🔎 Code Breakdown:
Dim ws As Worksheet, sortRange As Range, sortColumn As RangeDeclares variables to hold worksheet, range to sort, and column to sort.
Set ws = ActiveSheetSets the worksheet object to the active worksheet.
Set sortRange = ws.Range("B4:D14")This line sets the range object to the range of data to be sorted.
Set sortColumn = Application.SelectionSets the range object to the selected column.
If sortColumn.Columns.Count > 1 Then
        MsgBox "Please select a single column to sort.", _
        vbExclamation
        Exit Sub
    End If
This If statement checks if more than one column is selected, if so display a message and exit the sub.
Dim sortOrder As XlSortOrderDeclares variable to store the sort order.
Select Case sortColumn.Value
        Case "Employee Name"
            sortOrder = xlAscending
        Case "Job Title"
            sortOrder = xlAscending
        Case "Age"
            sortOrder = xlAscending
        Case Else
            MsgBox "The selected column does not have a header name.", _
            vbExclamation
          Exit Sub
  End Select
We are determining the sort order based on the selected column header name.
With sortRange
        .Sort Key1:=sortColumn, _
              Order1:=sortOrder, _
              Header:=xlYes, _
              OrderCustom:=1, _
              MatchCase:=False, _
              Orientation:=xlTopToBottom, _
              DataOption1:=xlSortNormal
  End With
Here, we are sorting the range of data (B4:D14) based on the selected column header name and sort order.
Here is the final output after running the VBA macro.
Read More: Excel VBA to Custom Sort
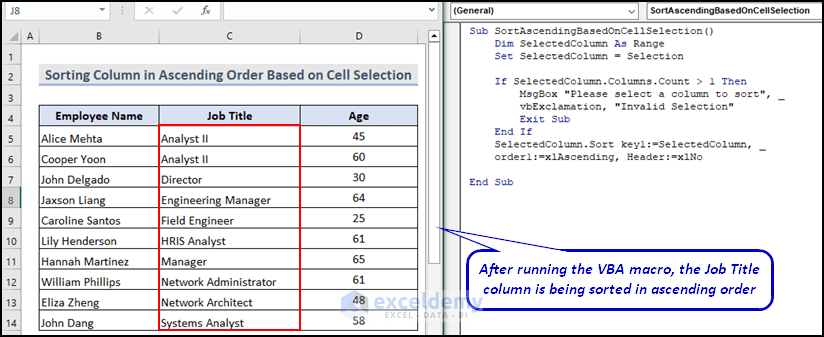
5. Sorting Column in Ascending Order Based on Cell Selection
Suppose you want to sort a column in ascending order based on cell selection. With the following VBA code, the user can select a single-column range from the computer and the values will be immediately reordered alphabetically. In this scenario, we want to select the Job Title column data and sort the data in ascending order. You can watch the video below to get a better understanding.
Now let’s insert a new module and copy paste the following code. Select the Macro name SortAscendingBasedOnCellSelection and click Run.
Sub SortAscendingBasedOnCellSelection()
    Dim SelectedColumn As Range
    Set SelectedColumn = Selection
    If SelectedColumn.Columns.Count > 1 Then
        MsgBox "Please select a column to sort", _
        vbExclamation, "Invalid Selection"
        Exit Sub
    End If
    SelectedColumn.Sort key1:=SelectedColumn, _
    order1:=xlAscending, Header:=xlNo
End Sub
🔎 Code Breakdown:
Dim SelectedColumn As RangeThis line declares a variable to store the selected column range.
Set SelectedColumn = SelectionGets the selected range.
If SelectedColumn.Columns.Count > 1 Then
       MsgBox "Please select a column to sort", _
        vbExclamation, "Invalid Selection"
        Exit Sub
    End If
This If statement checks if only one column is selected or not.
SelectedColumn.Sort key1:=SelectedColumn, order1:=xlAscending, Header:=xlNoSorts the selected column in ascending order.
Here, Header:=xlNo since the selected range doesn’t contain a header row.
Here is the final output.
6. VBA Code to Sort a Predetermined Cell Range in Ascending Order
Let’s say, now we want to sort the Age column in ascending order. The cell range of the Age column is predetermined which is D5:D14. You can easily sort a predetermined cell range in ascending order using Excel VBA. I have attached a demonstrative video for your better understanding.
Now let’s insert another new module and copy paste the following code. Select the Macro name SortPredeterminedCellRange and click Run.
Sub SortPredeterminedCellRange()
Dim rng As Range
  Application.ScreenUpdating = False
  Set rng = Range("D5:D14")
  ActiveSheet.Sort.SortFields.Clear
  rng.Sort Key1:=rng.Cells(1), _
  Order1:=xlAscending, Header:=xlNo
End Sub🔎Code Breakdown:
Dim rng As RangeThis line declares a variable to store the range to be sorted.
Application.ScreenUpdating = FalseDisables screen updating to speed up the sorting process.
Set rng = Range("D5:D14")Sets the range to be sorted. You can put your preferred range to be sorted.
ActiveSheet.Sort.SortFields.ClearClears any existing sort fields on the active sheet.
rng.Sort Key1:=rng.Cells(1), Order1:=xlAscending, Header:=xlNoSorts the range in ascending order based on the first cell in the range. Here, Header:=xlNo since the selected range doesn’t contain a header row.
How to Sort Worksheets Alphabetically in Excel using VBA
It can be very useful to use Excel VBA when you have multiple worksheets in your workbook and you wish to sort them in different ways. In this part of the article, I am going to show you different scenarios of sorting multiple worksheets using Excel VBA. To show you different scenarios of this method, we have created another workbook with multiple worksheets. We have a total of 10 worksheets in our new workbook.

Now let’s go through the following parts.
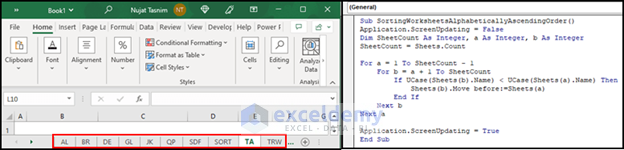
i. VBA code to Sort Worksheets Alphabetically in Excel
First I am going to show you how you can sort worksheets alphabetically in ascending order. Here is a demonstrative video.
Now insert a new module and put the following code in that module. Select the Macro name SortingWorksheetsAlphabeticallyAscendingOrder and click Run.
Sub SortingWorksheetsAlphabeticallyAscendingOrder()
Application.ScreenUpdating = False
Dim SheetCount As Integer, a As Integer, b As Integer
SheetCount = Sheets.Count
For a = 1 To SheetCount - 1
    For b = a + 1 To SheetCount
        If UCase(Sheets(b).Name) < UCase(Sheets(a).Name) Then
            Sheets(b).Move before:=Sheets(a)
        End If
    Next b
Next a
Application.ScreenUpdating = True
End Sub
🔎 Code Breakdown:
Here,
-
Application.ScreenUpdating = False→ Turning off screen updating to speed up the code execution.
-
Dim SheetCount As Integer, a As Integer, b As Integer→ Declaring variables for worksheet count and iteration.
-
SheetCount = Sheets.Count→ Getting the total number of worksheets in the workbook.
-
For a = 1 To SheetCount - 1
    For b = a + 1 To SheetCount
        If UCase(Sheets(b).Name) < UCase(Sheets(a).Name) Then
            Sheets(b).Move before:=Sheets(a)
        End If
    Next b
Next a
Here, the first For loop goes through all worksheets in the workbook and the second For loop goes through all worksheets that come after the current worksheet in the outer loop.The If statement compares the names of the current and next worksheets and swap their positions if it’s necessary.
Application.ScreenUpdating = True→
Turning screen updating back on.
Here is the final output after running the VBA macro successfully.
ii. VBA code to Sort Worksheets in Descending Order
In this part, I will show you how to sort worksheets in descending order. To do that you only need to change the < (less than) sign with the > (greater than) sign. Here is a quick step by step video for your better understanding.
Now insert a new module and put the following code in that module. Select the Macro name SortingWorksheetsAlphabeticallyDescendingOrder and click Run.
Sub SortingWorksheetsAlphabeticallyDescendingOrder()
Application.ScreenUpdating = False
Dim ShCount As Integer, i As Integer, j As Integer
ShCount = Sheets.Count
For i = 1 To ShCount - 1
    For j = i + 1 To ShCount
        If UCase(Sheets(j).Name) > UCase(Sheets(i).Name) Then
            Sheets(j).Move before:=Sheets(i)
        End If
    Next j
Next i
Application.ScreenUpdating = True
End Sub
🔎 Code Breakdown:
Application.ScreenUpdating = FalseTurns off screen updating to speed up the code execution.
Dim ShCount As Integer, i As Integer, j As IntegerDeclares variables for worksheet count and iteration.
ShCount = Sheets.CountGets the total number of worksheets in the workbook.
For i = 1 To ShCount - 1
    For j = i + 1 To ShCount
        If UCase(Sheets(j).Name) > UCase(Sheets(i).Name) Then
            Sheets(j).Move before:=Sheets(i)
        End If
    Next j
Next i
Here, the first For loop goes through all worksheets in the workbook and the second For loop goes through all worksheets that come after the current worksheet in the outer loop. The If statement compares the names of the current and next worksheets and swap their positions if it’s necessary. The only difference from the previous scenario is that we have used the > (greater than) sign instead of the < (less than) sign.
Application.ScreenUpdating = True Turns screen updating back on.
Here is the final output after running the VBA macro.

Read More: Excel VBA to Sort in Descending Order
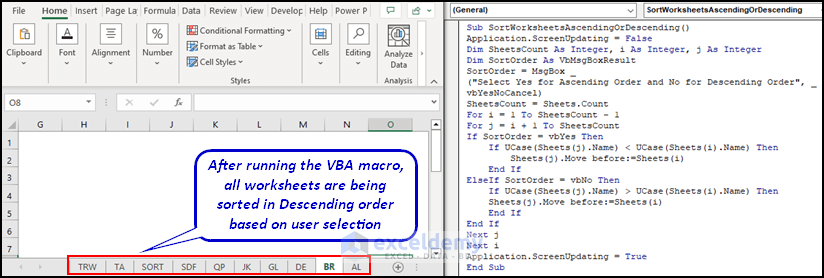
iii. VBA code to Sort Worksheets in Ascending or Descending Order Based on User Input
You can also allow the user to choose whether to sort ascending or descending. The following code would display a message box and allow the user to select the sorting order. Please find attached a video demonstration to help you understand.
Now insert a new module and copy paste the following code. Then select the Macro name SortingWorksheetsAlphabeticallyDescendingOrder and click Run.
Sub SortWorksheetsAscendingOrDescending()
Application.ScreenUpdating = False
Dim SheetsCount As Integer, i As Integer, j As Integer
Dim SortOrder As VbMsgBoxResult
SortOrder = MsgBox _
("Select Yes for Ascending Order and No for Descending Order", _
vbYesNoCancel)
SheetsCount = Sheets.Count
For i = 1 To SheetsCount - 1
For j = i + 1 To SheetsCount
If SortOrder = vbYes Then
    If UCase(Sheets(j).Name) < UCase(Sheets(i).Name) Then
        Sheets(j).Move before:=Sheets(i)
    End If
ElseIf SortOrder = vbNo Then
    If UCase(Sheets(j).Name) > UCase(Sheets(i).Name) Then
    Sheets(j).Move before:=Sheets(i)
    End If
End If
Next j
Next i
Application.ScreenUpdating = True
End Sub
🔎 Code Breakdown:
Application.ScreenUpdating = FalseTurns off screen updating to speed up the code execution.
Dim SheetsCount As Integer, i As Integer, j As Integer
Dim SortOrder As VbMsgBoxResult
Declares variables for worksheet count, iteration, and sort order.
SortOrder = MsgBox _
("Select Yes for Ascending Order and No for Descending Order", _vbYesNoCancel)Prompts the user to select ascending or descending order.
SheetsCount = Sheets.CountGets the total number of worksheets in the workbook.
For i = 1 To SheetsCount - 1
For j = i + 1 To SheetsCount
If SortOrder = vbYes Then
    If UCase(Sheets(j).Name) < UCase(Sheets(i).Name) Then
        Sheets(j).Move before:=Sheets(i)
    End If
ElseIf SortOrder = vbNo Then
    If UCase(Sheets(j).Name) > UCase(Sheets(i).Name) Then
    Sheets(j).Move before:=Sheets(i)
    End If
End If
Next j
Next i
Here, the first For loop goes through all worksheets in the workbook and the second For loop goes through all worksheets that come after the current worksheet in the outer loop. The If statement compares the names of the current and next worksheets and swap their positions if necessary. Suppose the user wants to sort all worksheets in descending order. Here is the final output result after running the VBA macro.
Read More: How to Sort Array with Excel VBA (Both Ascending and Descending Order)
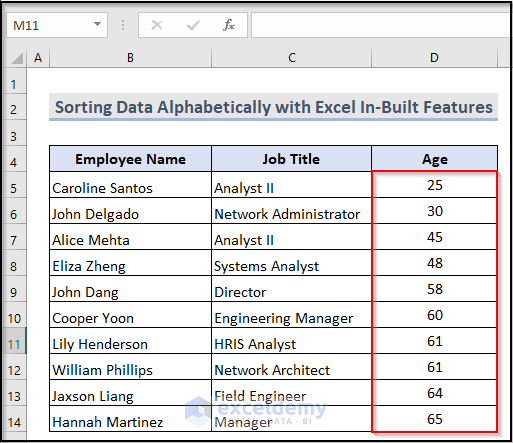
How to Sort Data Alphabetically with Excel In-Built Features
Without using VBA macro you can also sort data by using Excel in-built features. To sort data alphabetically, Excel has a built-in feature called Sort. With this, you can easily sort data. Suppose you want to sort the Age column data in ascending order. Here is a demonstrative video for your clear understanding.
Follow the steps below to complete the task.
📌 Steps:
- First select the data range (D5:D14)of Age column.
- Go to Editing → Sort & Filter
- Click on Sort Smallest to Largest
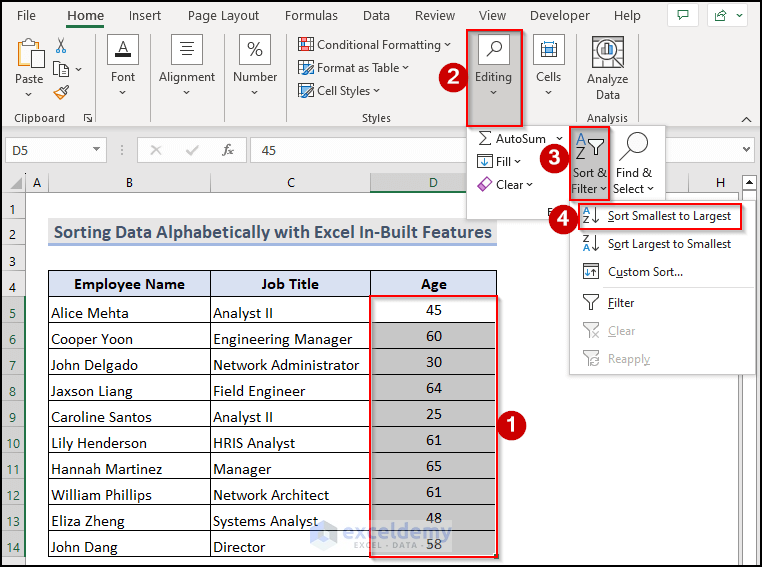
You will see that the Age column is sorted alphabetically.
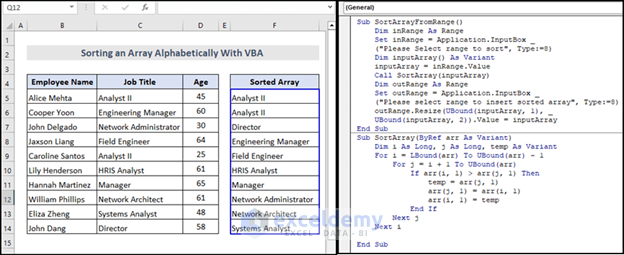
How to Sort an Array Alphabetically With Excel VBA
VBA needs to display or re-order arrays alphabetically in some scenarios. It’s not possible to sort arrays automatically with VBA, but with a little bit of coding we can build a reusable function to accomplish the same task. Below there is a demonstrative video of sorting an array alphabetically using Excel VBA.
Now, insert a new module and put the following code in that module. Select the Macro name SortArrayFromRange and click Run.
Sub SortArrayFromRange()
    Dim inRange As Range
    Set inRange = Application.InputBox _
    ("Please Select range to sort", Type:=8)
    Dim inputArray() As Variant
    inputArray = inRange.Value
    Call SortArray(inputArray)
    Dim outRange As Range
    Set outRange = Application.InputBox _
    ("Please select range to insert sorted array", Type:=8)
    outRange.Resize(UBound(inputArray, 1), _
    UBound(inputArray, 2)).Value = inputArray
End Sub
Sub SortArray(ByRef arr As Variant)
    Dim i As Long, j As Long, temp As Variant
    For i = LBound(arr) To UBound(arr) - 1
        For j = i + 1 To UBound(arr)
            If arr(i, 1) > arr(j, 1) Then
                temp = arr(j, 1)
                arr(j, 1) = arr(i, 1)
                arr(i, 1) = temp
            End If
        Next j
    Next i
End Sub
🔎 Code Breakdown:
Here,
Dim inRange As Range
Set inRange = Application.InputBox ("Please select range to sort", Type:=8)
→ Prompting user to select range to sort.
-
Dim inputArray() As Variant
inputArray = inRange.Value→ Storing the values in the selected range in an array.
-
Call SortArray(inputArray)→ Calling the SortArray subroutine to sort the values in the array
-
Dim outRange As Range
Set outRange = Application.InputBox ("Please select range to insert sorted array", Type:=8)→ Prompting user to select range to insert the sorted array.
-
outRange.Resize(UBound(inputArray, 1), UBound(inputArray, 2)).Value = inputArray→ Inserting the sorted values from the array into the selected range
For i = LBound(arr) To UBound(arr) - 1
        For j = i + 1 To UBound(arr)
            If arr(i, 1) > arr(j, 1) Then
                temp = arr(j, 1)
                arr(j, 1) = arr(i, 1)
                arr(i, 1) = temp
            End If
        Next j
    Next iF
Here, the first For loop goes through each element in the array. Then the second For loop goes through the remaining elements in the array. We have used an If statement that checks if the current element is greater than the next element and if so then swap their positions.
Here is the final output image.
How to Sort a String Alphabetically With Excel VBA
With Excel VBA, you can sort a string alphabetically as well. Suppose you want to sort the employee name “Alice Mehta” alphabetically. VBA makes that easy. In order to do this, we will create a function named functionSortString, which will be used to sort any string. The following video will help you understand the whole process.
Now follow the below steps.
📌 Steps:
- Insert a new module and put the following code in that module.
Function functionSortString(stringPassed As String) As String
Dim temporary As String
Dim r As Integer
While Len(stringPassed)
    temporary = Left(stringPassed, 1)
        For r = 2 To Len(stringPassed)
            If UCase(Mid(stringPassed, r, 1)) < UCase(temp) Then
                temporary = Mid(stringPassed, r, 1)
            End If
        Next r
    functionSortString = functionSortString & temporary
    stringPassed = Left(stringPassed, InStr(1, stringPassed, temporary) - 1) & _
                        Mid(stringPassed, InStr(1, stringPassed, temporary) + 1)
Wend
End Function
🔎 Code Breakdown:
Here,
-
Dim temporary As String→ Declaring a variable to hold temporary characters.
Dim r As Integer→ Declaring a variable for loop iteration.
While Len(stringPassed)
    temporary = Left(stringPassed, 1)
        For r = 2 To Len(stringPassed)
            If UCase(Mid(stringPassed, r, 1)) < UCase(temp) Then
                temporary = Mid(stringPassed, r, 1)
            End If
        Next r
This While loop goes through until the length of the string is zero. It takes the first character of the remaining string and compares it to the rest of the string and finds the smallest character.
-
functionSortString = functionSortString & temporary→ Adding the smallest character to the result string.
-
stringPassed = Left(stringPassed, InStr(1, stringPassed, temporary) - 1) & Mid(stringPassed, InStr(1, stringPassed, temporary) + 1)→ Removing the smallest character from the remaining string.
Now insert the following function in cell B16 and press Enter.
=functionSortString(B5)Here, cell B5 contains the string “Alice Mehta”.
Note: The UCase function is used to make sure that the lowercase and uppercase are not treated differently.
This is the final output.

Frequently Asked Questions:
- How do you custom sort in Excel?
Yes, you can also custom sort in Excel. Hopefully, the attached article from ExcelDemy will make your job easier and more efficient.
- How do I automatically sort columns alphabetically in Excel?
Yes, you can automatically sort columns alphabetically by using Excel in-built features. I have already discussed this method in the previous part of this article. You can check that. Hopefully you will get your answer.
Key Takeaways from Article
- In this article, I have showed launching VBA editor in Excel
- Chosen real life dataset for better understanding.
- Focusing on how to sort alphabetically with VBA code in Excel.
- Explained different approaches with VBA code.
- Showed how to sort worksheets alphabetically using VBA code.
- Provide solutions to frequently asked questions of readers.
- Overall focused on using VBA code to sort data alphabetically in Excel.
Download Practice Workbook
You can download the practice workbook from here:
Conclusion
My goal in this article is to explain how to sort data alphabetically using VBA code. This will boost your productivity and ease your work. I hope this article was informative and enjoyable for you. Feel free to leave any questions, comments, or recommendations in the comments section.

