How to Launch the VBA Editor in Excel
Utilizing the Module Tool:
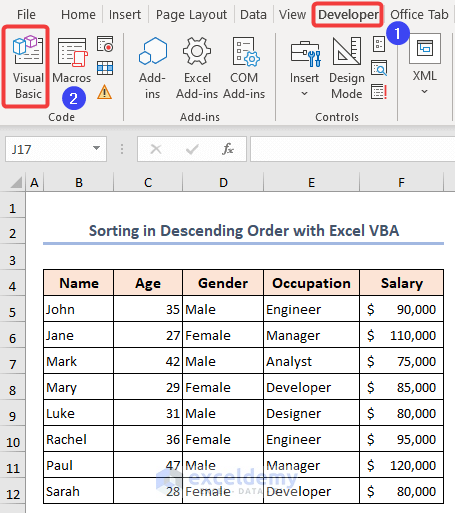
- Open your workbook and select Visual Basic in the Developer tab.
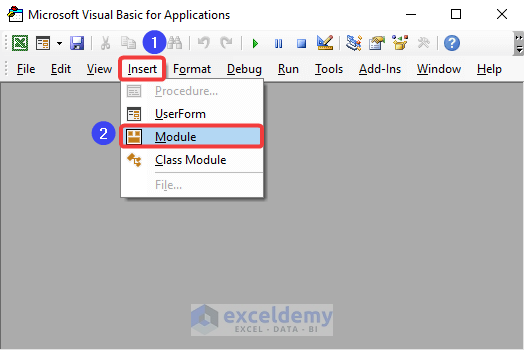
- Choose Module in the Insert tab.
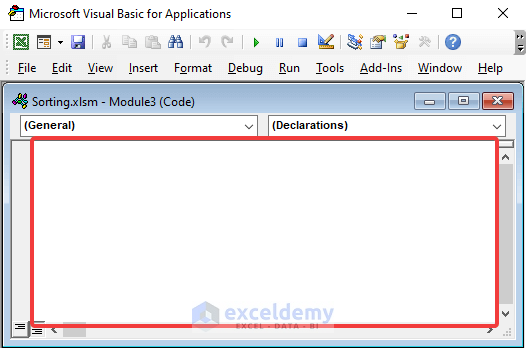
- A module will open.
Using the View Code Option:
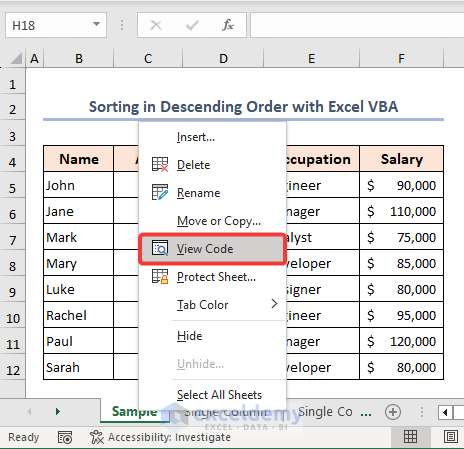
- Choose View Code in the Context Menu.
- A window will open.
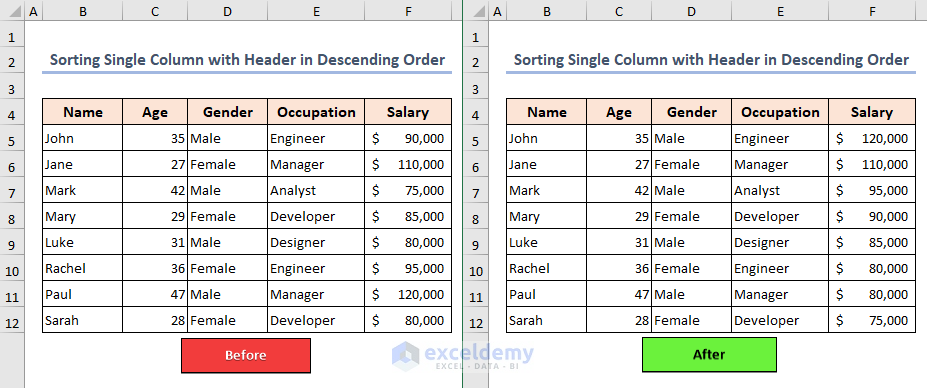
Example 1 – Sorting a Single Column with Header
Steps:
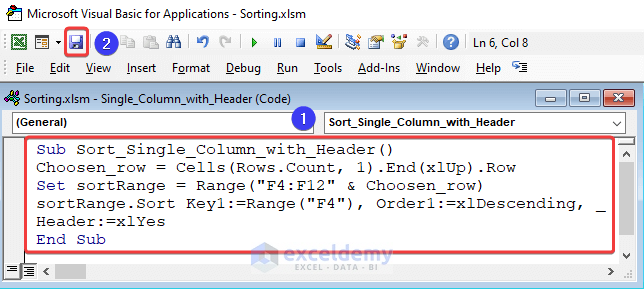
- Open a new module, enter the following code and Save the file.
Sub Sort_Single_Column_with_Header()
Choosen_row = Cells(Rows.Count, 1).End(xlUp).Row
Set sortRange = Range("F4:F12" & Choosen_row)
sortRange.Sort Key1:=Range("F4"), Order1:=xlDescending, Header:=xlYes
End Sub
- Create a macro button in the Insert tab.
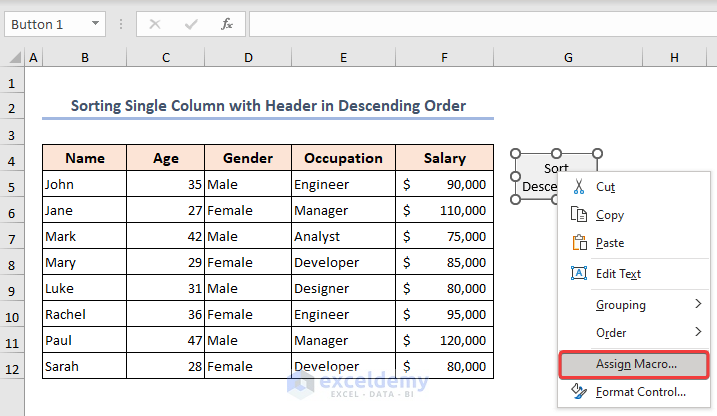
- Draw a button and choose Assign Macro in the Advanced tab.
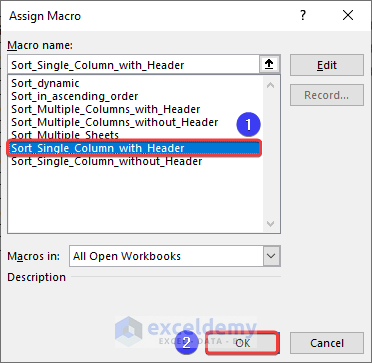
- In Assign Macro, choose the Macro and click OK.
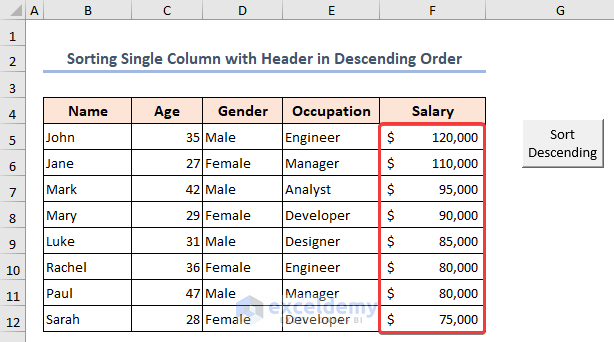
- Click the button and you will see the table sorted in descending order.
Example 2 – Sorting a Single Column Without Header Using Excel VBA

Steps:

- Open a new module, enter the code, and Run it by pressing F5.
Sub Sort_Single_Column_without_Header()
Choosen_row = Cells(Rows.Count, 1).End(xlUp).Row
Set sortRange = Range("C5:C12" & Choosen_row)
sortRange.Sort Key1:=Range("C5"), Order1:=xlDescending, Header:=xlNo
End Sub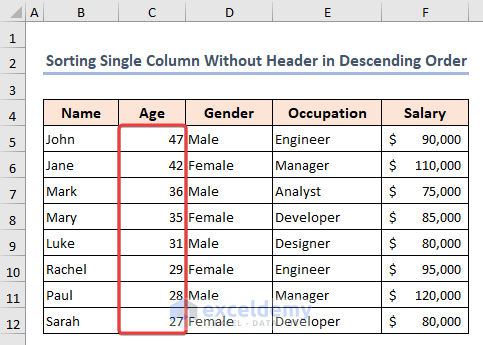
The table is sorted in descending order.
Read More: VBA to Sort Table in Excel
Example 3 – Sorting Multiple Columns with a Header
Steps:
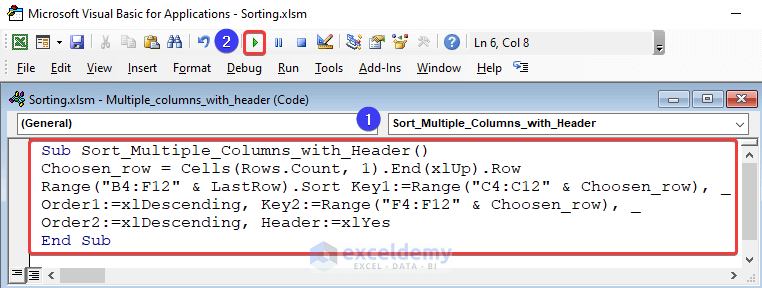
- Create a new module, enter the code, and run it by clicking Run.
Sub Sort_Multiple_Columns_with_Header()
Choosen_row = Cells(Rows.Count, 1).End(xlUp).Row
Range("B4:F12" & LastRow).Sort Key1:=Range("C4:C12" & Choosen_row), _
Order1:=xlDescending, Key2:=Range("F4:F12" & Choosen_row), _
Order2:=xlDescending, Header:=xlYes
End Sub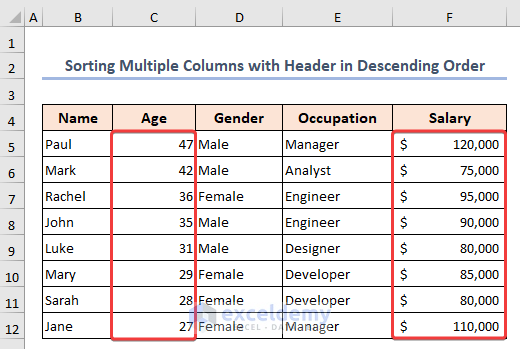
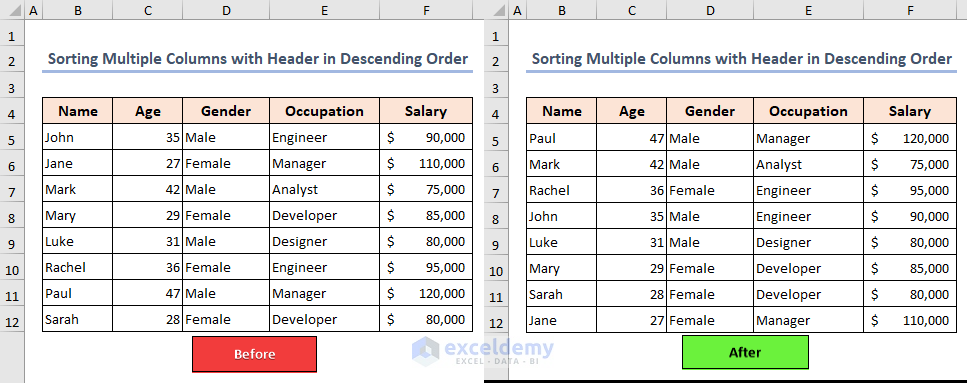
You will see the whole table sorted by Age and Salary in descending order.
Read More: Excel VBA to Custom Sort
Example 4 – Sorting Multiple Columns Without a Header
Steps:
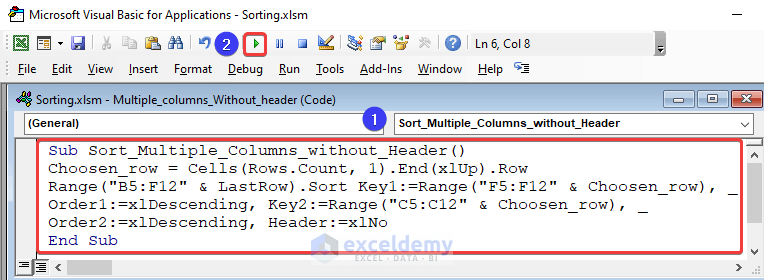
- Open a module, use the code, and click Run.
Sub Sort_Multiple_Columns_without_Header()
Choosen_row = Cells(Rows.Count, 1).End(xlUp).Row
Range("B5:F12" & LastRow).Sort Key1:=Range("F5:F12" & Choosen_row), _
Order1:=xlDescending, Key2:=Range("C5:C12" & Choosen_row), _
Order2:=xlDescending, Header:=xlNo
End Sub
The list is sorted.
Read More: How to Sort Array with Excel VBA
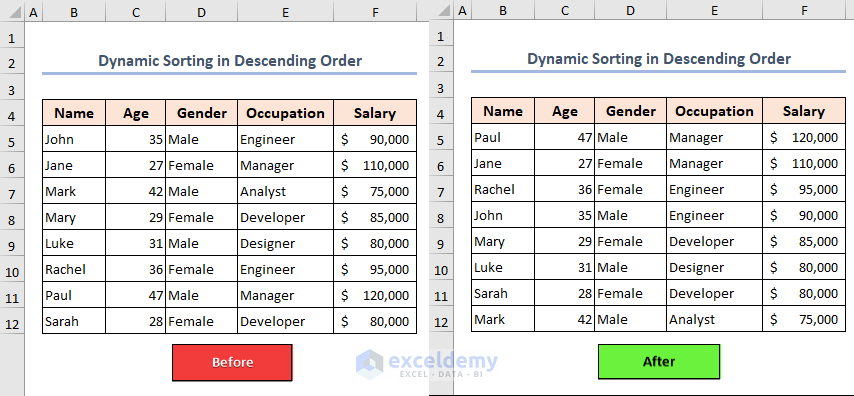
Example 5 – Enabling the Double Click Event to Sort Columns
Steps:
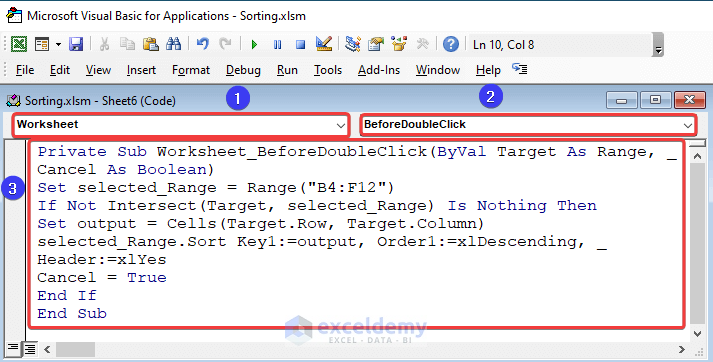
- Use the code and Save it.
Private Sub Worksheet_BeforeDoubleClick(ByVal Target As Range, Cancel As Boolean)
Set selected_Range = Range("B4:F12")
If Not Intersect(Target, selected_Range) Is Nothing Then
Set output = Cells(Target.Row, Target.Column)
selected_Range.Sort Key1:=output, Order1:=xlDescending, Header:=xlYes
Cancel = True
End If
End Sub
VBA Code Breakdown:
Private Sub Worksheet_BeforeDoubleClick(ByVal Target As Range, Cancel As Boolean)a subroutine of two parameters is called: Target indicates the cell that the user double–clicked. Cancel is a boolean value that can be set to True to cancel the default behavior of the double-click.
Set selected_Range = Range("B4:F12")a variable named selected _Range is declared and set to the range B4:F12.
If Not Intersect(Target, selected_Range) Is Nothing Thenchecks whether the Target cells are within the selected_Range. If it is, the code inside the If block will be executed.
Set output = Cells(Target.Row, Target.Column)defines a variable named output that sets the cell value for the double-click.
Sort Key1:=output, Order1:=xlDescending, Header:=xlYessorts the selected_Range based on the output cell, in descending order. The Header parameter is set to xlYes to indicate that the first row of the range contains headers.
Cancel = Truesets the Cancel parameter to True, which cancels the default behavior of the double-click.
- Double-click any header to sort data.
Example 6 – Apply Excel VBA to Dynamic Sorting in Descending Order
Steps:
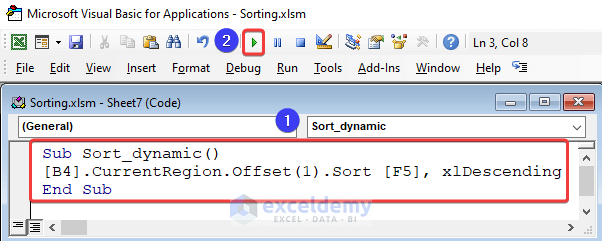
- Create a new module,use the code inside the module, and click Run.
Sub Sort_dynamic()
[B4].CurrentRegion.Offset(1).Sort [F5], xlDescending
End Sub
The table will be sorted.
How to Sort in Ascending Order with Excel VBA
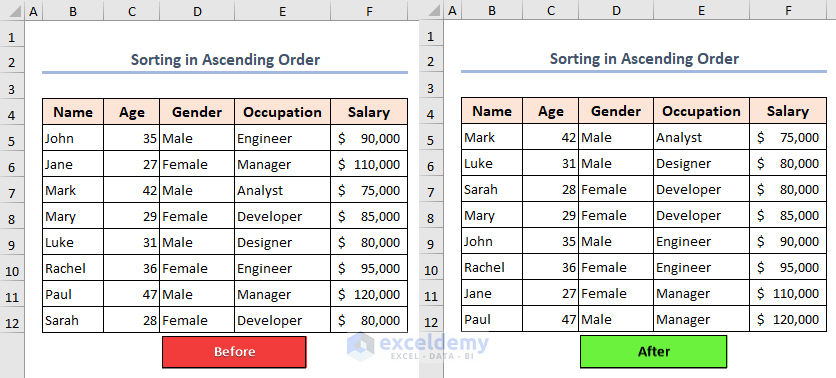
Steps:
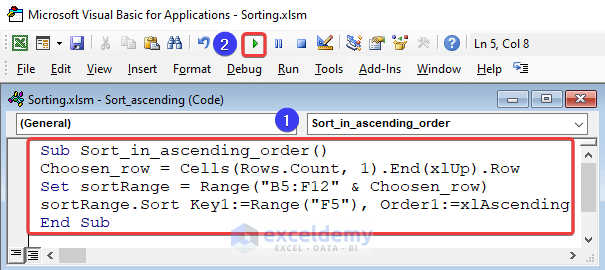
- Create a new module, enter the code and click Run.
Sub Sort_in_ascending_order()
Choosen_row = Cells(Rows.Count, 1).End(xlUp).Row
Set sortRange = Range("B5:F12" & Choosen_row)
sortRange.Sort Key1:=Range("F5"), Order1:=xlAscending
End Sub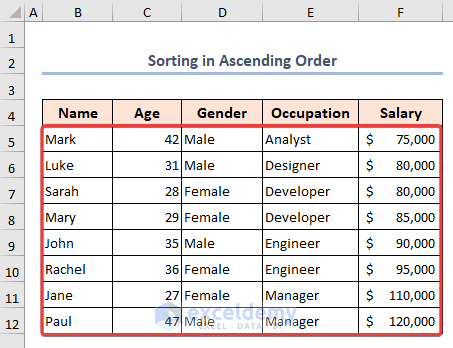
The table is sorted in ascending order.
Read More: Excel VBA to Sort Alphabetically
How to Sort Across Multiple Sheets Using Excel VBA
Steps:

- Create a new module, enter the code, and click Run.
Sub Sort_Multiple_Sheets()
For Each Worksheet In ThisWorkbook.Worksheets
If Worksheet.Name = "MS-1" Or Worksheet.Name = "MS-2" Then
Worksheet.Range("B5:F12").CurrentRegion.Offset(1).Sort Worksheet.Range("F5"), xlDescending
End If
Next Worksheet
End Sub- The table will be sorted for multiple sheets.
Things to Remember
- In the Sort method, the Key1 parameter specifies the column or range to sort by, and the Order1 parameter specifies the sort order.
Frequently Asked Questions
- Can I sort by multiple columns in descending order?
Yes, specify multiple key columns in the Sort method.
- Is it possible to sort a range based on a custom function in descending order?
Yes, create a custom function that returns a value that can be used for sorting, and use that function as the sort key.
Download Practice Workbook
Download the practice workbook.
Related Articles
- Excel VBA Sort Array Alphabetically
- Excel VBA to Sort Multidimensional Array
- Excel VBA to Sort a ComboBox List Alphabetically

