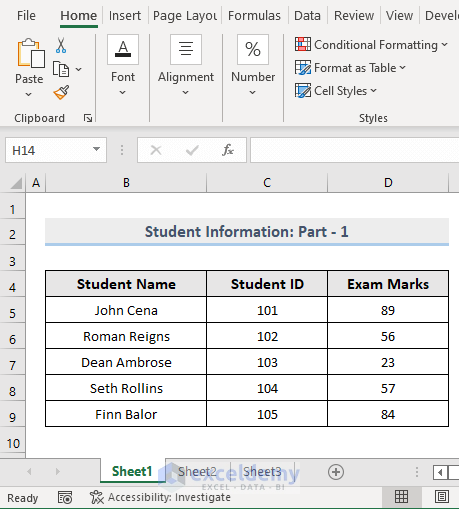
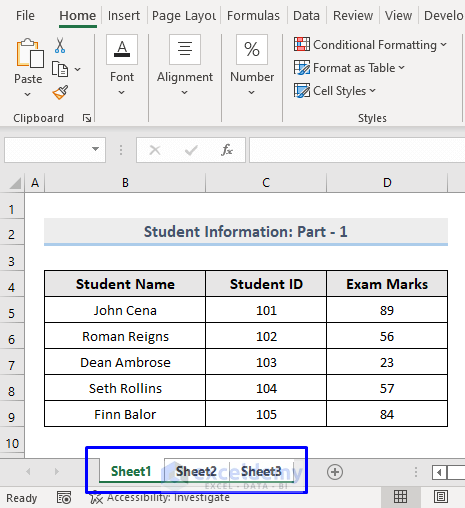
We have an Excel workbook consisting of three worksheets. The first worksheet is Sheet 1, and the data is shown in the picture below.
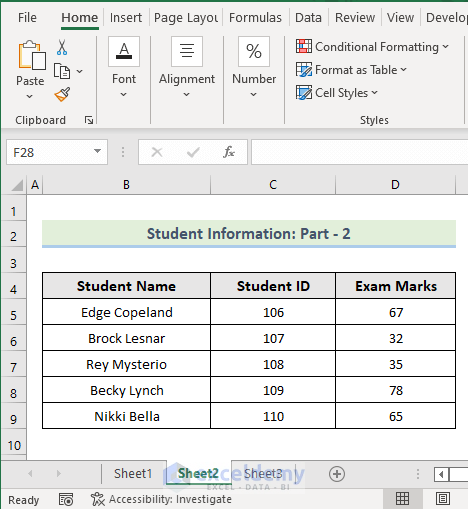
The second worksheet is Sheet 2, and the data in this sheet is shown in the following picture.
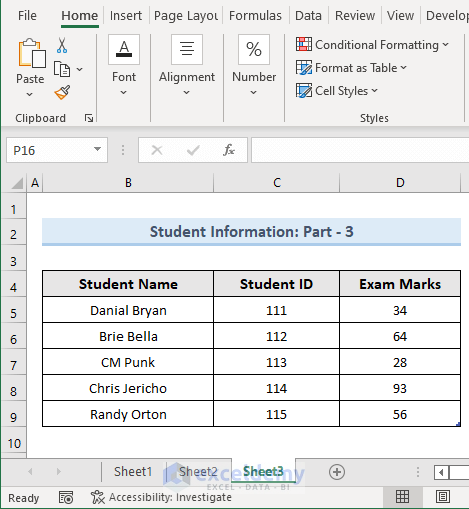
The third worksheet is Sheet 3, and the data in this sheet is shown in the picture below.
We will learn to print all these Excel sheets into a PDF file with VBA.
Method 1 – Embedding VBA to Print All Sheets of an Excel Workbook in a Single PDF
Steps:
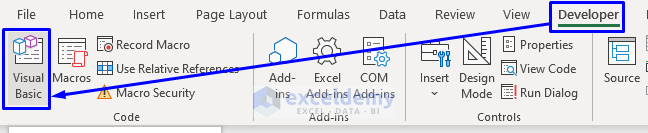
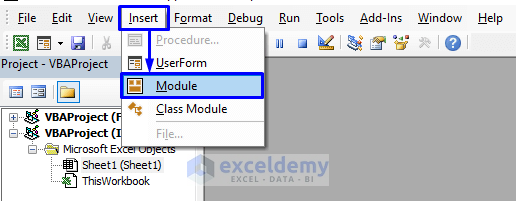
- Press Alt + F11, or go to the tab Developer -> Visual Basic to open Visual Basic Editor.
- In the pop-up code window, from the menu bar, click Insert -> Module.
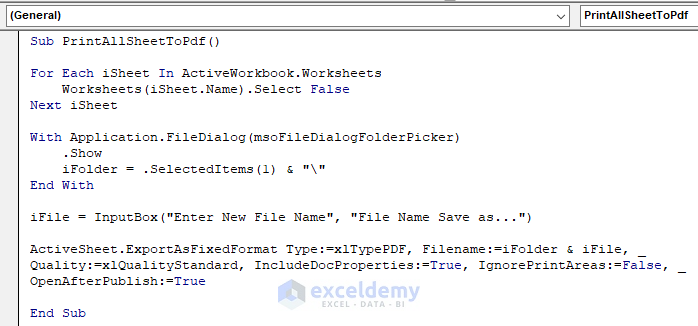
- Enter the following code into the code window:
Sub PrintAllSheetToPdf()
For Each iSheet In ActiveWorkbook.Worksheets
    Worksheets(iSheet.Name).Select False
Next iSheet
With Application.FileDialog(msoFileDialogFolderPicker)
    .Show
    iFolder = .SelectedItems(1) & "\"
End With
iFile = InputBox("Enter New File Name", "PDF File Name")
ActiveSheet.ExportAsFixedFormat Type:=xlTypePDF, Filename:=iFolder & iFile, Quality:=xlQualityStandard, IncludeDocProperties:=True, IgnorePrintAreas:=False, OpenAfterPublish:=True
End Sub
Your code is now ready to run.
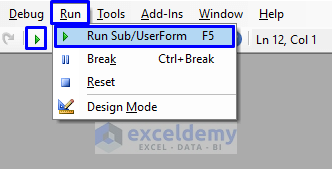
- Press F5, or from the menu bar, select Run -> Run Sub/UserForm. You can also just click on the small Run icon in the sub-menu bar to run the macro.
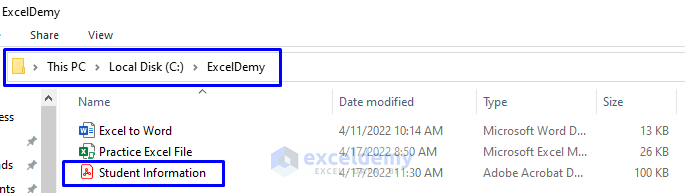
- Select the folder where you want to save the PDF file. In our case, we will save the file in the “ExcelDemy” folder in the Local Disk (C:).
- Click OK.

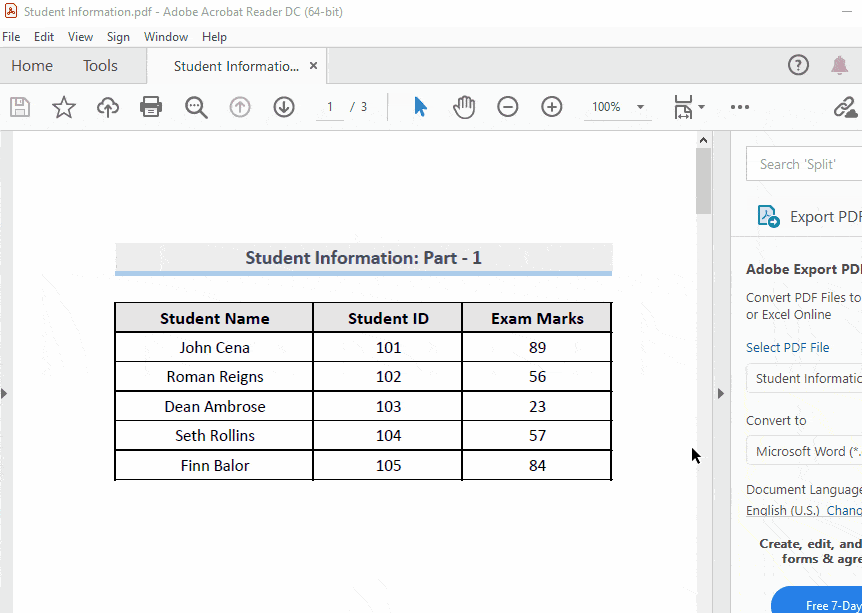
- A pop-up input box will appear. Enter any name for your new PDF file. In our case, we named our new PDF file “Student Information”.
- Click OK.

All the sheets in your workbook are automatically selected (notice in the image below).
- After providing the name for the new PDF file, you will see the newly created PDF file will automatically open.
- The picture below has the newly created “Student Information” PDF file in the “ExcelDemy” folder in Drive C.
- Open the file.
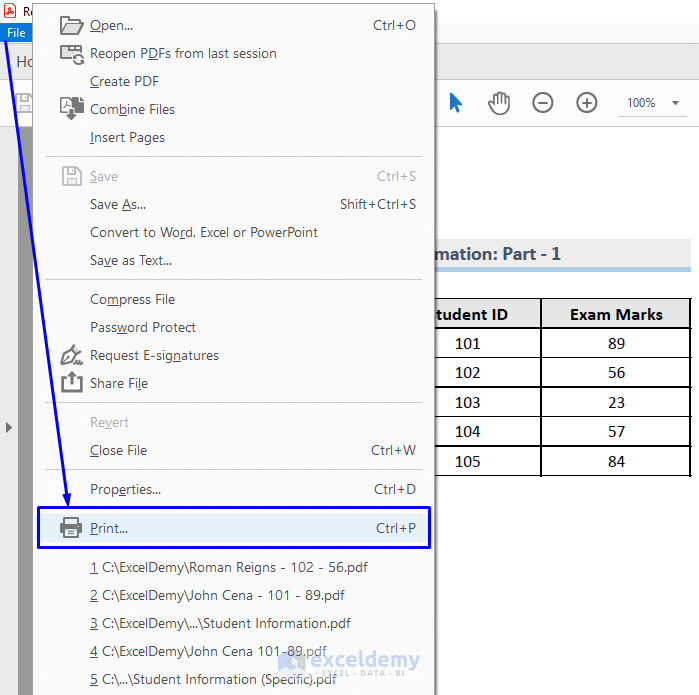
- Go to File -> Print. Or press Ctrl + P to print the file.
- It will open Print and modify the page setup according to your needs.
- Press Print.
Your newly created PDF file from multiple Excel sheets will start printing. This is how you print all the sheets from the Excel workbook into a single PDF file with VBA.
VBA Code Explanation
Sub PrintAllSheetToPdf()Name the sub-procedure of the macro.
For Each iSheet In ActiveWorkbook.Worksheets
    Worksheets(iSheet.Name).Select False
Next iSheet
Select all worksheets in the active workbook.
With Application.FileDialog(msoFileDialogFolderPicker)
    .Show
    iFolder = .SelectedItems(1) & "\"
End With
Ask for a directory to save the newly created PDF file in.
iFile = InputBox("Enter New File Name", "PDF File Name")Ask for a name for the newly created PDF file.
ActiveSheet.ExportAsFixedFormat Type:=xlTypePDF, Filename:=iFolder & iFile, Quality:=xlQualityStandard, IncludeDocProperties:=True, IgnorePrintAreas:=False, OpenAfterPublish:=TrueSave all worksheets from the active workbook as a single PDF file –
- In the path address and with the file name
- With the Standard
- With the Word file properties.
- Without the Print Areas.
- It will automatically open after the code execution.
End SubEnds the sub-procedure of the macro.
Method 2 – Implementing VBA to Print Multiple Worksheets from Selection
Steps:
- Open Visual Basic Editor from the Developer tab and Insert a Module in the code window.
- Enter the following code in the window:
Sub PrintActiveSheetToPdf()
Dim msg As String
Dim iFolder As String
Dim iFile As String
msg = "Do you want to save these worksheets to a single pdf file?" & amp & nbsp & Chr(10)
For Each iSheet In ActiveWindow.SelectedSheets
msg = msg & iSheet.Name & Chr(10)
Next iSheet
iText = MsgBox(msg, vbYesNo, "Confirm to Save as PDF...")
If iText = vbNo Then Exit Sub
With Application.FileDialog(msoFileDialogFolderPicker)
.Show
iFolder = .SelectedItems(1) & "\"
End With
iFile = InputBox("Enter New File Name", "PDF File Name")
ActiveSheet.ExportAsFixedFormat Type:=xlTypePDF, Filename:=iFolder & iFile, Quality:=xlQualityStandard, IncludeDocProperties:=True, IgnorePrintAreas:=False, OpenAfterPublish:=True
End Sub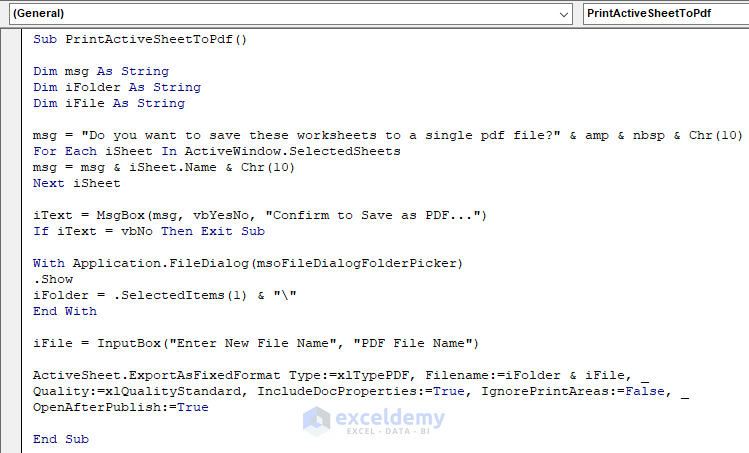
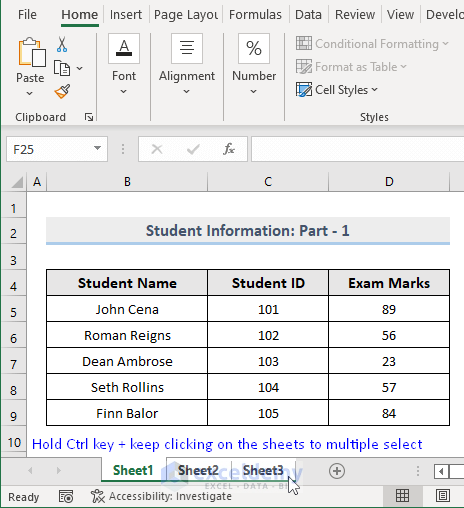
- Go back to the workbook and select all the sheets that you want to export. You can select multiple sheets by clicking on the sheets while holding down the Ctrl key.
- Run the macro.
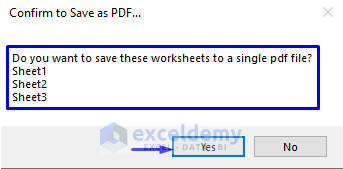
- A pop-up box will appear, showing you all the sheets that you selected to convert into a single PDF.
- After confirming, click Yes.
- You will be taken to the Browse window, where you will be asked to select the folder where you want to save the PDF file. In our case, we will save the file in the “ExcelDemy” folder in the Local Disk (C:).
- Select the new file path and click OK.

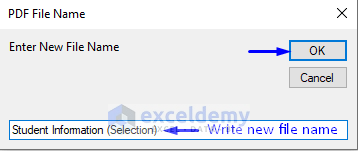
- A pop-up input box will appear. It will ask you for a name. Write any name for your new PDF file. In our case, we named our new PDF file “Student Information (Selection)”.
- Click OK.
- You will see the newly created PDF file.
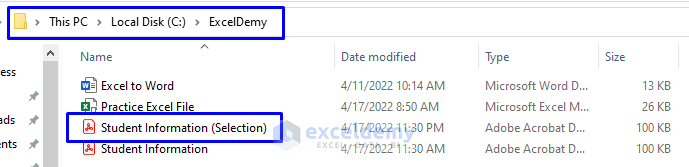
We have the newly created “Student Information (Selection)” PDF file in the “ExcelDemy” folder in Drive C, as shown below.
Print the PDF file:
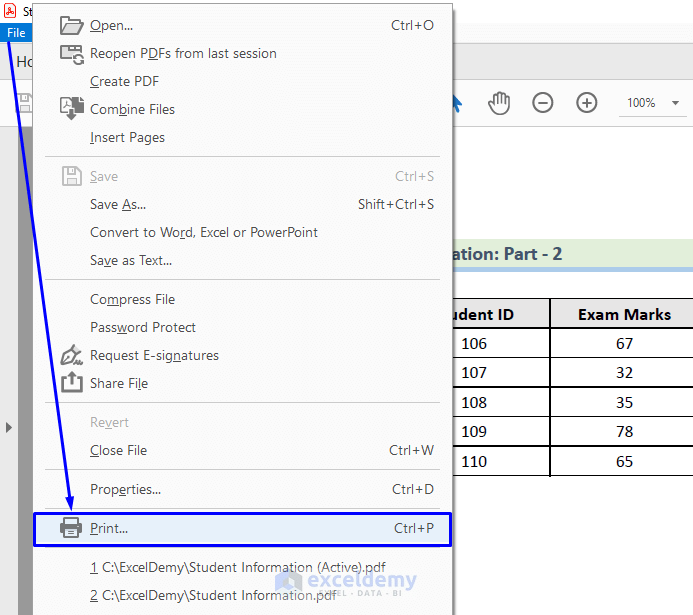
- Open the file.
- Go to File -> Print. Or you can press Ctrl + P.
- It will open Print. Modify the page setup according to your needs.
- Press Print.
Your newly created PDF file from multiple Excel sheets will start printing. This is how you print all the sheets by selection from the Excel workbook into a single PDF file with VBA.
VBA Code Explanation
Sub PrintActiveSheetToPdf()Name the sub-procedure of the macro.
Dim msg As String
Dim iFolder As String
Dim iFile As String
Declare the variables.
msg = "Do you want to save these worksheets to a single pdf file?" & amp & nbsp & Chr(10)
For Each iSheet In ActiveWindow.SelectedSheets
msg = msg & iSheet.Name & Chr(10)
Next iSheet
Select only the selected worksheets in the active workbook. Show the sheet names concatenated with a question in a MsgBox to confirm. Chr(10) is a carriage return.
iText = MsgBox(msg, vbYesNo, "Confirm to Save as PDF...")
If iText = vbNo Then Exit Sub
Execute the task according to Yes or No confirmation. If Yes, then continue with the procedure. If No, then exit the procedure.
With Application.FileDialog(msoFileDialogFolderPicker)
.Show
iFolder = .SelectedItems(1) & "\"
End With
Ask for a directory to save the newly created PDF file in.
iFile = InputBox("Enter New File Name", "PDF File Name")Ask for a name for the newly created PDF file.
ActiveSheet.ExportAsFixedFormat Type:=xlTypePDF, Filename:=iFolder & iFile, Quality:=xlQualityStandard, IncludeDocProperties:=True, IgnorePrintAreas:=False, OpenAfterPublish:=TrueSave all worksheets from the active workbook as a single PDF file –
- In the path address and with the file name
- With the Standard
- With the Word file properties.
- Without the Print Areas.
- It will automatically open after the code execution.
End SubEnds the sub-procedure of the macro.
Method 3 – Apply VBA Macro to Print Specific Sheets into Single PDF from a Workbook
Steps:
- Open Visual Basic Editor from the Developer tab and Insert a Module in the code window.
- Enter the following code into the code window:
Sub PrintSpecificSheetsToPdf()
    Dim iSheets As Variant
    iSheets = Array("Sheet1", "Sheet2")
    ThisWorkbook.Sheets(iSheets).PrintOut
End Sub
Sub PrintSpecificSheetsToPdfWithLoop()
    Dim iSheets() As String
    Dim iCount As Long
    ReDim iSheets(1 To ThisWorkbook.Sheets.Count)
    For iCount = LBound(iSheets) To UBound(iSheets)
        iSheets(iCount) = ThisWorkbook.Sheets(iCount).Name
    Next iCount
    ThisWorkbook.Sheets(iSheets).PrintOut
End Sub
Your code is now ready to run.
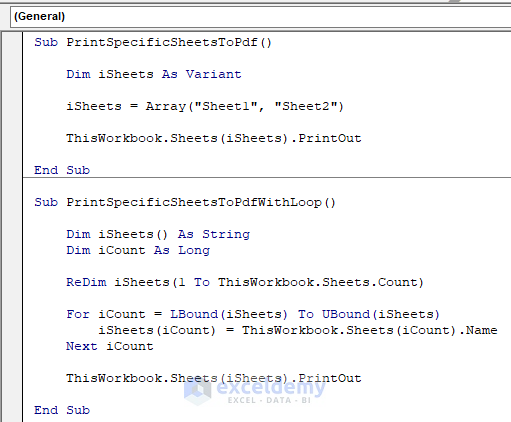
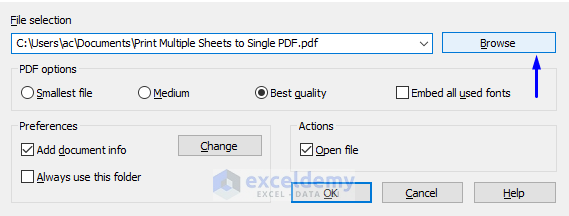
See the indicated part in the following image. In that line of code, we hardcoded only the specified sheet name – Sheet1 and Sheet2 – that we want to export into PDF.
- Run the macro. A Printing pop-up box opens.
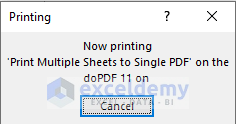
- The File selection pops up. save the newly created PDF file in the file path that the window is showing. Press OK.
- Or, if you want to store the PDF file at a different address, click Browse.
- You will be taken to the Save As window, where you get to select the file path that you want the PDF to store. In our case, we will save the file in the “ExcelDemy” folder in the Local Disk (C:).
- Name the PDF file. You can either keep the file name that the system is showing you. The name that the system will show you will be the name similar to the Excel file that you are working on.
- Click Save.
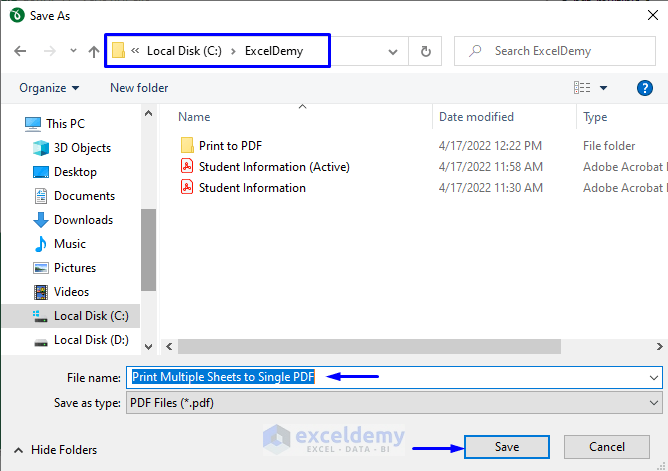
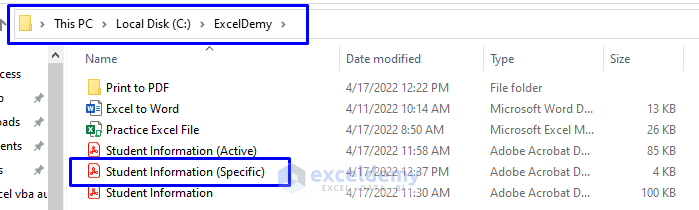
- If you want to save a new name for the PDF file, you replace the old name with the new one in the File name. In our case, we named our new PDF file “Student Information (Specific)”.
- Click Save.
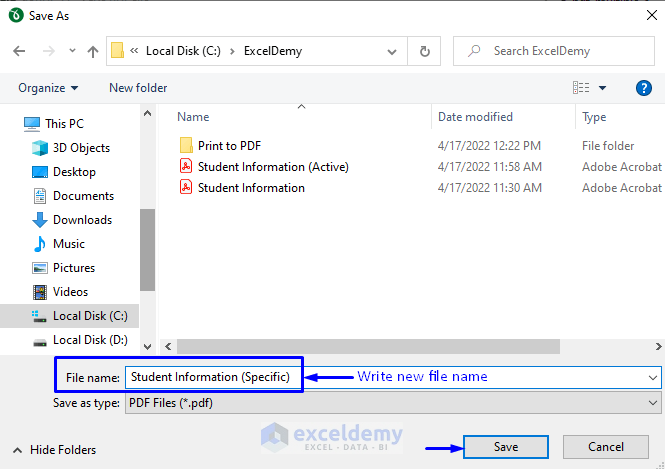
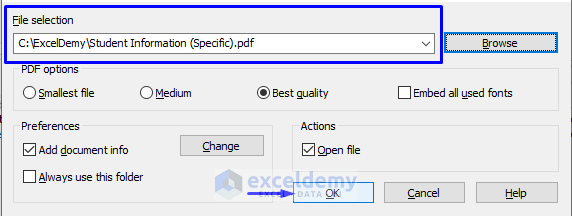
- You will be able to see the file path you have just selected with the new file name in the File selection
- Click OK.
- After providing the path and name for the new PDF file, you will see that it will automatically open.
Now let’s check whether the “ExcelDemy” folder that we selected as the storage of our PDF file.
- As you can see from the picture below, we have the newly created “Student Information (Specific)” PDF file in the “ExcelDemy” folder in Drive C.
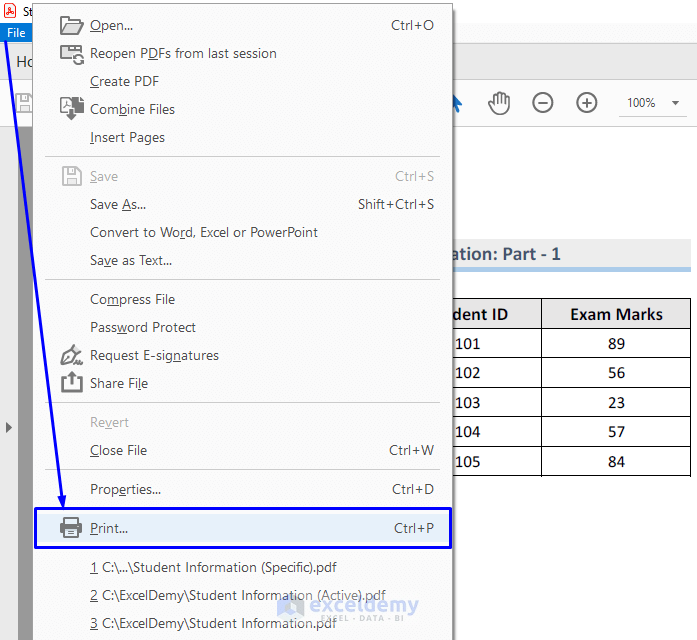
To print the PDF file:
- Open the file.
- Go to File -> Print. Alternatively, press Ctrl + P from your keyboard to print the file.
- It will open the Print, you can modify the page setup according to your needs.
- Press Print.
Your newly created PDF file from multiple specified Excel sheets will start printing. This is how you print the multiple specified sheets from the Excel workbook into a PDF file with VBA.
VBA Code Explanation
Sub PrintSpecificSheetsToPdf()Name the sub-procedure of the macro.
Dim iSheets As VariantDeclare the variable to store the multiple sheets.
iSheets = Array("Sheet1", "Sheet2")Store the sheets that will be exported in the declared array variable.
ThisWorkbook.Sheets(iSheets).PrintOutPrints the group of sheets with the PrintOut function.
End SubEnds the sub-procedure of the macro.
Sub PrintSpecificSheetsToPdfWithLoop()Name the sub-procedure of the macro that will perform the loop operation.
Dim iSheets() As String
Dim iCount As Long
Declare the variables.
ReDim iSheets(1 To ThisWorkbook.Sheets.Count)Re-declare the array variable. This time it stores the number of the total sheet count in it.
For iCount = LBound(iSheets) To UBound(iSheets)
    iSheets(iCount) = ThisWorkbook.Sheets(iCount).Name
Next iCount
This part of the code starts iterating from the smallest subscript to the largest subscript of the array and stores the array value in the variable. It continues doing this until it finishes scanning through the whole array.
ThisWorkbook.Sheets(iSheets).PrintOutPrints the group of sheets with the PrintOut function.
End SubEnds the sub-procedure of the macro.
Method 4 – Embedding VBA to Print Multiple Sheets as PDF and Rename According to Cell Value
Steps:
- Open Visual Basic Editor from the Developer tab and Insert a Module in the code window.
- Enter the following code into the window:
Option Explicit
Public Sub PrintSpecificSheetsToPdfWithRename()
    Dim iSheetList As Variant
    Dim iSheet As Worksheet
    Dim iFileName As String
    Dim iFilePath As String
    Set iSheet = ThisWorkbook.Sheets("Sheet1")
    iSheetList = Array("Sheet1", "Sheet2")
    iFilePath = "C:\ExcelDemy\"
    With iSheet
        iFileName = iFilePath & .Range("B5").Value & " " & .Range("C5").Value & "-" & .Range("D5").Value & ".pdf"
    End With
    ThisWorkbook.Sheets(iSheetList).Select
    iSheet.ExportAsFixedFormat Type:=xlTypePDF, Filename:=iFileName, Quality:=xlQualityStandard, IncludeDocProperties:=True, IgnorePrintAreas:=False, OpenAfterPublish:=True
    iSheet.Select
End Sub
Before running the code, do you see the indicated part in the following image?

-
- This means the cell values that we will be taking to name our file are on that sheet.
- In the second line, we define the sheets that will be exported into PDF by bypassing Sheet1 and Sheet2 inside the array as parameters.
- In the third line, we wanted to store our PDF file in the Local Drive C inside the “ExcelDemy” folder. You must write the path address where you want your file to save.
Consider the following image to understand the naming system for the PDF file.

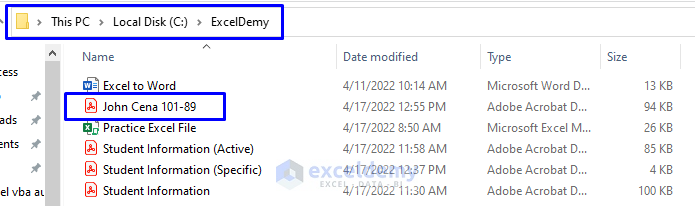
In this part of the code, we provided three cell numbers, Cell B5, C5, and D5 from Sheet1. Cell B5 has the value “John Cena,” Cell C5 has the value “101,” and Cell D5 has the value “89.” So, the name for the newly created PDF file will be “John Cena 101-89.” We also provided a hyphen (—) between Cell C5 and D5 in the code.
- Run the macro and you will see the newly created PDF file will automatically open.
Now let’s check whether the “ExcelDemy” folder that we hardcoded as the storage of our PDF file.
- As you can see from the picture below, we have the newly created “John Cena 101-89” PDF file in the “ExcelDemy” folder in Drive C.
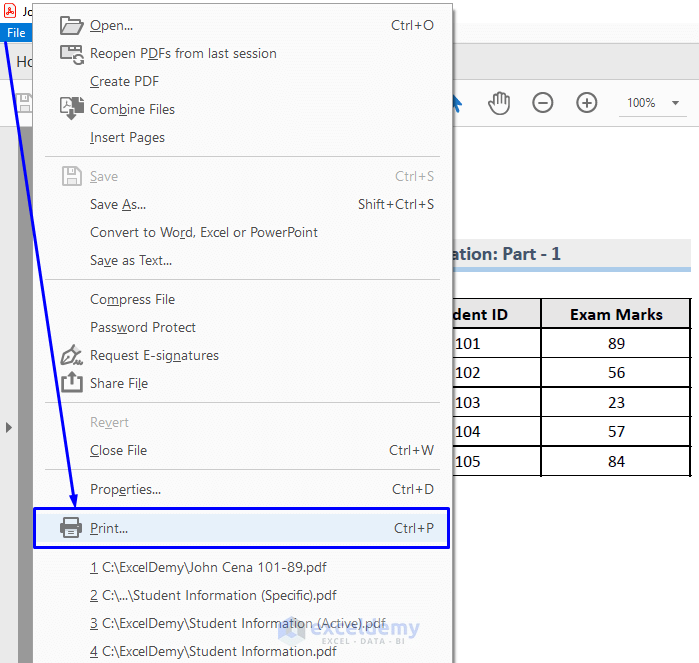
To print the PDF file:
- Open the file.
- Go to File -> Print. Or press Ctrl + P.
- It will open the Print. You can modify the page setup according to your needs.
- Press Print.
Your newly created PDF file from multiple hardcoded Excel sheets will start printing. This is how you print the multiple specified sheets from the Excel workbook into a single PDF file and name it according to the cell values from a sheet with VBA.
VBA Code Explanation
Option ExplicitForces to declare all the variables explicitly of the file.
Public Sub PrintSpecificSheetsToPdfWithRename()Name the sub-procedure of the macro.
Dim iSheetList As Variant
Dim iSheet As Worksheet
Dim iFileName As String
Dim iFilePath As String
Declares all the variables.
Set iSheet = ThisWorkbook.Sheets("Sheet1")Stores the sheet from where we will be taking the cell values to name our PDF file.
iSheetList = Array("Sheet1", "Sheet2")Declares the sheets that will be exported into PDF.
iFilePath = "C:\ExcelDemy\"Declares the directory to store our PDF file.
With iSheet
    iFileName = iFilePath & .Range("B5").Value & " " & .Range("C5").Value & "-" & .Range("D5").Value & ".pdf"
End With
Selects the sheet and takes values from Cell B5, C5 and D5 to name the PDF file. Then exit the sheet.
ThisWorkbook.Sheets(iSheetList).Select
    iSheet.ExportAsFixedFormat Type:=xlTypePDF, Filename:=iFileName, Quality:=xlQualityStandard, IncludeDocProperties:=True, IgnorePrintAreas:=False, OpenAfterPublish:=True
    iSheet.Select
Save the hardcoded worksheets from the active workbook as a single PDF file –
- In the path address and with the file name
- With the Standard
- With the Word file properties.
- Without the Print Areas.
- It will automatically open after the code execution.
End SubEnds the sub-procedure of the macro.
Method 5 – Apply Macro to Export Multiple Excel Sheets to PDF inside a Created Folder
Steps:
- Open Visual Basic Editor from the Developer tab and Insert a Module in the code window.
- Enter the following code into the code window:
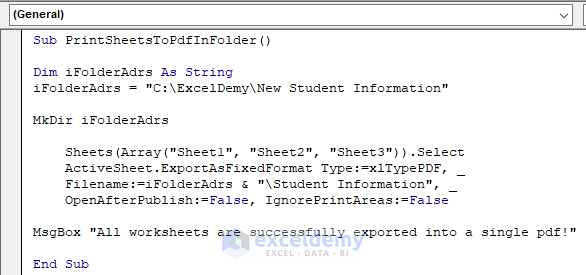
Sub PrintSheetsToPdfInFolder()
Dim iFolderAdrs As String
iFolderAdrs = "C:\ExcelDemy\New Student Information"
MkDir iFolderAdrs
Sheets(Array("Sheet1", "Sheet2", "Sheet3")).Select
ActiveSheet.ExportAsFixedFormat Type:=xlTypePDF, Filename:=iFolderAdrs & "\Student Information", OpenAfterPublish:=False, IgnorePrintAreas:=False
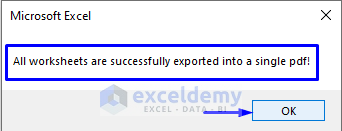
MsgBox "All worksheets are successfully exported into a single pdf!"
End SubYour code is now ready to run.
- Run the macro. You will be notified by a pop-up MsgBox after a successful file conversion.
- Press OK.
Before proceeding, let’s describe a couple of things first. Can you see the part of the code indicated in the image below?

In that line of the code, we did the tricks. We store the path – C:\ExcelDemy – where we want to save the PDF file, and following that, we provide a name – “New Student Information” – as the new folder name in our case. You must write the path address according to your data, and you can provide any name that you want as your new folder name.
Consider the following image.

-
- In the first indicated part, we stored the sheets named – Sheet1, Sheet2 and Sheet3 – that we want to export as PDF. You can add more sheets to that line or remove any sheets from that line.
- In the second indicated part, we provided a new file name – “Student Information” – for our PDF file. You can write any name that you want.
Now that you have understood the code’s key aspects, let’s check whether the newly created folder we hardcoded as “New Student Information” in the C: ExcelDemy path has been created.
- As you can see from the picture below, the newly created “New Student Information” folder is in the “ExcelDemy” folder in Drive C.
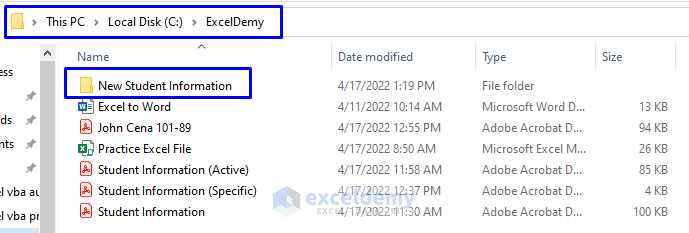
- Open the folder.
- As you can see from the picture below, the newly created PDF file “Student Information” is inside the “New Student Information” folder, which is in the “ExcelDemy” folder in Drive C.

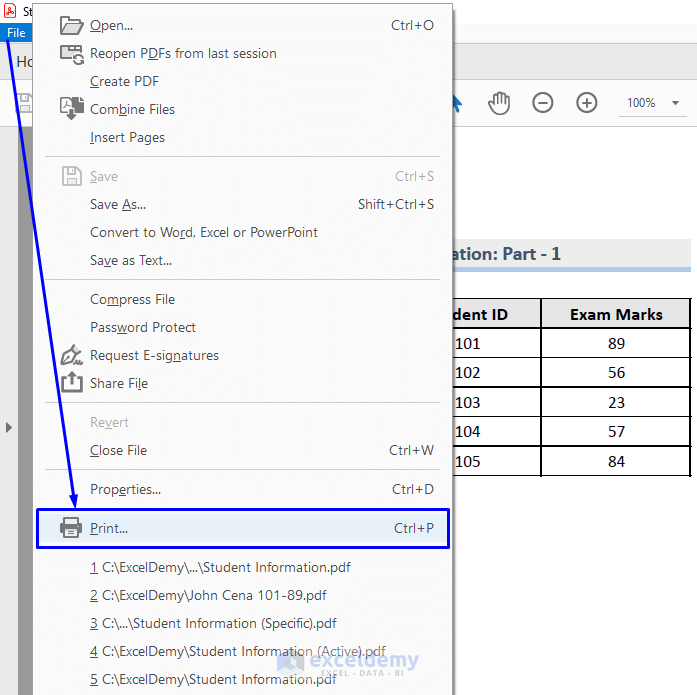
To print the PDF file:
- Open the file.
- Go to File -> Print. Or press Ctrl + P.
- It will open the Print. You can modify the page setup according to your needs.
- Press Print.
Your newly created PDF file from multiple hardcoded Excel sheets inside the new folder will start printing. This is how you print the multiple sheets from the Excel workbook into a single PDF file and store it inside a folder that you create with VBA.
VBA Code Explanation
Sub PrintSheetsToPdfInFolder()Firstly, provide a name for the sub-procedure of the macro.
Dim iFolderAdrs As StringDeclare the variable to carry the path address.
iFolderAdrs = "C:\ExcelDemy\New Student Information"Stores the directory and declares a new folder name.
MkDir iFolderAdrsCreates the new folder with Excel’s MkDir statement.
Sheets(Array("Sheet1", "Sheet2", "Sheet3")).Select
    ActiveSheet.ExportAsFixedFormat Type:=xlTypePDF, Filename:=iFolderAdrs & "\Student Information", OpenAfterPublish:=False, IgnorePrintAreas:=False
Selects the sheets and save them as a single PDF file –
- In the path address and with the file name – “\Student Information” – provided.
- Without the Print Areas.
- Turn off the automatic file opening after the code execution.
MsgBox "All worksheets are successfully exported into a single pdf!"Confirmation message after successfully file creation.
End SubEnds the sub-procedure of the macro.
Method 6 – Implementing VBA to Export Active Worksheet to PDF Multiple Times in the Working Folder
Steps:
- Open Visual Basic Editor from the Developer tab and Insert a Module in the code window.
- Enter the following code into the code window:
Sub PrintSpecificSheetsToPdfInCurrentPath()
Dim iSheet As Worksheet
Dim iBook As Workbook
Dim iFileName As String
Dim iFilePath As String
Dim iFile As String
Dim iPathFile As String
Dim NewFile As Variant
Dim msg As Long
On Error GoTo errHandler
Set iBook = ActiveWorkbook
Set iSheet = ActiveSheet
iFilePath = iBook.Path
If iFilePath = "" Then
  iFilePath = Application.DefaultFilePath
End If
iFilePath = iFilePath & "\"
iFileName = iSheet.Range("B6").Value & " - " & iSheet.Range("C6").Value & " - " & iSheet.Range("D6").Value
iFile = iFileName & ".pdf"
iPathFile = iFilePath & iFile
If iOldFile(iPathFile) Then
  msg = MsgBox("Replace current file?", vbQuestion + vbYesNo, "Existing File!")
  If msg <> vbYes Then
    NewFile = Application.GetSaveAsFilename(InitialFileName:=iPathFile, FileFilter:="PDF Files (*.pdf), *.pdf", Title:="Enter folder and filename to save")
    If NewFile <> "False" Then
      iPathFile = NewFile
    Else
      GoTo exitHandler
    End If
  End If
End If
iSheet.ExportAsFixedFormat Type:=xlTypePDF, Filename:=iPathFile, Quality:=xlQualityStandard, IncludeDocProperties:=True, IgnorePrintAreas:=False, OpenAfterPublish:=False
MsgBox "New PDF file is created: " & vbCrLf & iPathFile
exitHandler:
    Exit Sub
errHandler:
    MsgBox "There is an error while creating PDF file!"
    Resume exitHandler
End Sub
Function iOldFile(rsFullPath As String) As Boolean
  iOldFile = CBool(Len(Dir$(rsFullPath)) > 0)
End Function
Your code is now ready to run.
- Run the macro, and the file path and the name for your newly created PDF file will be shown to you via Excel MsgBox.
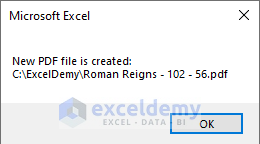
To understand how we got the name and the file path, look at the following image.
See the indicated part in the above image. This did the trick of naming the file.
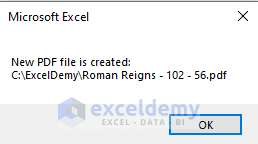
In this part of the code, we provided three cell numbers—Cell B6, C6, and D6—from the active sheet, Sheet1. Cell B6 has the value “Roman Reigns,” Cell C6 has the value “102,” and Cell D6 has the value “56.” So, the name for the newly created PDF file is “Roman Reigns—102 – 56.” We also provided a hyphen (—) between Cell B6, C6, and D6 in the code.
The path we got is none other than the path where we have the source Excel workbook. We have our workbook in the C:\ExcelDemy path, so the newly created PDF file “Roman Reigns – 102 – 56” is also stored in the exact same address.
- Run the macro.
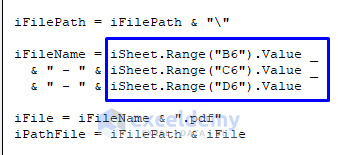
Open the file, and you will see that the PDF has only one page, and the data on that page is the exact data from the active sheet, Sheet1, from the workbook.
To print the PDF file:
- Open the file.
- Go to File -> Print. Or press Ctrl + P.
- It will open Print. You can modify the page setup according to your needs.
- Press Print.
If you need to modify the Excel sheet and re-print it again, or if you want to keep both the old PDF file and the new PDF file:
- Run the code again.
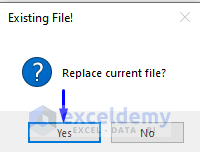
- There will be a pop-up MsgBox asking you whether you want to replace the old file with the new file.
- If you want to replace the old file, then simply click Yes.
- It will automatically replace your old PDF file created from the Excel worksheet with the new one.
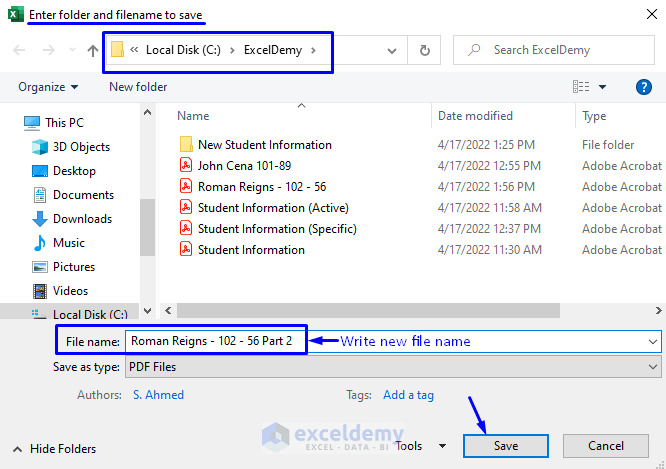
- If you want to keep both PDF files, click NO in the pop-up MsgBox.
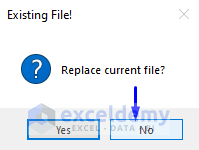
- This will take you to the Browse window, where you can select the path and rename the file according to your requirements. In our case, we stored the new PDF file in the C: ExcelDemy path and renamed the file “Roman Reigns—102 – 56 Part 2.”
- Click Save.
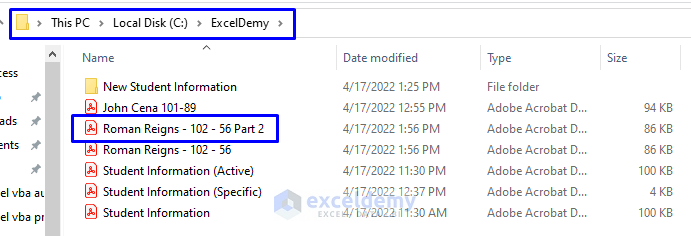
Now go back to the file directory to check whether there are multiple copies of the same PDF file with different names.
- In the picture below, both files – “Roman Reigns – 102 – 56” and “Roman Reigns – 102 – 56 Part 2” – are in the “ExcelDemy” folder in Drive C.
This is how you print an active Excel sheet to a PDF and rename it multiple times with VBA.
VBA Code Explanation
Sub PrintSpecificSheetsToPdfInCurrentPath()At first, name the sub-procedure of the macro.
Dim iSheet As Worksheet
Dim iBook As Workbook
Dim iFileName As String
Dim iFilePath As String
Dim iFile As String
Dim iPathFile As String
Dim NewFile As Variant
Dim msg As Long
Then, declare the variables.
On Error GoTo errHandlerIf any error occurs, then go to errHandler statement.
Set iBook = ActiveWorkbook
Set iSheet = ActiveSheet
Later, store the active workbook and worksheet in the variables.
iFilePath = iBook.Path
If iFilePath = "" Then
  iFilePath = Application.DefaultFilePath
End If
iFilePath = iFilePath & "\"
Gets the active workbook folder if the file is saved.
iFileName = iSheet.Range("B6").Value & " - " & iSheet.Range("C6").Value & " - " & iSheet.Range("D6").ValueAfter that, it takes values from Cell B6, C6 and D6 to name the PDF file and store the name in the variable.
iFile = iFileName & ".pdf"
iPathFile = iFilePath & iFile
creates a default name for the new file to save.
If iOldFile(iPathFile) Then
  msg = MsgBox("Replace current file?", vbQuestion + vbYesNo, "Existing File!")
  If msg <> vbYes Then
    NewFile = Application.GetSaveAsFilename(InitialFileName:=iPathFile, FileFilter:="PDF Files (*.pdf), *.pdf", Title:="Enter folder and filename to save")
    If NewFile <> "False" Then
      iPathFile = NewFile
It performs the file replacement operation. If the file already exists, then save the file with a new path and name. If the file doesn’t exist, then save the file in the current directory.
Else
      GoTo exitHandler
    End If
  End If
End If
Otherwise, go to the exitHandler statement in the code.
iSheet.ExportAsFixedFormat Type:=xlTypePDF, Filename:=iPathFile, Quality:=xlQualityStandard, IncludeDocProperties:=True, IgnorePrintAreas:=False, OpenAfterPublish:=FalseSave the worksheet from the active workbook as a single PDF file –
- In the path address and with the file name
- With the Standard
- With the Word file properties.
- Without the Print Areas.
- Turn off the automatic file opening after the code execution.
MsgBox "New PDF file is created: " & vbCrLf & iPathFileConfirmation message after successfully file creation.
exitHandler:
    Exit Sub
Code in the exitHandler statement to exit the sub-procedure.
errHandler:
    MsgBox "There is an error while creating PDF file!"
    Resume exitHandler
Code in the errHandler statement to notify that there is an error. Go back to the exitHandler statement.
End SubFinally, ends the sub-procedure of the macro.
Function iOldFile(rsFullPath As String) As Boolean
  iOldFile = CBool(Len(Dir$(rsFullPath)) > 0)
End Function
Lastly, calls the function to execute all the operations that we just explained.
Download the Workbook
You can download the free practice Excel workbook from here.
Related Articles
- Print Range to PDF with VBA in Excel
- Print to PDF Using Macro Button in Excel
- Excel VBA to Print As PDF and Save with Automatic File Name
- Excel VBA: ExportAsFixedFormat PDF with Fit to Page
- How to Print to PDF in Excel VBA : With Examples and Illustrations


Thank you for creating a resource with which users can learn and pick up pointers on routines which we do not normally do.
I would also add as a user of ‘Option Explicit’ the lack of consistency in defining variables did put me off at first.
For those unfamiliar with defining variables this could cause those copy and pasting as is, many debug errors.
Hello PAUL B,
I actually like to use this feature of VBA that variables don’t need to be declared before. But, obviously, using Option Explicit is a good practice to follow in all your VBA projects because it helps ensure that your code is free from potential bugs related to undeclared or misspelled variables.
By the way, thanks for your appreciation PAUL. Your such comments motivate us to move forward.
Regards,
SHAHRIAR ABRAR RAFID
Team ExcelDemy