Method 1 – Insert Single Row with Values
Use an Excel VBA code to insert a single row with values into a dataset that contains student names and grades. The outcome will resemble the picture shown above. The code below has been used to accomplish that.
Sub Insert_single_row()
    Rows("7:7").Select
    Selection.Insert Shift:=xlDown, CopyOrigin:=xlFormatFromLeftOrAbove
    Cells(7, 2).Value = "Ross"
    Cells(7, 3).Value = "Chemistry"
    cells (7, 4).Value = "86"
End Sub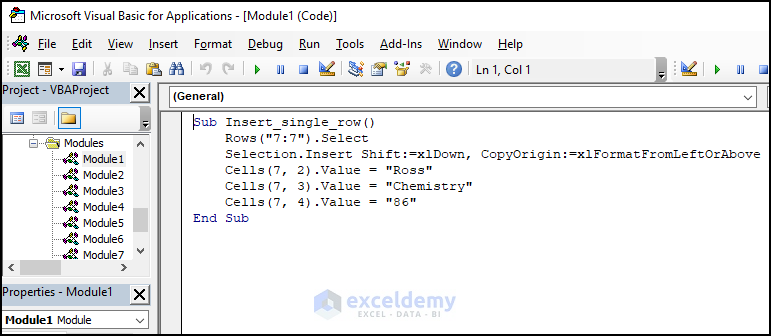
Code Explanation:
Sub Insert_single_row()
Provide a name for the sub-procedure of the macro.
Rows("7:7").SelectThis code selects the 7th row in the worksheet.
Selection.Insert Shift:=xlDown, CopyOrigin:=xlFormatFromLeftOrAboveThe existing rows are shifted downward and a new row is inserted below the currently selected row by this code.
Cells(7, 2).Value = "Ross"
Cells(7, 3).Value = "Chemistry"
Cells (7, 4).Value = "86"
This code sets the values “Ross,” “Chemistry,” and “86” for the cells in the second, third, and fourth columns of the seventh row.
End SubEnd the sub-procedure of the macro.
Pressing F5 at this point or by selecting the Macro window from the Developer tab, you can run the code. The results will therefore be as follows.
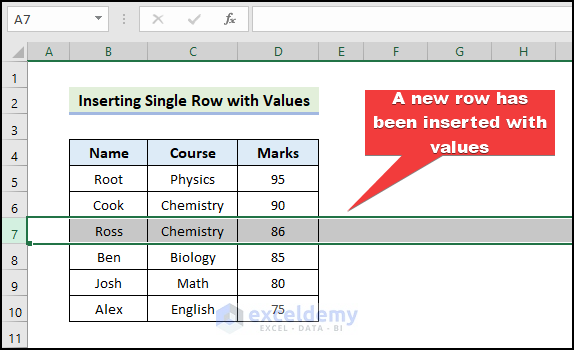
Method 2 – Insert Multiple Rows with Values
Use an Excel VBA code to add multiple rows with values in our Excel dataset. The result will look similar to the image above. To do that, the following code has been employed.
Sub insert_mutliple_rows()
    Dim Number_of_rows As Integer
    Dim Starting_row As Integer
    Number_of_rows = 3
    Starting_row = 7
    For i = 1 To Number_of_rows
        Rows(Starting_row).Insert Shift:=xlDown
        Range("B" & Starting_row).Value = "Ross"
        Range("C" & Starting_row).Value = "Math"
        Range("D" & Starting_row).Value = "88"
        Starting_row = Starting_row + 1
    Next i
End Sub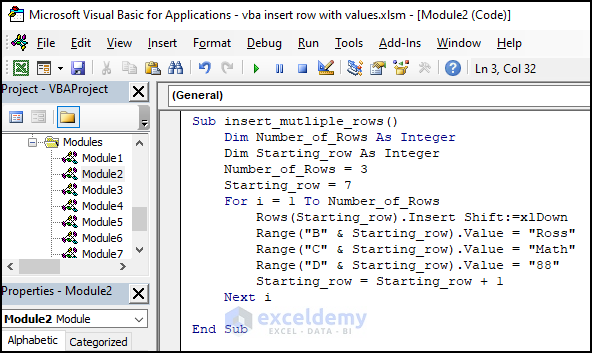
Code Explanation:
Sub insert_multiple_rows()Provide a name for the sub-procedure of the macro.
Dim Number_of_rows As Integer
Dim Starting_row As Integer
Declare the necessary variable for the macro.
Number_of_rows = 3
Starting_row = 7
This code set the values of Starting_row and Number_of_rows to 3 and 7, respectively.
For i = 1 To Number_of_rows
Rows(Starting_row).Insert Shift:=xlDown
This code moves the current rows down and inserts a new row beneath the row indicated by Starting_row.
Range("B" & Starting_row).Value = "Ross"
Range("C" & Starting_row).Value = "Math"
Range("D" & Starting_row).Value = "88"
The code changes the values of cells B, C, and D in the Starting_row row to “Ross,” “Math,” and “88,” respectively.
Starting_row = Starting_row + 1
Next i
This line increases the value of Starting_row by one so that the next loop iteration inserts a new row below the next row.
End SubEnd the sub-procedure of the macro.
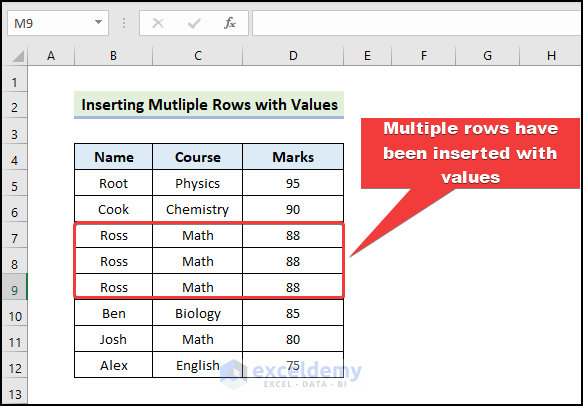
Run the code at this point by pressing F5 or by choosing the Macro window from the Developer tab.
The following output will appear after three rows have been added.
Method 3 – Insert Row in a Table with Data
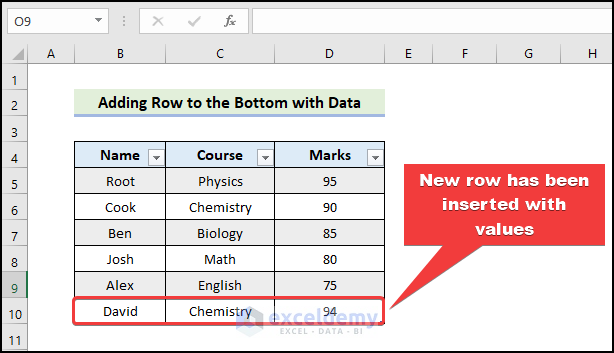
3.1 Add Row to the Bottom With data
Use an Excel VBA code to add a row to the bottom of our Excel dataset. Similar to the image above, the outcome will appear. This has been accomplished using the following code.
Sub Add_Row_to_Bottom_With_data()
    Dim Name_of_table As ListObject
    Set Name_of_table = ActiveSheet.ListObjects("Table1")
    Dim adding_row As ListRow
    Set adding_row = Name_of_table.ListRows.Add()
    With adding_row
        .Range(1) = "David"
        .Range(2) = "Chemistry"
        .Range(3) = "94"
    End With
End Sub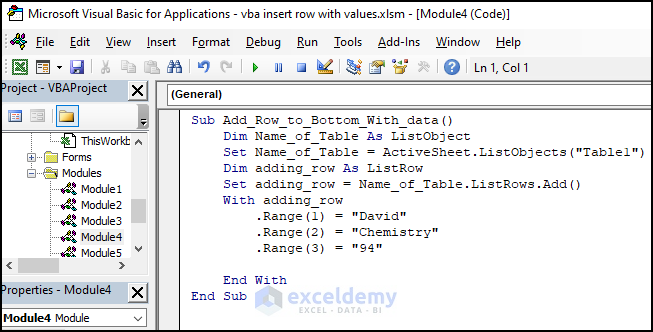
Code Explanation:
Sub Add_Row_to_Bottom_With_data()Provide a name for the sub-procedure of the macro.
Dim Name_of_table As ListObject
Set Name_of_table = ActiveSheet.ListObjects("Table1")
This code sets the “Name_of_table” variable to the “Table1” table on the active worksheet and declares it a ListObject type.
Dim adding_row As ListRow
Set adding_row = Name_of_table.ListRows.Add()
The “Add” method of the ListRows collection adds a new row to the table named “Name_of_table” in the code.
With adding_row
    .Range(1) = "David"
    .Range(2) = "Chemistry"
    .Range(3) = "94"
End With
This code sets the values for the first three columns of the newly added row.
End SubEnd the sub-procedure of the macro.
Run the code at this point by pressing F5 or by choosing the Macro window from the Developer tab.
As a result, after adding a row to the bottom of the table, the following output will appear.
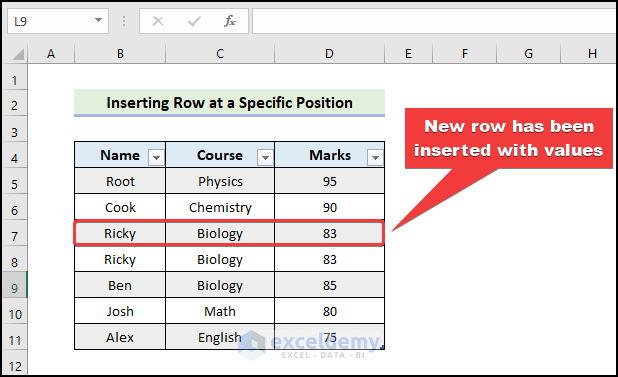
3.2 Insert Row at a Specific Position
In this section, we’ll use Excel VBA code to insert a row with values at a specific location in our Excel dataset. The result will look like the image above. The following code was used to accomplish this.
Sub Insert_Row_at_Specific_Position()
    Dim Name_of_Table As ListObject
    Set Name_of_Table = ActiveSheet.ListObjects("Table13")
    Dim adding_row As ListRow
    Set adding_row = Name_of_Table.ListRows.Add(3)
    With adding_row
        .Range(1) = "Ricky"
        .Range(2) = "Biology"
        .Range(3) = "83"
    End With
End Sub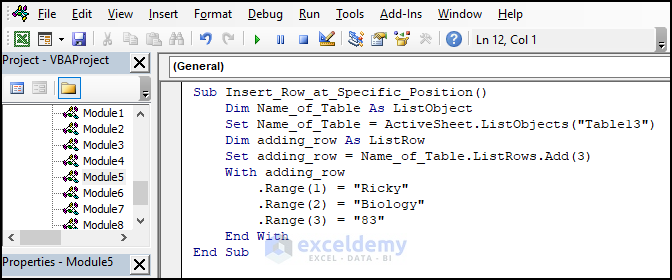
Code Explanation:
Sub Insert_Row_at_Specific_Position()Provide a name for the sub-procedure of the macro.
  Dim Name_of_Table As ListObject
    Set Name_of_Table = ActiveSheet.ListObjects("Table13")
This code sets the “Name_of_Table” variable to the “Table13” table on the active worksheet and declares it a ListObject type.
 Dim adding_row As ListRow
    Set adding_row = Name_of_Table.ListRows.Add(3)
The “Add” method of the ListRows collection adds a new row to the table named “Name_of_Table” in the code.
With adding_row
        .Range(1) = "Ricky"
        .Range(2) = "Biology"
        .Range(3) = "83"
    End With
This code sets the values for the first three columns of the newly added row.
End SubEnd the sub-procedure of the macro.
Run the code at this point by pressing F5 or by choosing the Macro window from the Developer tab.
The following output will appear after adding a row to a specific table position.
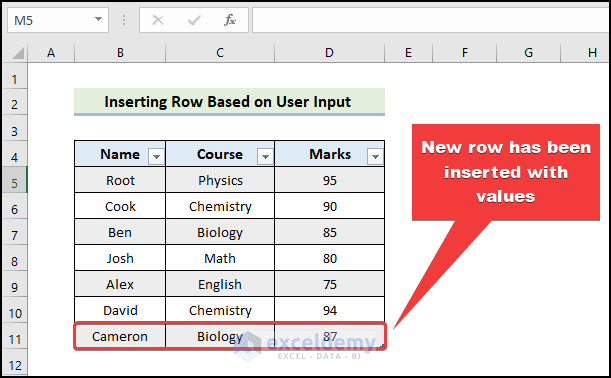
3.3 Insert Row based on User Input
The following code was used to insert a row with a value into our Excel dataset based on user input in this section using Excel VBA code. The end result will resemble the picture above.
Sub Insert_Row_based_on_user_Input()
    Dim Name_of_Table    As ListObject
    Dim A, B, C, D, E, T1_Name  As String, Msg As String
    On Error GoTo Message
    T1_Name = InputBox("Enter Name of the Table: ", "Table Name")
    Set Name_of_Table = ActiveSheet.ListObjects(T1_Name)
    If T1_Name = "" Then Exit Sub
    A = InputBox("Enter Student Name: ", "Name of Student")
    If A = "" Then Exit Sub
    B = InputBox("Enter Course Name: ", "Course")
    If B = "" Then Exit Sub
    C = InputBox("Enter Marks: ", "Marks")
    If C = "" Then Exit Sub
    Dim addedRow    As ListRow
    Set addedRow = Name_of_Table.ListRows.Add()
    With addedRow
        .Range(1) = A
        .Range(2) = B
        .Range(3) = C
    End With
    Exit Sub
Message:
    Msg = "Your table was Not found."
    MsgBox Msg, vbCritical
End Sub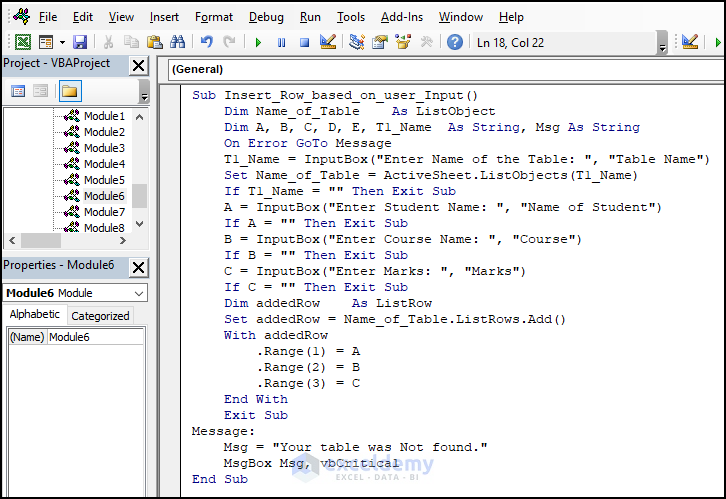
Code Explanation:
Sub Insert_Row_based_on_user_Input()Provide a name for the sub-procedure of the macro.
Dim Name_of_Table As ListObject
Dim A, B, C, D, E, T1_Name As String, Msg As String
Declare the necessary variable for the macro.
On Error GoTo MessageThis line will jump to the Message label if an error occurs.
On Error GoTo Messageer Name of the Table: ", "Table Name")Prompts the user to provide the name of the Excel table to which they wish to add a row in an input box.
Set Name_of_Table = ActiveSheet.ListObjects(T1_Name)Assigns the Excel table whose name is supplied in the T1 Name variable to the Name of Table variable.
If T1_Name = "" Then Exit SubVerifies whether a table name was entered into the input field. If not, the subroutine will terminate.
A = InputBox("Enter Student Name: ", "Name of Student")
If A = "" Then Exit Sub
B = InputBox("Enter Course Name: ", "Course")
If B = "" Then Exit Sub
C = InputBox("Enter Marks: ", "Marks")
If C = "" Then Exit Sub
These lines show an input box that asks the user to submit the necessary data and then checks whether they entered anything. If they do not, the subroutine will exit.
Dim addedRow As ListRow
Set addedRow = Name_of_Table.ListRows.Add()
Create a new ListRow object variable called addedRow, and set it to a new row in the Excel table identified by the Name_of_Table variable.
With addedRow
    .Range(1) = A
    .Range(2) = B
    .Range(3) = C
End With
The user-inputted values for the A, B, and C variables are used to set the values of the first three cells in the added row object.
Exit SubThis line ends the subroutine.
Message:
    Msg = "Your table was Not found."
    MsgBox Msg, vbCritical
This code block is jumped to if an error occurs in the subroutine.
End SubEnd the sub-procedure of the macro.
Run the code by pressing F5, or you can select the Macro window from the Developer tab.
The output will, therefore, look as follows after adding a row based on user input.
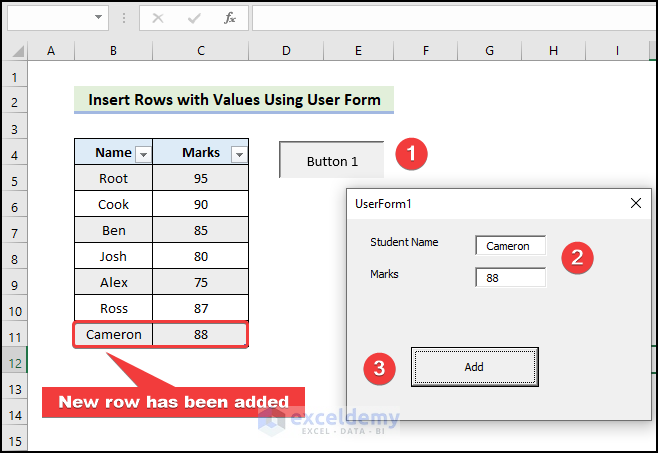
Method 4 – Insert Rows with Values Using User Form
Insert row with values to our Excel dataset in response to user input. The final outcome will look similar to the image above. To do this, follow the below steps.
Create UserForm:
- From the Visual Basic Editor click on UserForm from the Insert drop-down menu bar.
- This will create a UserForm in your Visual Basic Editor.
- To create this user form, we added two labels: Student Name and Marks.
- Insert a CommandButton named Add.
- Get the following UserForm.

Macro of Add Button:
- Double-click on the Add button and type the following Code.
Private Sub CommandButton1_Click()
Dim StudentName As String
StudentName = txtstudent.Text
Dim Marks As String
Marks = txtMarks.Text
If StudentName = "" Or Marks = "" Then
MsgBox "Please Enter both Student Name and Marks", vbExclamation, "Empty fields"
Exit Sub
End If
Dim Wsh As Worksheet
Set Wsh = ThisWorkbook.Worksheets("Sheet8")
Set tb1 = Wsh.ListObjects("Table3")
Dim L1row As ListRow
Set L1row = tb1.ListRows.Add
With L1row
.Range(1) = StudentName
.Range(2) = Marks
End With
End Sub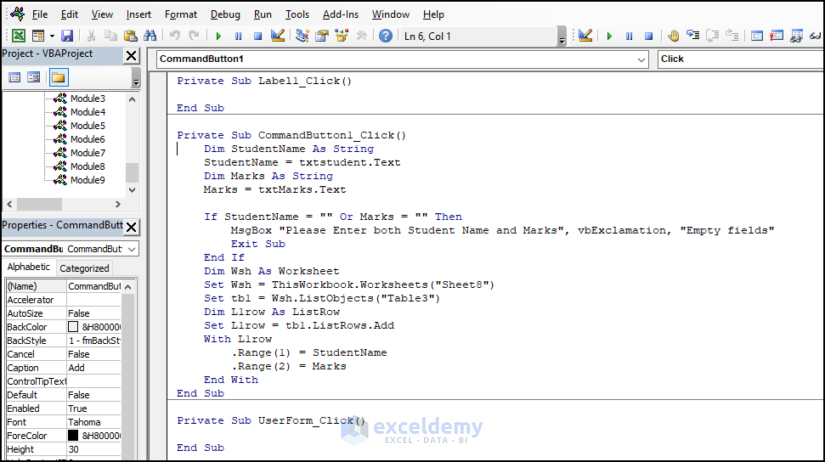
Code Explanation:
Private Sub CommandButton1_Click()This line defines the sub-procedure.
 Dim StudentName As String
StudentName = txtstudent.Text
The text entered in the “txtstudent” text box is used to create a string variable called “StudentName” and assign it a value.
 Dim Marks As String
Marks = txtMarks.Text
Another variable called “Marks” is declared in the code to be a string, and its value is the text that was entered into the “txtMarks” text box.
   If StudentName = "" Or Marks = "" Then
MsgBox "Please Enter both Student Name and Marks", vbExclamation, "Empty fields"
Exit Sub
End If
Checks to see if the “StudentName” or “Marks” variables are empty, and if they are, it displays a message box asking the user to enter the student’s name and marks.
Dim Wsh As Worksheet Set Wsh = ThisWorkbook.Worksheets("Sheet8")The “Sheet8” worksheet from the current workbook is set as the variable “Wsh,” which is declared in the code as a worksheet.
Set tb1 = Wsh.ListObjects("Table3")Creates a variable called “tb1” that is declared a list object.
 Dim L1row As ListRow
Set L1row = tb1.ListRows.Add
Declares a variable named “L1row” as a list row and adds a new row to the list object
    With L1row
.Range(1) = StudentName
.Range(2) = Marks
End With
We assigned the first column of the new row as the value of the “StudentName” variable, and “Marks” variable is value the second column.
End SubEnd the sub-procedure of the macro.
Insert Code in Module to Show UserForm:
- Insert a new module and type the following code.
Sub ShowForm()
UserForm1.Show
End Sub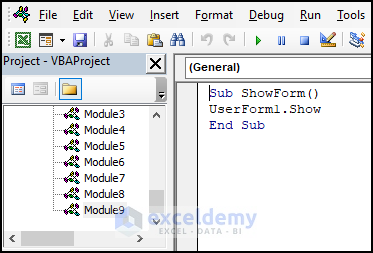
Assign Code in Button 1:
Insert Button 1 to assign the Userform Show code. The outcome will look similar to the image above.
- Execute the code by selecting Button 1.
- UserForm1 will consequently appear.
- Enter the student’s name and marks and select Add.
- You will be able to insert a row as shown below.
How to Insert Alternate Rows with Excel VBA
Using Excel VBA code, we’ll add alternative rows to our dataset in Excel. The final outcome will look similar to the image above. To do this, we used the following code.
Sub Insert_alternate_Rows()
Dim rng1 As Range
Set rng1 = Selection
Dim i As Long
For i = rng1.Rows.Count To 1 Step -1
rng1.Rows(i).EntireRow.Insert
Next i
End Sub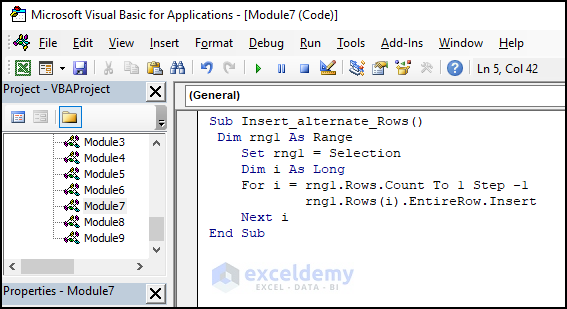
Code Explanation:
Sub Insert_alternate_Rows()Provide a name for the sub-procedure of the macro.
 Dim rng1 As Range
Dim i As Long
Declare the necessary variable for the macro.
Set rng1 = Selection
For i = rng1.Rows.Count To 1 Step -1
rng1.Rows(i).EntireRow.Insert
Next i
We used this code to insert a blank row following each set of rows.
End SubEnd the sub-procedure of the macro.
Pressing F5 or choosing the Macro window from the Developer tab will allow you to execute the code.
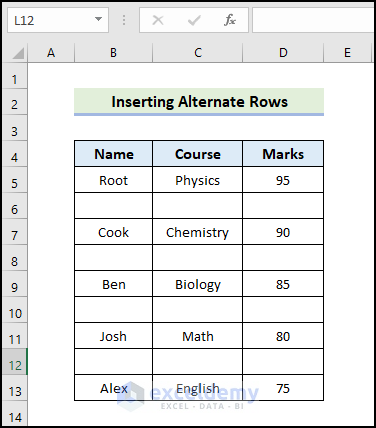
After adding alternate rows, the output will appear as follows.
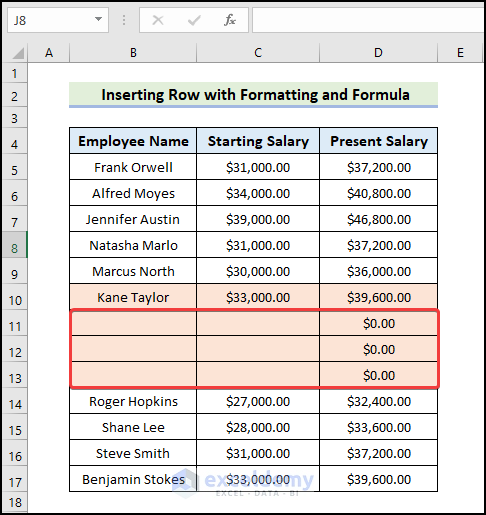
How to Insert Row with Formatting and Formula with Excel VBA
Use an Excel VBA code to insert rows with formatting and formulas in our Excel dataset. The result will look similar to the image above. To do that, we used the following code.
Sub Insert_Rows_with_Formatting_and_Formula()
Number_of_Rows = Int(InputBox("Enter the Number of Rows to Insert: "))
For i = 1 To Number_of_Rows
Selection.EntireRow.Insert , xlFormatFromLeftOrAbove
Next i
Range(Cells(ActiveCell.Row + Number_of_Rows, ActiveCell.Column), Cells(ActiveCell.Row + Number_of_Rows, ActiveCell.Column)).Copy
Range(Cells(ActiveCell.Row, ActiveCell.Column), Cells(ActiveCell.Row, ActiveCell.Column)).PasteSpecial Paste:=xlPasteFormulas
For i = 1 To Number_of_Rows - 1
Range(Cells(ActiveCell.Row + 1, ActiveCell.Column), Cells(ActiveCell.Row + 1, ActiveCell.Column)).PasteSpecial Paste:=xlPasteFormulas
Next i
Application.CutCopyMode = False
End Sub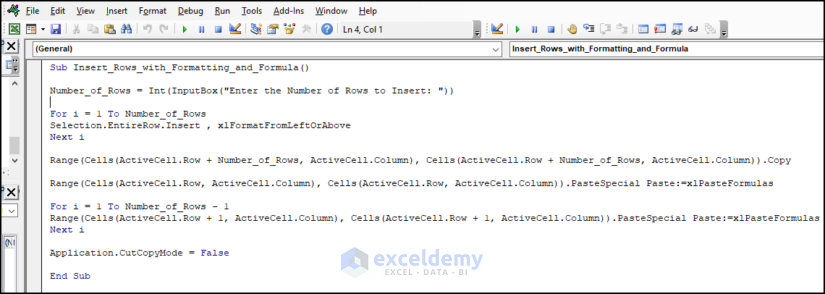
Code Explanation:
Sub Insert_Rows_with_Formatting_and_Formula()Provide a name for the sub-procedure of the macro.
Number_of_Rows = Int(InputBox("Enter the Number of Rows to Insert: "))This code prompts the user to insert the number of rows to insert.
For i = 1 To Number_of_Rows
Selection.EntireRow.Insert , xlFormatFromLeftOrAbove
Next i
This loop begins with the active cell and adds the specified number of rows to the worksheet.
Range(Cells(ActiveCell.Row + Number_of_Rows, ActiveCell.Column), Cells(ActiveCell.Row + Number_of_Rows, ActiveCell.Column)).Copy
Range(Cells(ActiveCell.Row, ActiveCell.Column), Cells(ActiveCell.Row, ActiveCell.Column)).PasteSpecial Paste:=xlPasteFormulas
This line of code picks out the active cell and pastes the formula from the copied cell into it.
For i = 1 To Number_of_Rows - 1
Range(Cells(ActiveCell.Row + 1, ActiveCell.Column), Cells(ActiveCell.Row + 1, ActiveCell.Column)).PasteSpecial Paste:=xlPasteFormulas
Next i
Application.CutCopyMode = False
This loop will copy the formula from the active cell and paste it into the remaining inserted rows.
End SubEnd the sub-procedure of the macro.
Run the code at this point by pressing F5 or by choosing the Macro window from the Developer tab.
The following output will appear.
Frequently Asked Questions
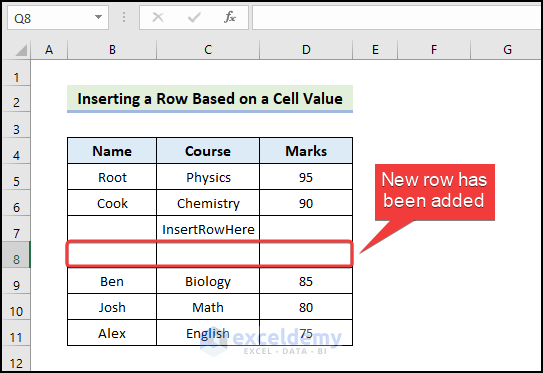
1. How do I insert a row based on a cell value in VBA?
Insert a row based on a cell value in Excel. To do the task, you have to use the following code.
Sub Inserting_Row_Based_On_Cell_Value()
Dim rng1 As Range
Dim cell As Range
Set rng1 = Range("A1:D10")
For Each cell In rng1
If cell.Value = "InsertRowHere" Then
cell.Offset(1, 0).EntireRow.Insert
End If
Next cell
End Sub
Run the code at this point by pressing F5 or by choosing the Macro window from the Developer tab.
The following output will appear after you added a row based on a cell value “ InsertRowHere”.
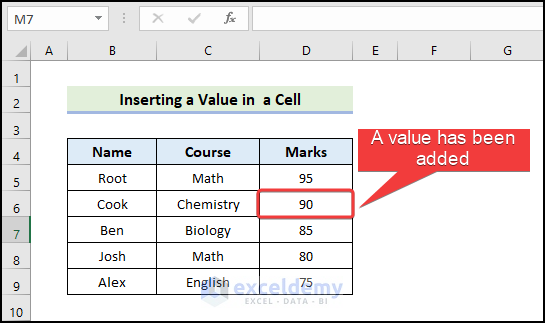
2. How do I insert a value in VBA?
In Excel, you may need to enter a value into a cell. You need to use the following code to complete the task.
Sub insertvalue()
Dim myValue As Integer
myValue = 10
Range("A2").Value = 10
End Sub
F5 or selecting the Macro window from the Developer tab will allow you to run the code at this point.
After you enter a value in cell D6, you will see the following output.
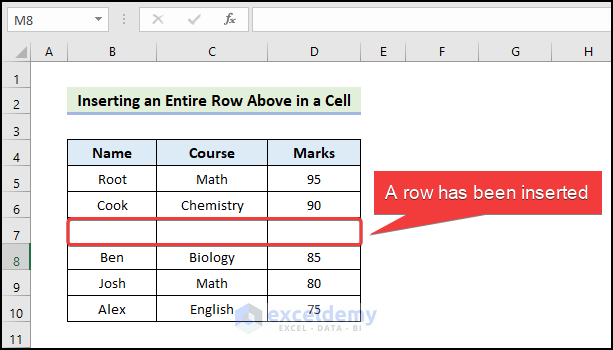
3. How do I insert an entire row above in VBA?
You might need to enter a row above in an Excel cell. To finish the task, you must use the outlined code.
Sub Inserting_Row_Above()
Dim rowNum1 As Integer
rowNum1 = 7
Rows(rowNum1).Insert Shift:=xlDown
End Sub
Run the code by pressing F5 or by choosing the Macro window from the Developer tab.
You will get the following output after adding a row.
Download Practice Workbook
Download this practice workbook to exercise while you are reading this article. It contains all the datasets in different spreadsheets for a clear understanding. Try it yourself while you go through the whole process.
Get FREE Advanced Excel Exercises with Solutions!
