When working with large data sets containing hidden cells, one can easily select the visible cells along with the hidden cells by dragging the mouse cursor horizontally and vertically over them. But it’s not that simple to select the visible cells only.
In this tutorial, we will demonstrate some methods to select just the visible cells in Excel.
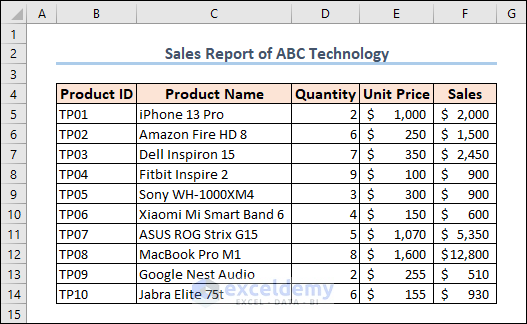
To demonstrate our methods, we’ll use the following dataset “Sales Report of ABC Technology”. There are some rows hidden in this dataset e.g. rows 6, 9, 10 and 12.
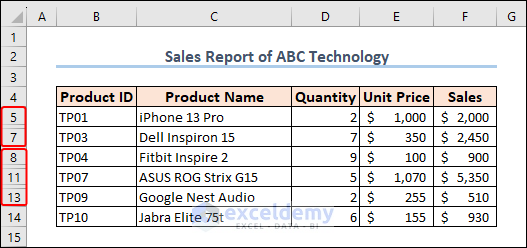
After unhiding the sheet, the entire dataset is visible to us. Our dataset has a total of 10 rows excluding the header row.
Note: This is a basic dataset to keep things simple. In a practical scenario, you may encounter a much larger and more complex dataset.
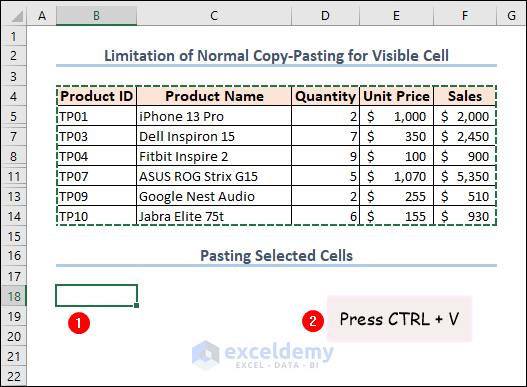
Limitations of Normal Copy-Pasting of Visible Cells in Excel
- Select the B4:F14 range and press CTRL + C to copy it.
It appears we will be copying 7 rows here.
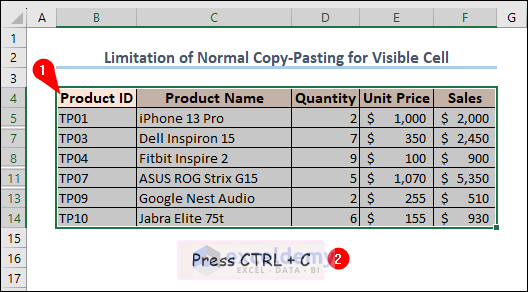
- Select cell B18 and press CTRL + V to paste the range.
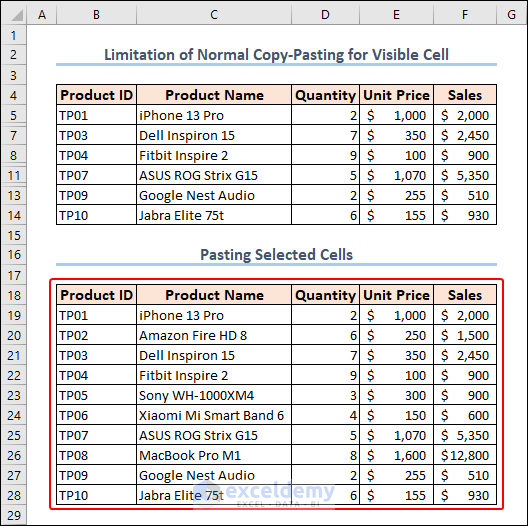
All the hidden rows get pasted too.
Let’s use this dataset to select the visible cells only using various techniques.
We used Microsoft Excel 365, but you may use any other version at your disposal. Please leave a comment if any part of this article does not work in your version.
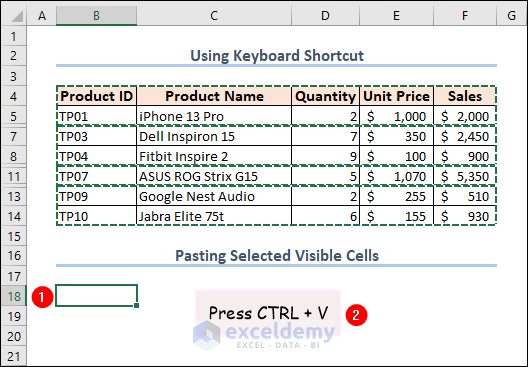
Method 1 – Using Keyboard Shortcut
This is the quickest method to select visible cells only in Excel.
Steps:
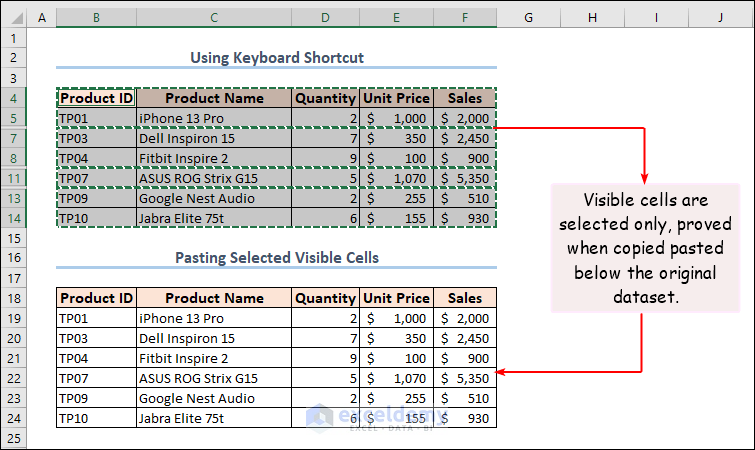
- Drag and select the entire dataset (B4:F14).
- Press the ALT + ; keys together.
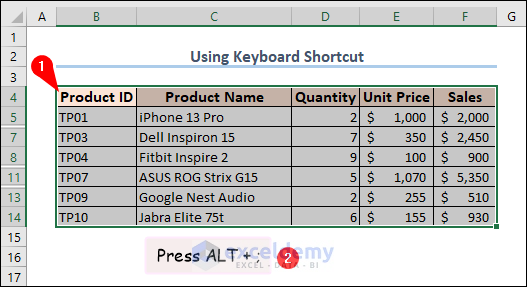
The range is selected. To prove that only the visible part is selected:
- Copy the selected visible range by pressing CTRL + C on your keyboard.
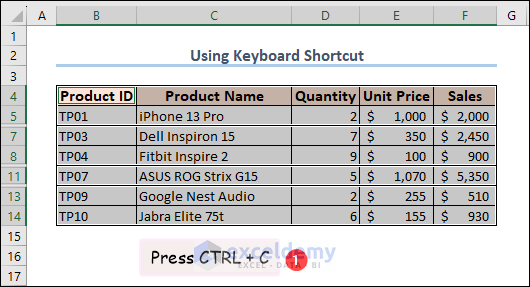
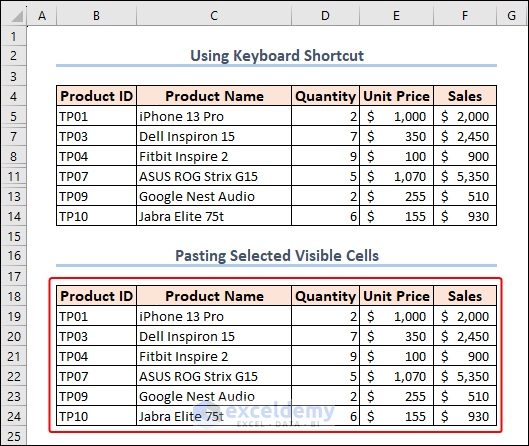
- In cell B18 press CTRL + V to paste the data.
Only the visible cells are pasted.
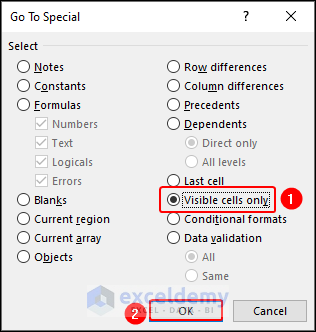
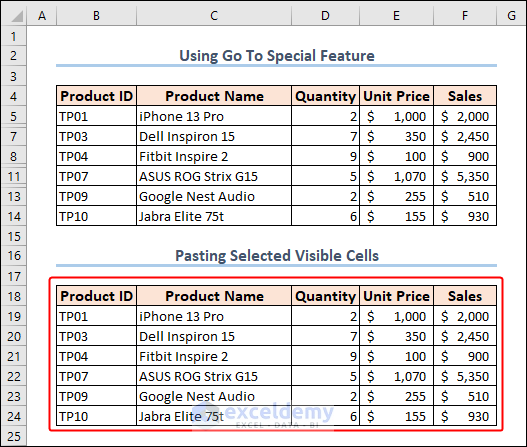
Method 2 – Using Go To Special Feature
The Go To Special feature in Excel can quickly find and select a specific type of cells, including only the visible cells.
Steps:
- Select the dataset (B4:F14).
- Navigate to the Home tab.
- Under the Editing group of commands, click the Find & Select drop-down icon.
- From the drop-down list, select the Go To Special option.

- In the Go To Special dialog box that opens, select Visible cells only and press OK.
This will exclude any hidden cell from the selection.
All the visible cells are selected.
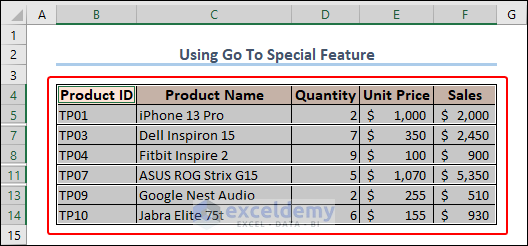
- Like the previous method, use the Copy-Paste feature to verify the selection of visible cells only.
Note: Press the F5 key to replicate the process, or the CTRL + G keyboard shortcut.
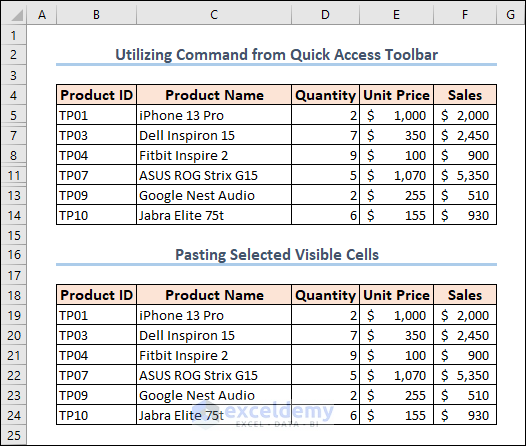
Method 3 – Using Select Visible Cells Command from the Quick Access Toolbar
If we use a certain command frequently, we can add it to the Quick Access Toolbar. By default, this toolbar contains only 4 commands: Autosave, Save, Undo, and Redo, but we can add the Select Visible Cells option to this toolbar.
Steps:
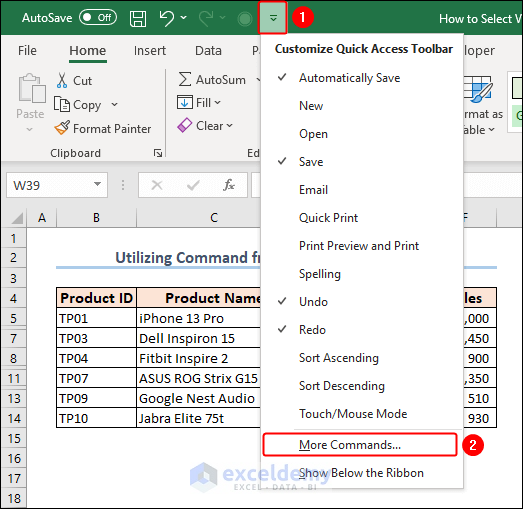
- Click on the down arrow icon which represents the Customize Quick Access Toolbar.
- From the options, select More Commands.
- Select All Commands under the section Choose commands from.
- Find the Select Visible Cells command and click on Add >>.
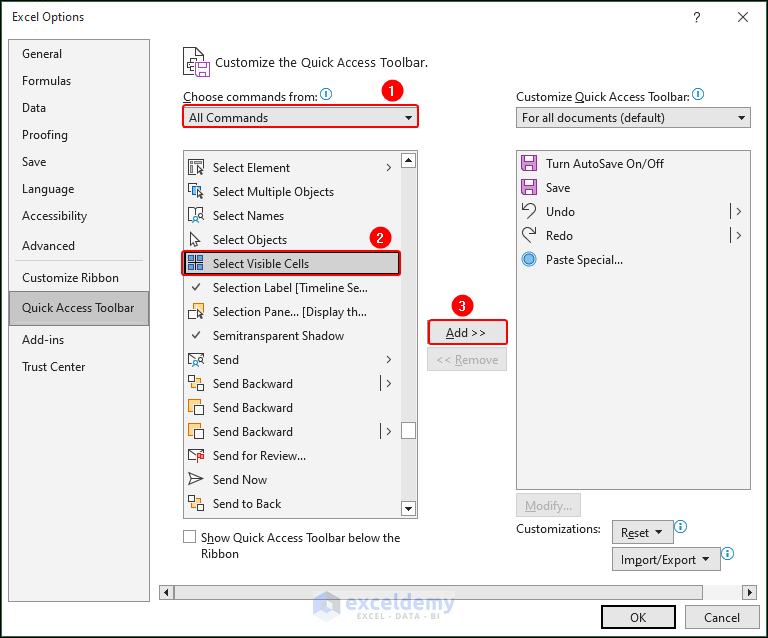
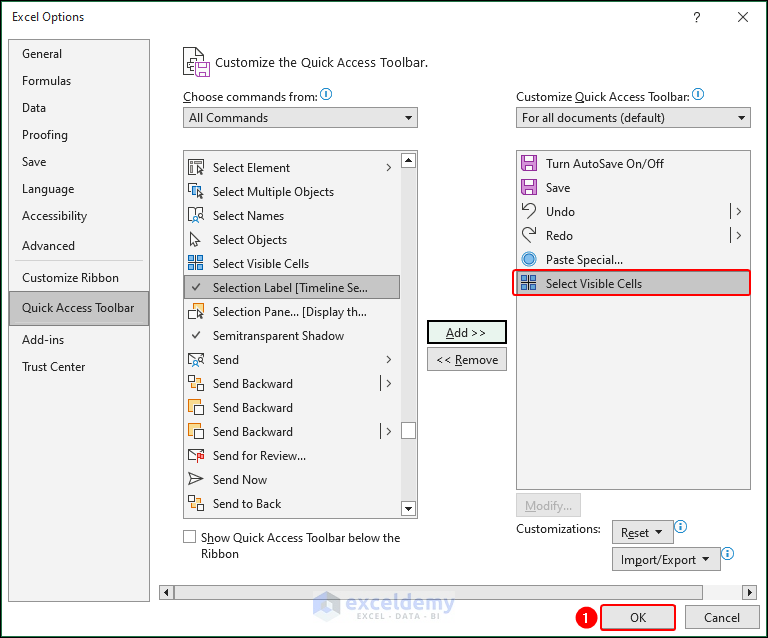
The command is visible in the right side box, which means it’s now visible on the QAT.
- Click OK.
A square-shaped icon that wasn’t present before is on the QAT. It’s the icon to Select Visible Cells.
![]()
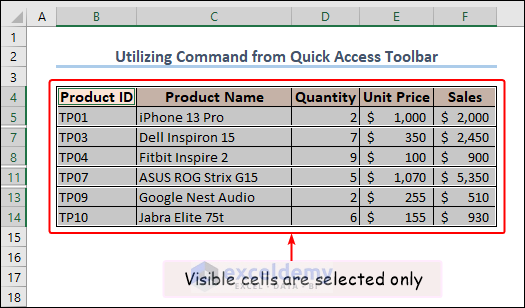
- Highlight the entire dataset and click on this icon.
![]()
Only the visible cells in the dataset are selected.
- Copy and paste as above to authenticate the selection of visible cells only.
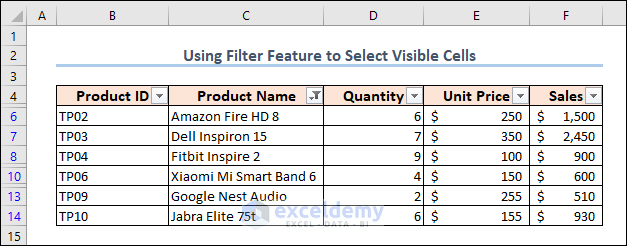
Method 4 – Using the Filter Feature
By applying a Filter to the dataset some rows are hidden, but we can select only the visible rows containing data.
Steps:
- Select cell B4 (or any cell inside the dataset).
- Click the Home tab >> Sort & Filter drop-down icon >> Filter.
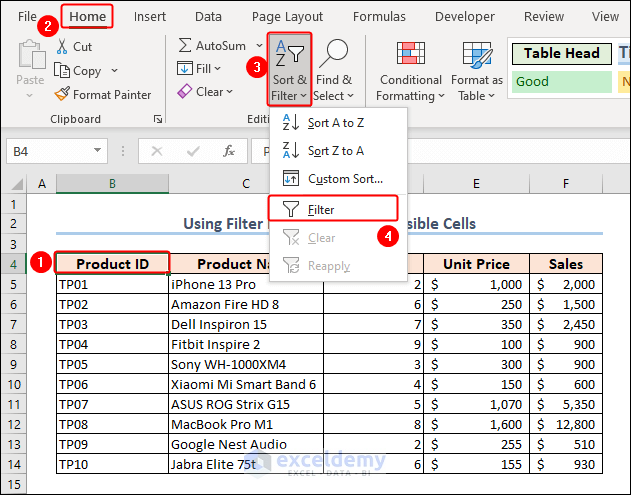
A down arrowhead is added to all the column headers.
- Click on the arrowhead beside the heading Product Name.
- Unselect some items that will be hidden, and click OK.
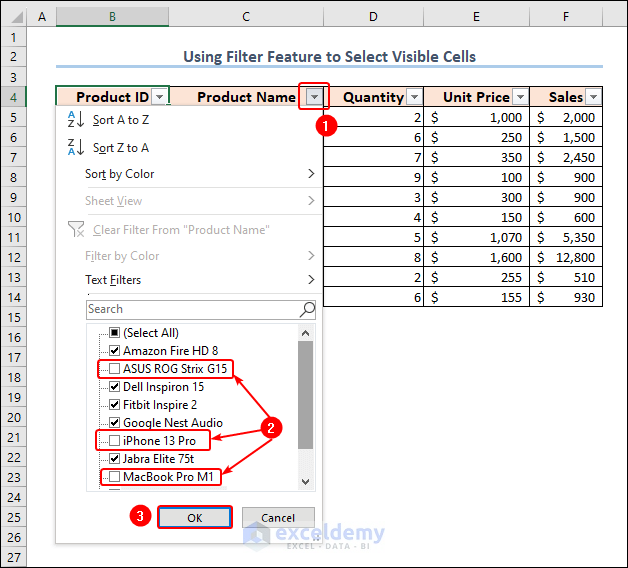
Now only the selected products are visible in the worksheet.
- Select the whole dataset and press CTRL + SHIFT + * on your keyboard to select only the visible cells.
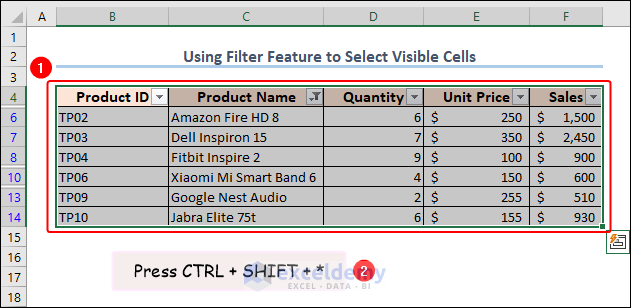
- Use the copy-paste technique to see the result.

Method 5 – Using VBA Code
We can apply VBA code in Excel to select visible cells by specifying a cell range to select.
Steps:
- Go to the Developer tab.
- Click the Visual Basic button in the Code group.
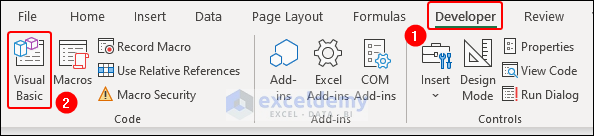
The Microsoft Visual Basic for Applications window opens.
- Click the Insert tab and choose Module from the list.
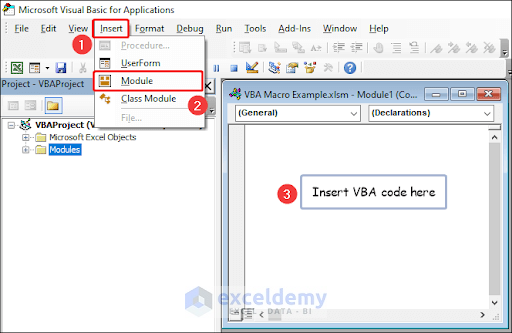
A small Module window opens in which to insert our VBA code.
- Copy the following code and paste it into the module:
Sub Select_visible_cells()
Range("B4:E14").Select
Selection.SpecialCells(xlCellTypeVisible).Select
End Sub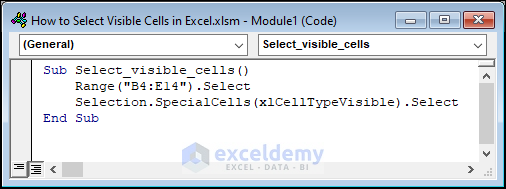
Watch the following video to understand the rest of the process.
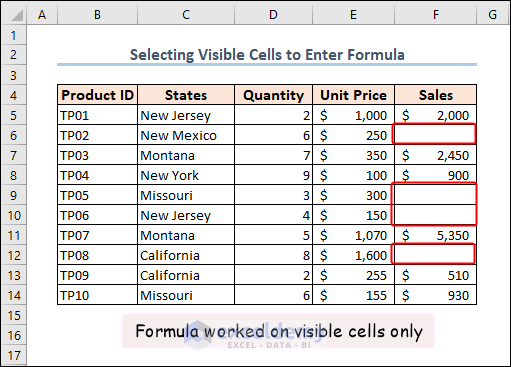
How to Select Visible Cells to Enter a Formula
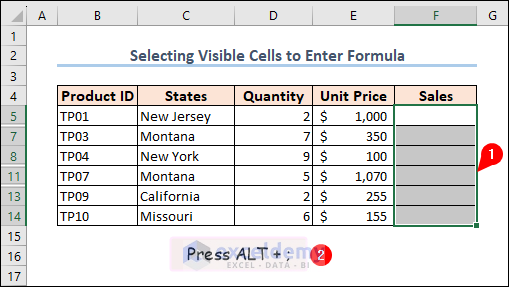
In this section, we will explore how to select only the visible cells to enter formulas in Excel, even if cells, rows, or columns have been hidden by applying a filter or collapsing an outline.
Steps:
- Select the range F5:F14.
- Press ALT + ; to select the visible cells only.
- In the first cell of the selected range, enter the following formula:
=D5*E5- Press CTRL + ENTER.
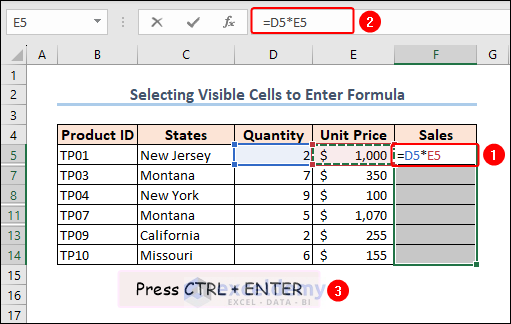
The formula is applied to all visible cells in the selected range.
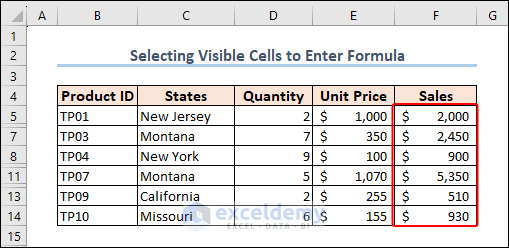
- Unhide the rows to confirm that just the visible cells were affected.
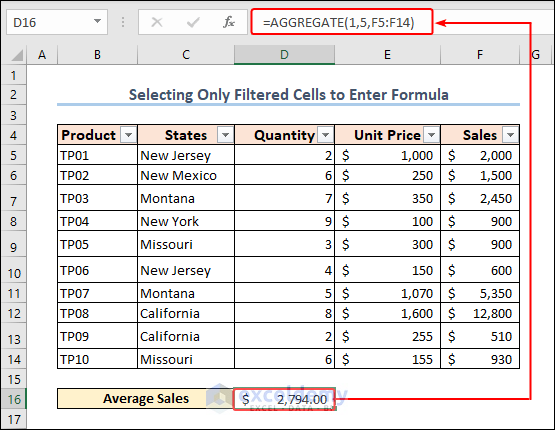
How to Select Only Filtered Cells to Enter Formula in Excel
Now we’ll use the AGGREGATE function in an Excel formula to apply it only to the filtered cells.
Steps:
- Apply a Filter to filter out some data.
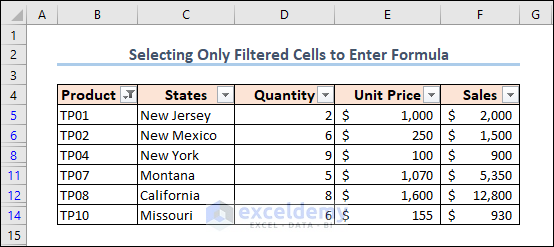
We want to calculate the average Sales of the visible cells in cell D16.
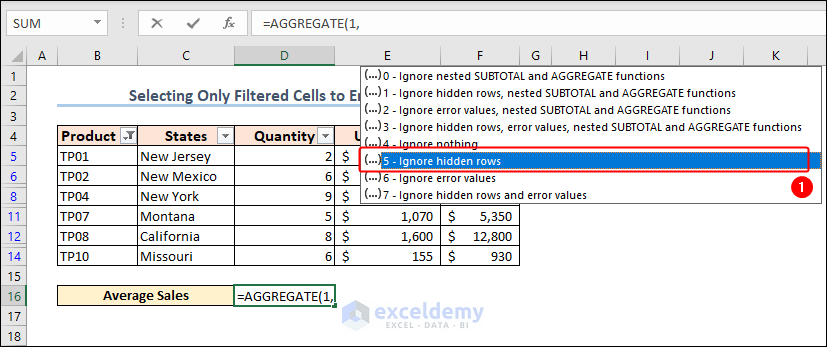
- In cell D16, enter =AGGREGATE(.
- Select 1 – AVERAGE as the function_num argument.

- Enter a comma after 1, and select 5 – Ignore hidden rows as the options argument.
- Enter ) to finish the formula.
- Press ENTER.
The final form of the formula is as follows:
=AGGREGATE(1,5,F5:F14)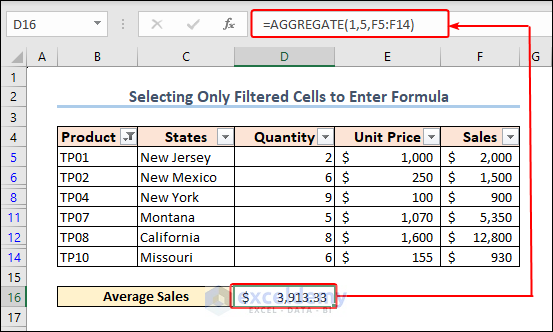
- To verify that the formula is showing the average of visible cells only, clear the Filter from the dataset.
The result changes as the hidden cells become visible..
Advantages to Selecting Visible Cells in Excel
- Prevents Errors: When working with large datasets in Excel, it is common to apply filters, hide rows or columns, or use conditional formatting to highlight specific cells. If you copy and paste the entire range without selecting only the visible cells, you may inadvertently copy hidden or filtered cells, leading to errors in your analysis or calculations.
- Saves Time: Selecting visible cells in Excel can save you a lot of time, especially when dealing with large datasets. By copying and pasting only the visible cells, you can avoid copying unnecessary data and focus only on the information you need.
- Improves Data Accuracy: When you select only the visible cells in Excel, you can be confident that you are working with accurate and relevant data. This is particularly important when working with datasets that contain missing or incomplete data.
- Provides Better Data Insights: You can get a better understanding of your data and draw more accurate conclusions, because you are working with a subset of the data that is relevant to your analysis, rather than the entire range.
Things to Remember
- Selecting visible cells does not remove any hidden data, so be careful when copying and pasting.
- Make sure that your data is formatted correctly to avoid any errors when selecting visible cells.
- Make sure to spell the VBA in-built functions properly.
- If you are a Mac user, use the keys Cmd + Shift + Z instead of ALT + ;.
- If any cells are hidden due to filtering, the above methods are unnecessary as Excel will exclude them by default.
Frequently Asked Questions
1. Why can’t I select visible cells only in Excel?
Make sure that you have applied the filter correctly before selecting visible cells. Also, check that you are using the correct keyboard shortcuts or features to select visible cells.
2. Can I select only visible cells in a specific range in Excel?
Yes. Select the range where you want to select only visible cells, then use the Go To Special feature or keyboard shortcuts.
3. Will selecting visible cells only remove hidden data in Excel?
Answer: No, selecting visible cells only will leave the hidden cells untouched.
Download Practice Workbook
Related Articles
<< Go Back to Excel Cells | Learn Excel
Get FREE Advanced Excel Exercises with Solutions!
