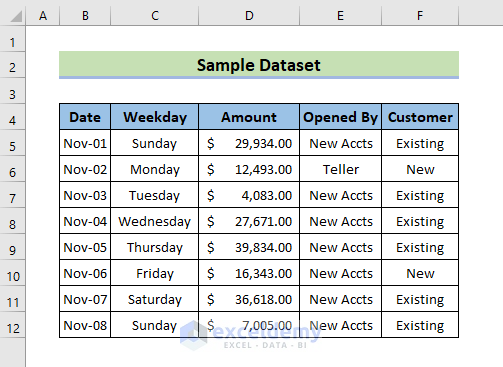
This is the sample dataset.
Method 1 – Making a Cell Read-Only by Using the ‘Format Cells’ Command
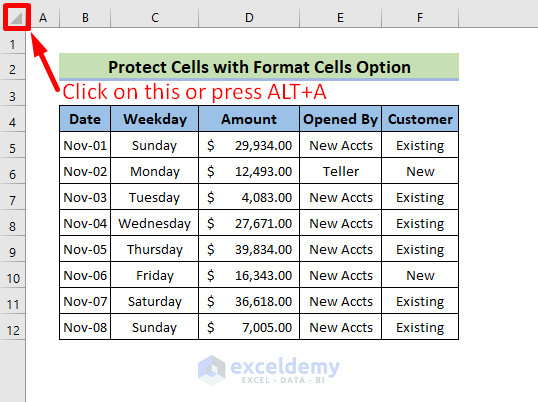
STEPS:
- Go to the file location and open your Excel file. Select all cells in the worksheet by clicking on the top left corner or pressing Ctrl + A.
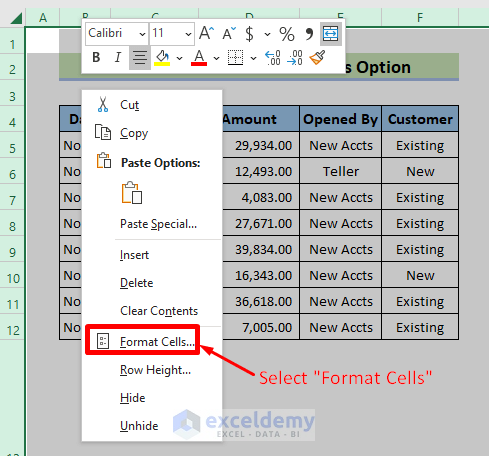
- Right-click and select “Format Cells” . You can also open “Format Cells” by pressing Ctrl + 1.
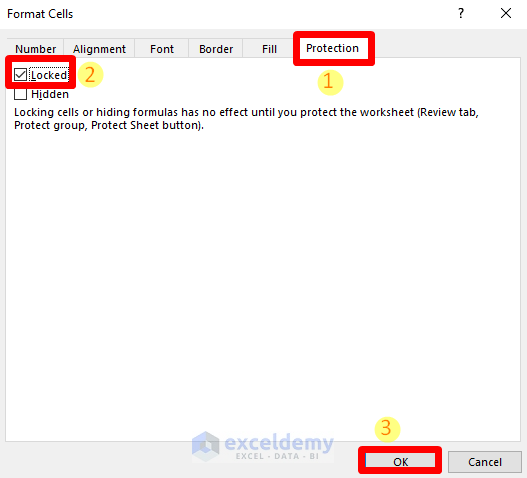
In the dialog box:
- Select “Protection”.
- Uncheck “Locked”.
- Click OK.

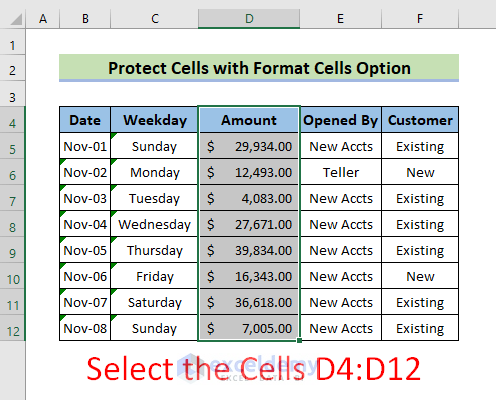
- Go to the Excel file again, and select the cells you want to make read-only.
- Go to “Format Cells”.
- Check “Locked” in “Protection”.
- Click OK.
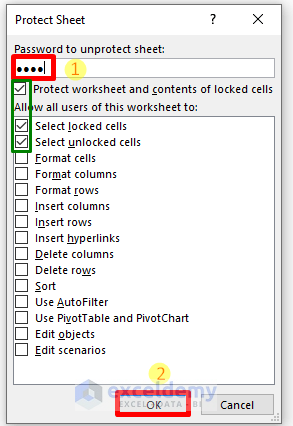
- Go to the Review tab > Protect drop-down list > Protect Sheet to open a new window.

- Enter the password in the box.
- You will see 3 checked boxes: “Protect worksheet and contents of locked cells”, “Select locked cells” and “Select unlocked cells”. Click OK.
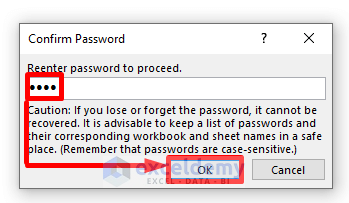
- A confirmation window will be displayed. Re-enter the password and click OK.
- The selected cells will be locked. When you open the file again, you will see that you can’t edit them.
- To edit those cells, unprotect them: go to Review > Unprotect Sheet. Enter the password in the new window and click OK.
NOTES:
- By default, all cells are “Locked” in the format option. The “Protect Sheet” option only protects the locked cells.
Read More: How to Make Excel Workbook Read Only with Password
Method 2 – Using a VBA Code to Protect Selected Cells
STEPS:
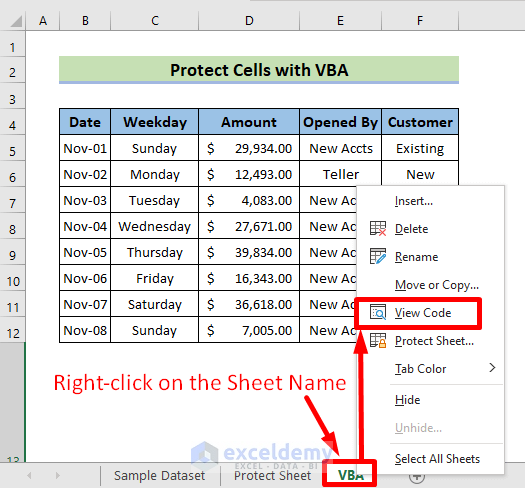
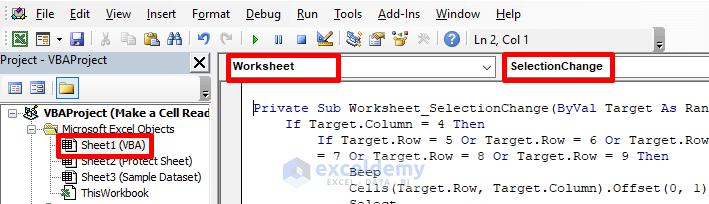
- Right-click the Sheet tab.
- Select “View Code”.
- In the Microsoft Visual Basic for Applications window, enter the following code.
Private Sub Worksheet_SelectionChange(ByVal Target As Range)
If Target.Column = 4 Then
If Target.Row = 5 Or Target.Row = 6 Or Target.Row = 7 Or Target.Row = 8 Or Target.Row = 9 Then
Beep
Cells(Target.Row, Target.Column).Offset(0, 1).Select
MsgBox Cells(Target.Row, Target.Column).Address & " Cell are read-only and protected ", _
vbInformation, "Cells Read Only"
End If
End If
End Sub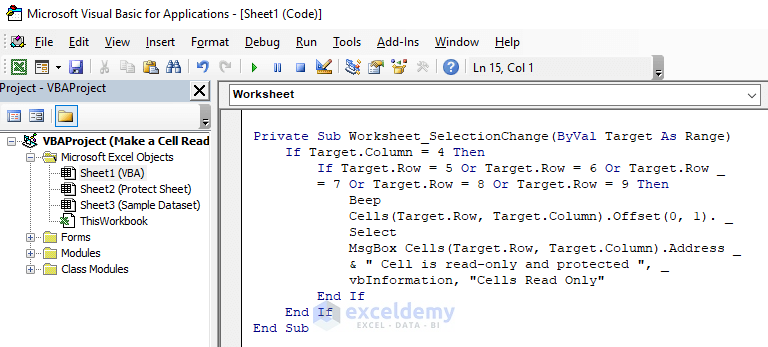
- Press Alt + Q to close the window.
- Go to the Excel Sheet and you will see that the selected cells in the VBA code are in read-only mode.
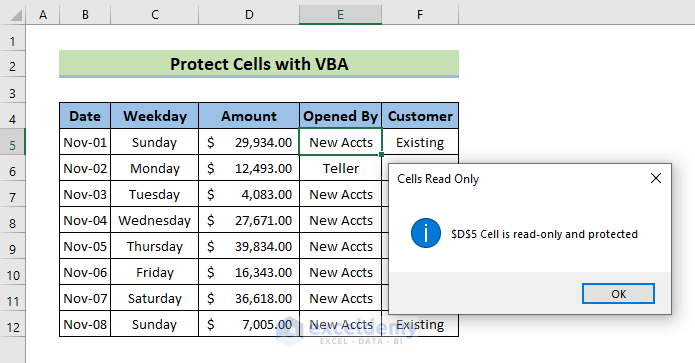
- Save the file.
VBA Code Explanation:
- Private Sub Worksheet_SelectionChange(ByVal Target As Range)
→ is written by default. - If Target.Column = 4
If Target.Row = 5 Or Target.Row = 6 Or Target.Row = 7 Or Target.Row = 8 Or Target.Row = 9
→ D5:D9. - Beep
→ a sound will be heard if you click any of these cells. - Cells(Target.Row, Target.Column).Offset(0, 1).Select
→ Statements to declare: click any of the selected cells. - MsgBox Cells(Target.Row, Target.Column).Address & ” Cell is read-only and protected “, _
→ declares that if you click any of the selected cells, a message box will be displayed. The underscore is the continuation of the macro. - vbInformation, “Cells Read Only”
→ the title of the message box. - End If
→ The first End If ends the If function mentioning rows. - End If
→ The second End If ends the If function mentioning column. - End Sub
→ ends the sub-procedure.
NOTES:
- Open the Visual Basic window by right-clicking Sheet1. A macro will open selecting this worksheet and declaring SelectionChange.
- After entering the code, close the window. You don’t have to run it.
- To remove the read-only mode from Excel, go to the visual basic window and remove the code.
Read More: How to Make an Excel File Read Only
Download Practice Workbook
Download the practice workbook here.
Related Articles
- [Solved]: All Excel Files Opening as Read Only
- [Fixed!] This Excel Workbook Was Opened in Read-Only Mode
- [Fixed!] Excel Files Open as Read Only from Network
<< Go Back to Excel Read Only | Protect Workbook in Excel | Excel Protect | Learn Excel
Get FREE Advanced Excel Exercises with Solutions!
