Method 1 – Enabled Read-Only Attribute Makes Excel Workbook Open in Read-Only Mode
STEPS:
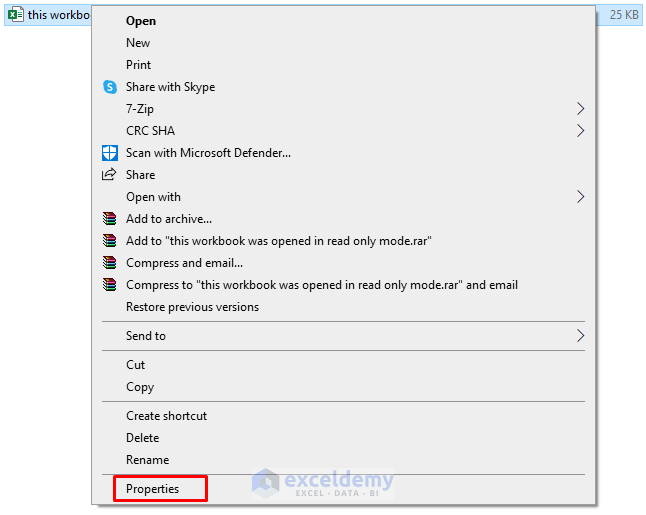
- Select the Excel file and right-click your mouse.
- Select Properties.
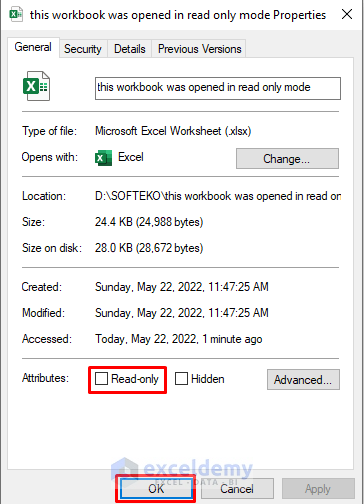
- A dialog box will open. There, in the General tab, uncheck the box for Read-only.
- Press OK.
- You can edit the file after opening it.
Method 2 – Excel Workbook Opens in Read-Only Mode Due to Saving the File in Read-only Recommended Setting
STEPS:
- Open the Excel workbook.
- In the pop-out warning box, press No.

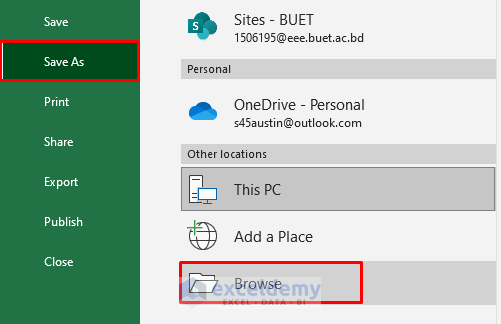
- Go to the File window.
- Click Save As ➤ Browse.
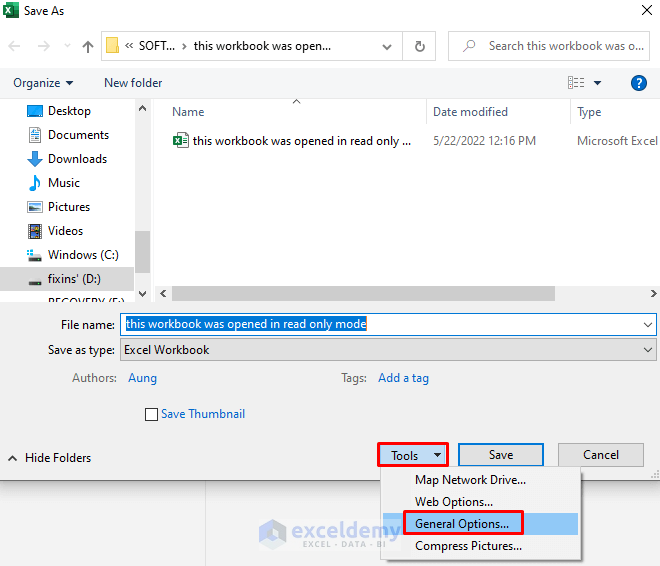
- The Save As dialog box will emerge.
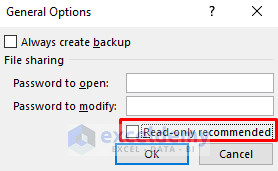
- Choose General Options from the Tools drop-down.
- The General Options dialog box will appear.
- Uncheck the box for Read-only recommended.
- Press OK and save the file.
- You can make changes.
Method 3 – Activated Read-Only Mode in Excel Prevents Users from Editing
STEPS:
- Edit the file as much as necessary.
- Choose Save As in the File window, instead of Save.

- You can now modify the Excel workbook in the sheet you generated.
Method 4 – Enabled Protected View Options Result in Read-Only Mode Issue
STEPS:
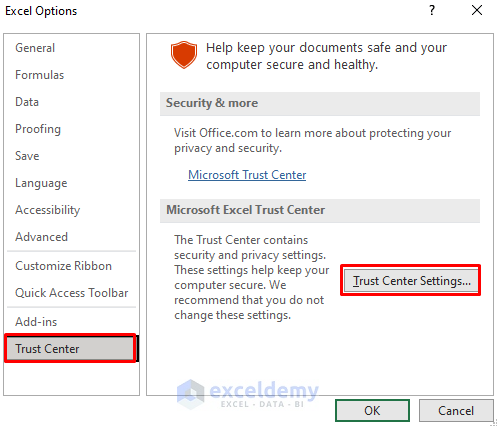
- Go to File ➤ Options at first.
- The Excel Options dialog box will pop out.
- In the Trust Center, click Trust Center Settings.
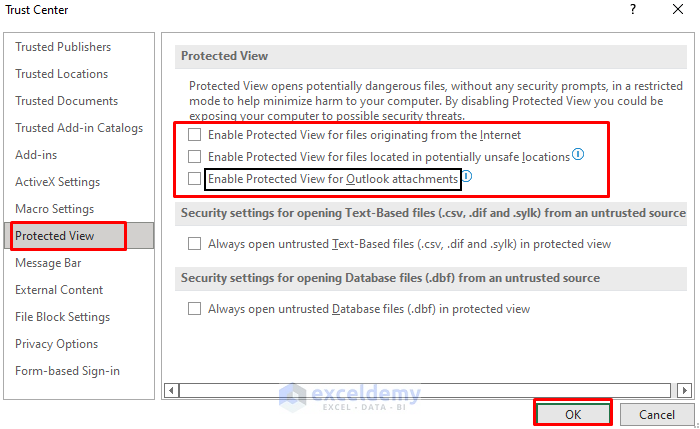
- In the Trust Center dialog box, select the Protected View tab.
- Under the Protected View section, uncheck all the boxes there.
- Press OK and go back to the workbook window.
- You can make changes to the file.
Method 5 – Marked As Final Excel Workbook Prevents Users from Editing
STEPS:
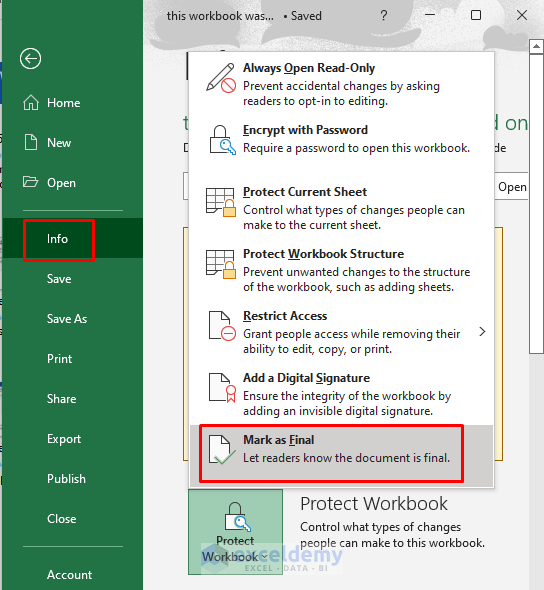
- Go to the File window.
- Select Info.
- Remove the selection for ‘Mark as Final’ in the Protect Workbook.
- When you open the final version of an Excel file, you’ll see a warning message like shown below. Choose ‘Edit Anyway’ to edit the workbook.

Method 6 – Protected Excel Workbook Opens in Read-Only Mode
STEPS:
- Go to the Review tab.
- Press Unprotect Sheet and Protect Workbook to remove the selection on them.
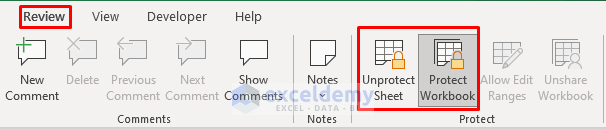
- You’ll see the Review tab in the image below.
Method 7 – Shared Excel Workbook Prevents Co-Authors from Offline Editing
Sometimes, you can’t edit the file with the desktop MS Excel app due to the co-authoring feature. Try to edit it in Office Online. It can solve the problem.
Method 8 – Antivirus Settings on PC Will Open Excel Workbook in Read-Only Mode
Some Antivirus apps may see the Excel files as a threat. In that case they will open the files in read-only mode. Look for the Antivirus Settings where you can allow the Excel files to open normally.
Method 9 – Expired Office App Results in Read-Only Mode of Excel Workbook
Again, if the subscription to Office apps gets canceled or expires, you can’t edit the Excel workbook. Renew the subscription to avoid the issue.
Method 10 – Older Office App Versions Will Open Latest Excel File Versions in Read-Only Mode
If the latest version of Office apps is not installed on your PC, the Excel files from other sources may open in read-only mode. Updating the Office apps can easily solve the problem.
Things to Remember
It’s better to prevent the ‘This Excel Workbook Was Opened in Read-Only Mode’ problem from occurring in the first place. For that purpose, follow the below notes carefully.
- Save the files carefully. An accidental close of the file can result in a read-only mode issue.
- Track the latest updates of the MS Excel app.
- Check the subscription period of MS Office.
- Use a trusted antivirus app and check for malware regularly.
- Keep a backup copy of your Excel workbook.
- Select the option for the final version of the workbook only when you’re sure of it.
Download Practice Workbook
Download the following workbook to practice by yourself.
Related Articles
- How to Make an Excel File Read Only
- How to Make a Cell Read-Only in Excel
- How to Make Excel Workbook Read Only with Password
- [Solved]: All Excel Files Opening as Read Only
<< Go Back to Excel Read Only | Protect Workbook in Excel | Excel Protect | Learn Excel
Get FREE Advanced Excel Exercises with Solutions!

